Magical Fireplace

This is the sixth card in the Fireplace Christmas Card series.

Fireplaces have a bit of magic in them on Christmas eve. This easel card plays into the magic complete with an elf sitting on the mantel shelf.

Hero Arts made the Stamp & Cut XL Fireplace set that was used to make this card along with Graphic 45 patterned paper Lets Get Cozy.

Cardbase: Starting with a purchased A7 cardbase, I cut it along its fold to have two pieces of 5×7 inch rectangles. Next, I cut a piece of the heavy weight pink cardstock 7.5-inches by 4.25-inches and folded at 2-inches and at 5.5-inches. (You may need to change the fold in the easel arm as I did, but you can cover the extra fold line with decorative paper.)

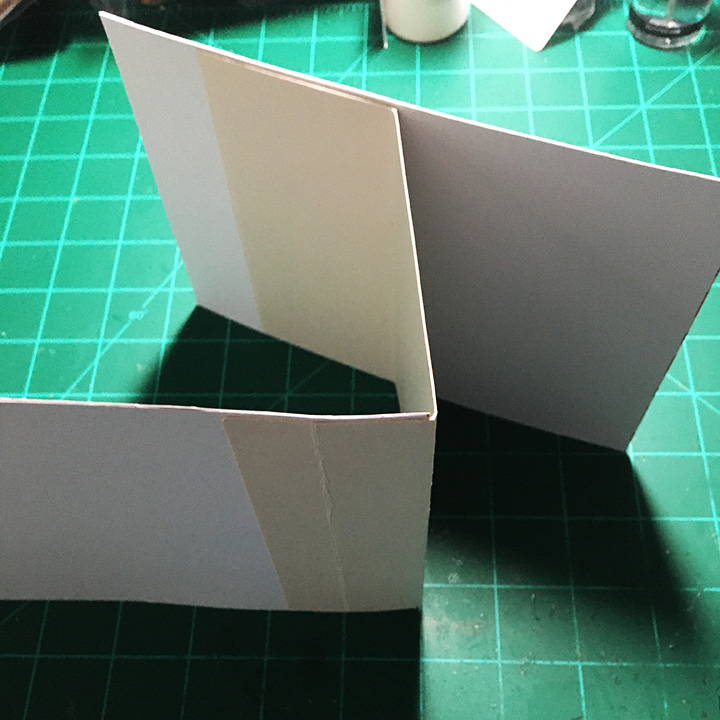
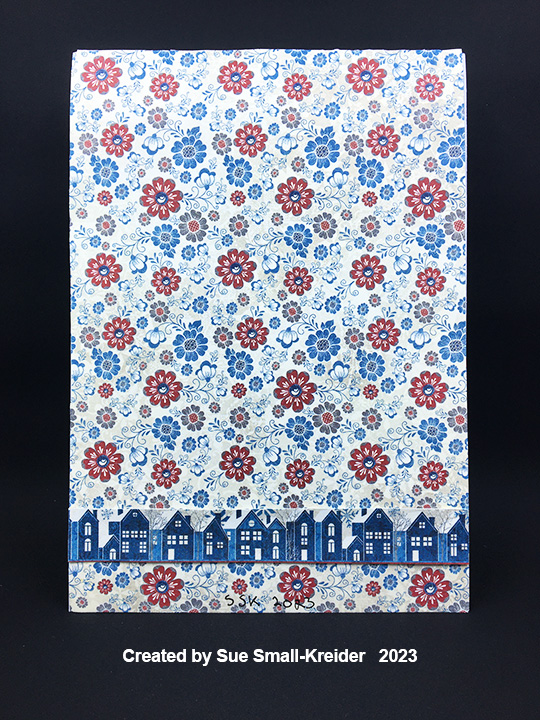
One tab was glued to the top of a cardbase panel and the other tab will be glued to the base of the other panel once it is decorated as the card front. Cover the bottom card base panel with a carpet like patterned paper. Also cover the back side of the case base with patterned paper. (I choose a wallpaper-like floral print and put a house border along the bottom edge to ground the back of the card.)

Fireplace: While designed to be a single layer die-cut, the fireplace can be cut multiple times to create a more 3D effect. The dies need to be clipped to separate the main outline of the fireplace from the mantel piece and the stocking from the rest of the piece. Cut one outline piece and one mantel piece from heavy blush pink cardstock. You will have to cut the mantel piece from the cardstock at its connecting points with a kraft knife. Cut another mantel piece to fussy cut the scalloped inner opening that frames the firebox. (I like to cut this piece to include some of the columns.)

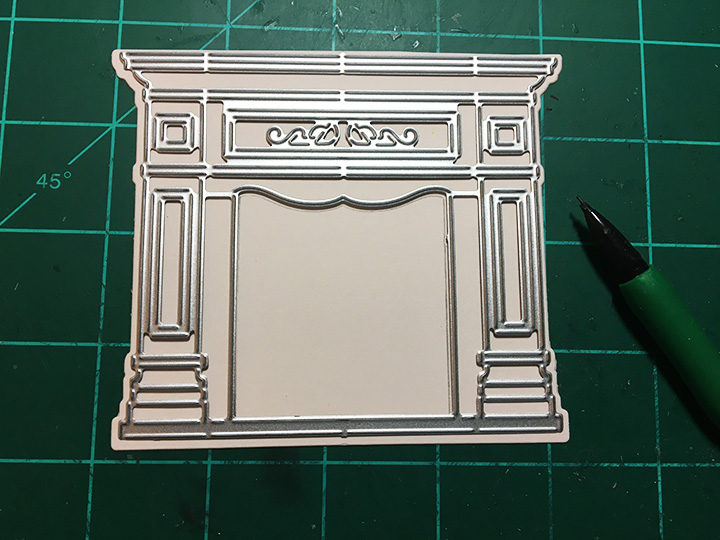
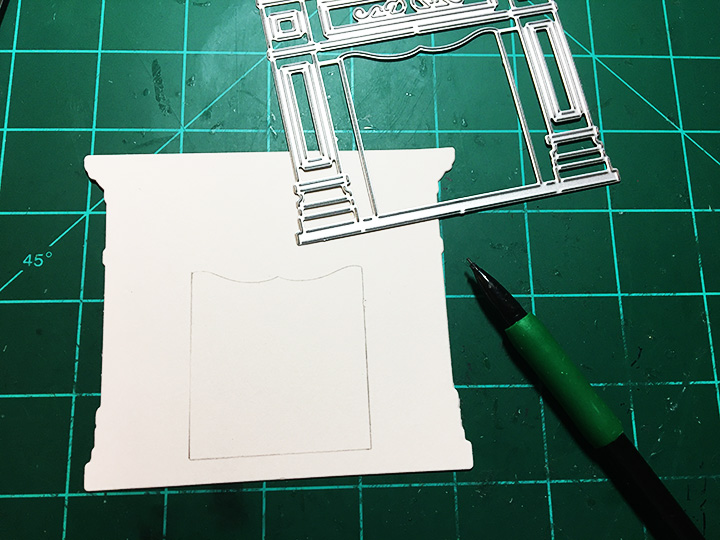
On the outline piece, trace the firebox opening with a light pencil using the mantel piece die.

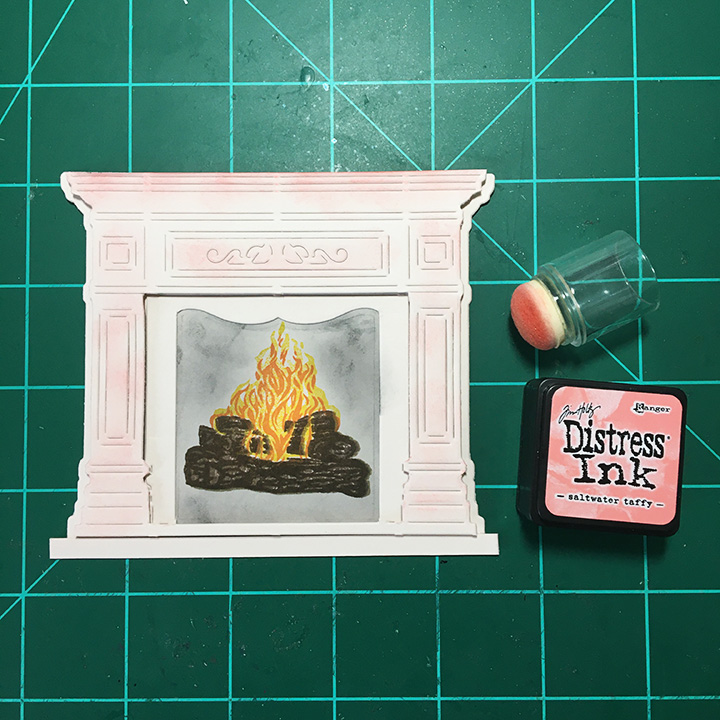
Using the layering stamps with two shades of brown ink for the logs and yellow and orange ink for the flames, create the burning logs within the penciled firebox. Using a blending brush, ink up the firebox to make sooty walls. Glue the inner firebox frame around the inked firebox. Use foam squares on the back of the mantel piece to adhere it to the outline piece. Blend some color onto the mantel piece.

Decorations: There are a number of decoration stamps in Fireplace Stamp & Cut set. I stamped both candles, the elf, tallest tree and the pinecones in greenery onto white heavy cardstock and heated embossed them before coloring with watercolor pencils. Next, I fussy cut them out leaving a long tab at the bottom of each to attach them to the fireplace I glued the tabs to the backside of the mantel piece and place foam squares on the backs of the pieces. The stockings were also stamped, heat embossed and watercolored. They are glued to the front of the mantel piece.

Sentiments: All of the sentiments were stamped, and heat embossed onto cardstock. The β€œho ho ho” was stamped on pink cardstock to go at the base of the fireplace as if the sounds were coming down the chimney into the firebox. Crosshatch dies were used to cut out the larger sentiments of β€œWarm wishes” on a rug and β€œMerry Christmas” on a wall plaque. A second white rug was added for a personal message. The first rug is popped up on foam squares to act as an easel stop while the second rug is glued down for the ease of writing a message.

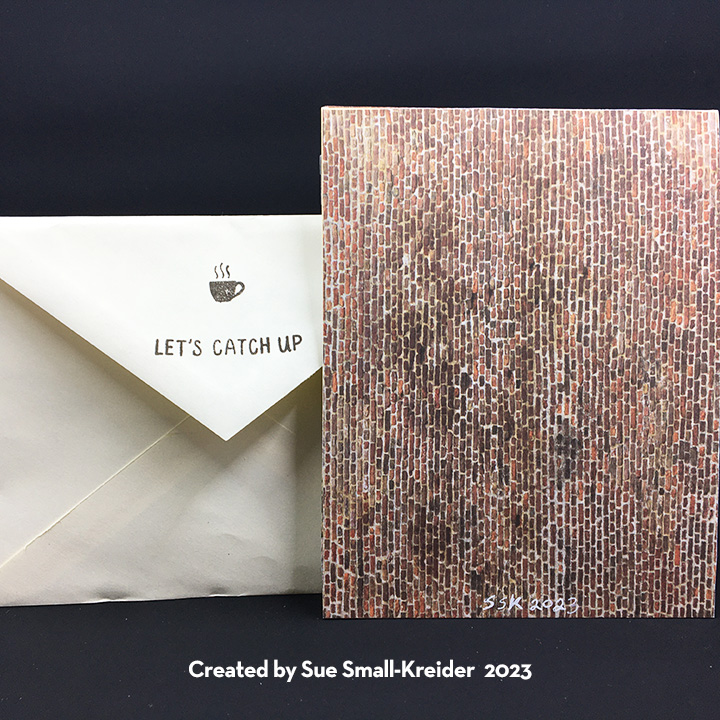
Envelope: The back flap of the envelope is stamped with a green elf to hint at the magic to come.

CRX Sheet:  With many interactive cards, the recipient needs instructions on how to open and set-up the card. I create CRX sheets (card recipient experience) to include in the envelope. You can download for free the easel/double easel CRX sheet.

Thank you for reading this blog post. I hope this inspires you and makes you smile. Please like and leave comments 😊

Other Fireplace Cards by designer/brand

Materials Used:

Dies

Stamps

  • Hero Arts – Stamp & Cut XL – Clear Stamps – Fireplace – DC295

Papers

  • Graphic 45 – 8×8 Double-Sided Paper Pack – Let’s Get Cozy
  • Recollections – 8.5×11 Cardstock 110 lb – Rose Petals
  • White Cardstock
  • Park Lane Paperie – A7 Cardbase and Envelope – White

Pigments: Ink, Watercolors & Embossing Powder

  • Simon Says Stamp – Pawsitively Saturated Ink – Aegean
  • VersaMark – Watermark Stamp Pad
  • Ranger – Tim Holtz – Distress Ink- Black Soot and Saltwater Taffy
  • Hero Arts – My Monthly Hero Mini Stamp Cubes – Cup O’Joe, Lemon Drop and Creamsicle
  • My Favorite Things – Premium Dye Ink – Milk Chocolate
  • Sharpie – Permanent Marker – Ultra Fine Tip – Red
  • Crafter’s Square – Metallic Marker – .05 In Point – Gold
  • Nuvo – Highly Pigmented Watercolor Pencils – Elementary Tones and Brilliantly Vibrant
  • Recollections – Detail Embossing Powder – Ebony

Adhesives

Tools

  • Die Cutting Machine
  • We R Memories – QuickStick
  • Stamping Platform
  • LDRS – Stampendable Stamping Tool
  • Stamping Cloth
  • Sponge Dauber
  • Ink blending Brush
  • Craft Mat
  • Scissors
  • Heat Tool
  • Kat Scrappiness – Anti-Static Tool
  • Water Brush
  • Kraft Knife

Shop Cards – Coffee and Books

Miniature houses and shops fascinate me. When I saw that Concord & 9TH had come out with a Pop-Up Shoppe Die set and add-on sets for a bakery and a bookstore, I knew I had to try them.

First try – Bookstore
Second try – Coffee/Bake Shop

Here are my first and second cards that I made from these die sets. The first one, a bookstore, was done without watching the assembly video and hence I attached the pop-up store front as an accordion fold rather than the β€œU” pop-up fold as the video shows. The second one, a coffee/bake shop, uses the β€œU” fold. (Bake shoppe video, Book shoppe video)

For the coffee/bake shop I cut a 4.25×5.5-inches piece of banana cream cardstock folded in half for a top fold A2 size card base. using double-sided tape I adhered the decorative papers on all but the front inside of the card.

I found that assembling the shop front from the acetate windows, door and, flower box and eaves dental molding first, made it easier to plan how to lay out the inside scene. On the coffee/bake shop I used the largest door die to do a partial die-cut of three sides on the shop front, so that the door could be opened. (I’ve also thought for my next card to use both door dies to cut in windows to the door.)

The acetate windows can be one large piece if you don’t make the door open or two or three pieces if you do cut the door to open. (I reinforced the narrow strip by the door with a piece of acetate.) You need the acetate to glue the window frames onto as well as tables and lights bumped out with foam squares.

The inside decor for the coffee/bake shop uses the bake shoppe dies as well as the counter made from the bookstore’s cabinet with the shelves cut off. The stamped coffee signs come from a coffee shop stamp set from My Favorite Things. The β€œOPEN” sign on the door is from a Lawn Fawn stamp set. “Bakery” is part of the Concord & 9TH stamp set.

All of the coffee and bakery elements were curved using fingers or flower shaping ball tools. The breads and baskets were inked with Distress inks. Printed watercolored papers were used for other elements like cups and flowers. Foam squares are used to adhere most of the elements to the card back.

Placement of items to be seen through the upper windows and open door may make the inside layout seem off-balance.

The inside of the card needs layers of matted sentiment and a decorative paper on the card back to balance out the weight of the card front.  I think the top fold card works best for the card design, but the side fold card is good too.

As is my way, I decorated the back flaps of both A2 envelopes with stamps from Hero Arts (bookstore) and Concord & 9TH (coffee/bake shop) to hint as to what is inside the envelope.

See more coffee themed cards by clicking here or shop cards click here.

Thank you for reading this blog post. I hope it brought you comfort and inspiration.  Please like and leave comments 😊

Materials Used:

Dies

Stamps

Papers

  • Clear Acetate Sheet
  • Craft Consortium – 6×6 Premium Paper Pad – Brick Textures
  • My Favorite Things – 6×6 Paper Pad – Finishes and Textiles
  • Funky Fossil Designs – 20cm x 20cm Paper Pad – Watercolour Rainbow
  • Fun Stampers Journey – 8.5×11 Cardstock – Banana Cream – CS-0087
  • White A2 Card Base
  • Colored Cardstock
  • Colored, Pattern and Foiled Paper Scraps
  • A2 Envelopes

Inks & Pigments

  • Ranger – Tim Holtz Distress Inks – Walnut Stain and Soot Black
  • Stampin’ Up – Classic Stampin’ Pad – Early Espresso
  • Pigma Micron 01 – Black
  • Sakura – Gelly Roll 08 – Gel Pen – White

Miscellaneous

  • Neutral PH Adhesive by LINECO
  • Fine-Tip Glue Bottle
  • Scrapebook.com – Double-sided Tape – 1/4-inch wide
  • Die Cutting Machine
  • Stamping Platform
  • LDER Creative – Stampendable Stamping Tool
  • Stamping Blocks
  • Sponge Daubers
  • Piercing Tool
  • Tweezers
  • Foam squares

Waiting on You Know Who!

The anticipation of the holiday season, the longing to see family and friends, the desire for relaxation and time off from the work world, and all the other anticipated joys and adventures of the holidays are what this card is about.

Colorado Craft company’s clear stamps and coordinating dies of Anita Jeram’s delightful drawings and hand lettering make it a joy to make a holiday card using a permanent black ink and watercolor pencils. Thin foam squares and festive background paper complete the front of the card.

My Favorite Things has a cute, layered stamp set and coordinating die which I used inside the card for the famous red suited elf.

I made this card in an evening starting with an A2 card base (4 ΒΌ x 5 Β½ inches) in white. I trimmed a 6×6 background paper down to 4 x 5 ΒΌ inches and saved the scraps to decorate the back of the card. Using the leftover white cardstock from the card base, I stamped all the images and sentiments and then colored the images. Next, I die cut the images and fussy cut the sentiments. The front of the card decorations are adhered with thin foam squares while the inside stamped pieces are glued in place.

The back of the card was stamped in white with a snarky sentiment of β€œYep I made this . (Don’t throw it out.)” from Technique Tuesday. (If I had had more time and forethought, I would have heat embossed all the sentiments on this card.)

To set the experience for the card recipient, I always decorate the envelope back. This time the flap was stamped with a sentiment from another Anita Jeram’s stamp sets Make A Wish and sparkles from a vintage Disney stamp set.

Thank you for reading. If you enjoyed this blog post, please like it and follow the blog. 😊

Stamps

  • Colorado Craft Company – clear stamps & dies – AJ527 – On The Lookout by Anita Jeram
  • Colorado Craft Company – clear stamps & dies – AJ481 – Make A Wish Mini by Anita Jeram
  • My Favorite Things – clear stamps & dies – CS-600 Sweet Christmas
  • Disney -Mickey Mouse & Friends – clear stamps – DUS0171 Mickey A6 Stamp
  • Technique Tuesday – Clear Stamps – Made with Love

Inks & Waterolors

  • Memento – Fade-Resistant Dye Ink Pad – Tuxedo Black
  • Stampin’ Up – Classic Stampin’ Pad -Pear Pizzazz and Real Red
  • Simon Says Stamp – Premium Pigment Ink – White
  • Nuvo – Highly Pigmented Watercolour Pencils – Pastel Highlights, Brilliantly Vibrant and Elementary Midtones

Papers

  • Heavy white cardstock – 1 sheet 8 Β½ x 11 inches
  • Catherine Pooler – Winter Pick-N-Mix  6×6 Patterned Paper
  • A2 white envelope

Additional Supplies: