I’m using Tim Holtz’s Retro Oven to create this tri-fold shaker card.
Watch video above for a tutorial on how to make the card.
Cardbase: Start with a 9 x 5-inches rectangle of white 65lb. cardstock. Score and fold at 3-inches and 6-inches.
Oven: Cut out two oven base piece from red cardstock covered with clear packing tape. Cut decorative oven pieces for each stove from silver, white and black. (I used cardboard packaging from some Tim Holtz protucts for the white and black pieces.)
Sentiments: Stamp the Paper Discovery “Eat Drink & be merry” inside the last oven window panel. Use other sentiment stamps on other middle panels. (I used “Fill your heart with joy” from Scrapbook and Cards Today’s Jolly Holiday workshop kit.)
Envelope: The card fits into an A2 envelope.
___________________________________
Thank you for experiencing this blog post.
I hope this inspires you and makes you smile.
Please like and leave comments 😊
___________________________________
Disclaimer: Karen Burniston products are provided free of charge by the manufacturer for review and use. All other items were personally purchased. Compensated affiliate links used where or when possible, meaning I will receive a small percentage commission from these manufacturers at no cost to you. This will allow me to add more content to my YouTube channel and help out a lot. Thank you.
Materials Used:
Dies
Sizzix – Thinlits by Tim Holtz – Retro Oven
Stamps
Paper Discovery – A5 Stamp Set – Cosy Kitchen – Simple Food
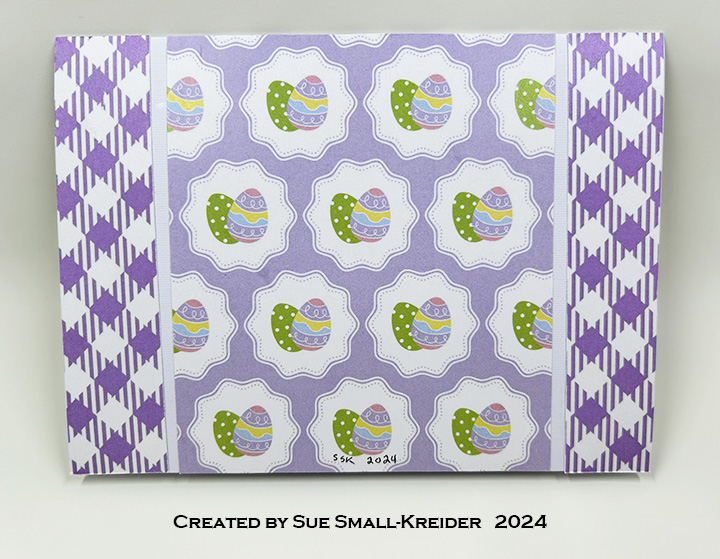
I saw a side-fold of like this card on social media and decided to make my own version using a top fold A6 (4 1/2 x 6 1/4-inches) purchased card base and the egg die from Karen Burniston’s Spring Animals die set.
Cardbase: Using a purchased A6 card base, I used double sided patterned paper from Kat Scrappiness to make a mat frame on the front panel, piecing it together as the patterned paper was 1/2-inch smaller than the card height. Added a yellow 5 3/4 x 4 1/4-inches panel over mat frame. On the back panel, I used the leftover pieces to make an interesting symmetrical design utilizing both patterned sides of the paper.
Egg Panel: A 4×5 1/2-inches rectangle cut from white cardstock, I lightly marked in pencil lines at 1 1/8-inches, 2 3/4-inches and 4 3/8-inches. Along the tops and bottoms of these lines I marked 5/16-inches from the edge. These “T” marks where to center the top or bottom of the egg die. I used the center crack in the egg die to center on the vertical lines. After die-cutting out the six eggs, I erased the pencil marks. (I found it easier to sketch out the egg placement on the back side of the card, tracing around the die to see if it looked right before die-cutting from the front of the panel.) (I added two clay flower shaker elements to the front of the card.)
Shaker Assembly: Position the white panel over the yellow panel and mark the corners of the white panel on the yellow as well as tracing the egg cut-outs onto the yellow. Using double-sided tape, adhere a 4×5 1/2-inches rectangle of clear acetate/film to the back of the white panel. Add strips of narrow foam tape to create boxes around the traced eggs on yellow panel. Using an anti static tool to apply powder to the inside of each box (including the sides of the sides of the foam tape) and back side of acetate/film on white panel. Add confetti and clay sprinkles to each box, avoid putting too much in each box and level out any high points to below the foam tape level. Holding the card base, carefully peel off the backing paper on the foam tape. Remove any confetti from tape. Using the corner marks on the yellow panel line-up the white panel and adhere to foam tape, sandwiching the confetti inside the boxes. (I like to use the confetti sequins from This Calls For Confetti who have a variety of colors, sizes and finishes and have wonderfully quick customer service/delivery time.They also have the best anti-static tool for making shaker cards.)
Sentiment: I cut out the words only using Karen Burniston’s Happy Easter word die from purple cardstock for the inside of the card.
Envelope: I cut out a sticker from the decorative paper to embellish the back of the envelope flap.
This card was made for Craft Roulette #192 whose parameters included a thank you card, roadside market colors, yard(s) element and confetti.
Heartfelt thanks is the emotion that this accordion-fold card expresses. Inspired by Karen Burniston’s December 2023 release Heart Add-ons pivoting panel, the card features a shaker element filled with confetti. Other Karen Burniston dies were used including: Fence Add-Ons, Thank You and Fancy Label Accordion.
Before starting, watch the assembly videos of the pop-ups which are usually near the bottom of the linked pages for the various die sets used.
Accordion Frames: Cut three accordion frames from heavy blue cardstock using the main large die in the Fancy Label Accordion set. Train the folds of each frame and set aside. (You will cut a fourth accordion frame under the Shaker section using the same heavy cardstock.)
Fence Panel: Using the largest of the label die in the Fancy Label Accordion set, tape it inside the accordion frame die and cut two from decorative paper. Save the inner fancy labels for use on the fence panel. From the decorative paper accordion frames, trim the smaller panel frames away from the larger frame leaving the small tabs attached to the frames. Set both accordion frames and small frames aside for later use. From brown decorative paper cut one fence using the fence die in the Fence Add-Ons set. Cut flowers and grass to decorate fence with using dies also in the Fence Add-Ons set.
Attach a fancy label to the center panel of one of the blue accordion frames. Trim fence to fit panel and adhere to panel. Decorate the fence with grass and flowers. Glue the remaining fancy label to the reverse side of center panel. Set the piece aside.
Heart Pivot Panel: Glue the tab of one blue accordion frame to the backside of the remaining blue accordion frame. Cut from a lightweight teal blue cardstock the Hearts-Add-Ons panel. Train the folds of the hearts panel. From the blue accordion frames cut off half of the center panel leaving them attached at their pivot points. (See photo)
Put glue on the left back side edge of the teal blue hearts panel before attaching to the left blue center panel of the blue accordion frame. Match up the fancy curved edges of the panels. With the blue connecting post of the accordion frame behind the teal blue hearts panel, attach the right side of the hearts panel to the right accordion frame panel.
Cut a hearts panel from decorative paper. Trim out the string of hearts and save to decorate the backside of hearts. Glue decorative panel to the front side of hearts panel. Using the smaller decorative heart dies in the set, cut a number of hearts from patterned paper. Decorate both front and back sides of panel.
Glue the panel frames to the front of the hearts panel with the panel tabs being covered with decorative paper. Trim off the parts of the frames at the center of the hearts panel that are not attached. Set piece aside.
Shaker: Using the largest of the label die in the Fancy Label Accordion set, tape it inside the accordion frame die. Cut the fourth frame piece from the blue heavy cardstock. Keep the dies tapped together to cut four heavy cardstock frames and two decorative paper frames. Use smaller pieces of the heavy cardstock for the four panel frames. Cut the full accordion frame with the decorative paper. Trim the panel frames from the accordion frames and save the decorative paper frames for later. Cut two squares of clear acetate or plastic slightly larger than the panel frames.
To assemble, glue two blue panel frame pieces together. Using 1/8-inch wide double-sided tape around the blue frame, adhere the acetate to frame. Trim off overhanging acetate. Attach decorative pink paper frame over the acetate with more double-sided tape matching up edges. Glue the assembly to the accordion frame panel matching blue frame to blue frame. Repeat with the remaining two blue frames, pink decorative paper frame and acetate piece, but DO NOT attach to accordion frame panel.
Using an anti-static tool, swipe powder over all of the acetate inside the frame and the sides of the shaker frames. Add confetti/sequins to the frame attached to the accordion frame. Glue the remaining shaker frame over the confetti filled frame. Leave undisturbed until glue dries. (To listen to commentary about the anti-static products I used go to my video.)
Accordion Assembly: With all the accordion frames decorated, assembly can begin. Collect the four decorative paper accordion frames previously cut in the Shaker and Fence Panel sections. Cut four more frames from decorative paper, trimming out the inner panels which can be saved for later. Glue the fence panel accordion frame tab to the backside of the first heart panel accordion frame. Glue the second heart panel accordion frame tab to the backside of the shaker accordion frame. Trim off the unused tab on the shaker accordion frame. Cover the backs of all the accordion frames with the decorative paper frames. (This should hide all the tabs.) Glue decorative paper frames to fronts of the accordion frames.
Once all the decoration of frames is completed, glue the center panels of fence and shaker accordion frames to the heart panels. (Note: the tabs that attach to the shaker panel are glued to the front of the shaker panel, while the fence tabs are glued to the back of the hearts panel.)
Cut one of the decorative paper inner panels in half to cover the backsides of the panels cut in half that the hearts panel is attached to. (Green paper in the photo.)
Sentiment: “Thank You” is a die-cut that was cut twice from the same double-sided paper with the blue side used as an off-set shadow behind the pink patterned paper.
Envelope: The card is thick and would require a padded bubble envelope if not hand delivered.
Thank you for reading this blog post. I hope this inspires you and makes you smile. Please like and leave comments 😊
Materials Used:
Dies
Karen Burniston in cahoots with Riley and Company – Heart Add-Ons – 1257
Making a gingerbread house always involves candy and white icing. Half the fun of making a gingerbread creation is sampling the construction elements.
This Christmas card is one that I hope the recipients won’t try and taste the ingredients. I used Queen & Co.’s Holiday House Kit to make this shaker card. In the kit you get dies to decorate the foam shaker base with pre-cut acetate window cover as either a gingerbread house or a Victorian house. I chose to use polymer clay shaker elements that are from Queen & Co. but not included in the kit. (There are solid color shaker beads included in the kit as well as stamps.)
Cardbase: I used a purchase brown kraft cardstock and matching envelope in an A7 size. The card I cut it down to a 6×4 3/4-inch side-fold card so that there would be room in the envelope for the foam shaker. The front panel was covered with a 4 1/2×5 3/4-inch piece of patterned red paper from the Queen & Co. Happy Holly Days mat stack. The inside white panel is the same size cut from white copier paper.
House: Brown patterned paper from Queen & Co. Homemade Holiday mat stack was use for the gingerbread house and man. The white icing and candies were cut from white cardstock and made sparkly with a wash of a glitter gloss aqua brush. The stripes on the candy can were drawn on with a red marker while the round peppermint candies have a die to cut the red swirl. Gum drops on the roof ridge were cut using a die in the kit and brushed with glitter gloss. The tiny peppermint candies are polymer clay shaker elements from Buttons Galore More.
Once the house front is made, position the foam frame on the cardbase to allow for the gingerbread man and candy cane to hang off the house, but not the card. Adhere foam to cardbase. Add strips of leftover foam to the inside of the frame to section off areas where the windows are. Add shaker elements to the sections. Place the acetate piece over the foam frame to seal in the elements. Color the exposed sides of white foam with a brown marker. Using double-sided tape, attach the decorated house front to the acetate piece.
Decorations: Glue candy pieces to decorate the house. The gingerbread man is cut in two pieces – bottom white with glitter gloss and the top from the brown patterned paper. Attach the man with thin foam squares to fit over the polymer clay candies.
Sentiment: The inside sentiment is a clear stamp included in the kit stamped in red ink.
Envelope: A gingerbread man from a Joanna Sheen card making kit was stamped in dark brown ink and brushed over with glitter gloss on the back flap.
Thank you for reading this blog post. I hope this inspires you and makes you smile. Please like and leave comments 😊
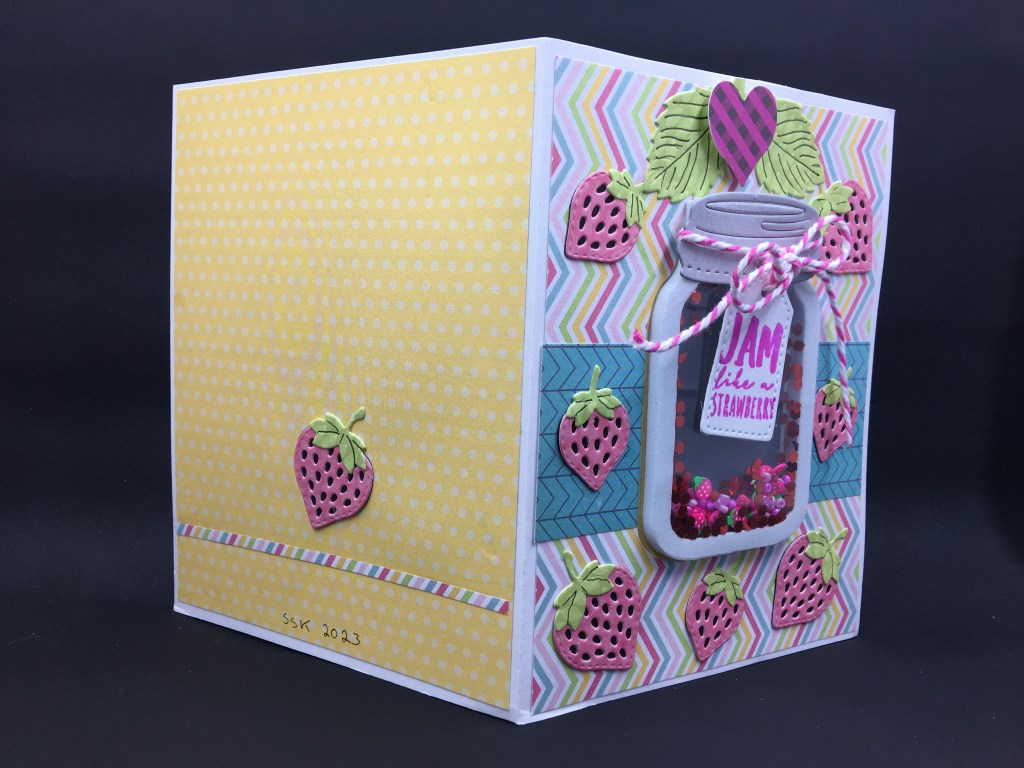
This card was made for Craft Roulette #176 whose parameters included: a split in the middle, jolly colors, a fruit element and a heart.
My inspiration for this card came from the Berry Special die and stamp set that came in the Die Cutting Essentials, issue 103. (This magazine is available on the Craftstash website. Note that there are different country based websites for this online vender. Use the one that works for youto avoid unnecessary currency/customs fees.) It has a stamp that says “Jam like a strawberry” so I immediately thought of a jam jar shaker and went to my Queen and Company stash of shaker kits.
Cardbase: Using a 8.5×5.5 inch rectangle of heavy white cardstock for the cardbase, I folded it in half and used a bone folder to burnish the card into a 4.25×5.5 inch A2 size. The front and back panels of the card are covered with 4×5.25 inch decorative paper rectangles. The front has an additional strip of blue decorative paper near its middle. The back uses a thin strip cut from the front panel paper as decoration. I used the jar frame die to cut the aperture into the card front when only the front decorative papers had been attached. Next, I glued on the inside decorative papers and cut the aperture again.
Shaker: Queen and Company are known for their shaker kits which use pre-cut foam shaker frames with adhesive on both sides and clear acetate covers which take the tediousness out of making shaker cards. For the jar I used two acetate pieces and one foam frame that all had been dusted with an anti-static brush. I peeled off one side of the frame’s adhesive backing and attached a pre-cut piece of acetate. Adding the glitter, seed beads and strawberry slices to the frame, I dusted the next acetate sheet again and peeled off the adhesive backing on the foam frame and attached the acetate to enclose the shaker elements. (The chucky glitter had a lot of static electric charge and jumped to the tiny bits of adhesive at the foam edges.) The shaker is attached to the card by gluing a jar frame cut from the front of the card to the inside of the card and then gluing the shaker to the jar frame.
Decorations: Eight layered strawberries were cut using the Berry Special die set from pink and green patterned paper and black cardstock. The dies cut two stems, large and small strawberry outlines and fronts with seeds cutout as well as a plant stem with large leaves. I also used two of the large leaves on the card front. Seven strawberries are scattered on the card front and one large strawberry on the back. A red plaid paper sticker on a foam dot is at the top of the card front.
Sentiments: Using the stamps from the Die-Crafting Essentials gift set, I stamped in purply-pink ink the sentiment “Jam like a strawberry” on the jar tag which is tied around the jar lid with baker’s twine, and the inside sentiment “Thank you berry much!”
Envelope: Stamped on the envelope flap is “You’re the sweetest!” in purply-pink ink.
Thank you for reading this blog post. I hope this inspires you and makes you smile. Please like and leave comments 😊
Materials Used:
Dies
Queen & Company – Steel Dies – Love Jar
Die Cutting Essentials, issue 103 – Dies – Berry Special
Stamps
Die Cutting Essentials, issue 103 – Clear Stamps – Berry Special
Shaker Elements and Frame
Queen & Company –Foam Shaker & Acetate – Love Jar
Red Chunky Glitter
Pink Seed Beads
Dress My Craft – Polymer Clay – Strawberry Slices
Papers
Queen & Company – 6×6 Double-Sided Mat Stack – Flirty Florals
Crate Paper – 6×6 Single-Sided Patterned Paper Pad – Cool Kid
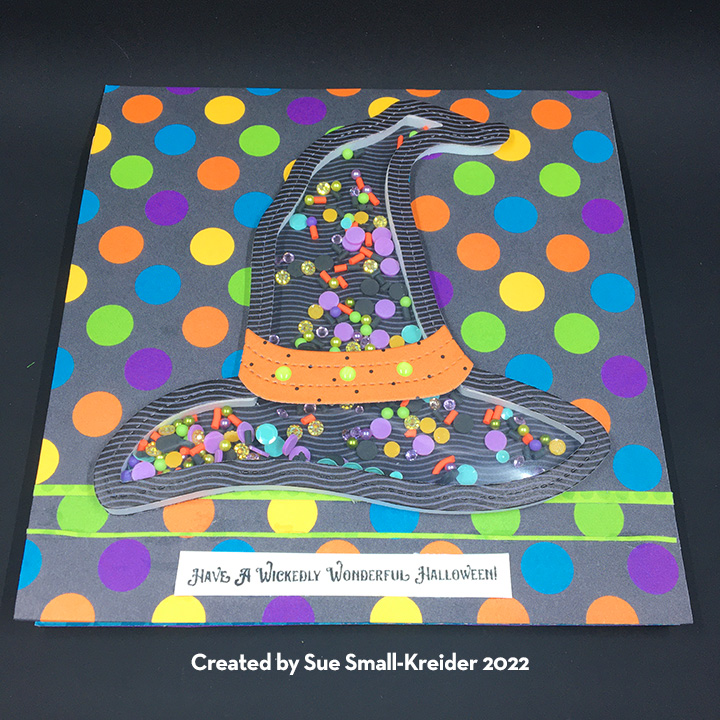
Sometimes there are crafting elements that just take you under their spell and make you play with them.
Queen & Co. Halloween shaker kits have me under their spell This card is made up of elements from two kits – Fright Fest (shoes and papers) and Witch Hat. These kits have the dies, foam shaker frames and acetate windows. Some come with the shaker elements (I added to them from my stash) and/or matching paper (Fright Fest for this card.)
Queen & Co. make some delightful shaker card kits and this Candy Land one is no exception. The thing that I love about the company’s kits are the pre-cut foam shaker frames that simplify the effort needed to make a shaker card. The extra foam left over from the frames is ideal for popping some of the candies cut from the paper pad as additional decorations.
The dies have uses beyond shaker cards with some basic shapes of circles and ovals.
I filled the shaker with elements I collected over the years, and are not included in the kit.
To hint at the envelope’s contents, I stamped in a variety of colors the candy stamps from the set with the sentiment “goody, goody gumdrops!” on the back flap and more colorful candy on the front left edge of the envelope.
Thank you for reading this blog post. Please like and leave comments 😊
Materials Used:
Dies & Dies
Queen & Co. – Candy Land Kit
Inks
Memento – fade-resistant Dye Ink – Tuxedo Black
Hero Arts – Hero Hues Reactive – Creamsicle, Blue Hawaii, Pool Party and Key Lime Fizz
Hero Arts – Dye Inks – Rose Hues -Cotton Candy, Pale Tomato and Bubble Gum
Papers
Queen & Co. –double-sided papers -6”x 6” Mat Stack – Candy Land
A2 floral card base and white envelope from American Crafts Boxed Cards – The Pier
Shaker Elements
Kat Scrappiness – Rainbow Dot Sprinkles
Buttons Galore & More – Sprinkletz – Pink It UP
Stamp Anniething Adornments – Jelly Dots – Blue and Red
Having made this hourglass card once before, I realized it would make a lovely winter Valentine with the Penny Black’s stamp sentiment “I love you to the moon and back” if I added a 3/4 inch moon to the scene. The Greetery’s Hourglass dies make this an easy card to create, but time consuming to cut and color all the pieces.
You can read about how I created my first hourglass card by clicking here. The video below will show you more on how I created this card.
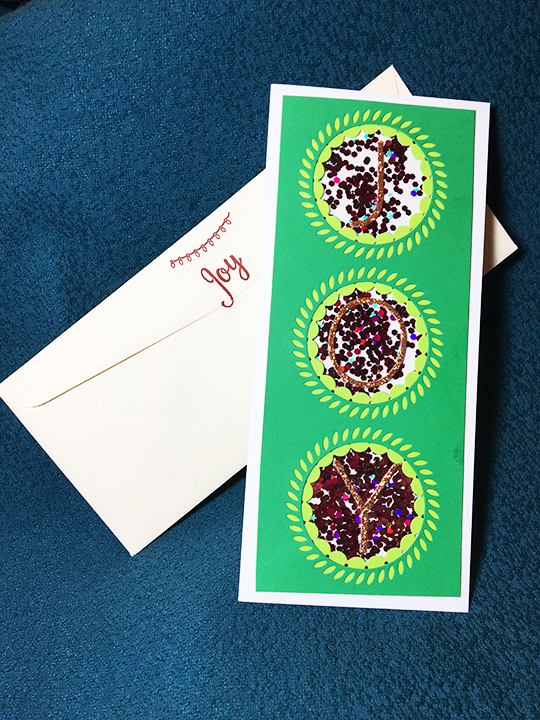
Everyone needs some joy around the end of the year holiday season. This contemporary slimline card wishes the recipient that the simple joys of the season are theirs.
I used two of Pink Fresh Studio’s Essential Slimline Cuts dies to make the trio of circles in two shades of green that form the main design element of this card. Pink and magenta halo glitter were sandwiched between two sheets of acetate using double sided tape. San serif letters cut from a bronze glitter sheet spell out “JOY” and are glued to the acetate windows.
Inside the card is stamped with a string of lights and the main sentiment. The same cherry red ink is used to stamp the string of lights and the word “Joy” on the back envelop flap hinting what’s to come.
Hoping you enjoyed seeing this card. Thank you for reading. Please like and leave a comment.