
A home cooked meal is often the ideal image and scent of Thanksgiving, but what really matters is a grateful heart for all the blessings we have.
The card uses dies from Karen Burniston’s September 2023 release including Oven Extras and Oven Pop-Up, and a few other previously released die sets.

Before starting, I recommend watching the assembly videos of the pop-ups which are usually near the bottom of the linked pages for the various dies used.
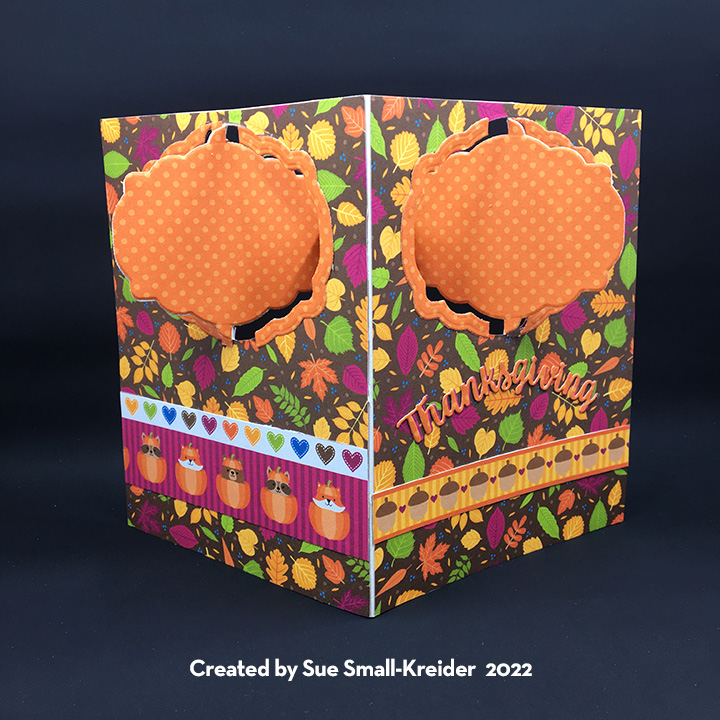
Cardbase: I started with a rectangle of patterned cardstock 12×6 inches that was folded in half to form a 6-inch square, top fold card. The outside was left to the beautiful autumn trees (Photoplay Autumn Vibes-Crunchy Leaves) while the inside top panel with a teal blue leaf wallpaper and the bottom panel a brown textured cardstock.

Oven/Stove: I was genuinely surprised at how easy the pop-up oven is assembled. It has just two pieces -the outer shell which I cut from black mirror cardstock and the inner platform which I cut from a gray cardstock. The platform attaches much like the Little Labels Pop-Up with the front tabs gluing to the floor of the card and the back tab gluing to the wall of the card. Before I attached the outer shell, I added a 1 3/8-inch square of clear plastic packaging to the back of the oven door with double-sided tape. Then I cut another oven door from gray cardstock trimming the bottom 1/8-inch shy of the fold line to cover the plastic inside when the door was opened. I also cut a 2-inch square of gray cardstock and glued it to the back wall just above the pop-up platform. This will be the inside wall of the oven. It is easier to add the items inside the oven before the outer shell is attached. I glued a silver rack to the platform and then added two pop-up cubes for the top oven rack which I trimmed one of the long edges from. Once the top rack was glued in place on the two cubes, I added another cube on top for the turkey pan which is in the Oven Extras set.

I find it easier to glue all the knobs, burners and door handle to the stove while it is still flat. (For this stove I cut all the knobs, burner base circles and door handle from gold foil cardstock). To attach the oven shell, glue the bottom to the center of the platform and then fold the oven flat and add adhesive to the back of the stove knob panel. Close the card and the top panel will be positioned on the card wall so that it forms the stove. On the tabs that come off the sides of the stove top add glue. Now position the squares of the cabinet pieces’ onto the tabs. Glue cabinet bottoms to the top edge of the platform, so that there is a toe kick below the cabinets.
Cabinets: Once the stove is attached, you can add the side cabinets. I cut the cabinets from some embossed wood grain cardstock and then inked them with Rusty Hinge ink to bring out the grain. The upper cabinets and lower cabinet door fronts are cut using the larger rectangle die in the Oven Extras set and then covered with the small rectangle die pieces.


To make the counter tops longer to fill the card, I followed Sandy Diller’s idea to use the larger rectangle door die for the countertops and two trimmed lampposts from the Street Lantern Pop-Up set for the turned legs that support the extended countertops.
Decorations: Between the two oven sets are lots of fun pieces that add dimension and realism to the pop-up scene. The Oven Pop-Up set includes the stove burners and knobs, oven rack and door handle. The Oven Extras set includes the turkey and roasting pan in the oven and pot on the stove as well as three pop-up cube strips that I used to pop-up the oven rack, pan inside the oven and pot on the stove. The turkey is cut in two pieces – leg bone base in pan and the bird body. The body I cut from kraft cardstock and inked with Fossilized Amber and Vintage Photo inks. The bone/pan base was cut from white cardstock and the pan colored with a silver marker, the body piece glued on so it sits in the pan and the bone was inked with rusty hinge ink.
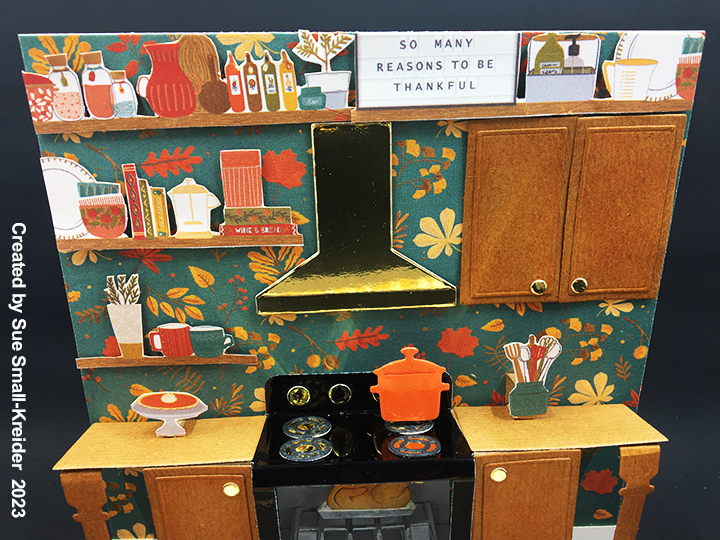
For the orange pot, I used clear packing taper over orange cardstock to die-cut the pot. The plaid rug is cut from the second largest crosshatch die from the Rectangle Crosshatch set. I found a patterned paper (Photoplay Thankful Collection) with shelves of kitchen items and a message board that I fussy cut and adhered to the wall with foam squares. The cooking hood was cut from gold foil cardstock using the hood die from the Oven Extras set. The large pumpkin on the floor is from the Autumn Elements set.

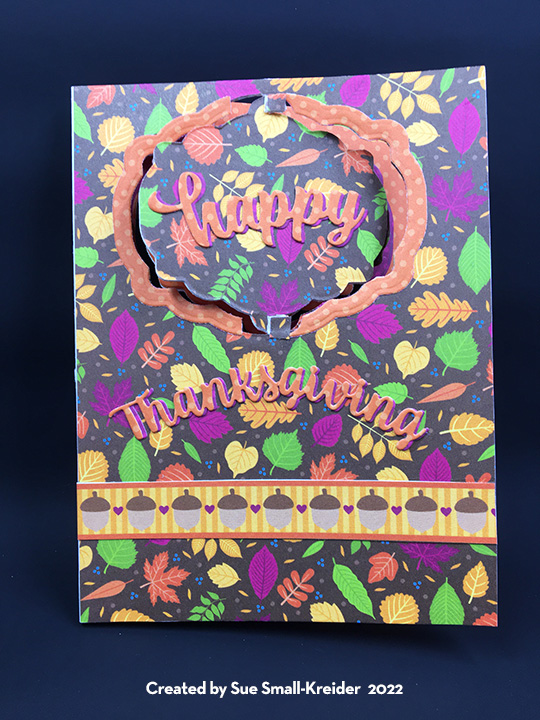
Sentiments: The small strip sentiments of “give thanks with a grateful heart” (card front) and “thankful hearts” on envelope flap are from the same paper collection as the autumn trees paper used on the card front. “Happy Thanksgiving” was cut into the plaid rug with the waste pieces saved and glued on to the card floor once the rung was glued in place. These words are from Word Set 7.

Envelope: The sticker leaves and sentiment strip on the back of the envelope set the tone for the card inside and are from the Photoplay Autumn Vibes paper collection.
Thank you for reading this blog post. I hope this inspires you and makes you smile. Please like and leave comments 😊
Materials Used:
Dies
- Karen Burniston in cahoots with Riley and Company – Oven Extras – 1251
- Karen Burniston in cahoots with Riley and Company – Oven Pop-Up – 1250
- Karen Burniston in cahoots with Riley and Company – Street Lantern Pop-Up – 1171
- Karen Burniston in cahoots with Riley and Company – Word Set 7 – Autumn – 1060
- Karen Burniston in cahoots with Riley and Company – Autumn Elements – 1059
- Karen Burniston in cahoots with Riley and Company – Rectangles – Crosshatch – 1054
Papers
- Photoplay – 12×12 Autumn Vibes Collection Pack by Becky Moore
- Photoplay – 6×6 Thankful Paper Pad by Michelle Coleman
- Bazzill – 8.5×11 Textured Cardstock – Tiara -18-1002
- American Crafts – 12×12 Embossed Wood Grain Cardstock – Dark Kraft
- Gold, Silver and Black Mirror Cardstock
- Kraft and Orange Cardstock
- Clear Plastic Packaging
- 6×9 Catalog Envelope – White
Ink
- Ranger – Tim Holtz – Distress Ink- Fossilized Amber, Rusty Hinge and Vintage Photo
- Sharpie – Permanent Marker – Ultra Fine Tip – Black
- Sharpie – Permanent Marker –Fine Tip – Olive
- Crafter’s Square – Metallic Maker .05 in/1.2 mm point – Silver
Adhesives
- Neutral PH Adhesive by LINECO
- Fine-Tip Glue Bottle
- Double-Sided Tape -1/4-inch wide
- Foam Squares
- Clear Packing Tape
Tools
- Die Cutting Machine
- We R Memories – QuickStick
- Bone Folder
- Sponge Daubers
- Craft Mat
- Scissors
- Tweezers


 Autumn leaves are falling. This simple shadow box card is made using


