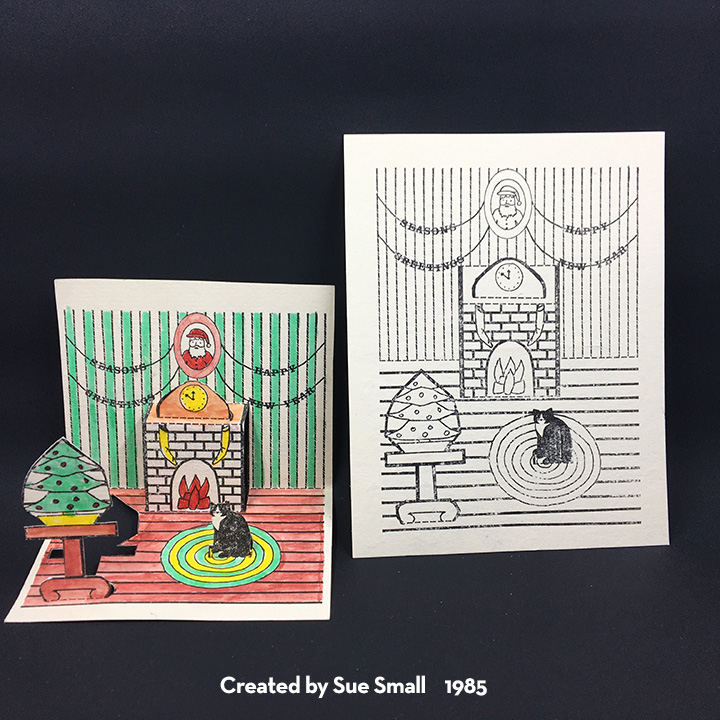
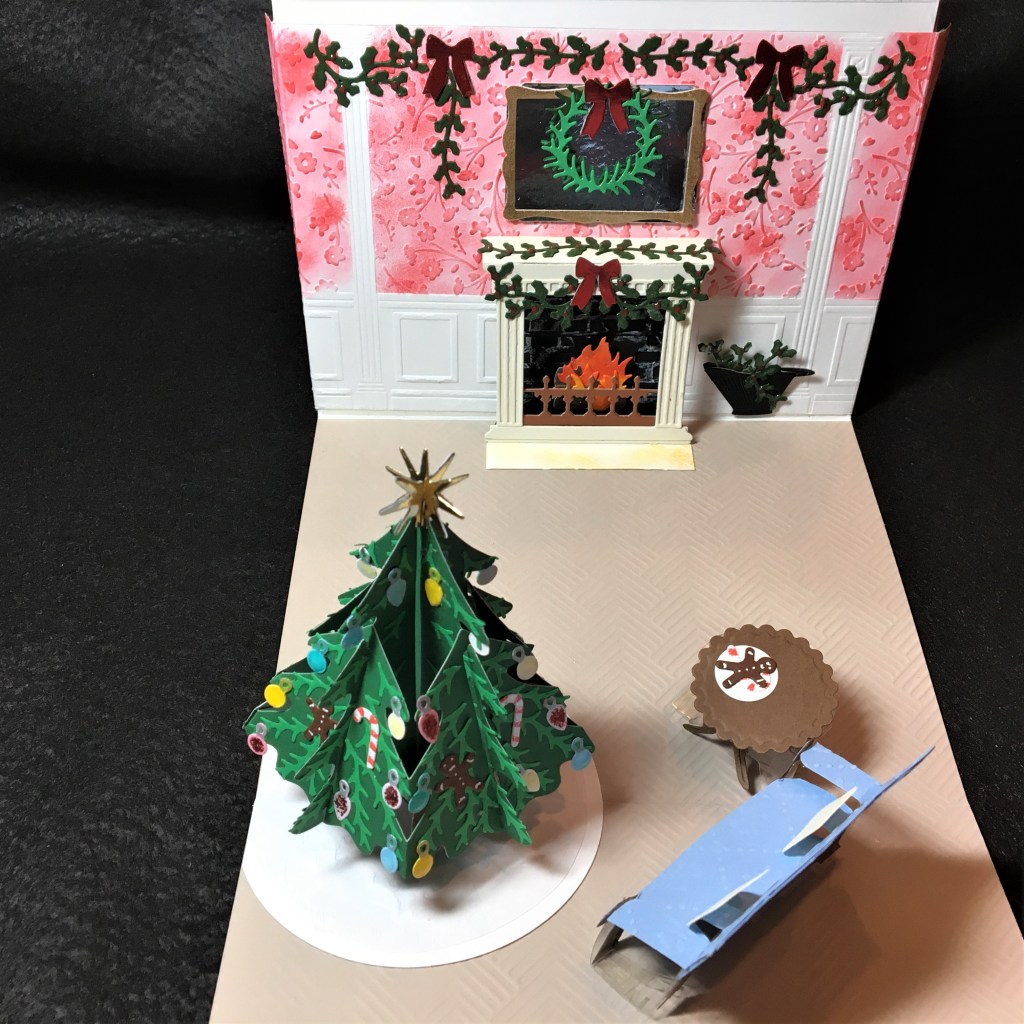
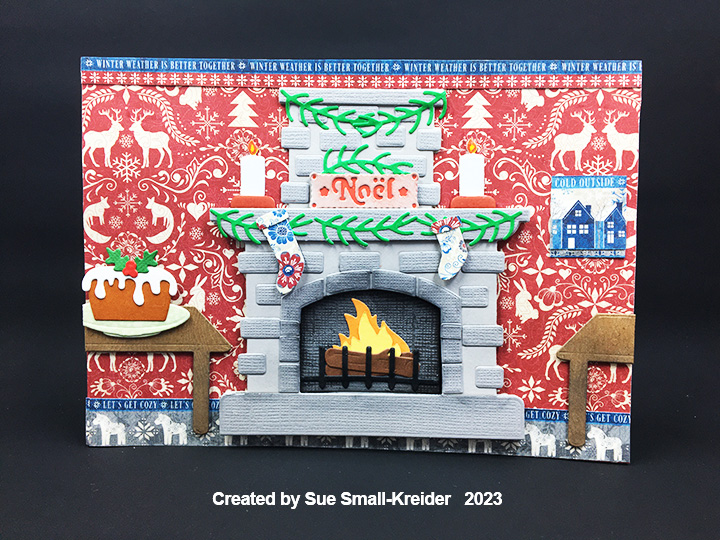
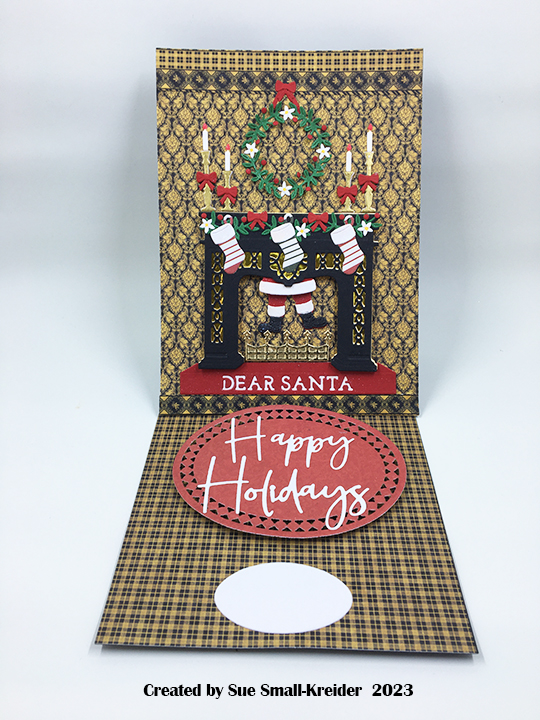
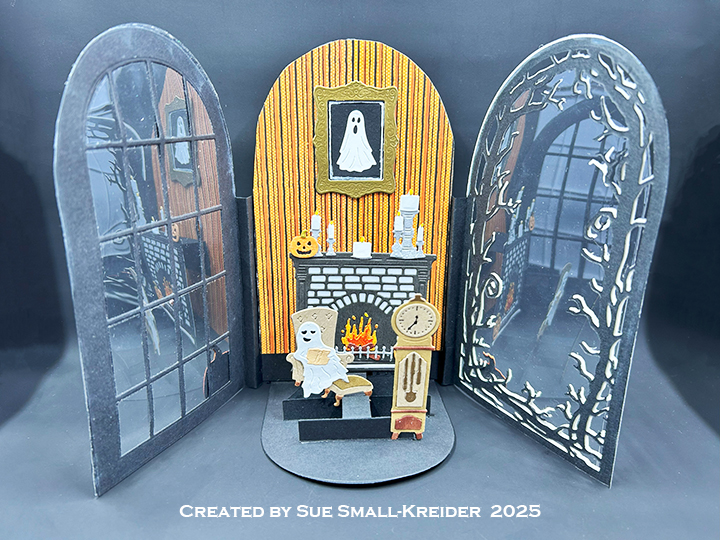
I have been collecting and making fireplace cards for several years now. Here is a collection of all my fireplace blog posts. Click on an image to see details of the fireplace.
___________________________________
Thank you for experiencing this blog post.
I hope this inspires you and makes you smile.
Please like and leave comments 😊
___________________________________
Disclaimer: Karen Burniston products are provided free of charge by the manufacturer for review and use. All other items were personally purchased. Compensated affiliate links used where or when possible, meaning I will receive a small percentage commission from these manufacturers at no cost to you. This will allow me to add more content to my YouTube channel and help out a lot. Thank you.
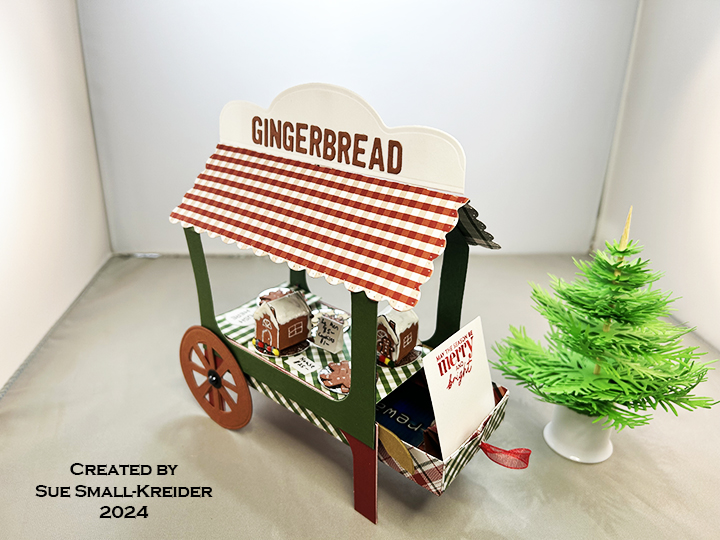
This card was made for Craft Roulette #231 whose parameters included for Project – Outside/Inside, tulip colors, festival element and checks.
Watch the video to see how I made this cart.
___________________________________
Thank you for experiencing this blog post.
I hope this inspires you and makes you smile.
Please like and leave comments 😊
___________________________________
Disclaimer: Karen Burniston products are provided free of charge by the manufacturer for review and use. All other items were personally purchased. Compensated affiliate links used where or when possible, meaning I will receive a small percentage commission from these manufacturers at no cost to you. This will allow me to add more content to my YouTube channel and help out a lot. Thank you.
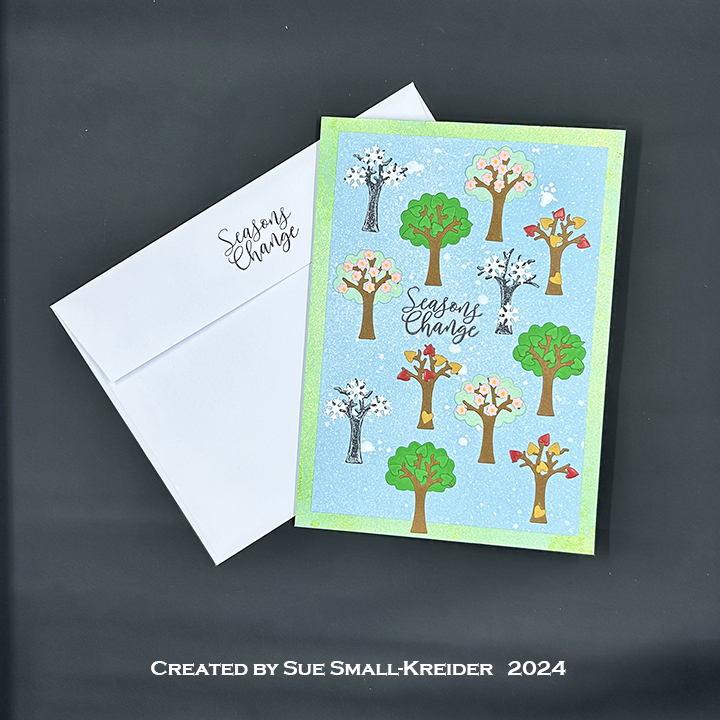
It’s time for the September 2024 Karen Burniston Design Team Challenge with the theme of Seasons.
This card could be used for retirement, thinking of you, and encouragement depending on what extra sentiment is added to the card. Watch the tutorial video below. You may also want to watch the assembly video for the Square Spinner Pop-Up die located at the bottom of this linked page.
The cardbase is a purchase A7 size (5×7-inches) The inside decorative papers are 4 3/4 x 6 3/4-inches. The outside panels have a 5×7-inches base and a 4 1/2 x 6 1/2-inch topper. The front panels were sprayed with white ink on the blue cardstock and green mica on the green cardstock.
This card was made for Craft Roulette #230 whose parameters included shaped card, peacock colors, tall element and XOXO.
Watch the video below to learn how I made the card.
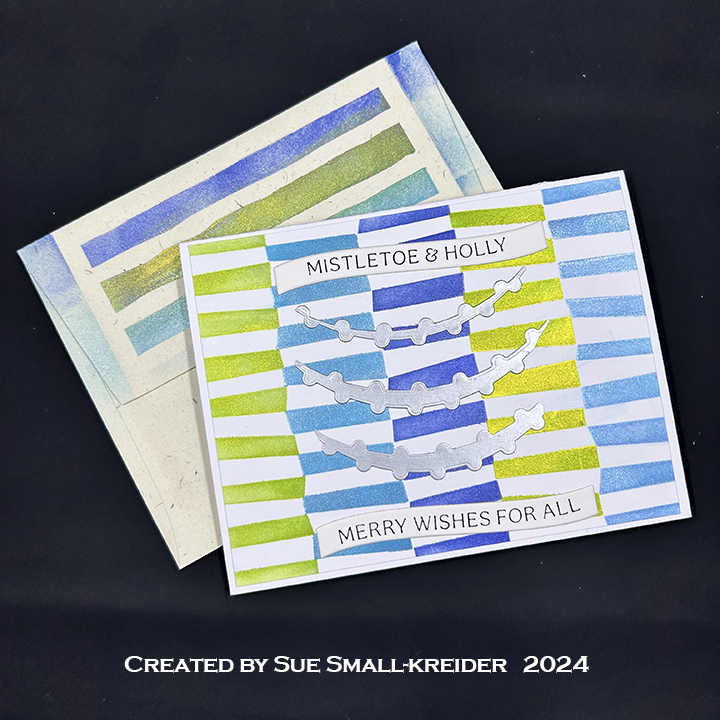
Cardbase: I made a side-fold A2 cardbase by folding a 4 1/4 x 5 1/2-inch rectangle in half and stenciled the front on a separate panel. The tiny gold gems where glued on as the last decoration.
Sentiments: The banner sentiments were made using the Spellbinders BetterPress letterpress system and Cheers to You press plates and dies. The inside of the card is blank for a personal message.
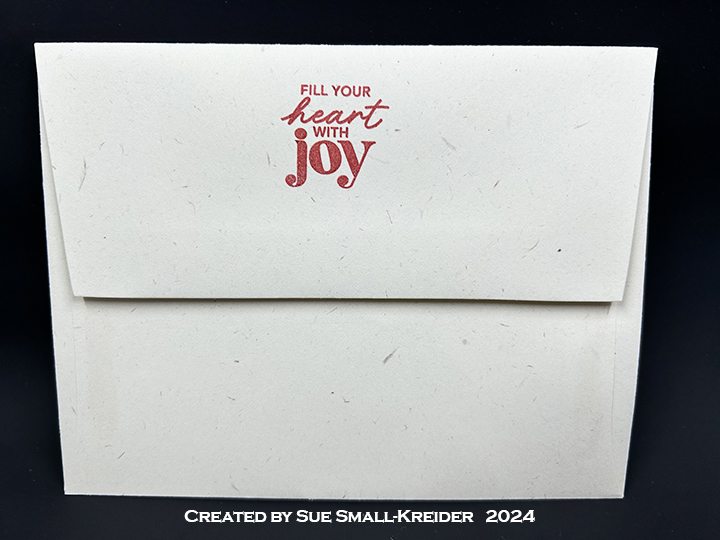
Envelope: Envelope flap was stenciled with the same stencil and inks.
Here are two more cards I made at the same time using the same inks and stencil sets, but different BetterPress press plate – Mistletoe Greetings. (“Merry everything” sentiment inside is from Scrapbook and Cards Today’s Jolly Holiday workshop kit.)
___________________________________
Thank you for experiencing this blog post.
I hope this inspires you and makes you smile.
Please like and leave comments 😊
___________________________________
Disclaimer: Karen Burniston dies are provided free of charge by the manufacturer for review and use. All other items were personally purchased. Compensated affiliate links used where or when possible, meaning I will receive a small percentage commission from these manufacturers at no cost to you. This will allow me to add more content to my YouTube channel and help out a lot. Thank you.
Materials Used:
Dies
Spellbinders – BetterPress Press Plates & Dies – Cheers to You Sentiments
Spellbinders – BetterPress Press Plates & Dies – Mistletoe Greetings
Stencils
PinkFresh – Stencils – Art Deco
Spellbinders – Stencil of the Month – March 2024 – Dynamic Backgrounds
Press Plates
Spellbinders – BetterPress Press Plates – Cheers to You Sentiments
I have been collecting and making oven cards for several years now. Here is a collection of all my ovens blog posts. Click on an image to see details of the oven.
(Images are posted from the earliest release of dies/stamps/kits 2016 to newest 2023.)
____________________________
Thank you for experiencing this blog post.
I hope this inspires you and makes you smile.
Please like and leave comments 😊
___________________________________
Disclaimer: Karen Burniston products are provided free of charge by the manufacturer for review and use. All other items were personally purchased. Compensated affiliate links used where or when possible, meaning I will receive a small percentage commission from these manufacturers at no cost to you. This will allow me to add more content to my YouTube channel and help out a lot. Thank you.
Watch the process video to learn how I made the card.
Cardbase: Cut an 11 x 5 1/2-inch rectangle and score and fold at 4 1/4-inches and at 8 1/2-inches. Cover with decorative papers cut at 4 x 5 1/4-inches (cut four of these) and then cut two of 2 1/4 x5 1/4-inches.
Envelope: The sentiment stamped on the back is by Technique Tuesday.
___________________________________
Thank you for experiencing this blog post.
I hope this inspires you and makes you smile.
Please like and leave comments 😊
___________________________________
Disclaimer: Karen Burniston products are provided free of charge by the manufacturer for review and use. All other items were personally purchased. Compensated affiliate links used where or when possible, meaning I will receive a small percentage commission from these manufacturers at no cost to you. This will allow me to add more content to my YouTube channel and help out a lot. Thank you.
I’m using Spellbinders’ APG Die of the Month for May 2022 – Pop-Up 3D Vignette – What’s Bakin’ Oven and a Pear Blossom Press One Light to create this light-up oven.
Watch video above for a tutorial on how to make the card.
Sentiments: The banner greeting of “Happy Christmas” was made using a BetterPress plate and die set.
Envelope: The card fits into an A7 envelope stamped with a sentiment “Warm Wishes” from Hero Arts.
___________________________________
Thank you for experiencing this blog post.
I hope this inspires you and makes you smile.
Please like and leave comments 😊
___________________________________
Disclaimer: Karen Burniston products are provided free of charge by the manufacturer for review and use. All other items were personally purchased. Compensated affiliate links used where or when possible, meaning I will receive a small percentage commission from these manufacturers at no cost to you. This will allow me to add more content to my YouTube channel and help out a lot. Thank you.
Materials Used:
Dies
Elizabeth Craft Designs – Metal Dies – Let’s Bake – 1994
Hero Arts – My Monthly Hero Kit – May 2022 – Kitchen Dies
Spellbinders – APG Die of the Month -May 2022-Pop-Up 3D Vignette – What’s Bakin’ Oven
Spellbinders – BetterPress Press Plate & Die Set – Mistletoe Greetings
Stamps
Hero Arts – My Monthly Hero Kit – May 2022 – Clear Stamps
Pear Blossom Press – Clear Stamps – PBP-01
Spellbinders – BetterPress Press Plate & Die Set – Mistletoe Greetings
Papers
Bazzill – 8.5×11 Cardstock – Tiara -18-1002
Bazzill – 12×12 inch Solid Cardstock – Nautral
Grafix – 8.5×11 Dura-Lar Acetate .005 – Clear Film
I’m using Lawn Fawn’s 2016 Sprinkled with Joy stamps and dies for this slimline Christmas oven card.
Watch video above for a tutorial on how to make the card.
Card FrontCard Back
Cardbase: The card base is 8 1/2-inches tall and 3 7/8-inches wide when folded closed.
Oven: Watch my YouTube video above for how the oven was assembled.
Sentiments: Outside I used “Sweet” stamped on a green scrap strip. Inside the oven I used “Christmas Wishes” both from the Lawn Fawn Sprinkled With Joy stamp set. Inside the card I used a stamp from Scrapbook and Cards Today’s Jolly Holiday workshop kit.
Envelope: The card fits into an A2 envelope.
___________________________________
Thank you for experiencing this blog post.
I hope this inspires you and makes you smile.
Please like and leave comments 😊
___________________________________
Disclaimer: Karen Burniston products are provided free of charge by the manufacturer for review and use. All other items were personally purchased. Compensated affiliate links used where or when possible, meaning I will receive a small percentage commission from these manufacturers at no cost to you. This will allow me to add more content to my YouTube channel and help out a lot. Thank you.
Materials Used:
Dies
Lawn Fawn – Custom Craft Dies – Sprinkled With Joy-LF1271
Stamps
Lawn Fawn – Clear Stamps – Sprinkled With Joy-LF1214
Scrapbook and Cards Today’s Jolly Holiday workshop kit.
Embossing Folder
Stampin’ Up – Cut & Emboss Folder – Dotted Circles 3D
I’m using My Favorite Things What’s Cooking kitchen dies for this A2 (4.25×5.5-inch) card.
Watch video above for a tutorial on how to make the card.
Sentiments: While the My Favorite Thing’s What’s Cooking collection comes with a stamp set, none of the sentiments fit the Christmas theme. So I used a “Merry Christmas” from The Greetery and two stamp sentiments from the Scrapbook and Cards Today’s Jolly Holiday kit for the card inside and envelope flap.
Envelope: The card fits into an A2 envelope.
___________________________________
Thank you for experiencing this blog post.
I hope this inspires you and makes you smile.
Please like and leave comments 😊
___________________________________
Disclaimer: Karen Burniston products are provided free of charge by the manufacturer for review and use. All other items were personally purchased. Compensated affiliate links used where or when possible, meaning I will receive a small percentage commission from these manufacturers at no cost to you. This will allow me to add more content to my YouTube channel and help out a lot. Thank you.
Materials Used:
Dies
My Favorite Things – Die-namics – Everything And The Kitchen Sink