It’s Sneak Peek Week for Karen Burniston’s June 2024 release of new dies and clear stamps. For this card I used several of the new sets including: Music Charms, Piano Keys Pop-Up and Happy Birthday Lorna Add-Ons die sets and the Music Sentiments clear stamp set. The new release will be available on July 1, 2024.
Cardbase: I started with a purchased 5×7-inch kraft cardstock cardbase and covered all sides with leopard spots paper. The inside was covered with two 5×7 pieces. (I covered my inside after I had die-cut the stage and had to fold the stage flat, cut on the die-cut lines and then retrain the folds. This gives you a solid coverage of the stage, hiding the center cut.) I cut the stage pop-ups, before I covered the outside with one 7×10-inch piece so I could hide the stage pop-out.
Pop-up Stage: (Watch the assembly video at the bottom of the linked page for Explosion Pop-Up before starting.) Because the stage in the Explosion Pop-Up set cuts into the card, I had to mark the card center and then die-cut the two parts of the stage on either side of the mark.
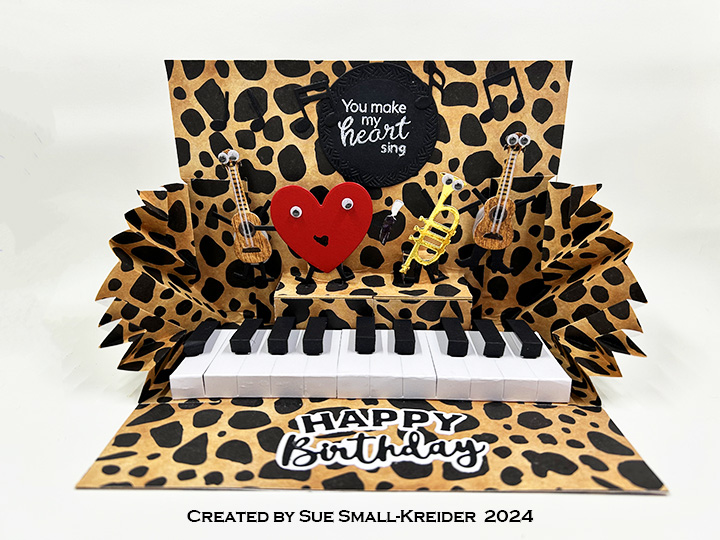
Explosion Side Panels: (Watch the assembly video at the bottom of the linked page for Explosion Pop-Up before starting.) Use paper rather than cardstock for the best results. As many times as I have made these panels, I always have to refer to the packaging or the assembly video to fold them correctly. Glue into the card before attaching the keyboard.


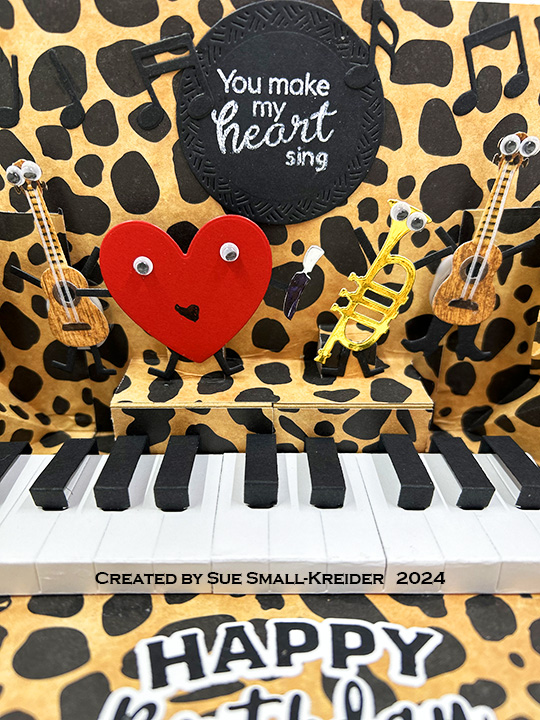
Piano Keys Pop-Up: This is a glue-in pop-up with good written directions on the packaging. You glue the black keys to the fold side without a tab with the bottom bar edge of the black keys piece lining-up to the bottom edge of the white keys. I added a second set of keys but had to trim off two white keys and one black key to fit into the Explosion card. (See photo above.) If you connect the two sets of keys inside with leftover strips from cutting the black keys, it will be easier to glue into the card. Attach the keys to stage pop-up and then glue the tab to the cardbase.
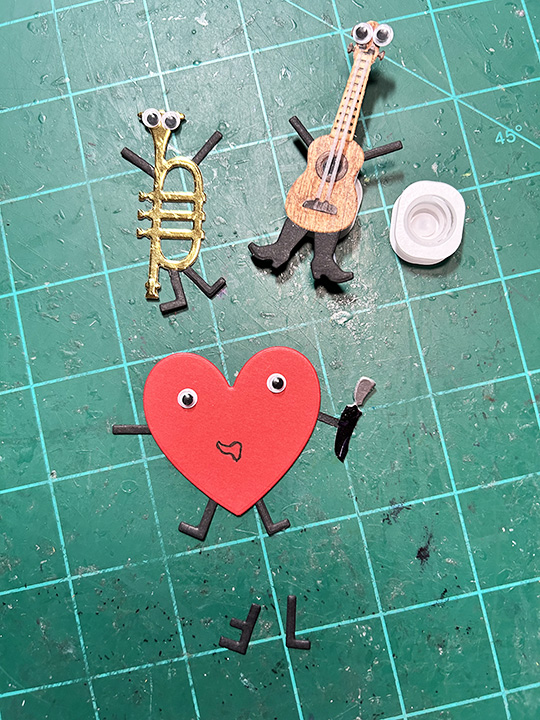
Characters: Assemble the guitar charm from the Music Charms set twice. (I cut the base from a woodgrain cardstock and the neck piece from white cardstock that was then inked with brown and stenciled with a black marker using the die stencil feature. The knobs were colored black, and the strings are cut from clear vellum and ends colored with a black marker.) Attach wiggly eyes, legs and arms. (One guitar I used legs made from the L and F of the Mini Alphabet, and the other I used the cowboy boots from the Tiny Accessories 3 set.) Glue to a mini wobbler spring before attaching to card.
The trumpet and heart are also made with the MiniAlphabet limbs of F, I and L and wiggly eyes. The heart has a hand-drawn mouth, and the microphone is the “i” from the Go Wild! sentiment set. The heart and trumpet are glued to the pop-up cubes atop the stage. The heart was cut from the Candy Hearts Box set.

There is a tiny white paw print on the back of the card that was cut from white cardstock and the paw pads colored with a black marker. This die comes from the Doghouse Tiny House Add-Ons set.

Sentiments: “Wild Thing!” is cut from two separate die sets – Go Wild! and the larger Alphabet set. Both words were cut from black and a pale-yellow cardstock with the layers staggered to create a sense of a shadow and to make them stand out on the dark background. They are glued on a heart cut from the Hearts – Crosshatch set.
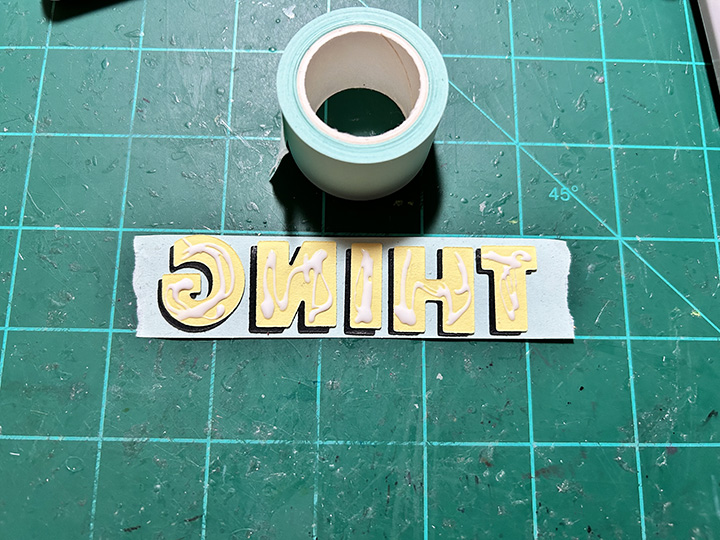


My trick for lining up the individual letters is to line them up on my grid mat and place low tack tape over them and then glue them in place while still on the tape. Attach to card and then once dry, peel off the tape.

The inside sentiments included a circle cut from the Circles – Crosshatch set that was stamped with a clear ink and then heat embossed with white detail embossing powder. The stamp is from the Music Sentiments clear stamp set. The die-cut “Happy Birthday” is cut from the Happy Birthday Lorna Add-Ons set with the shadow piece trimmed from its frame.
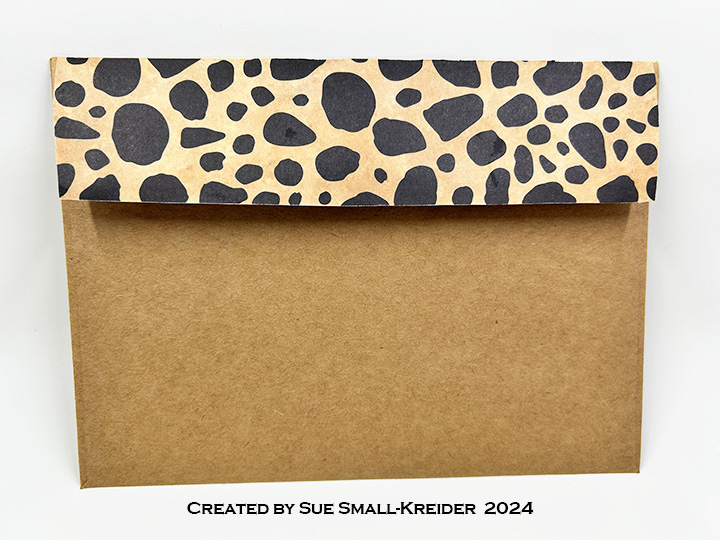
Envelope: The back flap of the kraft A7 envelope has spotted leopard paper glued to it.
___________________________________
Thank you for reading this blog post.
I hope this inspires you and makes you smile.
Please like and leave comments 😊
___________________________________
Materials Used:
Dies
- Karen Burniston in cahoots with Riley and Company – Happy Birthday Lorna Add-Ons – 1276
- Karen Burniston in cahoots with Riley and Company – Piano Keys Pop-Up – 1274
- Karen Burniston in cahoots with Riley and Company – Music Charms – 1271
- Karen Burniston in cahoots with Riley and Company – Candy Hearts Box – 1256
- Karen Burniston in cahoots with Riley and Company – Doghouse Tiny House Add-Ons – 1221
- Karen Burniston in cahoots with Riley and Company – Mini Alphabet and Numbers – 1197
- Karen Burniston in cahoots with Riley and Company – Hearts – Crosshatch – 1191
- Karen Burniston in cahoots with Riley and Company – Go Wild – 1128
- Karen Burniston in cahoots with Riley and Company – Tiny Accessories 3 – 1095
- Karen Burniston in cahoots with Riley and Company – Explosion Pop-Up – 1069
- Karen Burniston in cahoots with Riley and Company – Circles – Crosshatch – 1057
- Karen Burniston in cahoots with Riley and Company – Alphabet – 1053
Stamps
Papers
- The Paper Studio – 12×12 Printed Paper – Spotted Leopard
- The Paper Studio – 8.5×11 Clear Vellum
- Gold and Silver Foil Cardstock
- Black, RedWhite Cardstock
- Park Lane Paperie – A7 Cardbase and Envelope – Kraft
Ink & Embossing Powder
- VersaMark – Watermark Stamp Pad
- Recollections – Detail Embossing Powder – Snow
- Ranger – Tim Holtz – Distress Ink- Vintage Photo
- Pigma – Mircon 01 Fine Tip Pen – Black
- Sharpie – Permanent Marker – Fine Tip – Black
- Sakura – Gelly Roll Pen – Medium – White
- Sakura – Gelly Roll Pen – Black
Adhesives
Tools
- Die Cutting Machine
- Bone Folder
- Stamping Platform
- LDRS – Stampendable Stamping Tool
- Kat Scrappiness – Anti-Static Tool
- Heat Tool
- Stamping Blocks used as paperweights
- Scissors
- Pencil
- Ruler
- We R Memories – QuickStick
- Tweezers
- Tombow – Mono – Sand Eraser -512A
- Craft Mat
- Sponge Dauber
- Paper Masking Tape
Miscellaneous
- Art Impressions – Mini Action Wobblers
- Tiny Wiggly Eyes
