Flickering candles in a dimly light room, people singing along with the guitar man, these are the cues for this birthday card for a musician.
Using Paper Discovery dies and stamps designed by another musician, Olga Direktorenko, this was a quick card to make. The large guitar face die cuts a shaped folded card base using an 8.5-inch by 11-inch piece of kraft cardstock folded in half and then cut with the long straight edge of the die jutting out slightly over the fold. Using a specialty paper-backed wood, I cut an additional card front and adhered it to the shaped cardbase with double-sided tape. The details of the pick guard, bridge and soundhole are die-cut from cardstock with the six strings cut from pearlescent vellum.
Sentiments from two different stamp sets by Olga were used inside the card. “Life is a song. Sing it” and ”Happy Birthday.” Musical notes were also used from both sets on the envelope flap.
Thank you for reading this blog post. I hope this inspires you and makes you smile. Please like and leave comments 😊
Materials Used:
Dies
Paper Discovery by Olga Direktorenko – Music -play On – Guitar & Violin Card Front
Stamps
Paper Discovery by Olga Direktorenko – Music -play On – Sentiments
Papercraft Society Box 9 – Paper Discovery by Olga Direktorenko – Music
Papers
American Crafts – 12×12 Specialty Paper Backed Wood
This card was made for Craft Roulette #183 whose parameters included a card with ribbon, circus colors, September and hand cut.
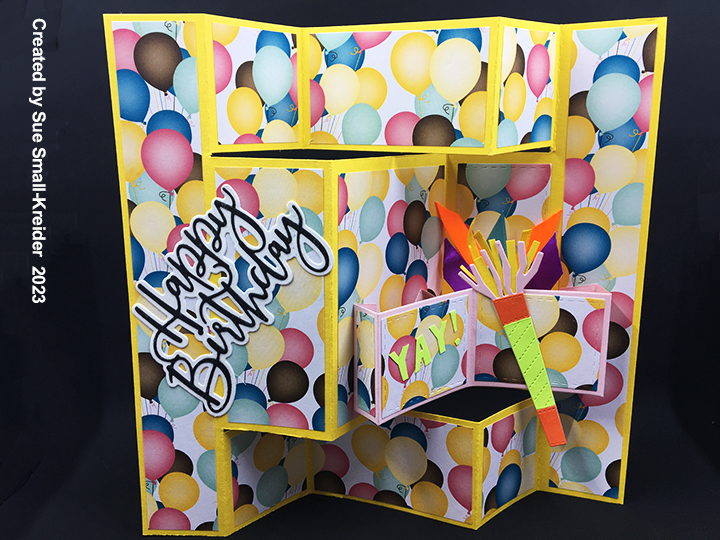
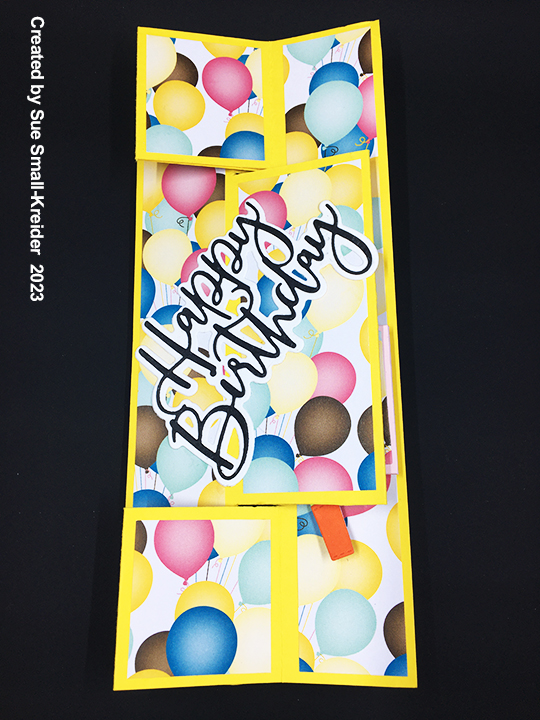
I made this card for a family member whose birthday is in September using a fancy fold display template that I had seen in a Die-cutting Essentials magazine a few years ago. I modified the template for an 8.5×11 inch piece of cardstock and to allow for the Karen Burniston Stocking Pop-Up mechanism that I wanted to use in it.
Cardbase
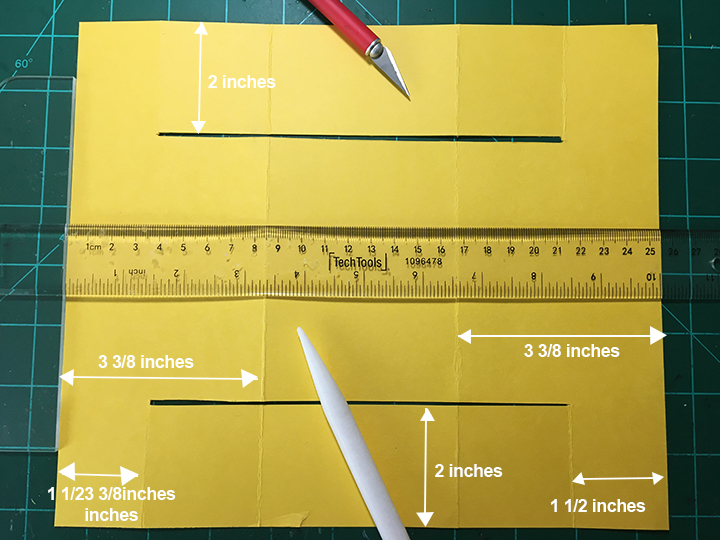
Cardbase: I started with an 8.5×10 inch piece of heavy yellow cardstock. Using a pencil and a T-ruler to mark where horizontal slots need to be cut as well as vertical scoring for the various folds. See photo for measurements. Measure the various sections and cut decorative paper 1/4 inch smaller than the measurement for each section. Glue in place before moving onto the mechanism. (I forgot and had to remove and then re-glue the mechanism.)
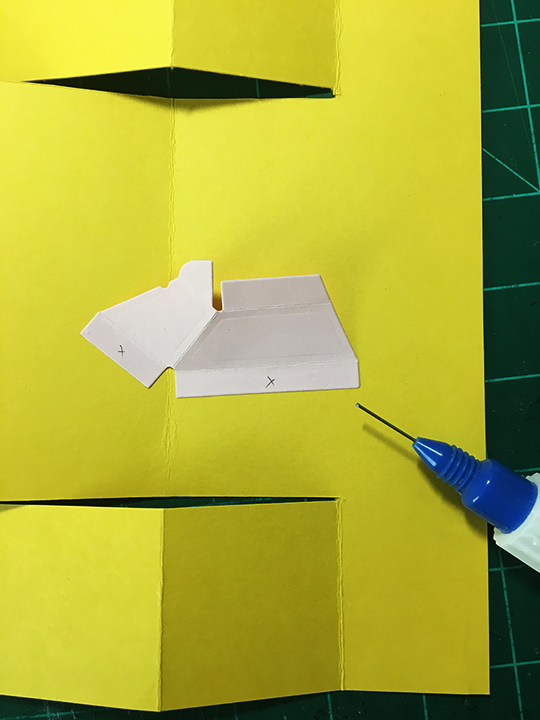
Lower MechanismTombstone piece on lower mechanism
Pop-Up Mechanism: (Watch the assembly video for the Stocking Pop-Up located at the bottom of the linked page before starting this portion of the card.) Play with the placement of the mechanism and noise maker using a temporary tape runner before committing to permanent glue. Make sure the noisemaker doesn’t create any catchpoints with the cardbase folds. Add ribbon to the pop-up “tombstone” shape using liquid glue and glue dots before attaching the top cover piece.
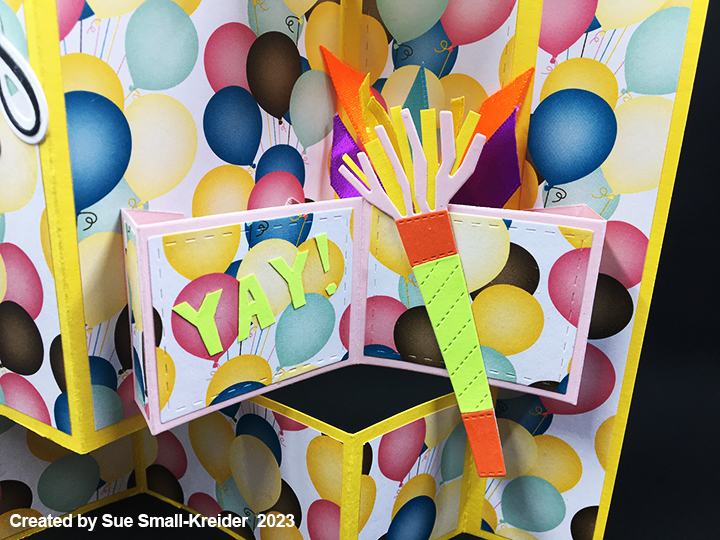
Sentiments: I used Chloe’s Happy Birthday dies for the white shadow behind the script words. I sketched out the word “YAY!” on green cardstock and fussy cut the pieces out.
Envelope: The card, when folded, fits into a #10 business envelope but will require extra USA postage for the weight and thickness.
Thank you for reading this blog post. I hope this inspires you and makes you smile. Please like and leave comments 😊
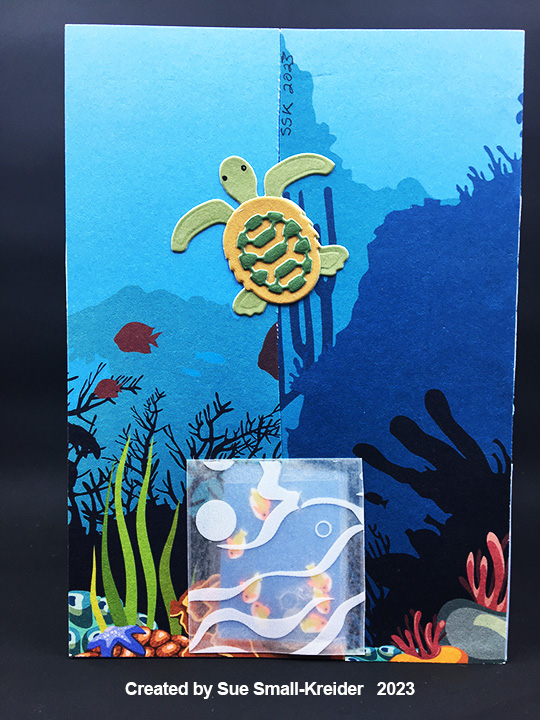
Cardbase: I started with an A5 (148 x 210mm or 5.875 x 8.25 inches) piece of heavy sea blue cardstock and folded in in half to form card that is (148 x 105mm or 5.875 x 4.125 inches) with a side fold. I had two sheets of the same A5 size printed underwater background. One I cut in half for the two panels inside. From the matching sheet I cut the decorative panels needed for the pop-up mechanism and used the remaining paper to cover the top half of the card front and the final two scraps to cover the card back. Any exposed areas on the outside of the card were covered with printed wave vellum.
Turtle Pop-Up: While the Stocking Pop-Up comes with a large stocking and Christmas decorations, you don’t need them to make the pop-up mechanism. I cut the large rectangular cover piece, the tombstone piece with baby tombstone and the triangular shaped piece with tabs from sea blue cardstock. I followed the directions on the packaging to assemble on to the card. (I practiced with some scrap cardstock first to get the placement right.) I assembled up to the point where I needed to glue the second tab of the large cover piece to the card. This so I could easily adhere the turtle to the mechanism.
Once I had the turtle from the Sea Animals die set assembled, I glued it to the large tombstone matching the upper edge of the turtle shell to the curve of the tombstone, so the arms and head of the turtle are above the tombstone. Next, I trimmed the tombstone down to fit the turtle’s shell.
Decorations: Plastic droplets were used on the card front along with trails of glitter gloss to simulate bubbles. A strip of vellum printed with waves adds to the sense of underwater motion.
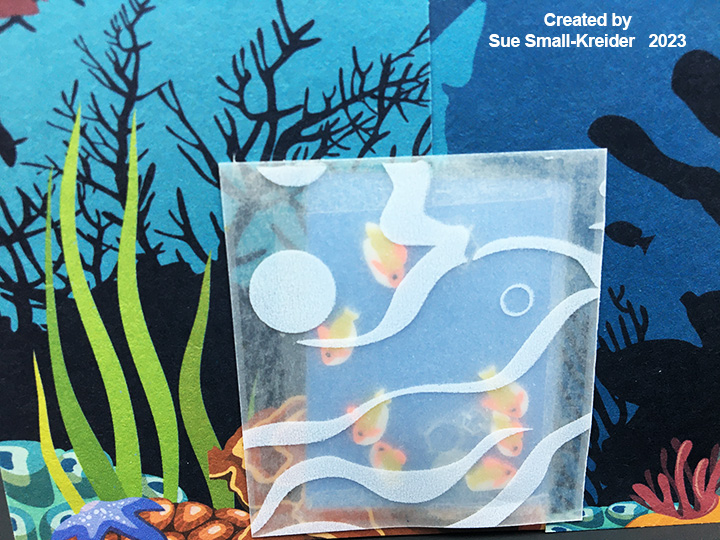
The back of the card uses scraps of the underwater paper with a turtle swimming upward. A tiny shaker element is under the vellum piece with tiny yellow and orange fish and clear sequins.
Sentiments: Three different die sets were used to create “Seas the Day.” The Mini Alphabet was uses for “Seas.” The “the” comes from Word Set 11 and “Day” is from Word Set 17. Both the Happy Birthday die and its shadow die were used. The shadow was cut from shimmer cardstock and the “Happy Birthday” was coated with glitter gloss.
Envelope: The A6 white envelope has a school of fish stamped on its back flap in blue ink.
Thank you for reading this blog post. I hope this inspires you and makes you smile. Please like and leave comments 😊
A lovely summer day in a Tennessee valley and the zoo animals are on a train outing to celebrate someone’s birthday.
This card uses Rubbernecker’s Animal Train slimline paper pad, some foam dots and a piece of clear packaging to create a cute interactive birthday card.
Cardbase: Cutting a 7 1/2 by 8 3/4-inch rectangle of white cardstock score and fold at 3 3/4-inches to make a folded cardbase of 3 3/4 by 8 3/4-inch. Glue a scenery page to card back panel.
Score and fold at 3 3/4 inchesCard back
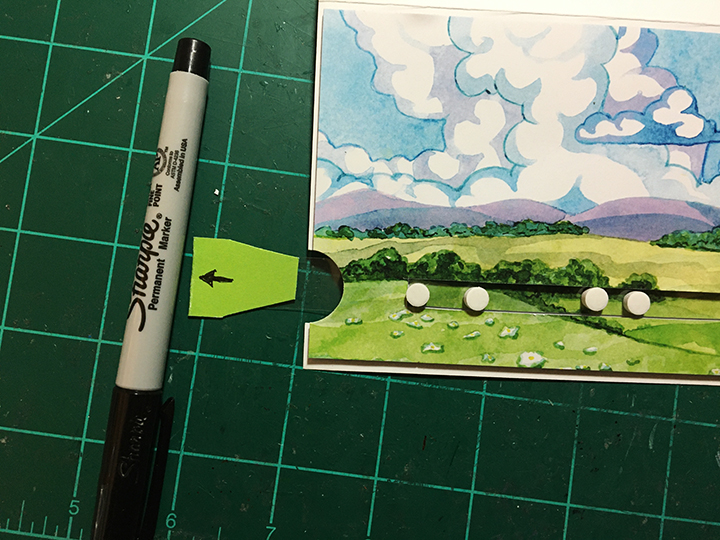
Slider Mechanism: Take a background scenery page from the paper pad. On the back side draw two lines in pencil at 7/8-inches from the bottom edge and the second at 2 5/8-inches from the top edge. (You may need to adjust the width of the slot to accommodate the height of your foam dots. My measurements are for 1/4-inch foam dots.) Measure 1-inch from the right side (backside right) and draw a line connected the previous two lines. On the left back side, measure 3/4-inch to connect the earlier lines. Use a craft knife and straight edge (metal ruler) to cut out slot. Save cut-out piece.
Center the scenery page over the front panel of cardbase. Mark the corners of the page on cardbase and trace the inside of the slot with a pencil. Using a circle punch cut a thumb hole (half circle) on the left edge centered off the penciled slot markings.
Glue the slot cut-out piece over the pencil markings on card front. Cut a piece of clear packaging that is 1/2-inch wide and at least 9-inches long. Lay the plastic piece over the slot cut-out. Add foam tape around the plastic leaving the thumb hole side open. (Make sure tape does not extend beyond the corner pencil marks as it will show when the scenery page is adhered on top the foam tape.) Once Scenery page is attached, remove plastic strip and use hole punch to cut thumb hole into scenery page. Insert plastic strip into slot and test for ease of movement. Assemble train and follow directions in Train section to attach it to slider plastic arm.
Train: Cut out train with sharp detail scissors. (There are coordinating dies that you can purchase from Rubbernecker if you do not like fussy cutting.) The trick to fussy cutting is to move the paper through the scissors and not the scissors through the paper. For the engine window, poke a hole and cut from hole to the corners and then cut out the window.
Glue the train together overlapping the hook-up bars. Cut out animals and flag. Glue flag to last car.
Position train above the slot with the flag just peeking over the card edge. Make sure plastic strip is pushed to the back stop of the slot. Add foam dots to plastic inside slot positioned two to the center of each train car and engine.
With plastic strip still pushed to back stop, trim plastic strip to left card edge. Cut a piece of coordinating green from paper pad to a 3/4-inch wide by 3-inch strip. Fold strip in half and attach to plastic strip with double-sided tape. (You may have to trim and taper the ends of the green strip to fit into the slot track depending on where your foam tape is.) With a black permanent marker, draw an arrow on the green tab to indicate the direction to pull.
Add a plastic strip to the train chimney and attach with a glue dot a fussy cut cloud of smoke. Glue animals onto the train. Peel off the foam dots’ backing paper and attach the train to the slider arm.
Sentiments: Stamp “Happy Birthday” on to a piece of white cardstock and fussy cut a cloud shape around it. Position the cloud on foam dots so that the smoke cloud on the train does not become a catchpoint with the birthday cloud when the slider is pulled open. Decorate the sky with remaining images of smoke clouds, bird and butterfly, using foam squares and glue dots. The inside sentiment is a computer generated one which can be downloaded below.
Last week I went to a cardmaking class taught by Donna Butler and had a chance to catch-up with some friends I hadn’t seen in a while. Here are the cards I made.
FRACTURED SHUTTER CARD
Here is a video that shows the Fractured Card or Faux Shutter technique.
SO REFRESHING CARD
Donna’s daughter Sarah designed this refreshing notecard.
IRRESISTIBLE BLOOMS CARD
Thank you for reading this blog post. I hope this inspires you and makes you smile. Please like and leave comments 😊
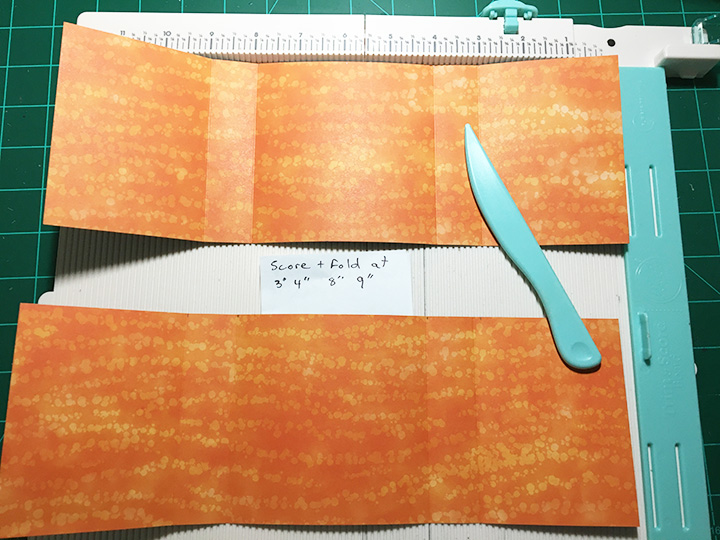
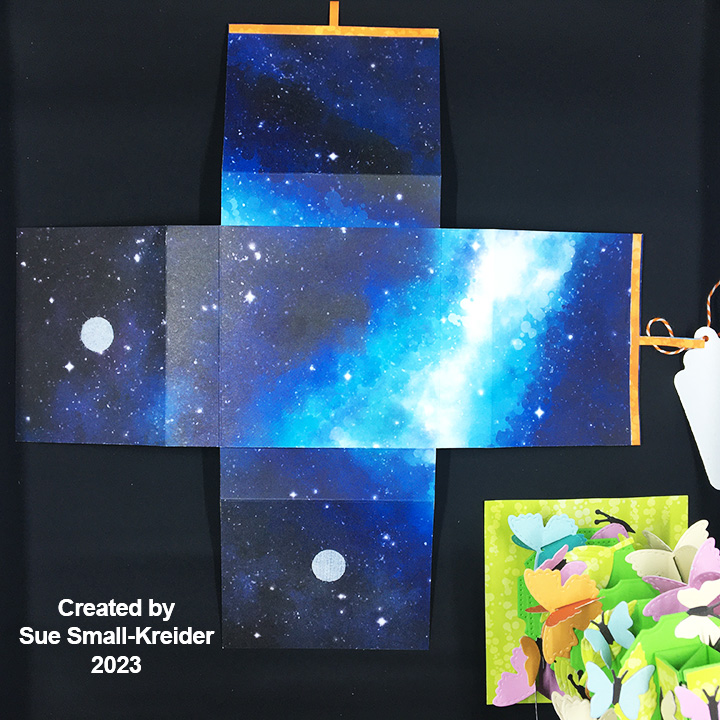
Box: The box is made of double-sided decorative cardstock cut into two 12 x 4 inches rectangles scored and folded at 3 inches, 4 inches, 8 inches and 9 inches. The middle squares are glued together to form a cross. Using strips of decorative paper for pull ribbons glued to the middle of each flap, I glued the remainder of the strips as a bottom flap border. Two adhesive-backed hook and ladder fasteners are the closures.
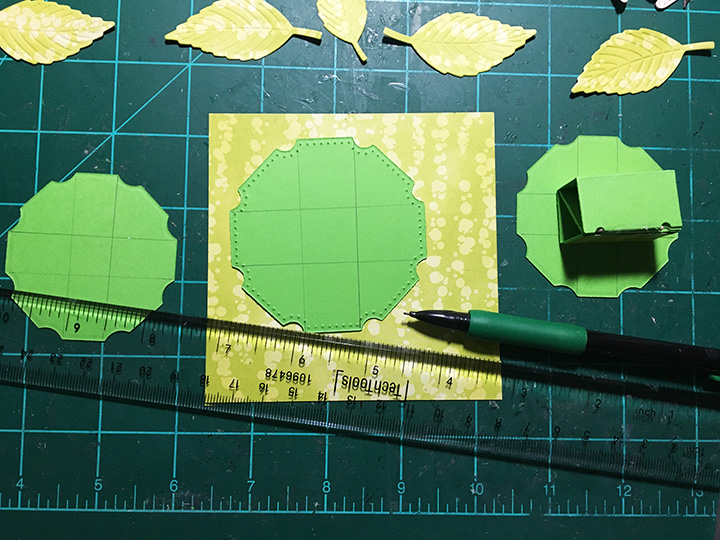
Tree: Utilizing the Bam Box die set, I cut six of the bam box strips, 13 of the bam box decorative rectangles and three each of the largest two fancy circles in the set from green cardstock. Because I like to let the glue dry before adding the rubber bands to bam boxes, I glue in stages. (See assembly video located at the bottom of the linked page and source of tiny rubber bands.)
Glue the decorative panels to the sides of each bam box for added thickness. (By sides I mean the sides that have the diagonal flap beside them. Not the side that has the smiley face or its parallel side.) These will be the sides seen between the layers of circles.
To assemble the tree, mark in pencil the location of the bam boxes on the bottom of each circle except one of the largest. Glue bam boxes to bottoms of five circles. The sixth bam box will be the top and the leftover, large circle will be the bottom.
To finish the tree assembly, alternate the direction of the diagonal inside flaps of the bam boxes, so that they make a zig-zag pattern when looked at from the side. By alternating the direction, the bam boxes will fold flat, and the tree will flatten into an oval shape. Use glue to attach each level. Once the tree is assembled, close or flatten the tree to position it on to a 4-inch square of green decorative paper that acts as the base for when the tree is in the box. Glue the tree to the square base.
Butterflies: (Watch the video at the bottom the linked page before starting.) Using the Butterfly Collage Add-ons die set, die cut all the dies from one color of doubled sided paper. Repeat with three other colors of paper. Die cut from black all non-moving butterflies four times.
Assembling the non-moving butterflies, use the black pieces as the base that the trimmed colored paper wings are glued to. On the double-winged one bend the wings up from the black body.
To attach the butteries to the tree, play with the positioning of the fluttering large butterflies on the tree in the closed position. If the butterfly stays within the green square base, it can be glued in place. I found that the flutter butterfly piece with the slot cut into it needs to be the piece glued to the tree, making sure the slot is not obstructed so the other piece can freely flutter.
I used green leaves cut from the decorative base paper to fill-in areas of the circles that were too close to the square’s edge when closed. Add in non-moving butterflies checking their position when tree is closed and that they are not creating catchpoints for fluttering butterflies.
Tag: My favorite gift tag to use for sentiments is in the Tag Book Pop-Up set. I stamped and heat embossed the sentiment. Baker’s twine was used to tie the tag onto the pull-up loop.
Thank you for reading this blog post. I hope it has provided some inspiration.
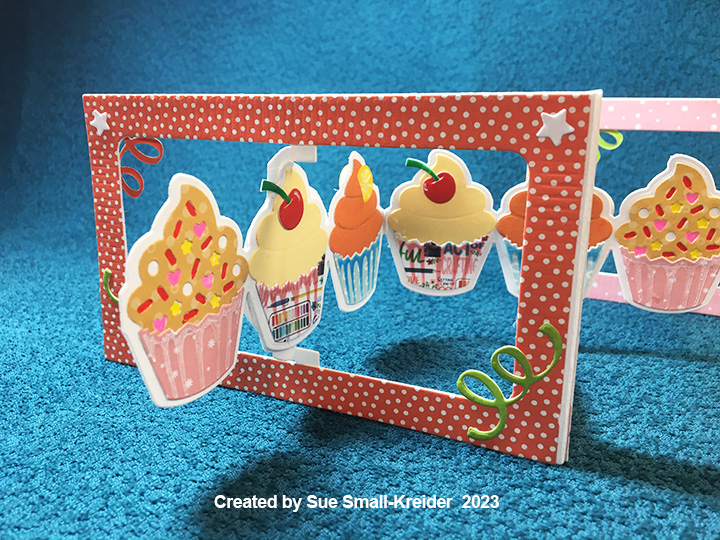
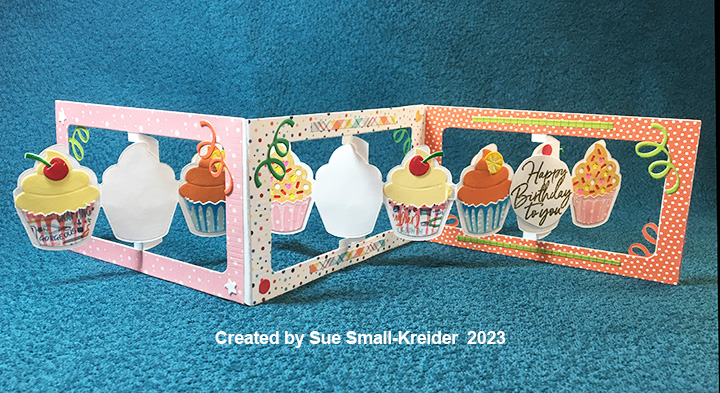
Accordion Frame: (Watch assembly video at the bottom of link page.) Cut three frames from heavy white cardstock using the Landscape Rectangle Accordion set. Trim the rectangle panel to just a pivot post. Cut a total of six frames from patterned papers and cut out the pivot panels and tabs from all to have decorative frames. Glue the white frames together as shown in video. Adhere the decorative frames. Trim off unused tab.
Cupcake Panels: (Watch assembly video at the bottom of link page.) Cut four of the cupcake panel die from the Cupcake Add-ons set from white cardstock. Cut a total of 15 of the cupcake icing piece from different papers. (I cut six from three different papers coating the yellow and orange papers with a glitter gloss. the sprinkles were die cut into the icing piece and colored with fine-tipped markers and gel pens.) Cut a total of 15 of the cupcake paper piece from different papers. Using die, stencil shadows onto cupcake papers. The sprinkles die and cherry decoration dies are included in the Cupcake Add-ons. The orange slice is from the Happy Hour Charms set. Adhere cupcakes to fronts of three of the white panels. Cut fourth panel apart into thee separate cupcake outlines. Glue decorated panels to pivot posts on frames. Decorate backs of panels using the white cupcake outlines to cover the pivot posts and the remaining six cupcakes to cover ends of panels. Glue the panels together using tabs. trim off unused tab.
Decorations: The ribbon streamers are in the Cupcake Add-ons set along with the hearts. The stars and circles come from the Paper Frames Pop-Up. Strips of decorative papers were also used from my scrap bag.
Sentiment: The white cupcake panels on the back are for either personal messages or the heat embossed happy birthday sentiment. When the card is closed the main sentiment is visible.
Thank you for reading this blog post. I hope this inspires you and makes you smile. Please like and leave comments 😊
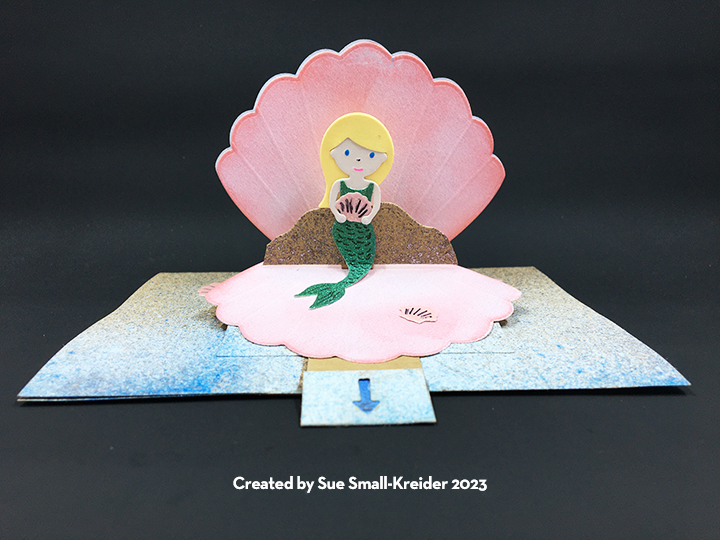
With a nod to Botticelli’s The Birth of Venus painting and Hans Christian Anderson’s The Little Mermaid story, this birthday card is full of birthday shell-ebration!
Card Base: Starting with a 5 1/2-inch by 8 1/2-inch rectangle of heavy kraft cardstock, Fold in half to form a top-fold A2 card. Create a finger hole in the center of the bottom edge, cut a half circle through both layers using a 3/4-inch circle punch. Spray both sides of the cardbase to create a sand effect with brown and gold mica and glitter sprays. Let card base dry for an hour or two and place between sheets of paper with weights on top to have it dry flat.
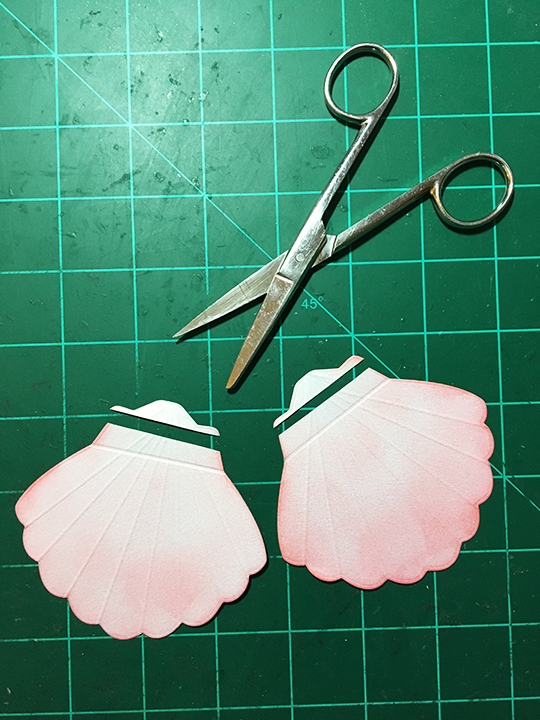
Pop-Up Shell: Cut three shell shapes from creamy white shimmer or pearlescent cardstock using a scalloped shell die approximately 3 1/2x 3 1/2-inches in size. (I used one by Frantic Stamper.) Ink the shimmer side of two of the shells pink and the remaining one blue. Using a score board with one channel marked in black, score the shells from center tip to dips between scallops on the shimmer side of the cardstock. Trim off the end of the pink shells to fit the flap of the mechanism.
Pop-up Mechanism: Watch the die assembly video for the Frame Pull-Pop-up set located at the bottom of the link page. before, cutting the two pieces with smiley faces. Glue the pull tab to the base piece. Trim off the corners as shown in photo. (I attached the brown kraft base to the card using strong doubled-sided tape instead of staples. Next, I did a light spray of white ink for sea form and a spritz of blue for water along the bottom edge of the card to blend in the base to the card.) Glue one of the pink trimmed shells to the base piece matching the trimmed edge to the tab. Put glue on base shell tab. Add the second pink shell with pink sides together to form top half of pop-up pull frame. Make sure shells are perfectly aligned overreach other. Test to make sure mechanism works properly and let glue dry. Glue blue shell to back of top shell, aligning all the edges. Test mechanism and adjust as needed.
Mermaid on Rocks: Follow the images on the Princess and Mermaid packaging to create mermaid. (I used stencil feature of the die to draw on fish scales on glitter cardstock using a permanent ink marker.) Cut the small pop-up mechanism in the Frame Pull-Pop-up set and glue inside pop-up shell. Glue on rocky backdrop from Small Scenes Bam Box. (I spritzed my rock with brown paint and had to trim the ends to fit inside my shell.) Fold mermaid to fit into the shell and glue in place. Add shell(s) from the mermaid set for decorations.
Sentiments: For “Shell-ebrate!” I used a shell charm from the Sea Charms set and trimmed off “Cel” from the Celebrate! die. The hyphen is cut from the “l.” Inside the card is “Happy Birthday using both the Happy Birthday and Happy Birthday Shadow sets. I cut two large shells from plain white cardstock and scored as shown before for personal message labels on the inside and back of card.
Envelope: The card fits into an A2 invitation envelope. I decorated the back flap with a glitter shell cut using the Sea Charms set.
Thank you for reading this blog post. I hope this inspires you and makes you smile. Please like and leave comments 😊
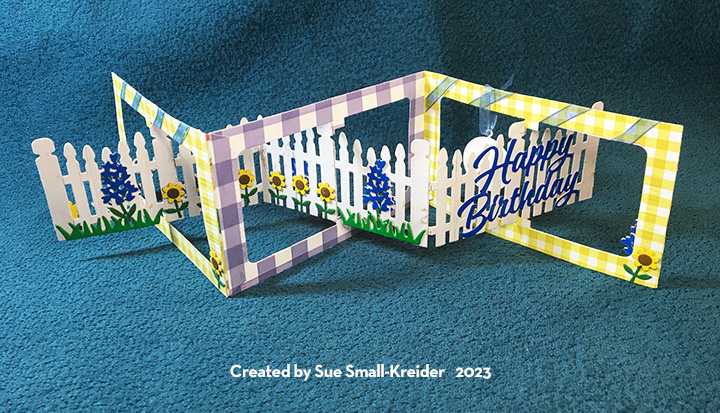
Today I’m featuring a picket fence accordion card using the new Fence Landscape Accordion Add-On die set which includes two kinds of flowers and some grass. Along with the previously released Landscape Rectangle Accordion set, this add-on lets you make a two or more panel interactive card. (I have made a similar card before, but I had to fussy cut the fence out. This die is a time saver.)
Cardstock needed for fence and frame should be of a heavyweight if cut in one layer, but lighter weight patterned papers can be used, but you will need to back them with more cardstock. (I used double-sided cardstock for my gingham frames and a single sided woodgrain paper for my fence and cut two layers for fence and frame.)
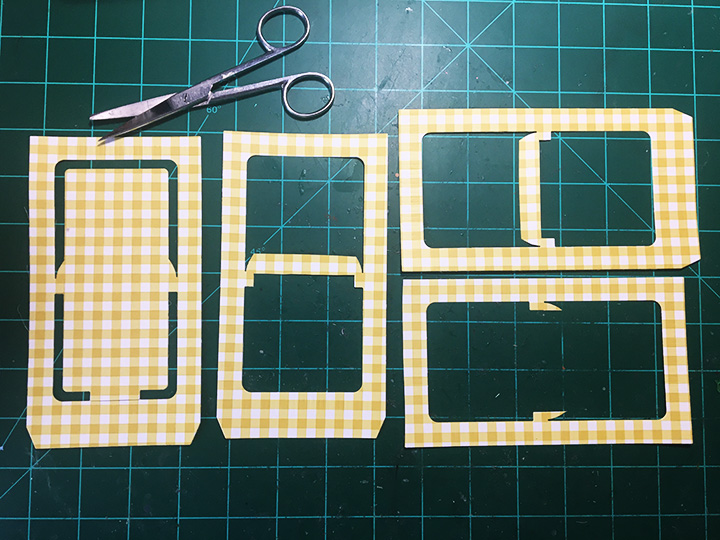
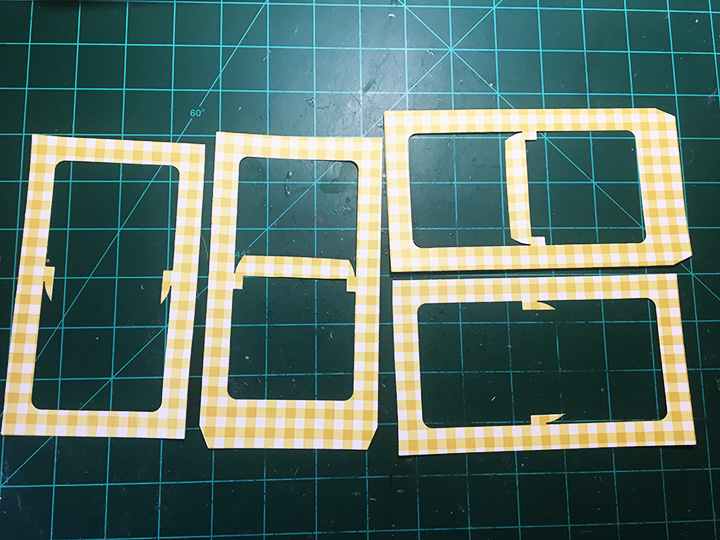
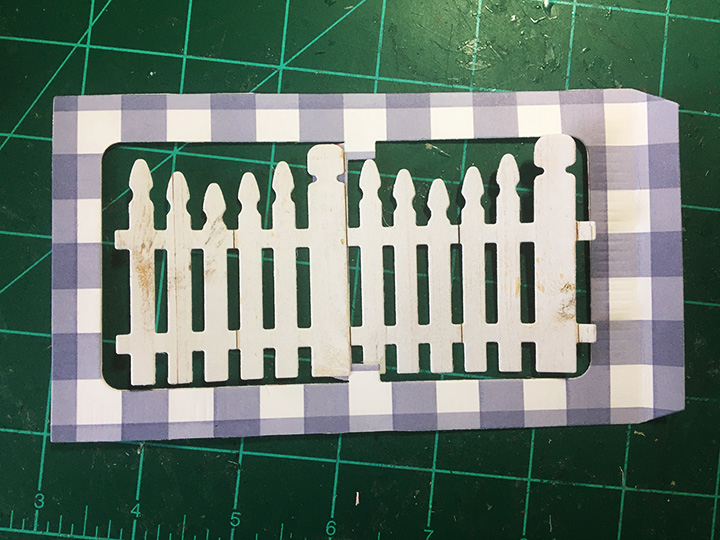
Accordion Frames: I cut four frame panels from a yellow-green gingham cardstock and two frame panels from a larger blue gingham cardstock. Two of the frame panels I trimmed the inside rectangle panel down to a center bar for the fence post to be glued onto. The other two panels I cut away the entire rectangle, leaving only the small pivot wings. (While I cut off the tabs on the pivot wings only frames, I would recommend waiting to trim off the tabs until you are ready to assemble the three panels together. I made a mistake in my assembly and had to patch in a tab that I had cut off earlier.)
The other two panels I cut away the entire rectangle, leaving only the small pivot wings. (While I cut off the tabs on the pivot wings only frames, I would recommend waiting to trim off the tabs until you are ready to assemble the three panels together. I made a mistake in my assembly and had to patch in a tab that I had cut off earlier.)
Repeat the trimming of the blue checked frames to have one frame with the center bar and one frame with the pivot wings.
Glue three sides of each set of frames (one center bar and one pivot wings) together leaving the tab side with no glue. (You will need to be able to hide the tab of the adjacent panel by gluing it between the layers of the frame.)
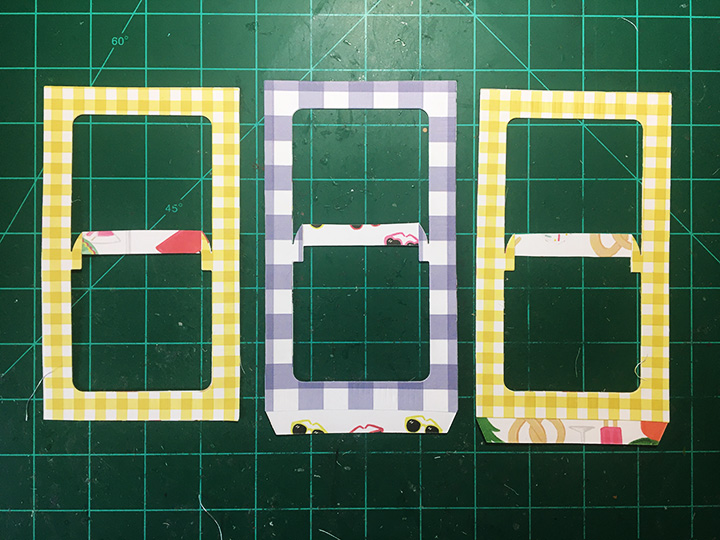
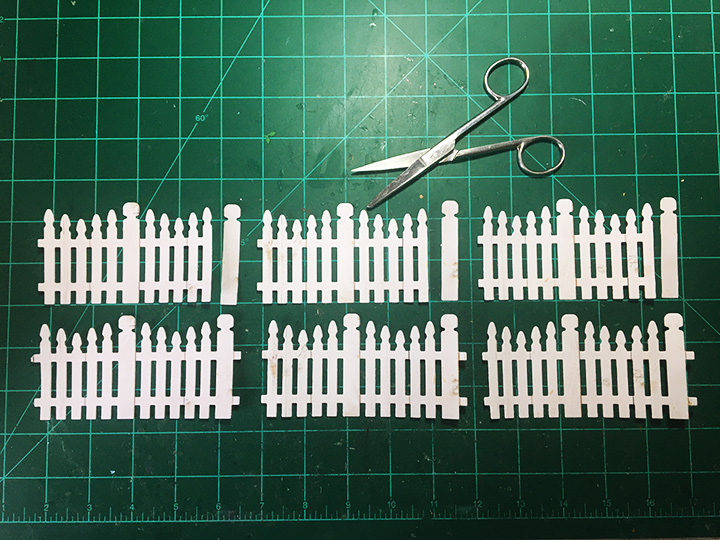
Fence: I cut six fence panels from woodgrain paper. (If I had to do it again, I would use a single layer of solid white card stock to eliminate the need for the next step.)
I trimmed of the end fence post on the three fence pieces that would be backing pieces, removing the tabs as shown.
Glue the front fence piece to the center bar. You may want to trim the center bar some to be hidden behind the fence post. Turn over panel and glue the back fence piece to the front piece, piecing in the separted post.
Place weights over glued fence layers so they dry flat. (I used clear stamping blocks and my cell phone as weights.)
I forgot and glued shut my layers on the frames, so I covered over the tabs with the tabs that had been cut off. I recommend decorating the fence before you glue the fence tabs together.
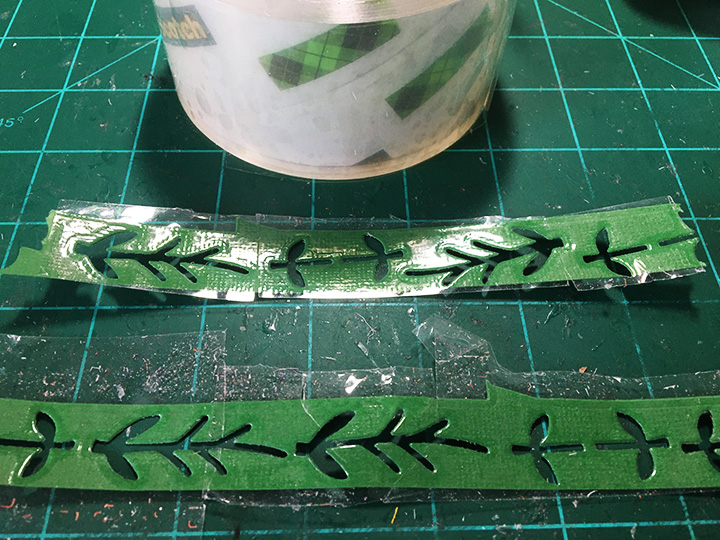
Flowers: I tried something I had seen Karen Burniston do in one of her videos where she covered her cardstock with clear packing tape before die-cutting into it to get shiny pieces. I did this for my green leaves and stems. For the grass I used shiny green cardboard packaging.
For the flower heads, I used shiny cardboard packaging from a well know yellow cereal box and a shiny piece of blue junk mail. I cut a front and a back for each flower head as some will show through the fence. (This made for thick, dimensional flower heads.) The stems were sandwiched between the flower heads’ front and back layers. I made an assembly line for making the 12 yellow flowers using glue and a Quikstick to pick-up and place the tiny brown centers on the flowers. When placing your flowers on the fence, remember not to place anything that will be a catchpoint below the fence or above the fence post. (I had thought about adding a small bird to the top of the fence, but it was too tall.)
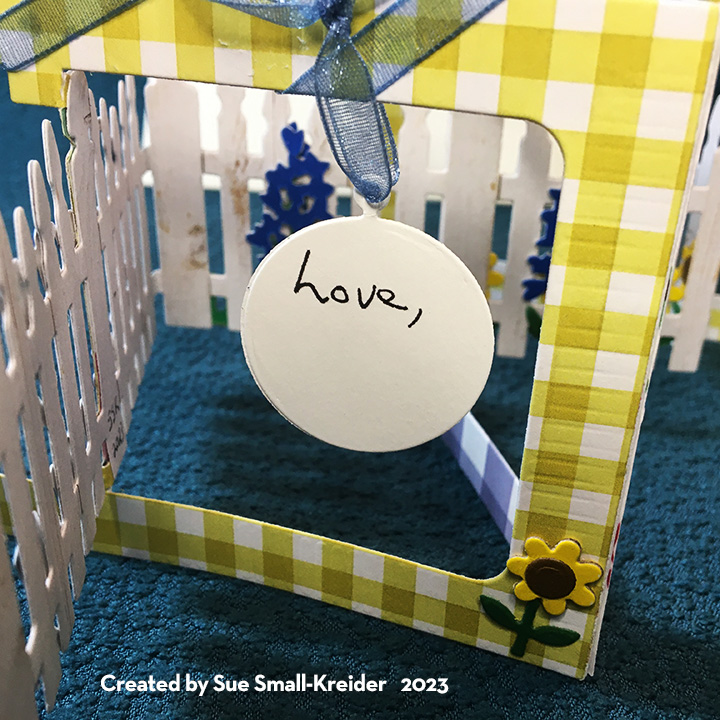
Sentiments: For the front of the card, I used the “on your Big Day” from the newly released Word Set 17 – Congratulations. On the back of the card, I used the previously released “Happy Birthday” die set. I also added a circle charm from the new Game Charms to write a personal message with a piece of ribbon. (You could also use the large circle charm in the Sports Charm set.)
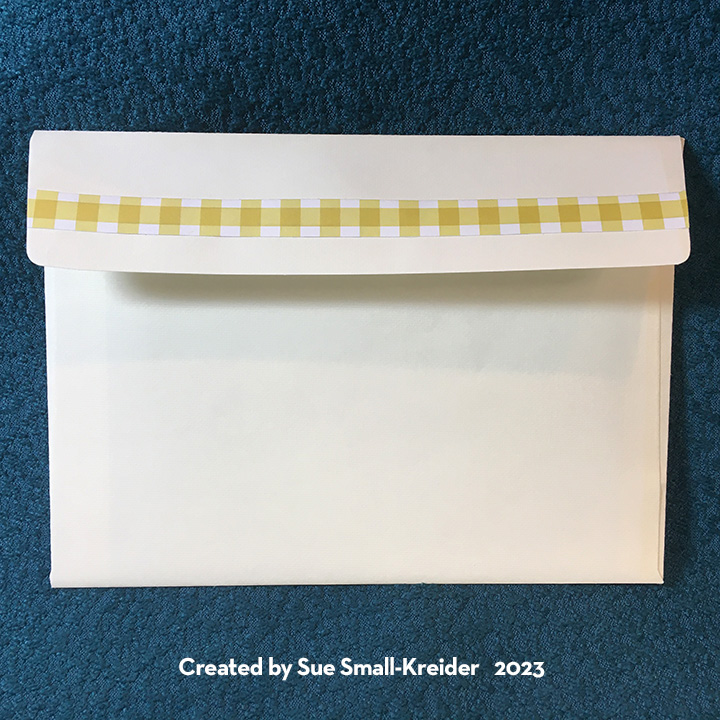
Envelope: This card fits into an A6 envelope that I glued a strip of gingham cardstock to its back flap.
Thank you for reading this blog post. I hope this inspires you and makes you smile. Please like and leave comments 😊