A Snowy Pines Card

It’s Sneak Peek Week for Karen Burniston’s November 2025 Release of new dies and stamps.
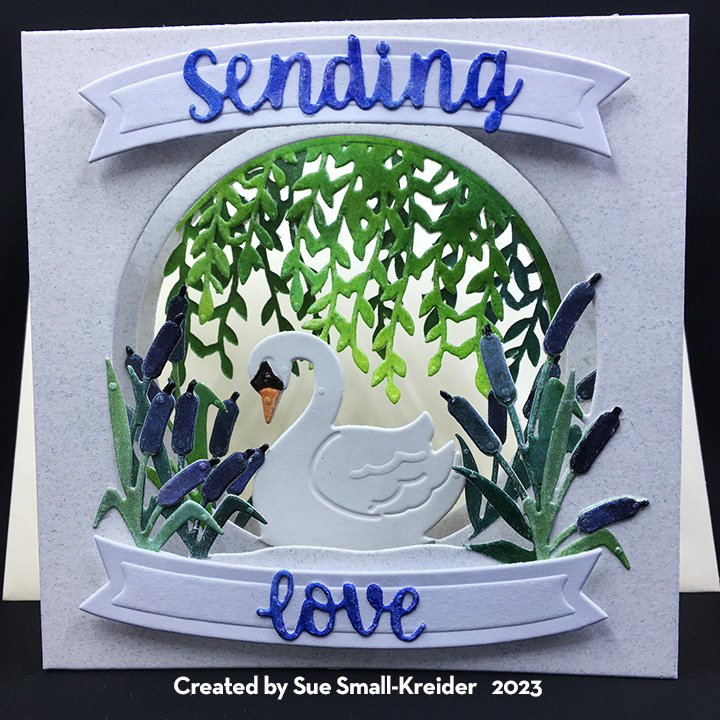
Today’s card uses a new die and a new stamp set – Pine Cone and Quiet Forest. It also uses the previously release dies of Pattern Plate – Swirls and Snow Charms. The new dies and stamps will be available for pre-order starting November 24, 2025.

Cardbase: I cut an 8.5×11 sheet of white 65lb. cardstock in half to create two 5.5×8.5-inch rectangles that I fold in half to make side-fold A2 cardbases. Cut one cardbase into two 4.25×5.5 panels.

Swirls Background: Tape a white 4.25×5.5 panel of cardstock to the Pattern Plate – Swirls die and using the embossing sandwich for your die cutting machine, and emboss the pattern into the cardstock. Color the swirls with a glitter marker of icy blue. Trim panel down to 4×5.25-inches. Glue panel to card front.

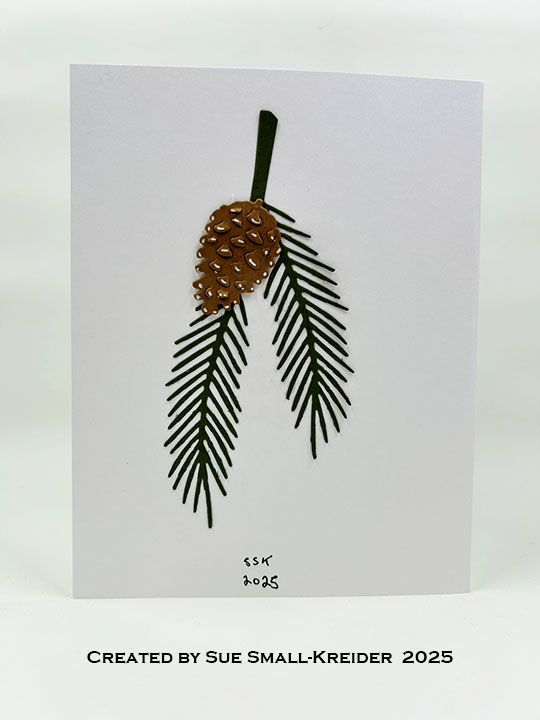
Pine Cones: Watch the video above to see how I made the pine cones using Karen Burniston’s Pine Cone dies.

Skates and Snowflakes: The skates and snowflakes were cut out using the Snow Charms die set. The three skate dies were cut from white cardstock and colored with markers before gluing together. The snowflakes were cut from white gold shimmer cardstock.

Sentiments: All the sentiments come from the Quiet Forest stamp set and are cut out with the Greeting Labels die set.

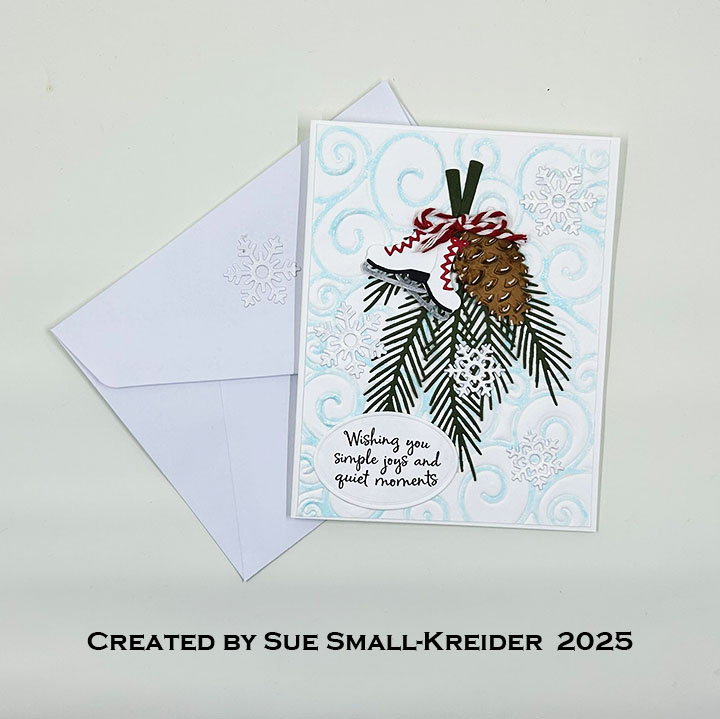
Envelope: The card fits in an A2 (4.25×5.5-inch) size envelope with a snowflake glued to the back flap.

Materials Used:

Dies

Stamps

  • Karen Burniston in cahoots with Riley and Company – Clear Stamps – Quiet Forest

Papers

  • Bazzill – 8.5×11 Cardstock – Rain Forest
  • Recollections – 8.5×11 65 lb. Shimmer Cardstock – White Gold
  • Brown and White Cardstock
  • A2 Envelope – White

Ink

  • American Crafts – Metallic Marker – Silver
  • Memento – Fade Resistant Dye ink – Tuxedo Black
  • Ranger – Tim Holtz – Distress Ink- Vintage Photo
  • Pigma – Mircon 01 Fine Tip Pen – Black
  • Sakura – Gelly Roll Pen – Medium – White
  • Scrapbook.com – Shimmer Glitter Brush Marker – Frosty Blue
  • Sharpie – Permanent Marker – Chisel Tip – Black
  • Sharpie – Permanent Marker – Fine Tip – Red

Adhesives

Tools

  • Die Cutting Machine
  • Paper Trimmer
  • Bone Folder
  • Score Board
  • Stamping Platform
  • LDRS – Stampendable Stamping Tool
  • Stamping Blocks used as paperweights
  • Scissors
  • Tweezers
  • We R Memories – QuickStick

Miscellaneous

  • Red & White Bakers Twine

Rainbow Bridge Card

It’s the Karen Burniston design team challenge for July 2025 using the theme of Rainbow. I choose to make a sympathy card for a pet using the new Rainbow Add-Ons and the previously released Flip Frame Pop-Up, Cat and Dog, and Rectangles and Labels – Crosshatch die sets along with the Rainbow Greetings stamp set.

Watch the process video to see how I made this card.

Cardbase: I started with a purchased side-fold 4×6-inch A6 cardbase. Cover the four panels with decorative papers cut using the scalloped edge die in the Rectangles and Labels – Crosshatch set. Use the large frame die in the Flip Frame Pop-Up set to cut the card front frame. The dog comes from the Cat and Dog die set. I inked the white dog slightly with gray ink and used a fine tipped black marker to stencil in his face and paw areas.

Rainbow Flip Pop-Up: Watch the assembly videos for the Flip Frame Pop-Up and Rainbow Add-Ons located at the bottom of each linked die set.

Sentiments:  All the sentiments used on the card come from the Rainbow Greetings stamp set and are stamped in brown ink. They are cut out using the two smallest label dies in the Rectangles and Labels – Crosshatch set.

Envelope:  The card fits into an A6 (4×6-inches) size envelope.

___________________________________

Thank you for experiencing this blog post.

I hope this inspires you and makes you smile.

Please like and leave comments 😊

___________________________________

Disclaimer: Karen Burniston products are provided free of charge by the manufacturer for review and use. All other items were personally purchased. Compensated affiliate links used where or when possible, meaning I will receive a small percentage commission from these manufacturers at no cost to you. This will allow me to add more content to my YouTube channel and help out a lot. Thank you.

Materials Used:

Dies

Stamps

Papers

  • Darice – 8.5×11-inch Single-Sided Paper – Green Prints
  • Concord & 9th – 8.5×11-inch Solid 80 lb Cardstock – Poppy, Marmalade, Buttercup, Clover, Peacock, Eggplant, Spout, Oceanside
  • Green and White Cardstock
  • Park Lane Paperie – A6 Cardbase & Envelope – Cream

Ink

  • Memento – Fade Resistant Dye ink – Espresso Truffle
  • Pigma – Mircon 01 Fine Tip Pen – Black
  • Ranger – Tim Holtz Distress Ink – Lost Shadow

Adhesives

Tools

  • Die Cutting Machine
  • Paper Trimmer
  • Bone Folder
  • Score Board
  • Stamping Platform
  • LDRS – Stampendable Stamping Tool
  • Stamping Blocks
  • Scissors
  • Paper Masking Tape

Miscellaneous

  • Green Gem
  • Green Satin Bow

Here For You – A Card of Comfort

This card was made using stamps, stencils and dies from the February 2025 Scrapbook and Cards With Love event. I made it before the event based off a design by DannaJoy.

Cardbase:  Cut a 4.25×11-inch rectangle from white cardstock. Fold to make a top-fold A2 (4.25×5.5-inch) card base. Cut a 4.25×5.5-inch rectangle of white cardstock and emboss it using the brick stencil.

(Use the embossing sandwich for a die as recommended for your die cutting machine.) Then glue the brick panel to the front of card.

Letters:  Cut four of the Letter A die from four different colors. Ink blend the edges and stamp on postage stamps and cancellation marks. Stamp on sentiments to three envelopes. Cut one of the string bow piece and place two envelopes behind it making string look like it is wrapped around the bundle. Arrange and then glue onto front of card. rub some water-based blue ink on a palette and wet with water. Pick up diluted ink on a small brush tip and splatter across card.

Sentiments:  Stamp on the inside “big hugs” in black and “made with love” on the card. “Smiles” with a heart is stamped in blue on the back envelope flap.

___________________________________

Thank you for experiencing this blog post.

I hope this inspires you and makes you smile.

Please like and leave comments 😊

___________________________________

Disclaimer: Karen Burniston products are provided free of charge by the manufacturer for review and use. All other items were personally purchased. Compensated affiliate links used where or when possible, meaning I will receive a small percentage commission from these manufacturers at no cost to you. This will allow me to add more content to my YouTube channel and help out a lot. Thank you.

Materials Used:

Dies

  • Scrapbook and Cards Today’s With Love Feb. 2025 workshop kit – Letter Dies

Stamps

  • Scrapbook and Cards Today’s With Love Feb. 2025 workshop kit – Clear Stamps

Stencil

  • Scrapbook and Cards Today’s With Love Feb. 2025 workshop kit – Brick Stencil

Papers

  • 8.5×11-inch 100 lb. Cardstock – White
  • 4.25×5.5-inch 80 lb. Cardstock – White
  • Blues, Pink and Yellows Cardstock Scraps
  • Fraser Papers for William House – A2 Envelope – Genesis Text Milkweed Smooth

Ink

  • Memento – Fade Resistant Dye ink – Tuxedo Black & Paris Dusk
  • Pigma – Mircon 05 Fine Tip Pen – Black

Adhesives

Tools

  • Die Cutting Machine
  • Paper Trimmer
  • Stamping Blocks
  • Scissors
  • Craft Mat
  • Sponge Daubers
  • Paper Masking Tape

Let The Music Play – A Sympathy Card

It’s time for the August 2024 Karen Burniston Design Team Challenge with the theme of LET THE MUSIC PLAY.

While normally I would choose to make an uplifting card for the monthly challenge, I needed a sympathy card for an organist who had recently passed.

The cardbase is made from a 7 1/4 x 8 1/2-inch rectangle of patterned cardstock folded in half to make a top-fold 3 5/8 x 8 1/2-inch slimline card. The inside is covered with strips that are 2 5/8 x 8 1/2-inches.

For the pop-up bar inside, I used a 4 3/4 x 8 1/2 – inch piece of patterned paper that was scored and folded at 1 1/8, 2 1/4, 3 3/8. And 4 1/2 inches.

___________________________________

Thank you for reading this blog post.

I hope this inspires you and makes you smile.

Please like and leave comments 😊

___________________________________

Materials Used:

Dies

Papers

  • Stamperia – 12×12 inch Double-Sided Papers – Music Scrapbooking
  • Black, Red and White Lightweight Cardstock
  • #10 Business Envelope – Ivory

Ink

  • Pigma – Mircon 01 Fine Tip Pen – Black

Adhesives

Tools

Summer Sympathy Basket

Sympathy cards are never easy cards to do. I think of making them as part of my own grieving process, putting in loving thoughts to those left behind.

Karen Burniston’s Wide Woven Basket has become my go to for sympathy cards tailoring the flowers and decorations to the individual who has passed.

I use the following Karen Burniston dies Woven Basket Box Card, Wide Woven Box Card, tag from Tag Book Pop-Up, flowers from the Flowers and Bee and Flower Pot Pop-Up, and With Sympathy sentiment. I also tried the new Small Scenes Bam Box to pop-out the basket when pulled from the envelope. Nuvo Drops were used to make the small flowers’ centers.

(Please watch the assembly videos for the various dies that are located toward the bottom of each die set’s link page before starting a card.) For a detailed tutorial of a sympathy basket click here.

The folded card fits into a catalog 6×9 inch envelope. To mail the card, I fold a sheet of 8 1/2 x 11-inch white cardstock in half to fit inside the envelope and cushion the card in the mail.

Thank you for reading this blog post. I hope this inspires you and makes you smile. Please like and leave comments 😊

Materials Used:

Dies

Stamps

  • Waffle Flower – Clear Stamps – Sweet Sentiments -271296

Papers

  • Colored Cardstock
  • Matte Gold Cardstock
  • White Heavyweight Cardstock
  • White Catalog 6×9 Inch Envelope

Ink

  • VersaMark – Watermark Stamp Pad

Embossing Poweder

  • Papercraft Society – Embossing Powder – Matte Gold

Adhesives

Tools

  • Die Cutting Machine
  • We R Memories – QuickStick
  • Stamping Platform
  • LDRS – Stampendable Stamping Tool
  • Stamping Cloth
  • Kat Scrappiness – Anti-Static Tool
  • Scissors
  • Tweezers
  • Heat Tool
  • Ball Tipped Flower Shaping Tool
  • Foam Mat

Miscellaneous

  • Ivory Organza Ribbon – 1/4-inch wide
  • Nuvo – Crystal Drops – Dandelion Yellow, Ripened Pumpkin, and Ebony Black

Patriotic Sympathy Basket

One of my cardmaking friends lost her husband to cancer recently. He was career military. I wanted to make a flower basket for the card with a nod to his military career, so I did the colors of red, white and blue with some flag bunting on the sides of the basket.

I use the following Karen Burniston dies Woven Basket Box Card, Wide Woven Box Card, tag from Tag Book Pop-Up, flowers from the Flowers and Bee and Flower Pot Pop-Up, and With Sympathy sentiment. I also tried the new Small Scenes Bam Box to pop-out the basket when pulled from the envelope.

Please watch the assembly videos for the various dies that are located toward the bottom of each die set’s link page before starting a card.

When assembling the woven basket, I like to make the rims of the basket fold by lining up a metal ruler from pointed edge to pointed edge. This make a straight fold that is more rounded to cover the top edges of the basket.

When making the flowers, I like to use some flower shaping techniques such as using a tool with a round ball on its end to push the center of the flower into foam to create depth. I most often use my fingers to curl the petal tips under. On the large hibiscus-like flower I used the ball tool to shape the undersides of the petals. Many flowers, such as daisies, have two layers of petals.

The arrangement of the flowers always scares me, but I tried to remember my flower arranging class tricks from years ago. Start with the largest flowers first, creating a tall focal point in the center and shorter to the sides. Fill-in with smaller flowers symmetrically and finish with baby’s breath to fill-out the empty spaces.

I cut the “with Sympathy” sentiment from matte gold cardstock and curved the word sympathy to fit the front of the basket. In addition, I cut a white tag from the Tag Book Pop-Up and stamped and heat embossed the tag with “Sending prayers your way” in matte gold embossing powder. A narrow ivory organza ribbon was used to tie the tag on to a basket handle. A personal message can be written on the tag back.

The folded card fits into a catalog 6×9 inch envelope. To mail the card, I fold a sheet of 8 1/2 x 11-inch white cardstock in half to fit inside the envelope and cushion the card in the mail.

Thank you for reading this blog post. I hope this inspires you and makes you smile. Please like and leave comments 😊

Materials Used:

Dies

Stamps

  • Waffle Flower – Clear Stamps – Sweet Sentiments -271296
  • Simon Says Stamp! – Clear Stamps – Brushed Flowers – sss202392c

Papers

  • Photoplay – 12×12 Double-Sided Paper Collection – Stars and Strips by Michelle Coleman
  • Keep It Simple – 6×6 Double-Sided Paper Collection – Back To basics – Ruby Collection
  • White Heavyweight Cardstock
  • White Catalog 6×9 Inch Envelope

Ink

  • Stampin’ Up – Classic Stampin’ Pad – Misty Moonlight
  • Simon Says Stamp – Pawsitively Saturated Ink
  • VersaMark – Watermark Stamp Pad
  • Sharpie – Permanent Maker – Ultra Fine Point – Yellow
  • Pigma – Mircon 03 Fine Tip Pen – Black

Embossing Poweder

  • Papercraft Society – Embossing Powder – Matte Gold

Adhesives

Tools

  • Die Cutting Machine
  • We R Memories – QuickStick
  • We R Memories – Scoring Board and Trimmer
  • Stamping Platform
  • LDRS – Stampendable Stamping Tool
  • Stamping Cloth
  • Kat Scrappiness – Anti-Static Tool
  • Scissors
  • Tweezers
  • Heat Tool
  • Ball Tipped Flower Shaping Tool
  • Foam Mat

Miscellaneous

  • Ivory Organza Ribbon – 1/4-inch wide

The Swan – Sending Love

There are some situations where words just don’t seem enough. This is a tunnel card for someone experiencing loss.

It uses the i-crafter Tunnel Card Base, Swan die set designed by Lynda Kinase. It assembles quickly although the detailed cattails and swan head do require some detailed coloring or in my use, paper piecing. Watch the assembly video before die-cutting.

The card base is cut three times using a different circle insert for each layer. I cut my bases from some white and gray craft cardstock. I cut two banners from pure white cardstock.

By using some printed watercolored papers, I was able to get the look of watercolors without having to get out my paints. The cattails and hanging green leaves were cut from various parts of one sheet of the Funky Fossil Design’s Watercolour Rainbow paper utilizing the various shades and hues on the green/blue/purple sheet. The swan’s beak and part of its head were cut from orange and the black band colored with black fine tip pens and a white gel pen for its eye, then trimmed down to the black band and beak. This was glued to the swan cut in pure white. The completed swan was attached to the middle box layer with the swan circle cut in the middle. The seven cattail pieces that I cut were added first to the front layer and then the leftover three pieces were added to the middle swan layer.

I didn’t have any stamps that fit the banners with a sentiment that I liked, so I used words from two of Karen Burniston’s word sets to say “sending love” cut from some of the purple/blue watercolor paper. The words were glued to the banners and the banners were attached to the front layer with foam squares.

As is my way, I decorated the back flap of an A2 cream envelope with some of the leftover light green vining leaves to hint as to what is inside the envelope.

See other other i-crafter projects below:

Thank you for reading this blog post. I hope it brought you comfort and inspiration.  Please like and leave comments 😊

Materials Used:

Dies

Papers

  • Funky Fossil Design – Watercolour Rainbow Printed Papers 180 gsm
  • Pure White Cardstock
  • A2 Envelope – Cream

Inks & Pigments

  • Pigma Micron 01 – Black
  • Pigma Micron 05 – Black
  • Sakura – Gelly Roll 08 – Gel Pen – White

Miscellaneous

Sending Violet Hugs

In the language of flowers, violets mean remembrance. Sometimes there aren’t words to express the comfort a hug can bring when someone is suffering a loss.  This card is meant to be up-lifting and offering comfort and hope.

Using recent PoppyStamps Flower Field Tall Curve Border, Penelope Pinpoint Frame and Sending Hugs Poe Script dies to create this card front, I used the solid green back of a striped A2 card base to be the background to the lattice work. Thin foam squares were used to raise the lattice frame off the green card base. (Dies-R-Us often stocks PoppyStamps dies as well as other name brand dies and stamps at discounted prices. The links under the Materials Used section links to Dies-R-Us.)

Scrap white cardstock was ink blended on both sides to create the die-cut violets. Four times the flower border was cut with the two glued to the front of the white lattice work frame.  The remaining borders were cut apart and the petals were bent to curl upward. These flowers were glued at the center to the base border flowers using a hand-held stylus with a tiny round tip to move and push the flower centers down into the glue. A dot of yellow Nuvo Drops completed the center of each flower.

The “Sending Hugs” was die cut from matte gold cardstock which was found on cookie packaging.

The inside sentiment “Happiness blooms from within” is from a new stamp set by PoppyStamps – Colorful Life. Another sentiment, “Bloom and Grow,” is from the same sent and is stamped in a gold ink on the envelope flap.

Thank you for reading this blog post. Please like and leave comments 😊

Materials Used:

Dies

Stamps

  • PoppyStamps – Clear Stamp Set – Colorful Life – CL509

Inks

  • Ranger – Jim Holtz’s Distress Oxide Ink – Chipped Sapphire, Shaded Lilac, Dusty Concord, Stormy Sky, Prize Ribbon
  • Stampin’ Up – Classic Stampin’ Pad – Crumb Cake

Papers

  • Lightweight white cardstock
  • Matte gold cardstock
  • A2 green striped card base and white envelope

Miscellaneous