Needing something cute to put a gift card in with a winter theme, I quickly created this mini gift bag with a polar bear holding a heart.
Karen Burniston’s December 2023 release includes the Mini Gift Bag die set that makes a collapsing bag that will hold a gift card and fit in the palm of your hand.
If you use a patterned paper that doesn’t have a design with a distinct up and down to it, you can cut the entire bag from a 6×6 piece of paper.
I use red vellum to cut a heart with the heart die in the set. The bear is from the Winter Animals set and the tiny heart he holds comes from the Safari Animals sets.
For the bag handles, I used 1/4-inch wide organza ribbon tied as a loop for each side with the knots hidden inside the bag.
Thank you for reading this blog post. I hope this inspires you and makes you smile. Please like and leave comments 😊
This card was made for Craft Roulette #192 whose parameters included a thank you card, roadside market colors, yard(s) element and confetti.
Heartfelt thanks is the emotion that this accordion-fold card expresses. Inspired by Karen Burniston’s December 2023 release Heart Add-ons pivoting panel, the card features a shaker element filled with confetti. Other Karen Burniston dies were used including: Fence Add-Ons, Thank You and Fancy Label Accordion.
Before starting, watch the assembly videos of the pop-ups which are usually near the bottom of the linked pages for the various die sets used.
Accordion Frames: Cut three accordion frames from heavy blue cardstock using the main large die in the Fancy Label Accordion set. Train the folds of each frame and set aside. (You will cut a fourth accordion frame under the Shaker section using the same heavy cardstock.)
Fence Panel: Using the largest of the label die in the Fancy Label Accordion set, tape it inside the accordion frame die and cut two from decorative paper. Save the inner fancy labels for use on the fence panel. From the decorative paper accordion frames, trim the smaller panel frames away from the larger frame leaving the small tabs attached to the frames. Set both accordion frames and small frames aside for later use. From brown decorative paper cut one fence using the fence die in the Fence Add-Ons set. Cut flowers and grass to decorate fence with using dies also in the Fence Add-Ons set.
Attach a fancy label to the center panel of one of the blue accordion frames. Trim fence to fit panel and adhere to panel. Decorate the fence with grass and flowers. Glue the remaining fancy label to the reverse side of center panel. Set the piece aside.
Heart Pivot Panel: Glue the tab of one blue accordion frame to the backside of the remaining blue accordion frame. Cut from a lightweight teal blue cardstock the Hearts-Add-Ons panel. Train the folds of the hearts panel. From the blue accordion frames cut off half of the center panel leaving them attached at their pivot points. (See photo)
Put glue on the left back side edge of the teal blue hearts panel before attaching to the left blue center panel of the blue accordion frame. Match up the fancy curved edges of the panels. With the blue connecting post of the accordion frame behind the teal blue hearts panel, attach the right side of the hearts panel to the right accordion frame panel.
Cut a hearts panel from decorative paper. Trim out the string of hearts and save to decorate the backside of hearts. Glue decorative panel to the front side of hearts panel. Using the smaller decorative heart dies in the set, cut a number of hearts from patterned paper. Decorate both front and back sides of panel.
Glue the panel frames to the front of the hearts panel with the panel tabs being covered with decorative paper. Trim off the parts of the frames at the center of the hearts panel that are not attached. Set piece aside.
Shaker: Using the largest of the label die in the Fancy Label Accordion set, tape it inside the accordion frame die. Cut the fourth frame piece from the blue heavy cardstock. Keep the dies tapped together to cut four heavy cardstock frames and two decorative paper frames. Use smaller pieces of the heavy cardstock for the four panel frames. Cut the full accordion frame with the decorative paper. Trim the panel frames from the accordion frames and save the decorative paper frames for later. Cut two squares of clear acetate or plastic slightly larger than the panel frames.
To assemble, glue two blue panel frame pieces together. Using 1/8-inch wide double-sided tape around the blue frame, adhere the acetate to frame. Trim off overhanging acetate. Attach decorative pink paper frame over the acetate with more double-sided tape matching up edges. Glue the assembly to the accordion frame panel matching blue frame to blue frame. Repeat with the remaining two blue frames, pink decorative paper frame and acetate piece, but DO NOT attach to accordion frame panel.
Using an anti-static tool, swipe powder over all of the acetate inside the frame and the sides of the shaker frames. Add confetti/sequins to the frame attached to the accordion frame. Glue the remaining shaker frame over the confetti filled frame. Leave undisturbed until glue dries. (To listen to commentary about the anti-static products I used go to my video.)
Accordion Assembly: With all the accordion frames decorated, assembly can begin. Collect the four decorative paper accordion frames previously cut in the Shaker and Fence Panel sections. Cut four more frames from decorative paper, trimming out the inner panels which can be saved for later. Glue the fence panel accordion frame tab to the backside of the first heart panel accordion frame. Glue the second heart panel accordion frame tab to the backside of the shaker accordion frame. Trim off the unused tab on the shaker accordion frame. Cover the backs of all the accordion frames with the decorative paper frames. (This should hide all the tabs.) Glue decorative paper frames to fronts of the accordion frames.
Once all the decoration of frames is completed, glue the center panels of fence and shaker accordion frames to the heart panels. (Note: the tabs that attach to the shaker panel are glued to the front of the shaker panel, while the fence tabs are glued to the back of the hearts panel.)
Cut one of the decorative paper inner panels in half to cover the backsides of the panels cut in half that the hearts panel is attached to. (Green paper in the photo.)
Sentiment: “Thank You” is a die-cut that was cut twice from the same double-sided paper with the blue side used as an off-set shadow behind the pink patterned paper.
Envelope: The card is thick and would require a padded bubble envelope if not hand delivered.
Thank you for reading this blog post. I hope this inspires you and makes you smile. Please like and leave comments 😊
Materials Used:
Dies
Karen Burniston in cahoots with Riley and Company – Heart Add-Ons – 1257
Making sure your loved-one, who is far away, feels love at Valentine’s Day, is what this card is all about. It uses two new die sets from Karen Burniston’s February 2023 release along with some previously released sentiments and collage decorations.
I started with a 10-inch by 7-inch rectangle and folded in half to make a 5-inch by 10-inch cardbase.
Next, I die-cut all my mats and decorative frames from patterned papers using the crosshatch rectangles from the new Rectangles and Labels – Crosshatch. For the scalloped frame I used white copier paper and heavier white cardstock to cut all the labels and twist mechanism two flag arms. The small, scalloped rectangles and flag arms are dies in the Little Twist Panel Pop-Up die set.
Because my decorative papers were thin paper, I used a sheet of double-sided adhesive to adhere the paper to a piece of cardstock. I did this for the twisting mechanism and the folded panel that is glued to the twisting mechanism. Before I die-cut my Little Twist Panel Pop-Up, I watched the assembly video for the pop-up mechanism.
Using double-sided tape, I covered the inside and outside card panels with coordinating paper mats. (My favorite technique for using double-sided tape is to place around the edge of the card, lift the ends of the tape so corners are sticky, position the covering paper, you can shift the top paper a bit before you pull all the tape backing paper strips. See tutorial post,)
Fold all the scored lines of mechanism piece as directed in video. Using a ruler mark the center of the cardbase fold with a pencil. Glue one side of mechanism to cardbase lining-up the mechanism’s center hole with the pencil mark making sure the folded score lines of the mechanism arms line up with the casebase fold. Fold mechanism shut and glue other side to cardbase.
The center heart is cut from the Heart Collage Pop-Up set in two pieces. Slide solid heart into slotted heart and glue the back halves to the mountain fold of the folded panel mechanism making sure that the panel slots are not blocked by heart. Following the video assembly instructions, insert the two flag arms into the slots on the folded panel. Glue the flag tabs onto the back of the other flag. Adhere the panel to the twisting mechanism as directed in assembly video. Test and train the mechanism how to fold inside the card.
The card front is simply decorated with the scalloped frame which is glued only on the straight edge inside of the frame.
To have a white shadow behind the die-cut “Happy Valentine’s Day,” Trace the outer edge of the word die with pencil and fussy cut the shadow.Two tiny hearts from the Sending Love die set complete the front.
The inside decorations include more tiny hearts in corners of the decorative panels as well as two hot air balloons carrying hearts. The balloons are from the Balloon Collage Add-Ons and the hearts on strings are from the Little Twist Panel Pop-Up. The balloons are adhered to the card with foam dimensionals. “Sending Love” sentiment is its own die set. There are two scalloped white labels are from the Little Twist Panel Pop-Up to write a personal message.
As with all my cards that are sent in an envelope, I have decorated the back flap with scalloped heart from the Heart Collage Pop-Up set. The card is A7 envelope.
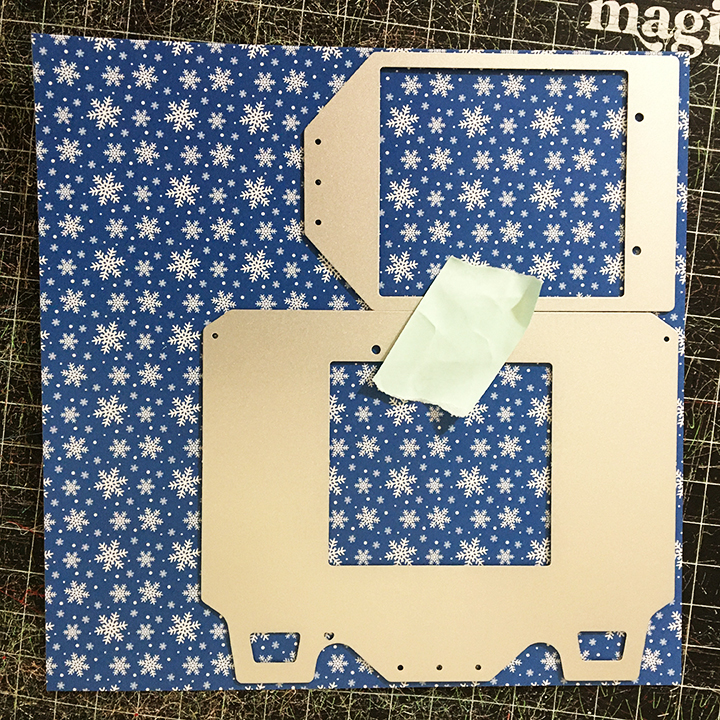
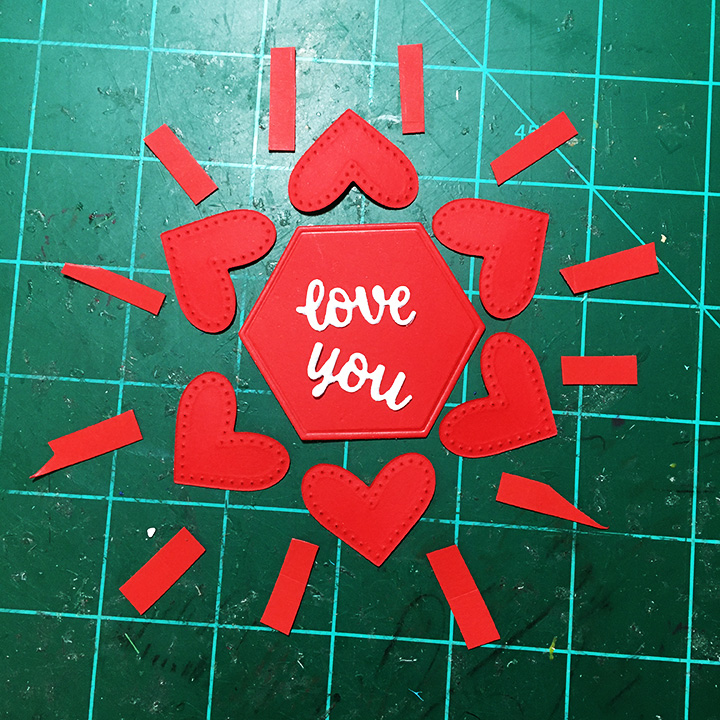
Center Layer: Cut one of the second smallest of the plain edged hexagon in the Hexagons Crosshatch set of red 65 lb. cardstock. Cut six of the hearts in the Circle Charm Pop-Up set in red 65 lb. cardstock. Cut 12 strips 1-inch by 1/4 inch in red 65 lb. cardstock. (Strips need one squared off end that will be visible when the card is open.) Cut in white cardstock “love you” from Word Set 13.
Adhere “love you” sentiment onto hexagon parallel to a straight edge. Glue squared ends of strips to back side of the rounded tops of hearts. (Each heart should have two strips.) Place heart face up over an edge of hexagon and fold under the attached strips and glue to the underside of the hexagon. Make sure the top of the heart is just at the edge of the hexagon and not overhanging. (Overhanging hearts will make catchpoints that will be hard to open when flower is assembled.) Repeat with the next five hearts.
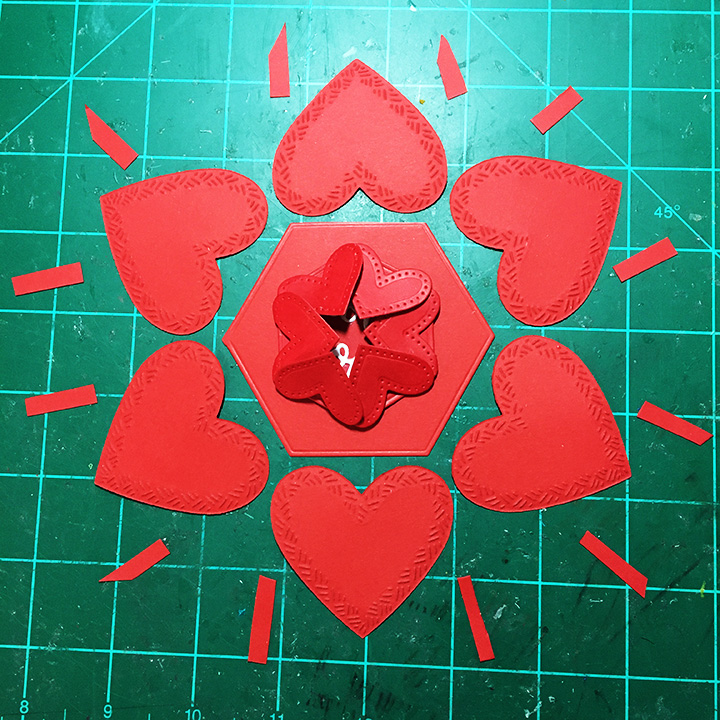
Fold hearts closed and test for catchpoints. Adjust attached hearts as needed to eliminate catchpoints.
Middle Layer: Cut one of the second largest of the plain edged hexagons in the Hexagons Crosshatch set in Pomegranate 100 lb. cardstock. Cut six of the smaller crosshatch heart in the Heart Crosshatch set in Pomegranate cardstock. Cut 12 strips 1-inch by 1/4 inch in Pomegranate cardstock. (Strips need one squared off end that will be visible when the card is open.)
Using thin foam squares, adhere center layer hexagon onto middle hexagon with points of smaller hexagon pointing towards the middle of each straight edge on larger hexagon. Glue squared ends of strips to back side of the rounded tops of hearts. (Each heart should have two strips.) Place heart face up over an edge of hexagon and fold under the attached strips and glue to the underside of the hexagon. Make sure the top of the heart is just at the edge of the hexagon and not overhanging. (Overhanging hearts will make catchpoints that will be hard to open when flower is assembled.) Repeat with the next five hearts.
Fold hearts closed and test for catchpoints. Adjust attached hearts as needed to eliminate catchpoints.
Outer Layer: Cut two of the largest hexagon in the Hexagons Crosshatch set – one red dotted Swiss and one white. Cut six of the scalloped heart in the Heart Crosshatch set in red dotted Swiss. Cut 12 strips 1-inch by 1/4 inch in red dotted Swiss. (Strips need one squared off end that will be visible when the card is open.)
Using thicker foam squares, adhere middle layer hexagon onto largest hexagon with points of smaller hexagon pointing towards the middle of each straight edge on larger hexagon. Glue squared ends of strips to back side of the rounded tops of hearts. (Each heart should have two strips.) Place heart face up over an edge of hexagon and fold under the attached strips and glue to the underside of the hexagon. Make sure the top of the heart is just at the edge of the hexagon and not overhanging. (Overhanging hearts will make catchpoints that will be hard to open when flower is assembled.) Repeat with the next five hearts.
Fold hearts closed and test for catchpoints. Adjust attached hearts as needed to eliminate catchpoints.
Glue white hexagon over the back of the red hexagon to cover-up strips and to provide a space to write a personal message.
Closing Band: Cut one strip of 12 inches by 3/4 inch in striped cardstock. Wrap loosely around widest part of closed flower. (Make such you can slide off the closed band before gluing closed.)
On white cardstock, trace around the “Happy Valentine’s Day” die to create a shadow for the words. Fussy cut the shadow. Die-cut the sentiment in red and use a pokey tool to weed out the words. Glue to shadow. Adhere the shadowed words to band.
The card will fit in an A2 size (4 3/8 x 5 3/4 inches) envelope. It may require extra US postage for its thickness.
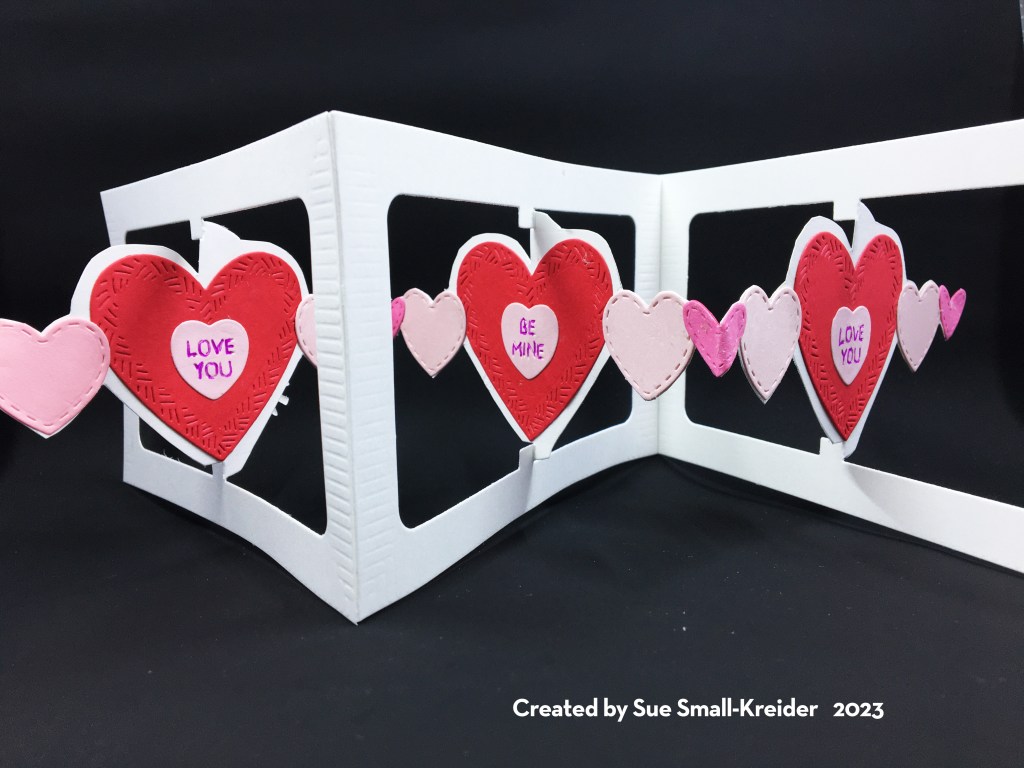
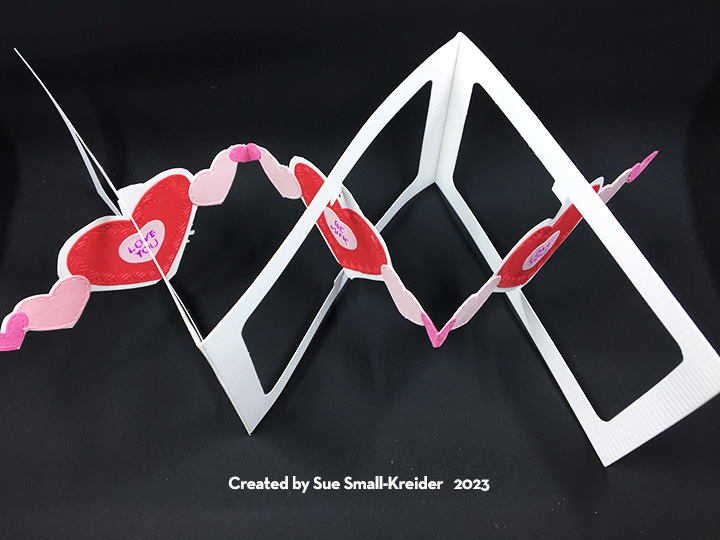
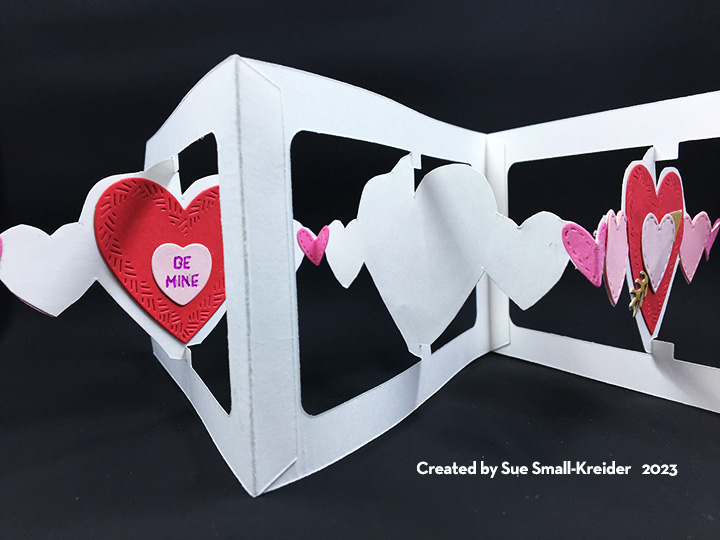
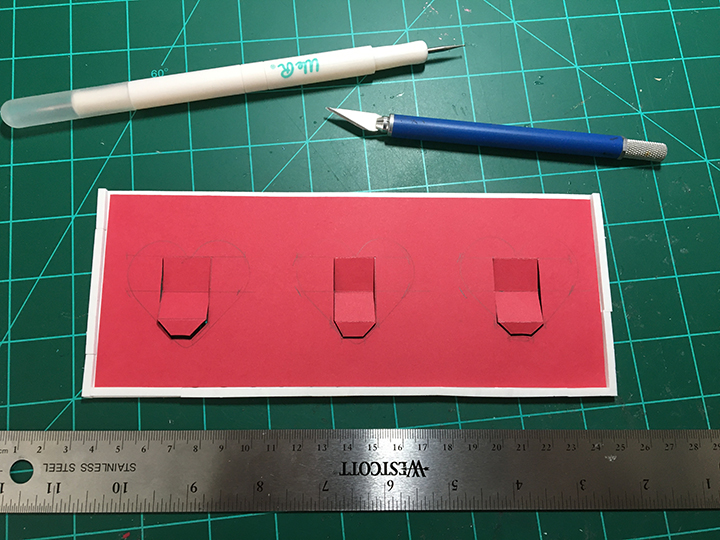
This is a quick fussy cut string of hearts using Karen Burniston’s Landscape Rectangle Accordion die. The large red hearts and smallest dark pink hearts are from the Hearts-Crosshatch set while the medium size pale pink hearts and hearts with sentiments and arrow are from the Love Charms set. (I used a purple gel pen to highlight the candy heart sentiments.)
Below is a PDF file which you can download for a basic template of how to fussy cut the panels which are connected by the smallest hearts.
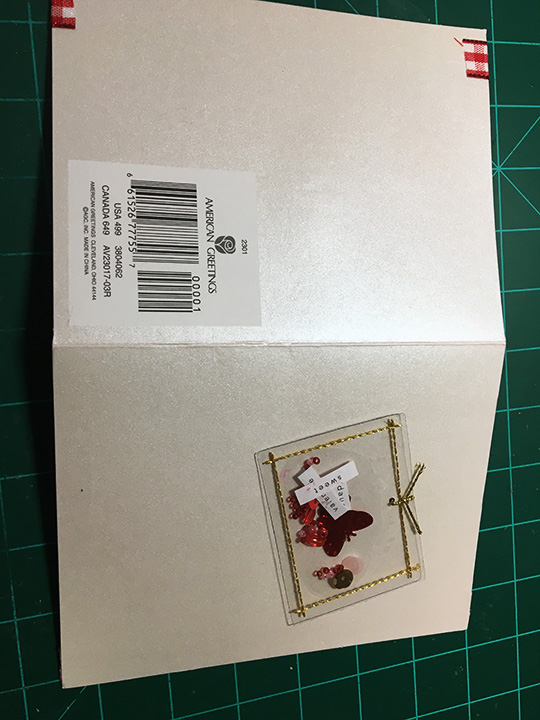
In cleaning up my craft room after the holidays, I came across a purchased Valentine I’d been sent many years ago with a stitched see-thru pouch with beads, sequins and the words “daughter,” sweet” and “valentine.” I decided to upcycle the card base with the pouch attached for a new Valentine.
The card base was an A6 size (5×6.5 inches). Ivory pearlescent on the outside and red on the inside. There were some tears of white on the inside where a sentiment sheet had been removed. (I hid the tears with red gingham ribbon adhered with double-sided tape.)
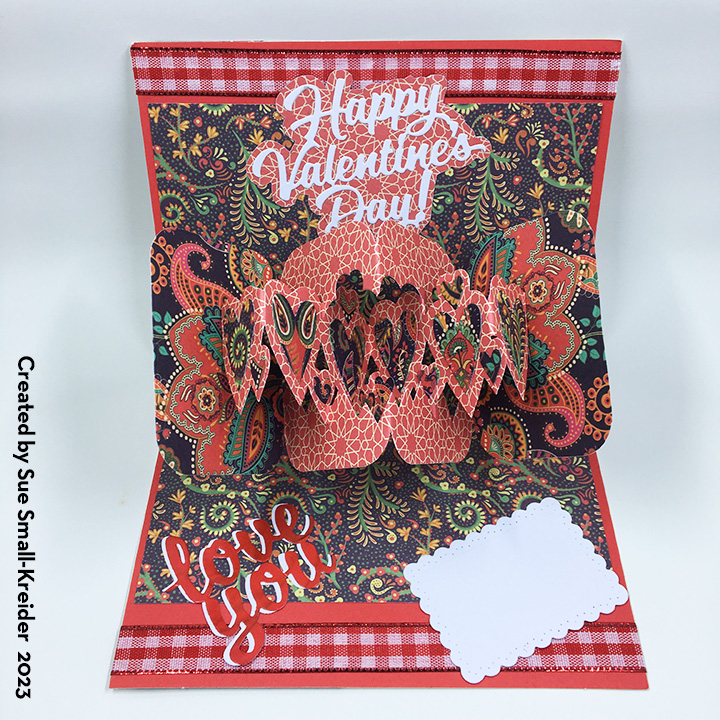
Using Karen Burniston’s Twist Panel Pop-Up and Heart Pivot Panels along with some of her word set dies, I recreated the card using two sheets of double-sided, printed cardstock from Craft Consortium.
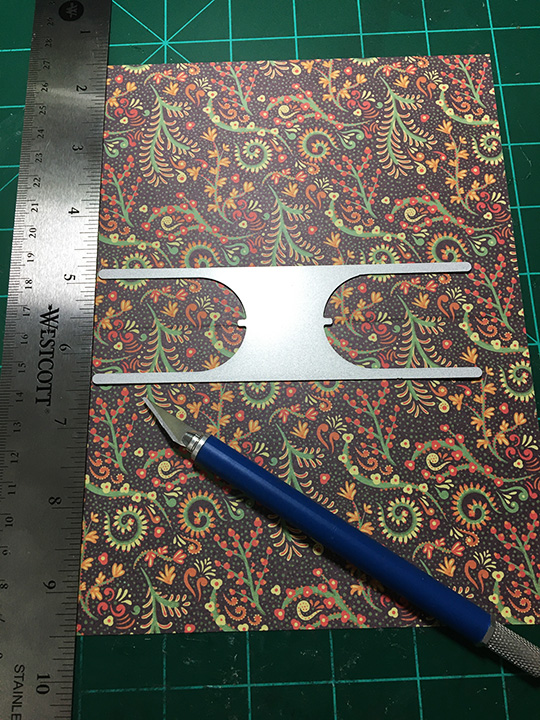
Because I opted for an 8 x6 1/4-inches cardstock insert, I had to use a craft knife with a metal ruler to cut the ends of the mechanism arms free from the insert. I also die-cut a third arm from the insert cardstock which I cut-in half twice to make four strips to cover the red card base where the insert mechanism arms are cut from.
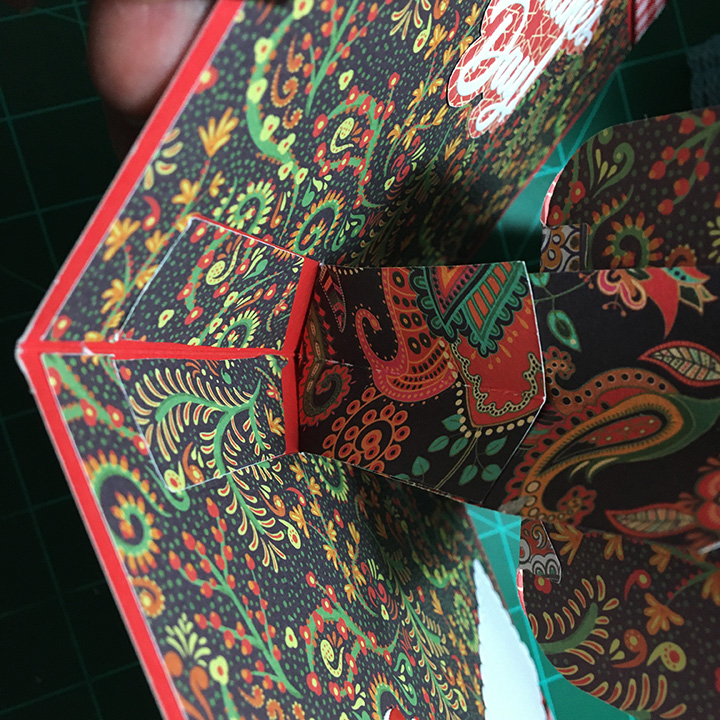
The assembly of the end panels and heart pivot panels were done as per the assembly video. Cutting the decorative hearts from the intricate paisley cardstock makes for a somewhat non-traditional Valentine.
The sentiments inside were both cut from white cardstock but finished differently. The “love you” was also cut from a red glossy magazine page and glued off-set with the white underneath. The “Happy Valentine’s Day” had a shadow added underneath it. The shadow is cut by tracing the outside of the sentiment die on the back side of the decorative cardstock and fussy cutting. The white scalloped rectangle is cut using a decorative panel die from the Twist Panel Pop-Up set. It serves as a place for a personal message.
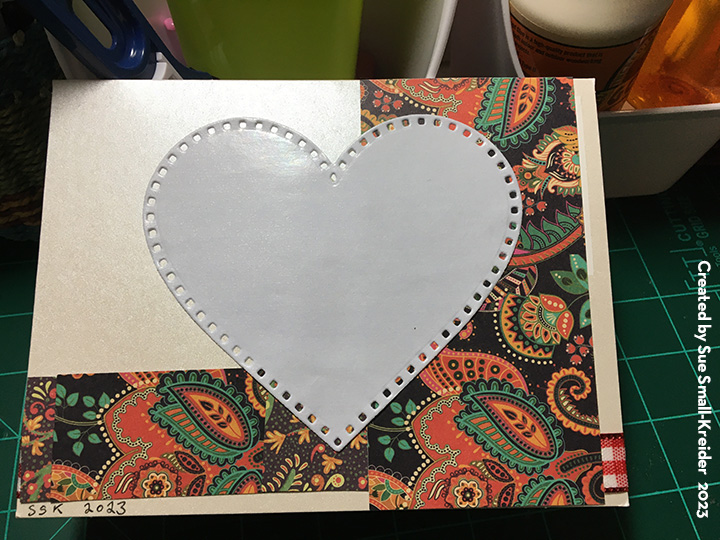
The outside of the card was decorated with leftover scraps of decorative cardstock and a die-cut heart I had in my stash. Because I changed the orientation of the card from a side-fold to a top-fold, I secured the see-thru pouch with glue dots and added tiny hearts to reflect the orientation.
The card will fit in an A6 size envelope. (I used an A7 envelope as I was out of A6s.) It may require extra US postage for its thickness.
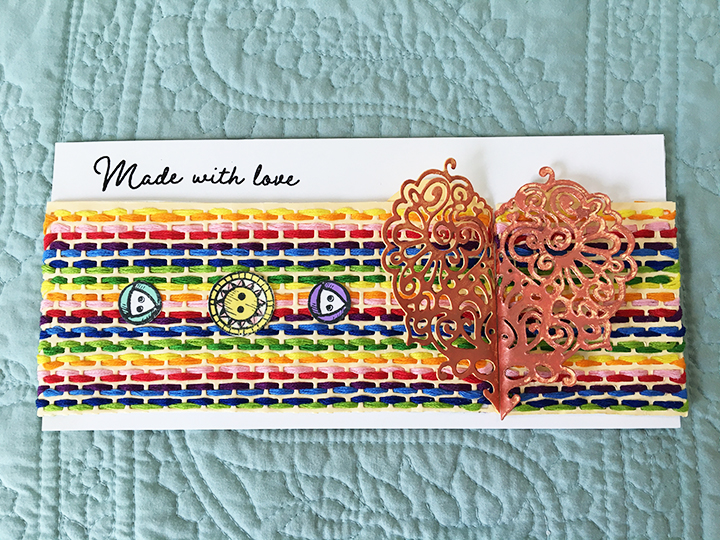
“Beautiful things come together one stitch at a time,” is the sentiment of this friendship card made with a new Lou Collins Text{ures} die and stamps along with some vintage stamps and heart die.
The Fabric Edging Die Set has a die that cuts a course woven strip of hessian or burlap which I used as the base for weaving embroidery floss in bright rainbow colors for the flaps of this asymmetrical-gatefold slimline card. Once the weaving was completed, I covered the back of the weaving with white cardstock cut ½ inch longer than the woven panel to use as a tab to glue to the 8 ½ inches x 4 inches rectangular card base.
For the lacy heart, two hearts were cut using the lace heart die by Moda Scrap of Elizabeth Craft Designs. Each heart is folded in half and the lacy side covered in Persian Red Nuvo Embellishment Mousse.
The solid part of the folded heart is glued to the inside of the flaps lining up the tips of the heart halves to make a whole heart when card is closed.
Before gluing the flaps to the card base, I stamped, and heat embossed the two sentiments in black detail embossing powder.
On the front of the card are three stamped and watercolored buttons from the Fun Stampers Journey Button Bliss set.
The envelope back is stamped with another sentiment from the same stamp set in a dark blue ink.
Hope you enjoyed this quick card. If so, please comment and like and follow this blog. 😊
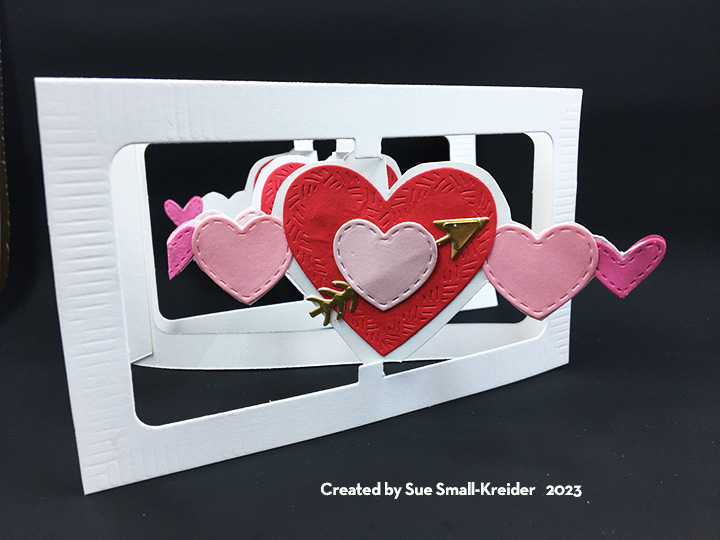
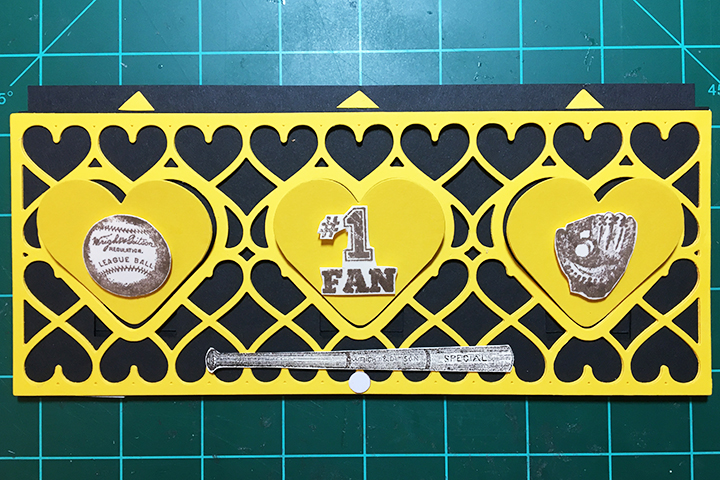
Card base is cut from heavy black cardstock. It is a rectangle 8 5/8 inches x 7 inches and folded in half to form a 3 ½ inch x 8 5/8 inches card base. The slider arm and easel panel template was printed also on heavy black card stock.
Split-Slider: This split slider is based off Spellbinders Large Die of the Month for January 2021. The three mini easels were drawn and cut based off the three heart openings in the slimline die. (You can download a template for the horizontal split slider in the Materials Usedsection below.) The slider arm is horizontal rather than vertical as previous cards were. (Hint: Rectangular easels that will slide under the heart frames eliminate a catchpoint for the easel.)
You can glue the easel panel to the back of the lacy panel as long as you don’t glue the easel tab area at the bottom of the heart frames. Just put glue around the outer edge of the lacy panel.
Because the top lacy panel is adhered on three sides to the card base and needs to be raised, I used foam tape strips to raise the panel. (I like Stampin’ Up’s foam adhesive strips because they are precut and narrow enough to fit along the edge of the lacy panel.) Adhere the easel tabs to the slider arm before removing the backing paper of the foam tape.
You may have to help fold the easels into the fully opened position the first time to train them. Once satisfied with the slider/easels’ movement, remove panel backing tape paper and adhere to card base lining up the lacy panel with the top fold edge of the card base. (Note: The top edge of the slider arm (the pull bar) should jut out over the card base so that fingers can easily pinch the bar and pull up.)
Pull-Bar: The long pull bar or top edge of the slider arm is reinforced with a thick cardstock strip. Three yellow arrows are glued to the pull bar and a white dot for the place to hold the card when pulling up the slider arm. (For good CRX – I add a slip of paper to the card when mailing to show how to open the card.PDF of slipdownloadis inMaterials Used.)
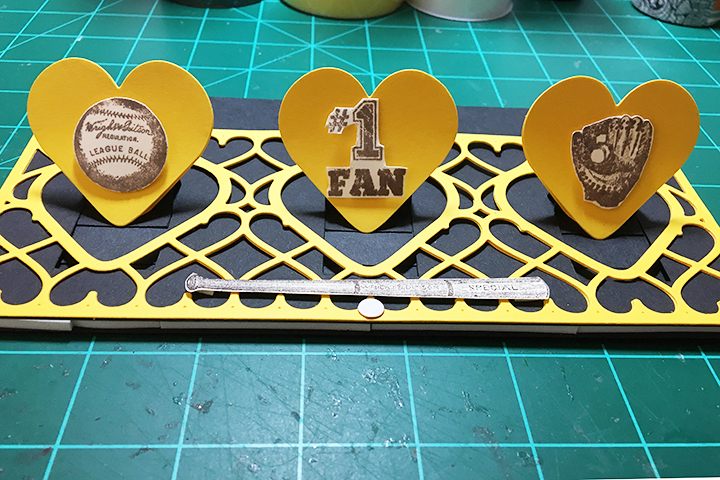
Decorating the Easels: Because I had cut the lacy panel three times, I had plenty of the heart cut outs. I used three yellow hearts to form the easel bases that are folded at the tip of the heart when adhered to the slider easel. Three more yellow hearts are glued only at the rounded tops to the easel base hearts.
Using foam squares I adhered stamped baseball equipment to the yellow hearts and placed a bat under them.
Make sure you don’t glue anything that will impede the easels from moving.
The foiled “Happy Valentine’s Day” sentiment and stamped “Take me out to the ball game” are adhered to the inside of the card with double sided tape.
Thank you for reading this blog post. Please like and leave comments 😊
If you enjoy reading about the card I make, please follow ullysworld489442913.com.
Valentine’s Day is coming and a handmade card, reminiscent of folk art hearts and flowers, fancy chocolate boxes and old-fashioned lacy Valentines, maybe just the thing for your loved one.
Split-Slider: This split slider is based off Spellbinders Large Die of the Month for January 2021. The three mini easels were drawn and cut based off the three heart openings in the slimline die. (See previous split slider posts for more detailed directions.) The slider arm is horizontal rather than vertical as previous cards were. (Hint: Cut rectangular easels that will slide under the heart frames to eliminate a catchpoint for the easel.)
You can glue the easel panel to the back of the lacy panel as long as you don’t glue the easel tab area at the bottom of the heart frames.
Because the top lacy panel is adhered on three sides to the card base and needs to be raised, I used foam tape strips to raise the panel. (I like Stampin’ Up’s foam adhesive strips because they are precut and narrow enough to fit along the edge of the lacy panel.) Adhere the easel tabs to the slider arm before removing the backing paper of the foam tape.
You may have to help fold the easels into the fully opened position the first time to train them. Once satisfied with the slider/easels’ movement, remove panel backing tape paper and adhere to card base.
Decorating the Easels: Because I had cut the lacy panel three times (once from lightweight cardstock and twice from heavy weight cardstock), I had plenty of the heart cut outs. I used the lightweight hearts so form the easel base that was folded at the tip of the heart when adhered to the slider easel. The decorated heavy weight hearts are glued only at the rounded tops to the easel base hearts.
I used flowers and greenery left from other projects on the outer hearts and then I foiled the center heart with a coordinating foiling plate from the Spellbinders Glimmer Plate of the Month for January 2021.
Make sure you don’t glue anything that will impede the easels from moving.
Pull-Bar: The long pull bar or top edge of the slider arm is reinforced with a thick cardstock strip. Three holes were punched, and ribbon looped through for pulls. (If I were to make this card again, I would make the card base narrower so no ribbon pulls would be needed. See free template download under Materials Listed)
The foiled “Happy Valentine’s Day” sentiment is attached with foam squares. Nuvo Glitter Drops were added to the lacy panel.
When sending this card, I would enclose a slip of paper with directions on how to open. (See split-slider CRX Sheet download.)
Thank you for reading this blog post. Please like and leave comments 😊