Cake Time Birthday Cards

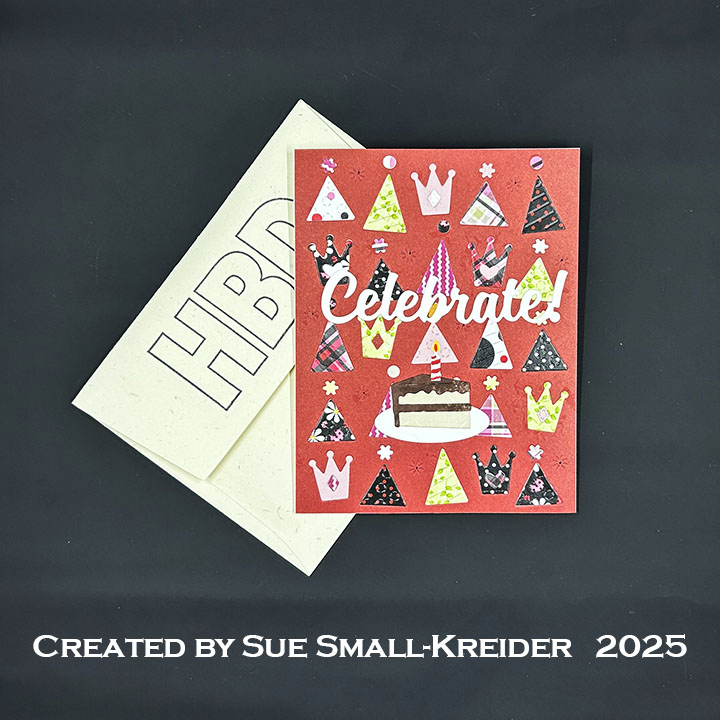
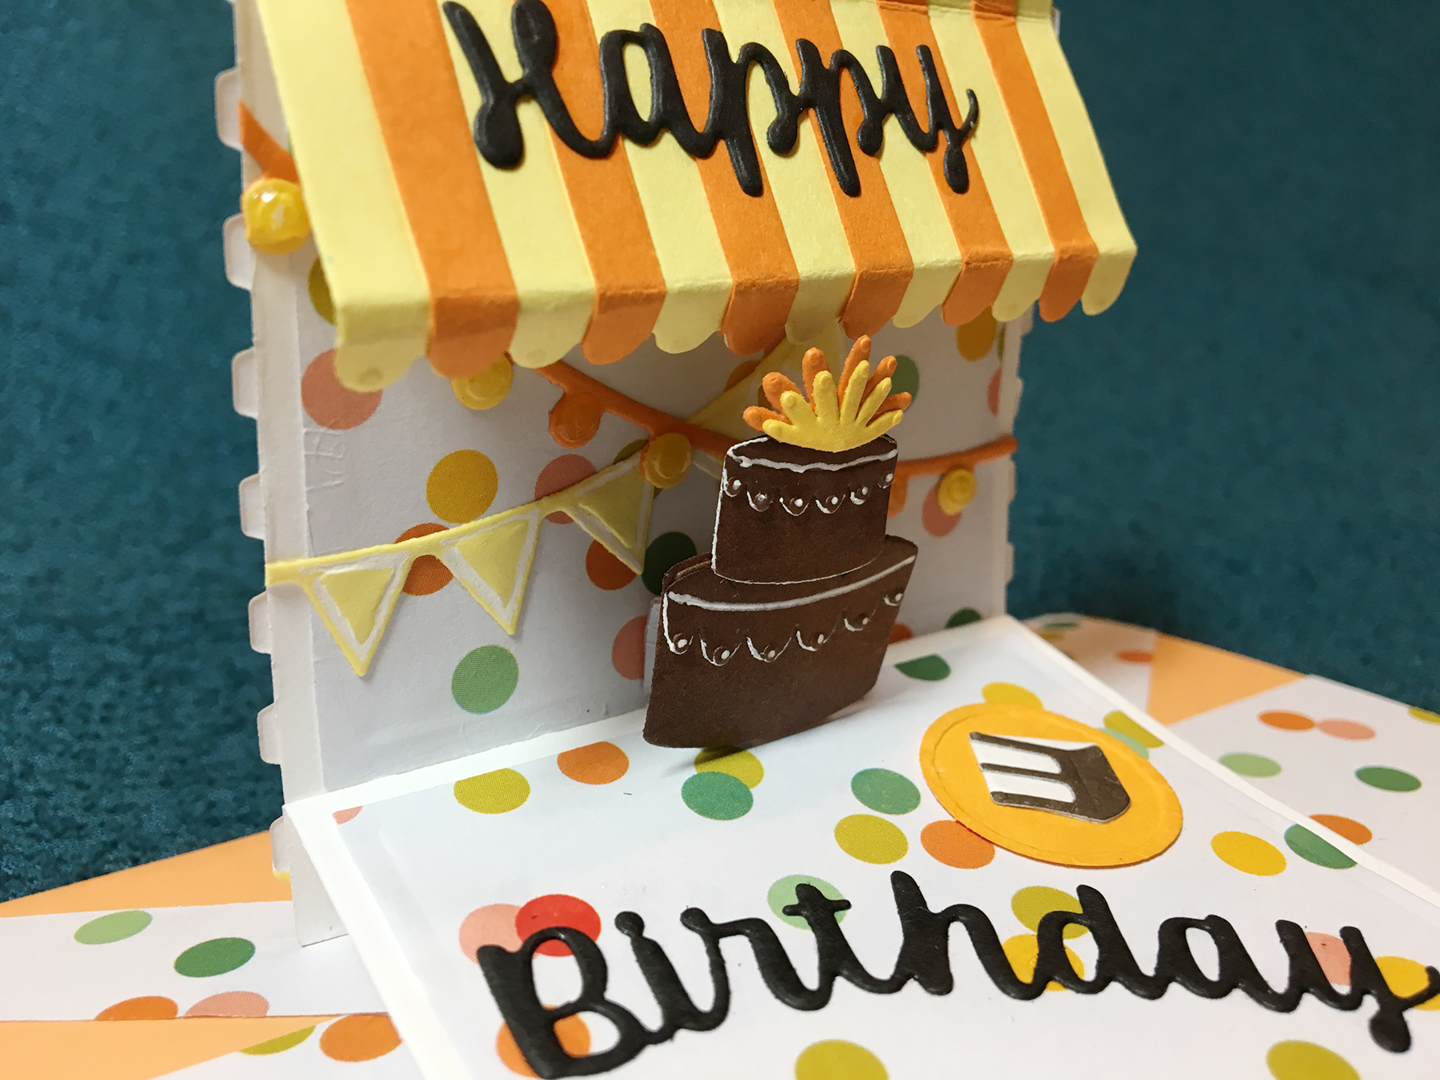
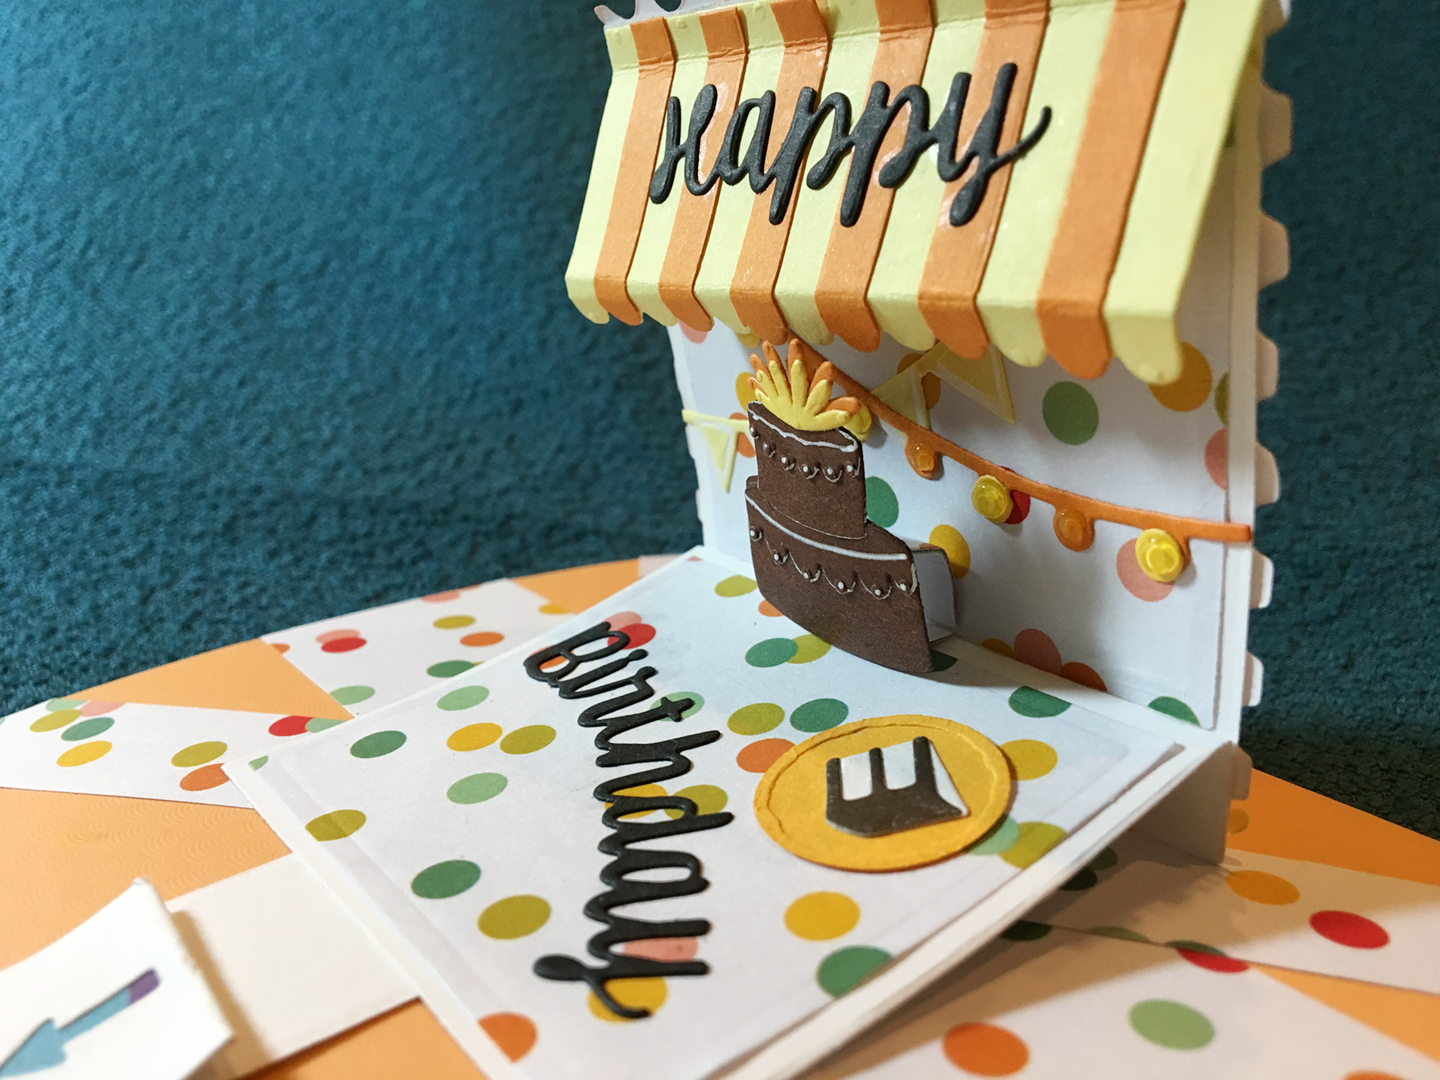
Having just received the new Waffle Flower Cake Time Texture die and stencil set, I decide to make a batch of birthday cards.

I used purchased A2 (4.25×5.5-inch) plaid cardbases with white envelopes to start.

CARD

Front

  • Taking an 8.5×11-inch sheet of cream cardstock and cut into four 4.25×5.5-inch panels (I used 100 lb cardstock.)
  • Die-cut two of the panels in the center of panel with the texture die
Die-Cut Texture
  • Emboss the remaining panels using die-cutting machine’s embossing sandwich to emboss the die into the cardstock (I like the texture this gives to the panel, but it was harder to line-up the stencils.)
Embossed Texture
  • Using the five layered stencils, color the image with ink (I used a blue/orange/yellow color palette.)
  • Trim off the panel edges to the embossed die edge
  • Adhere to the center of card fronts (I used double-sided tape.)
  • Add black sentiment strips to front

Inside

  • Die-cut four mechanism arms using Karen Burniston’s Katherine Label Pop-Up L-shaped die from cream colored cardstock (I used 65 lb weight cardstock.)
  • Watch the assembly video located at the bottom of the linked page for the Katherine Label Pop-Up
  • Die-cut from white cardstock four of Karen Burniston’s Happy Birthday Shadows
  • Die-cut from blue cardstock four of Karen Burniston’s Happy Birthday
  • Glue the words to shadow
  • Stamp the verse from the Craft Roulette’s Funn Sentiments #01 inside the cardbase just below the center of the panel
  • Glue in the pop-up mechanism
  • Attach the “Happy Birthday” to the box pop-up making sure there are no catchpoints and that the sentiment stays inside the card when closed
  • Add glitter gloss to “Happy Birthday” and the word Glitter in the stamped verse

ENVELOPE

  • Stencil the envelope flap with the pennant using similar colors to the card
  • Stamp “HBD” over the stenciling using the Craft Roulette’s Funn Sentiments #01

___________________________________

Thank you for experiencing this blog post.

I hope this inspires you and makes you smile.

Please subscribe, like and leave comments 😊

___________________________________

Disclaimer: Karen Burniston products are provided free of charge by the manufacturer for review and use. All other items were personally purchased. Compensated affiliate links used where or when possible, meaning I will receive a small percentage commission from these manufacturers at no cost to you. This will allow me to add more content to my YouTube channel and help out a lot. Thank you.

Materials Used:

Dies

Stamps

  • Craft Roulette – Clear Stamps – Funn Sentiments #01

Stencils

  • Waffle Flower – Layering Stencils – Cake Time

Papers

  • Plaid Cardbase and Envelope
  • Blue, Cream and White Cardstock
  • Waffle Flower – Sentiment Strips – Cake Time

Ink

  • Catherine Pooler – Premium Dye Ink – All That Jazz, Blue Raspberry, Mandarin Spice, Sauna, Tiara
  • Nuvo – Aqua Shimmer Brush Marker – Glitter Gloss

Adhesives

Tools

  • Die Cutting Machine
  • Paper Trimmer
  • Stamping Platform
  • LDRS – Stampendable Stamping Tool
  • Scissors
  • Paper Masking Tape

It’s A Party – Celebrate Your Birthday!

When needing a large number of birthday cards, making multiple inlay die-cut backgrounds is the way to go.

Watch the video below to see how I made these cards.

Cardbase:  I made eight A2 size cardbases by folding 8.5×5.5-inch rectangles of white cardstock in half.

Card Front: The card front uses Concord & 9th’s Party Hats inlay die along with the slice of cake from Karen Burniston’s Big Birthday Charms.

Sentiments:  The sentiments were stamped in black ink using the Craft Roulette’s Funn Sentiments #01 stamp set and Karen Burniston’s Celebrate, Happy Birthday and Shadow dies along with her Katherine Label Pop-Up die set.

Envelope:  The card fits into an A3 (4.25x 5.5-inches) size envelope stamped with a sentiment or a hand-drawn heart.

___________________________________

Thank you for experiencing this blog post. I hope this inspires you and makes you smile. Please like and leave comments 😊

___________________________________

Disclaimer: Karen Burniston products are provided free of charge by the manufacturer for review and use. All other items were personally purchased. Compensated affiliate links used where or when possible, meaning I will receive a small percentage commission from these manufacturers at no cost to you. This will allow me to add more content to my YouTube channel and help out a lot. Thank you.

Materials Used:

Dies

Stamps

  • Craft Roulette – Clear Stamps – Funn Sentiments #01

Papers

  • Craft Consortium – A4 Double-Sided Solid Colored Cardstock – Little Robin Redbreast
  • Craft Consortium – A4 Double-Sided Solid Colored Cardstock – ‘Tis the Season
  • Ink N’ Splatter – 6×6 Double-Sided Cardstock – Ladybug Days
  • Ink N’ Splatter – 6×6 Double-Sided Cardstock – Raspberry Crush
  • White Cardstock
  • Fraser Papers for William House – A2 Envelope – Genesis Text Milkweed Smooth

Ink

  • Memento – Fade Resistant Dye ink – Tuxedo Black
  • Pigma – Mircon 05 Fine Tip Pen – Black
  • Ranger – Letter It – Fineliner Pen – Yellow
  • Sakura – Gelly Roll Pen – Medium – White
  • Sharpie – Permanent Marker – Ultra Fine Tip – Red
  • Stampin’ Up – Stamp Write Marker – Chocolate Chip
  • Nuvo – Aqua Shimmer Brush Marker – Glitter Gloss

Adhesives

Tools

Triple The Fun With Mini Mini Slimline Pop-Up Cards

This card was made for Craft Roulette #251 whose parameters included for a slimline card, lumberjack colors, hat(s) or cap(s), and lace or doily.

Watch the process video to see how I made this card.

Cardbase:  Each card is made from a 2×6-inch piece of double-sided patterned paper, folded into a top-fold 3×2-inch card.  The box to hold them is made using Karen Burniston’s Candy Hearts Box die.

Sentiments:  The sentiments were all stamped in black ink using the Craft Roulette Funn Sentiments #01 set except for the “Hats off to you” which was handwritten.

Envelope:  The flatten box with three cards will fit into an A2 (4.25x 5.5-inches) size envelope.

___________________________________

Thank you for experiencing this blog post.

I hope this inspires you and makes you smile.

Please like and leave comments 😊

___________________________________

Disclaimer: Karen Burniston products are provided free of charge by the manufacturer for review and use. All other items were personally purchased. Compensated affiliate links used where or when possible, meaning I will receive a small percentage commission from these manufacturers at no cost to you. This will allow me to add more content to my YouTube channel and help out a lot. Thank you.

Materials Used:

Dies

Stamps

  • Craft Roulette – Clear Stamps – Funn Sentiments #01

Papers

  • Scrapbook.com – 6×8 Double-Sided Cardstock – Noel Patterned Collection
  • Simple Stories – 6×8 Double-Sided Cardstock – What’s Cookin’?
  • Black, Brown, Red, White and Yellow Cardstock Scraps
  • Fraser Papers for William House – A2 Envelope – Genesis Text Milkweed Smooth

Ink

  • Memento – Fade Resistant Dye ink – Tuxedo Black
  • Crafter’s Squares – Metallic Markers .05 in – Blue and Silver
  • Pigma – Mircon 01 Fine Tip Pen – Black
  • Pigma – Mircon 005 Fine Tip Pen – Black
  • Sakura – Gelly Roll Pen – Medium – White
  • Sharpie – Permanent Marker – Ultra Fine Tip – Black, Blue, Brown, Red

Adhesives

Tools

Miscellaneous

  • Nuvo – Aqua Shimmer Brush Marker – Glitter Gloss
  • Ranger – Glossy Accents
  • Cotton String

Over the Moon Birthday

Sometimes we just feel like being out there in space when it comes to celebrating birthdays. This interactive space themed birthday card is made with Whimsy Stamps “Over The Moon” stamp set and kinetic dies.

Having watched Jennifer Dove’s video on Whimsy Stamps kinetic dies, I proceeded in making a similar card to the one she made, but I expanded the card into a tri-fold card letting the viewer find the cake.

Because this was the first time, I had used the kinetic dies, I made a few mistakes – the first being I have the rocket moving backwards when you first pull the strip. My second mistake was that I should have used thicker cardstock or cut two and glued together for the pull strip. And my third mistake was allowing the moon to warp when I watercolored it.

I stamped the images with black Memento Fade-Resistant Dye Ink onto white cardstock. The images are colored with Spectrum Noir Sparkle Glitter Brush-Pens and a Faber-Castell white India ink pen. Once dry, the images were fussy cut and ready to use for decorations.

The moon background was colored using Nuvo Watercolour Pencils in gray and black tones as well as a black Spectrum Noir Sparkle Glitter Brush Pen. I used a heat tool to dry the second and third moon backgrounds which did not warp as badly as the first moon which I let air dry overnight.

I recommend watching the assembly video for all the steps in assembling the No-See Kinetic mechanism. Because I followed the video’s directions forgetting that my rocket image went the opposite direction from the one in the video, my rocket goes backwards. Doubling up the foam tape is a must so that it matches the height of the foam dot.

The navy blue card base is made up of two panels 5 1/2 x 6 1/2 inches with tabs scored and folded at 1/4 inches on the short side. The tabs are then glued to a 5 1/2 x 6 inches panel to create the tri-fold card base.

My card uses all the stamps in the set for the three panels. It would be an ideal card for a child.

The card fits folded into an A7 envelope which is stamped on the back with the last of the three sentiments included in the stamp set – “I’m over the MOON for you!”

Thank you for reading. If you enjoyed this blog post, please like it and follow the blog. 😊

Supplies Used:

When the Zoo Comes to You

Zoo Bus -Front-CU

When the zoo comes to you it’s party time!  I was inspired by this adorable stamp and die set drawn by Bonnie Krebs for Art Impressions of a bus full of animals.

Zoo Bus -Front-CU-right
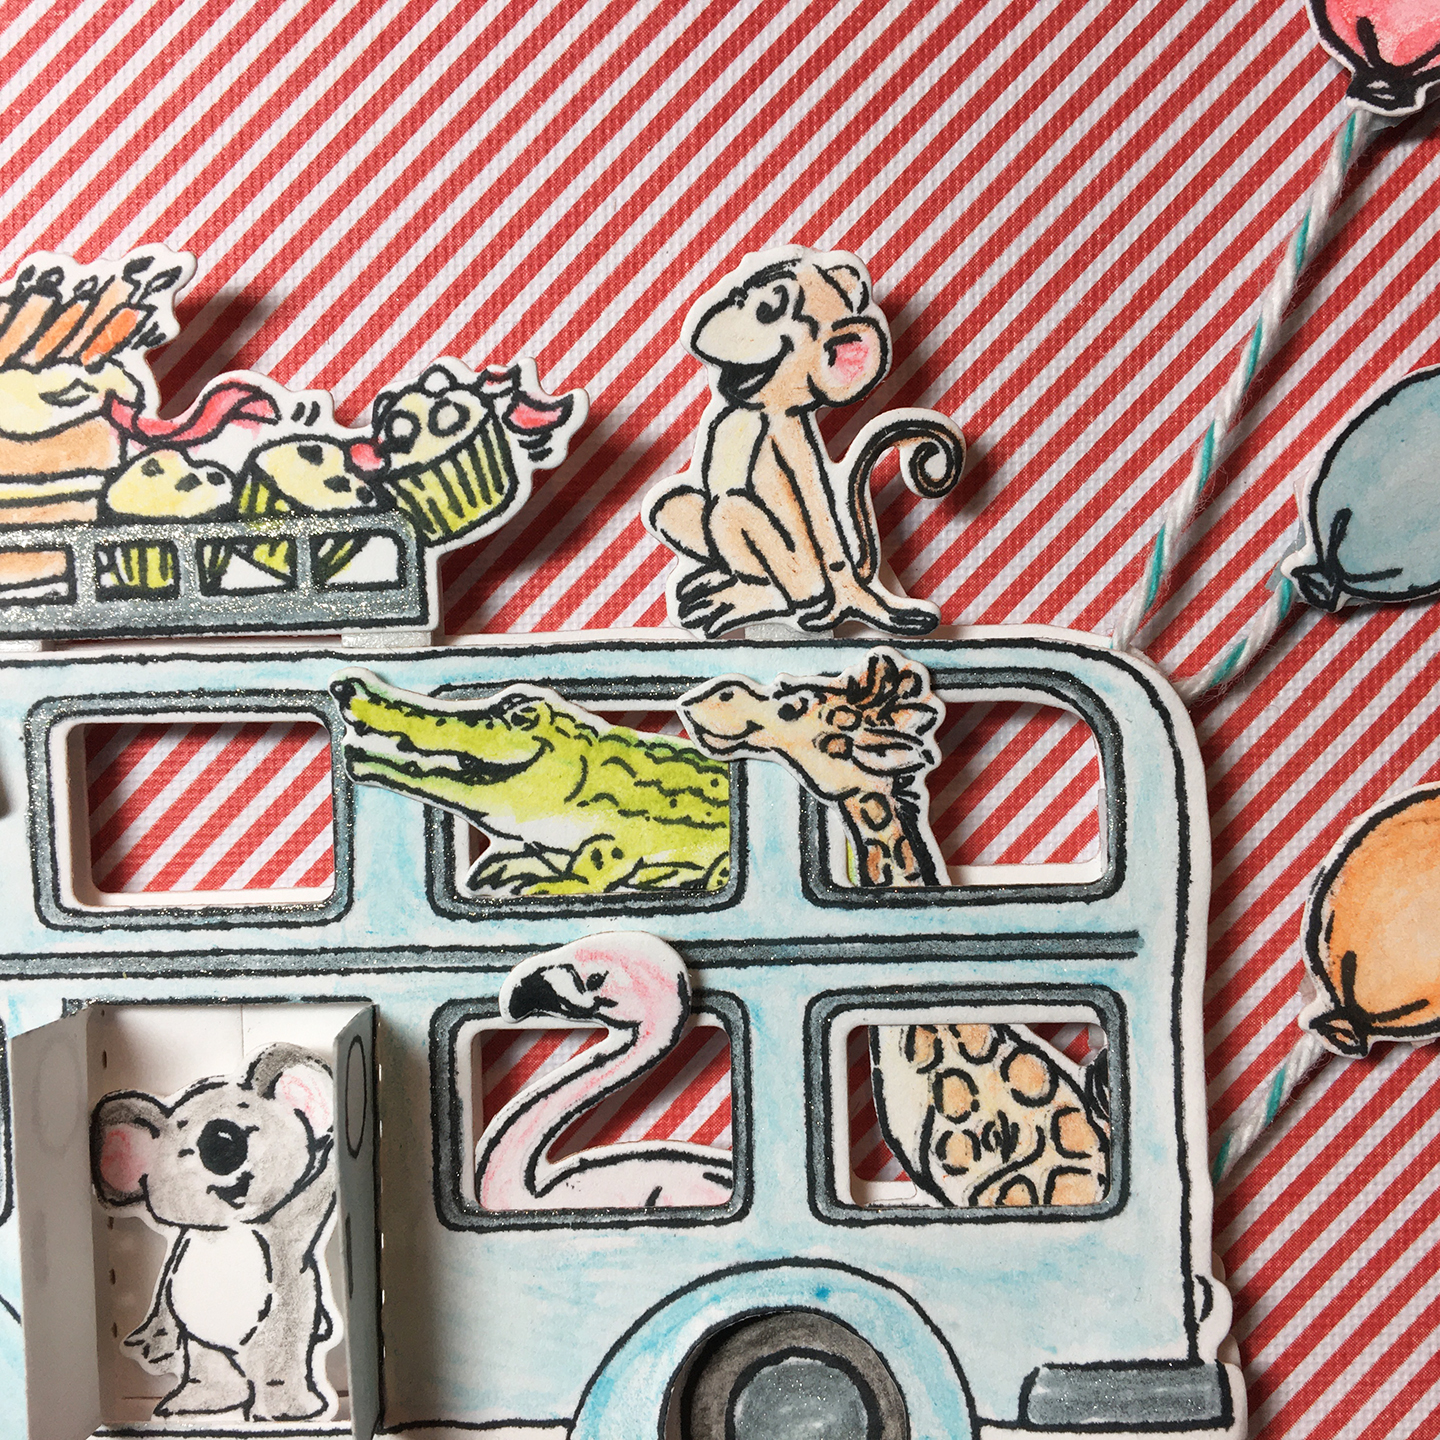
Using Memento Tuxedo Black ink to stamp the images on white cardstock, I colored them with using watercolor pencils and a waterbrush. Once the colors were dry, I used a silver gel pen to color all the chrome trim on the bus and hubcaps. Using the matching dies, I cut the animals and bus out. I cut a second bus out to act as a backing for the bus. I had colored and cut a set of spare tires, so I cut away the tires on the colored bus so I could add dimension of the tires being beneath the bus.

Zoo Bus -Front-CU-leftNext I played with the placement of the animals in the bus and once satisfied with their placement, I glued them to the backside of the blue bus. For the cake rack and the monkey, I had to add small slips of cardstock for supports for the foam tape that adhered them to the bus frame. The koala bear was also foam taped to the back bus using the die cut door opening as my placement guides. The tires were glued flat to the backing bus’s wheels. (And while I toyed with the idea of making the wheels on the bus spin – mimicking the children’s song – I deciding against it.) Doubled sided foam bits from my stash were sandwiched between the two bus layers for dimension. Baker’s twine was taped to the back of the colored balloons and poked between the bus layers and glued.

Zoo Bus -Inside -WUsing Stampin’Up Dapper Denim blue ink I stamped both outside “For You on your birthday” sentiment on white cardstock and then the large “Happy Birthday” inside the card. The “For You” I heat embossed with sparkly snow embossing powder which added sparkle, but embossed clear.

Zoo Bus -Inside -CU
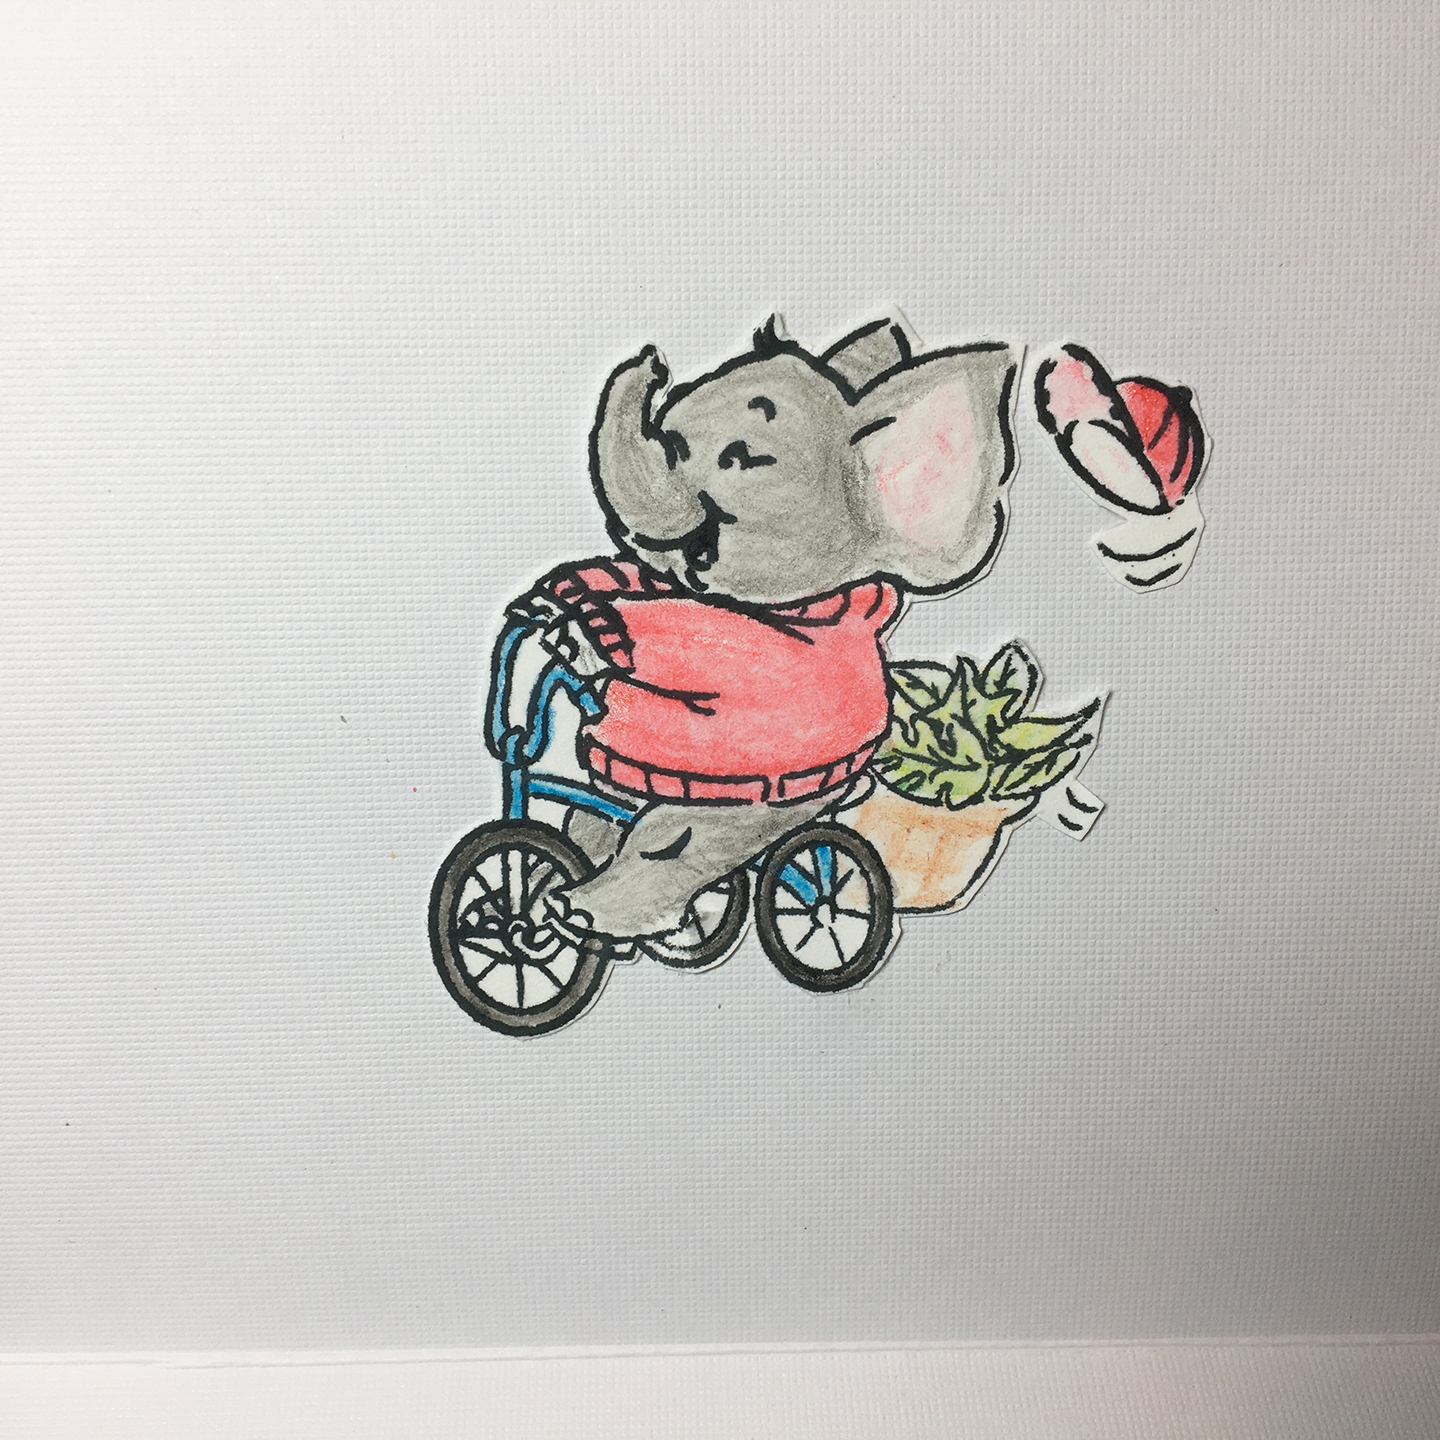
On the top inside panel I added another Art impression’s stamp of a tricycle riding elephant that I had colored and fussy cut out with its hat flying off.

Zoo Bus -Front-W
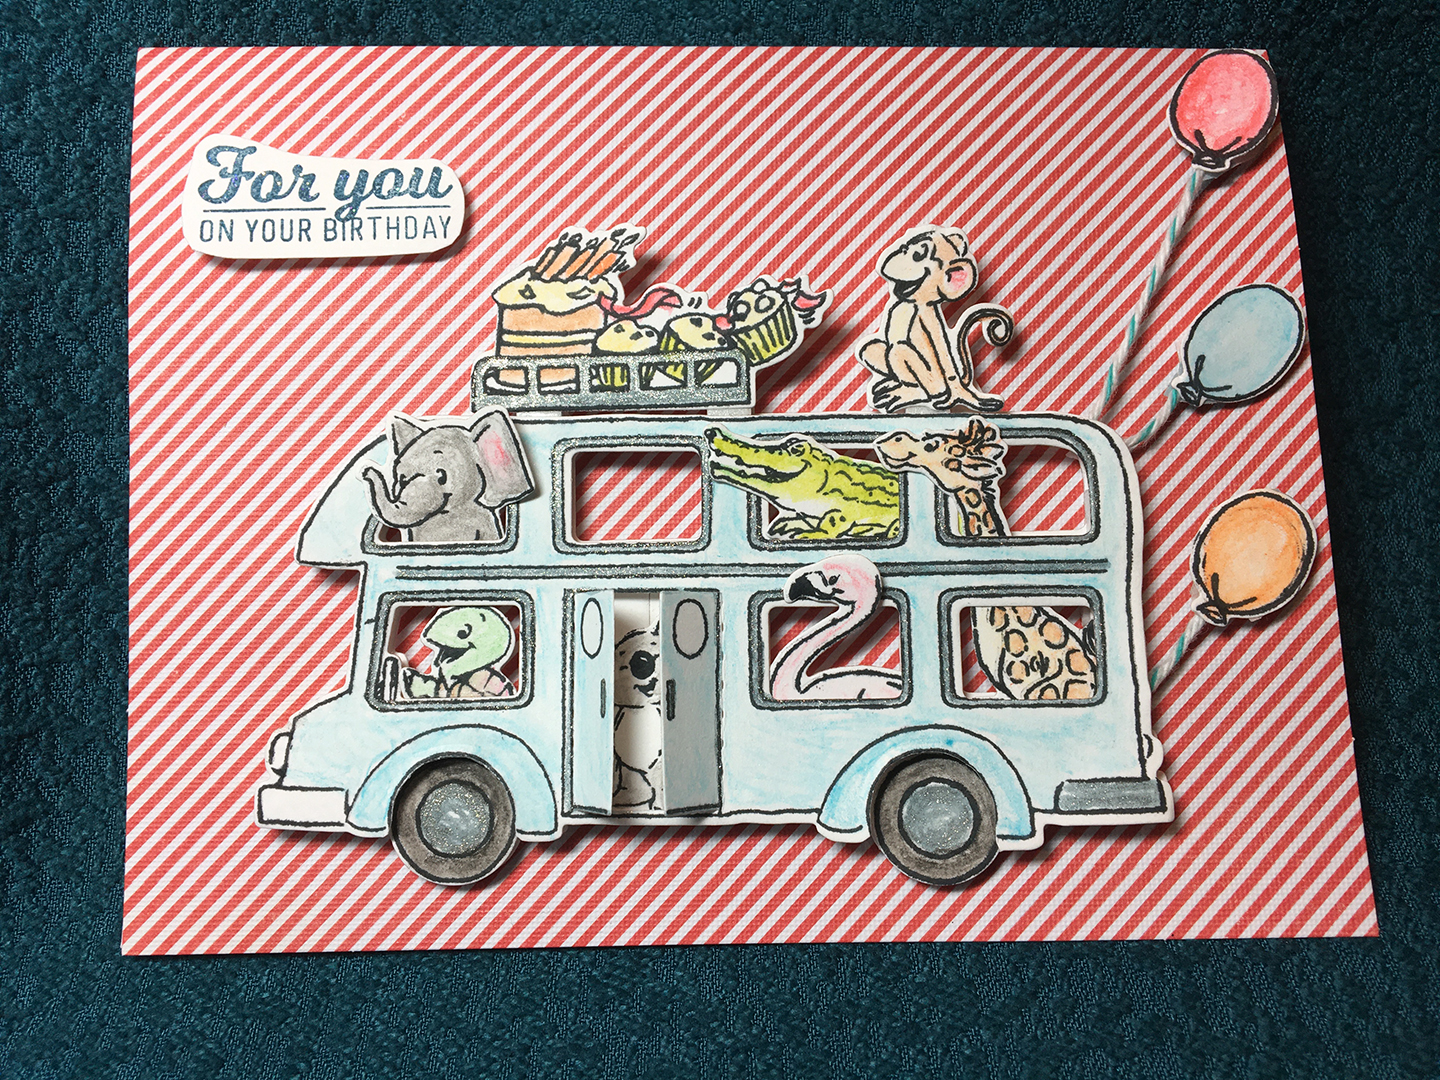
The completed card has the bus doors being able to be opened to shoe the koala bear.

Supplies:

Stamps/Dies

Papers

  • White light weight card stock from stash
  • DCWV – Strips Box of Cards – 40 A2 Printed Textured Cards & Envelops

Inks/Watercolors

Miscellaneous

A Party Without Cake

cake shop front-cu

“A party with out cake is just a meeting” is the sentiment for this pop-up cake shop birthday card.  Made with Die-cutting Essentials Special Edition Issue 6 – Shop Front and Hunkydory Moonstone Shadow Box Frame – MSTONE076 die sets and papers from shop front kit, this scrumptious card is a fun little diorama style card.

cake shop front-medium

The shop front papers include interior scenes as well as signs and background papers.  I adhered the interior paper for the cake shop on to light weight cardstock and then fussy cut around the table shapes. Then I cut the shadow box outer frame and two inner frames. I played with spacing the three tables out on the frames looking through he window and door, before I adhered the tables to frames. I taped using double-sided tape the striped pink wallpaper to the back piece of cardstock for the shadowbox frame and then using foam tape placed the back table on the wallpapered panel. The front two tables were taped using transparent removable tape to the lower corners of the interior shadow box frames.

cake shop front-roof

Next, I worked on decorating the shop front cut from a textured red paper, and I cut a second shop front from cream colored cardstock and fussy cut the window frame and door out it.  The “sweet” sign on the door is a sticker. The mail flap is a piece of gold holographic card, and the doorknob is Nuvo Crystal Drops. The green bushes are cut from a food box and embossed with the embossing folder from the shop front kit and placed with foam tape. The doorstep is from paper kit. A clear piece of acetate was adhered to the back of the window after the shop front was adhered to shadow box frame with double-sided-tape. This helps with the folding of the card, so cakes don’t get caught in the window frame. Sign was cut from papers and then adhered to cream cardstock before being permanently on shop front.

cake shop front-full

The “Happy Birthday” top of the card was stamped, and heat embossed onto white card stock and the cut out with a tab on the bottom. Using makers to create polka dots and then adhered to shop roof. The same polka dot paper from the back was used to roof the shop. The back sentiment was also heat embossed and adhered to back with foam tape.

cake shop back


SUPPLIES USED:

Dies

Paper:

Embossing Folder:

Stamps and Ink:

Miscellaneous:

Celebrating Mr. & Mrs.

wedding-cake-front-e1564794722688.jpg

Weddings, the formal ceremony and celebration of two people becoming one.

This card was created using Karen Burniston’s Frame Pull Pop-Up die set for the pop-up and Poppy Crafts Star Flourish die and star embossing folder for decorations.

WEDDING Cake-Front Angle

The base card with hearts is one from DCWV’s Embossed Box of Cards 5 1/2 x 5 1/2 inches.WEDDING Cake-Pop-Up

I used a silver metallic pen to color the die-cut letters and cake accents. Nuvo Glitter Drops were used to add a bit of sparkle to embossed hearts and pop-up flourishes.

Inside tabs cut to hold a gift card.

SUPPLIES USED:

Dies & Embossing Folder

Paper

Miscellaneous

Be Spontaneous!

BDay Party Ulta closeup-pop-up

Spontaneous birthday parties are wonderful, especially pop-up ones. This card’s inspiration came from experimenting with cutting multiple square wave frames and playing with shadow boxes. Once I realized the square wave frames fit the Karen Burniston Frame Pull Pop-Up top square, I knew I had to create a mini pop-up version of Courtney Chilson’s Birthday Shadow Box card.

BDay Party closeup-Front

Having made the Frame Pull Pop-up card before, I studied my practice card to make sure I remembered the assembly. (You can access the assembly video at here.) I remembered her advice to keep the top square flexible and not over decorated with stiff layers and used papers rather than cardstock to lay the background of colorful wave frames. I made sure the top edge did not have any overhanging edges of the frames that would catch when the card popped open.

IMG_5856

I had cut and assembled several sets of decorations from the Birthday Shadow Box card die set the last time I had made the card, so I only had to cut the cake and frosting and a circle for a plate from scrap cardstock in my stash. I found two shades of browns for the cake and used a white gel pen to added accents to the frosting. After gluing the cake together, I gently rounded the cake with my fingers to add depth to it as well as a Mini Dimensional foam dot to adhere it to the pop-up cube on the card. Double-sided red tape was used to attach the awning to the top of the pop-up.

BDay Party closeup-pop-up right

Decorations for the inside of the card all came from the Birthday Shadow Box set. The sentiment banner is a strip of thin cardstock stamped and embossed using Stampin’ Up Blow Out the Candles stamp set, VersaMark Watermark Stamp Pad and Ranger Black Sparkle Embossing Powder. The balloons stamped on the envelope flap are also from the Blow Out the Candles set. The die cut words on the pop-up come from Karen Burniston Word-Set-2-Birthday.

BDay Party -inside

SUPPLIES USED:

Dies

Stamps:

Paper:

Miscellaneous:

TZXT2727[1]