
It’s time for the Karen Burniston design team challenge for May 2023 with the theme of BEJEWELED.
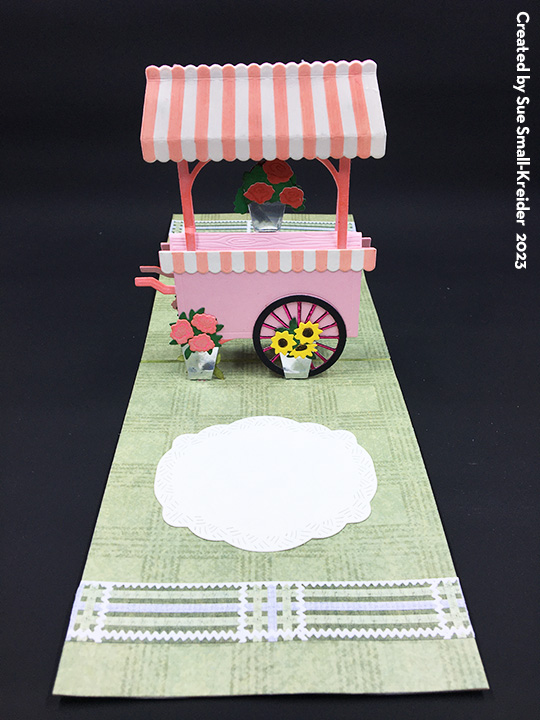
My inspiration for this card was drawn from a similar cart made by a crafting friend Diana Bentham several years ago and a video by Anna Griffin.

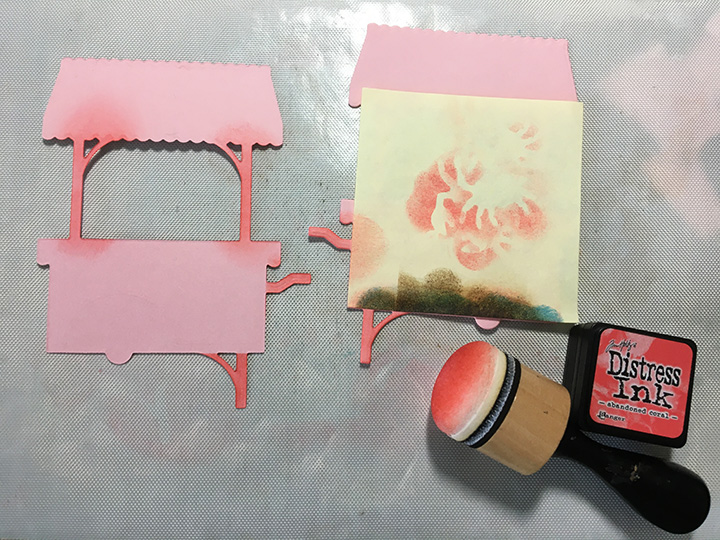
Cart Drawer: The cart is based around the Slider Box. Watch the assembly video before die-cutting pieces. I used blue 100 lb. cardstock for the box and 65 lb. white cardstock for the drawer. A piece of sheer blue ribbon was used as a drawer pull. A Bam Box (see assembly video) is what pops up the message of “Thank you love you.” The sentiment is from Word Set 13 – Snow and Word Set 1 – Greetings while the rectangle is cut using one of the slider box decorative dies. Another decorative die with crosshatches was used to line the drawer with a polka dotted pink paper. The front of the drawer is decorated with the scrap from cutting the scalloped roof.

Cart Base: The cart’s frame made by die-cutting two of the Fancy Label Accordion panels and removing the center pivot panel to create a square frame with a tab on one side. Fold in half with tab side facing up. Glue the u-shape together. I took the two smallest of the off-cuts from the die cut to make the cart handles. (Glue the pieces back-to-back for stability.) Glue handles on to slider box at open end before adhering the u-shape frame to slider box.


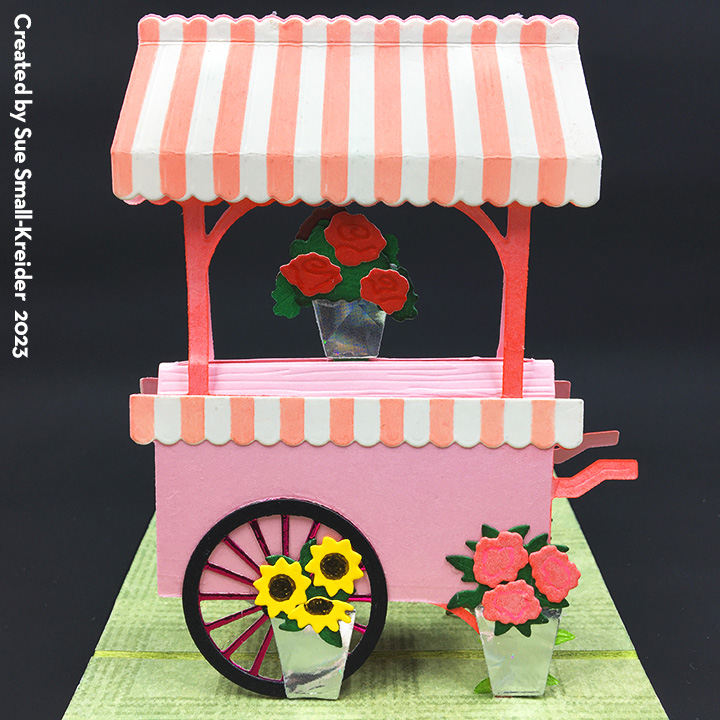
Flowers and Pails: The flowers were cut from two shades of pink greeting card envelopes that I upcycled. The dies used come from three different sets – Flutter Charms, Flowers and Bee, and Flower Pot Pop-Up. (The flowers in Flowers and Bee and the Flower Pot Pop-Up are the same.) I used yellow posy flatback gems as the larger flower centers and sparkly resin gems for the smaller flowers. You can create some dimension to the flowers by shaping them with your fingers. I glued flowers on to scrap pieces of green cardstock that were glued into the silver pails.


The pails are cut from another upcycled envelope of holographic silver using the pail from the Adirondak Chair Pop-Up. I cut a front and a back for each pail, plus four more single-sided pails, cutting 16 pails total. Flowers are glued on both front and back of the six pails that line the cart’s sides. Four pails are glued to a small cube I made from matte silver cardstock and adhered to the center of the cart’s tabletop.


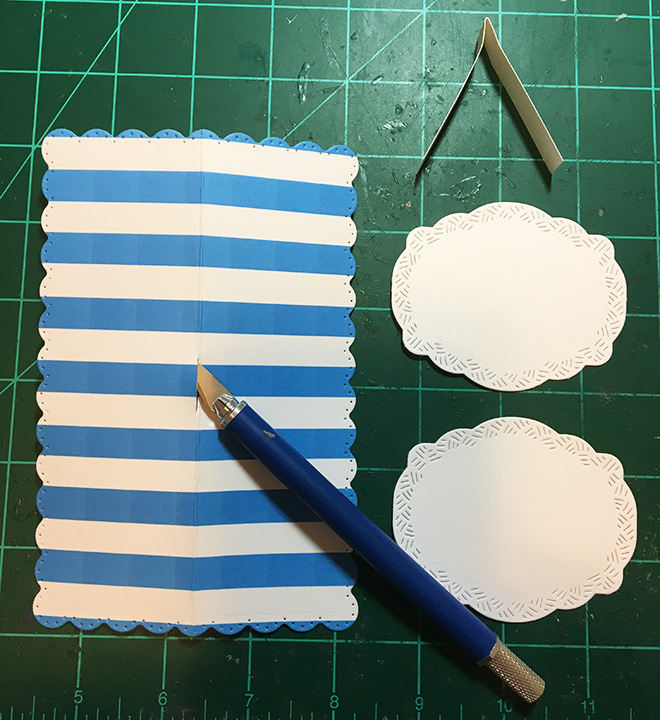
Roof Frame: The striped roof awning is cut from some digital striped paper using the large scalloped edged rectangle in the Rectangles and Labels – Crosshatch set. It is held up by a frame made by die-cutting two of the Fancy Label Accordion in white cardstock and cutting off the center pivot panel and side tab. (My cardstock was lightweight, so I cut a third frame and cut it in half to back the lower portion of my frames.)

Fold each of the frames at 2 3/4-inches. Glue the frames on to the sides of the cart base, lining up the bottom edge of the white frame to the inside edge of the blue cart frame.


Cut three strips of white cardstock 1 1/2-inches long by 1/2-inch wide. Fold each strip in half. Pinch the top halves of the roof frames towards each other to form triangular frame. Glue together with the three strips. Scraps from the die-cutting of the scalloped roof were used to decorate the cart sides.

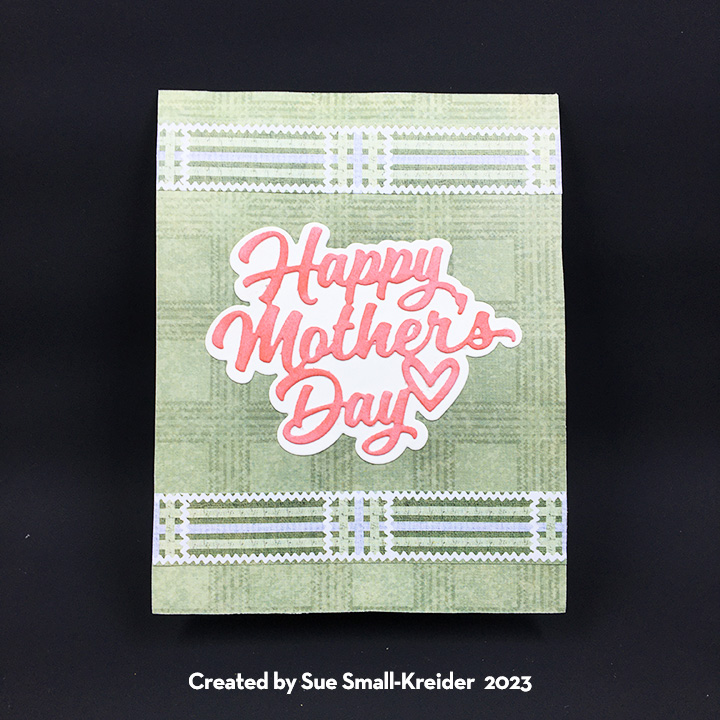
Roof Sign: For the roof sign the “Happy Mother’s Day” was die cut twice using a deep blue foiled cardstock glued to two of the crosshatch fancy label from the Rectangles and Labels – Crosshatch set. A strip of white cardstock 5-inches long by 1/2-inch wide was folded in half and then the folded end was sandwiched between the two fancy labels and the labels adhered together. (You now have the equivalent of a large paper brad with two legs.) A slit was cut in the roof fold center for the legs of the sign to slide through and be glued to the underside of the roof.


Message Label: A personal message can be written on the front of the cart’s label made from the smallest of the fancy labels in the Rectangles and Labels – Crosshatch set and the green mat from the dotted label from the Label Charm Pop-Up set.

Wheels: For the wheels I made a template using middle plain and crosshatched circles from the Circles – Crosshatch set. Cut the plain circle from scrap paper and the place the crosshatch circle die in the middle of the paper circle. Trace around the center of crosshatch die. Fold the paper in half, then half again and once more in half to come up with eight sections of the circle. Using a see-through ruler, mark and draw 5mm wide spokes interesting in the middle of the circle.

Die-cut from brown mirror or foil cardstock two plain circles. On the back side of the circles use the paper template to trace the triangles that need to be cute out using a craft knife and straight edge. Color the back of the wheels with black marker.

Die cut two black circles using the larger of the circles from either the Flowers and Bee or the Flower Pot Pop-Up set. These will be the wheel hubs. Top hubs with Nuvo Drops and flat-backed pearls.(Allow Nuvo Drops to dry 24 hours before gluing onto cart.)
Glue wheels onto cart’s front posts. Trim off posts just below wheel hubs.
Finished Measurements: This is card/gift box is designed to hand delivered and measures 8-inches high, 6 1/2-inches wide and 3-inches deep.
Thank you for reading this blog post. I hope this inspires you and makes you smile. Please like and leave comments 😊
For more Slider Box creations click here.
Materials Used:
Dies
- Karen Burniston in cahoots with Riley and Company – Rectangles and Labels – Crosshatch – 1233
- Karen Burniston in cahoots with Riley and Company – Slider Box – 1227
- Karen Burniston in cahoots with Riley and Company – Bam Box Pop-Up – 1222
- Karen Burniston in cahoots with Riley and Company – Label Charm Pop-Up – 1209
- Karen Burniston in cahoots with Riley and Company – Flutter Charms – 1196
- Karen Burniston in cahoots with Riley and Company – Word Set 13 – Snow – 1167
- Karen Burniston in cahoots with Riley and Company – Happy Mother’s Day – 1163
- Karen Burniston in cahoots with Riley and Company – Adirondack Chair Pop-Up – 1071
- Karen Burniston in cahoots with Riley and Company – Circles – Crosshatch – 1057
- Karen Burniston in cahoots with Riley and Company – Fancy Label Accordion – 1043
- Karen Burniston in cahoots with Riley and Company – Flowers and Bee – 1026
- Karen Burniston in cahoots with Riley and Company – Flower Pot Pop-Up – 1010
- Karen Burniston in cahoots with Riley and Company – Word Set 1 – Greetings – 1002
Papers
- Spellbinders-Color Essentials Cardstock – 100 lb – Raindrop -CS-019
- White, Black and Green Cardstock Scraps
- Pink and Silver Holographic Recycled Envelopes
- Brown and Deep Blue Mirror/Foil Cardstock
- Matte Silver Cardstock
- Ully Cat Designs – Digital 8.5×11 Cardstock – Blue Awning Stripes
Pens/Gels
- Sharpie – Permanent Marker Chisel Tip – Black
- Nuvo Jewel Drops – Coco Blush
Adhesives
Tools
- Die Cutting Machine
- Quickstik Tool
- Scissors
- Tweezers
- Metal Ruler
- Craft Knife
- Pencil
Bling
- Queen & Co. – Posies Topping – Golden
- Craft Consortium – Designed by Hackney & Co. – Enamel Dots – Gardener Delight
- Stampin’ Up – Wonderful Gems
- Blue Sheer Ribbon 5/8-Inch Wide


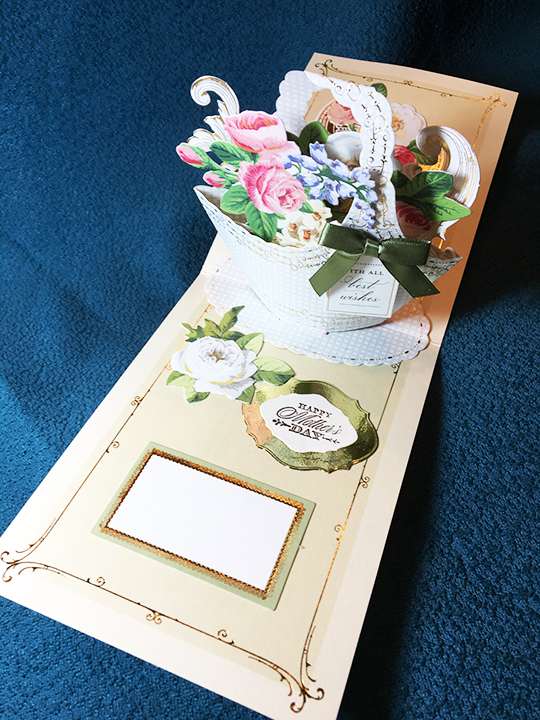

 Celebrating Mother with May flowers is a tradition. I was happy to see that Anna Griffin’s new teacup die set includes the ability to emboss flowers onto the edges and side of the cup and saucer.


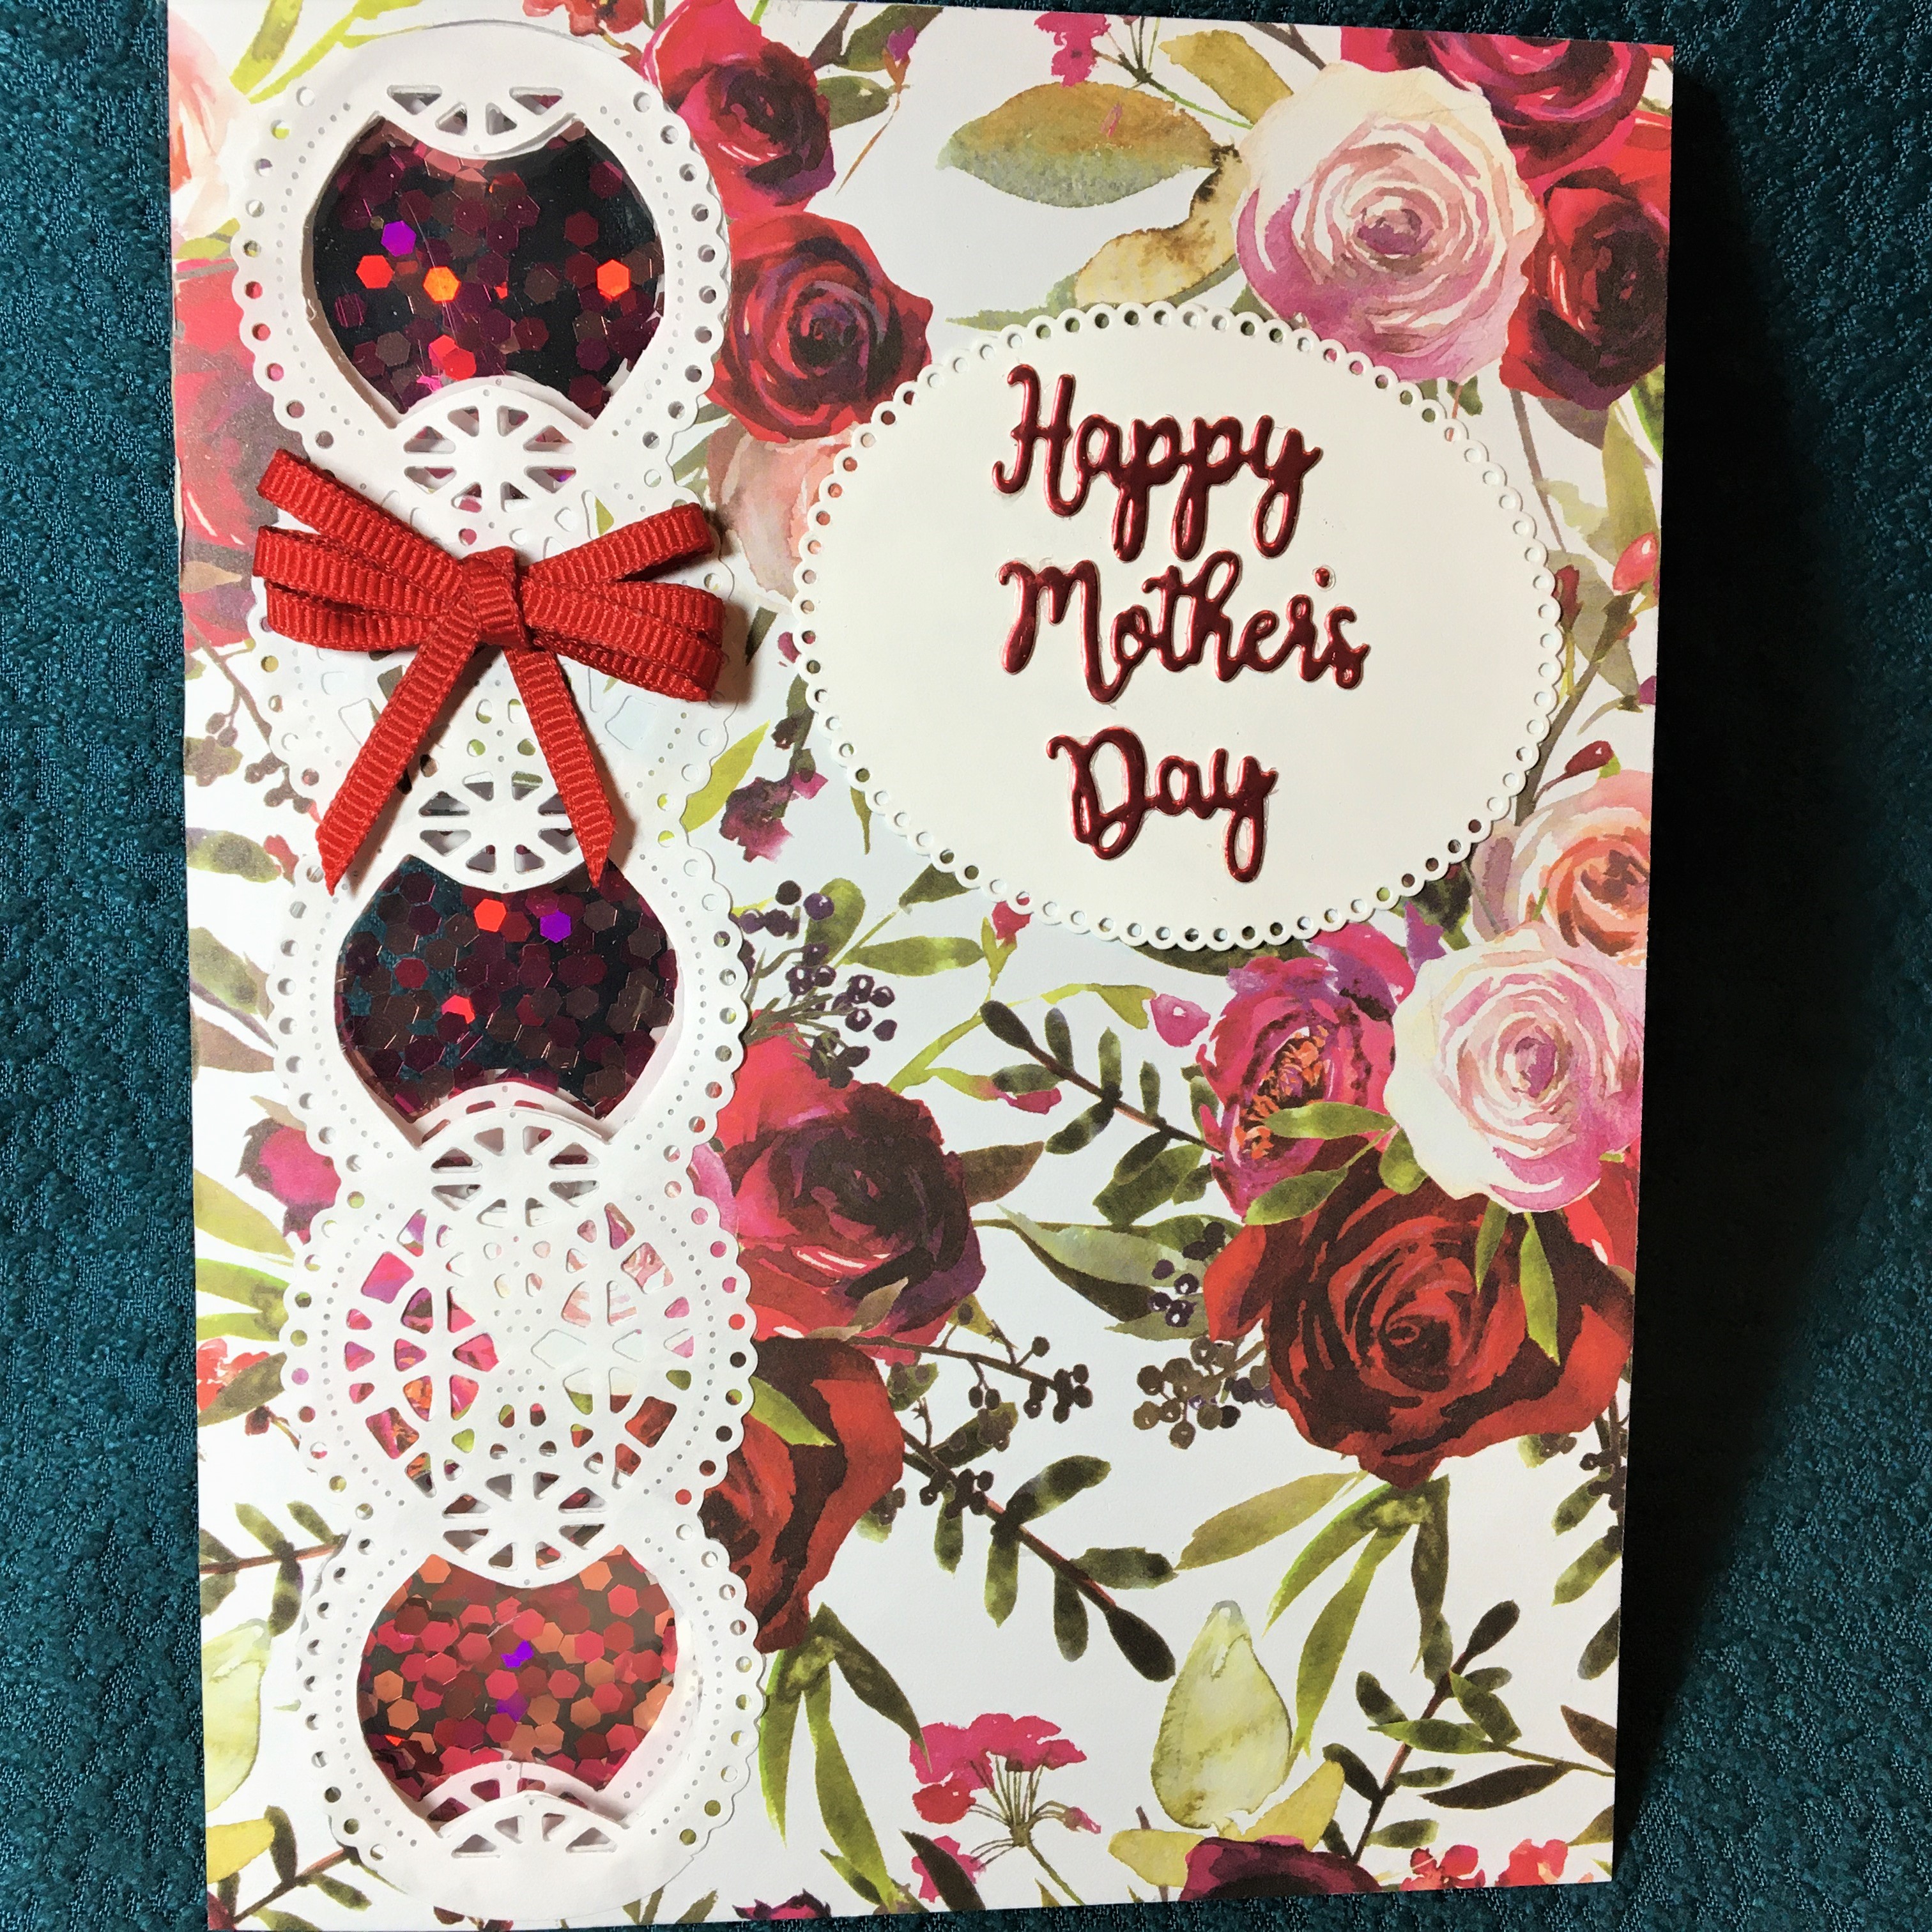
 Because the glitter is very clingy with static to the acetate, I decide to use this quality in my design and my shakers are only the thickness of some recycled cardboard box cut into a square and the circle die-cut out. I adhered a strip of acetate to the inside of the back panel of card base with double-sided tape. The cardboard squares were glued to back of card over the circle openings. With the card on a flat surface I put pinches of glitter into the cardboard circles and then added glue to edges of cardboard and dropped a square of acetate over each cardboard square to seal up the shaker. (If I had it to do over, I would have used the temple to mark out the cardboard and make it one long panel instead of squares.)
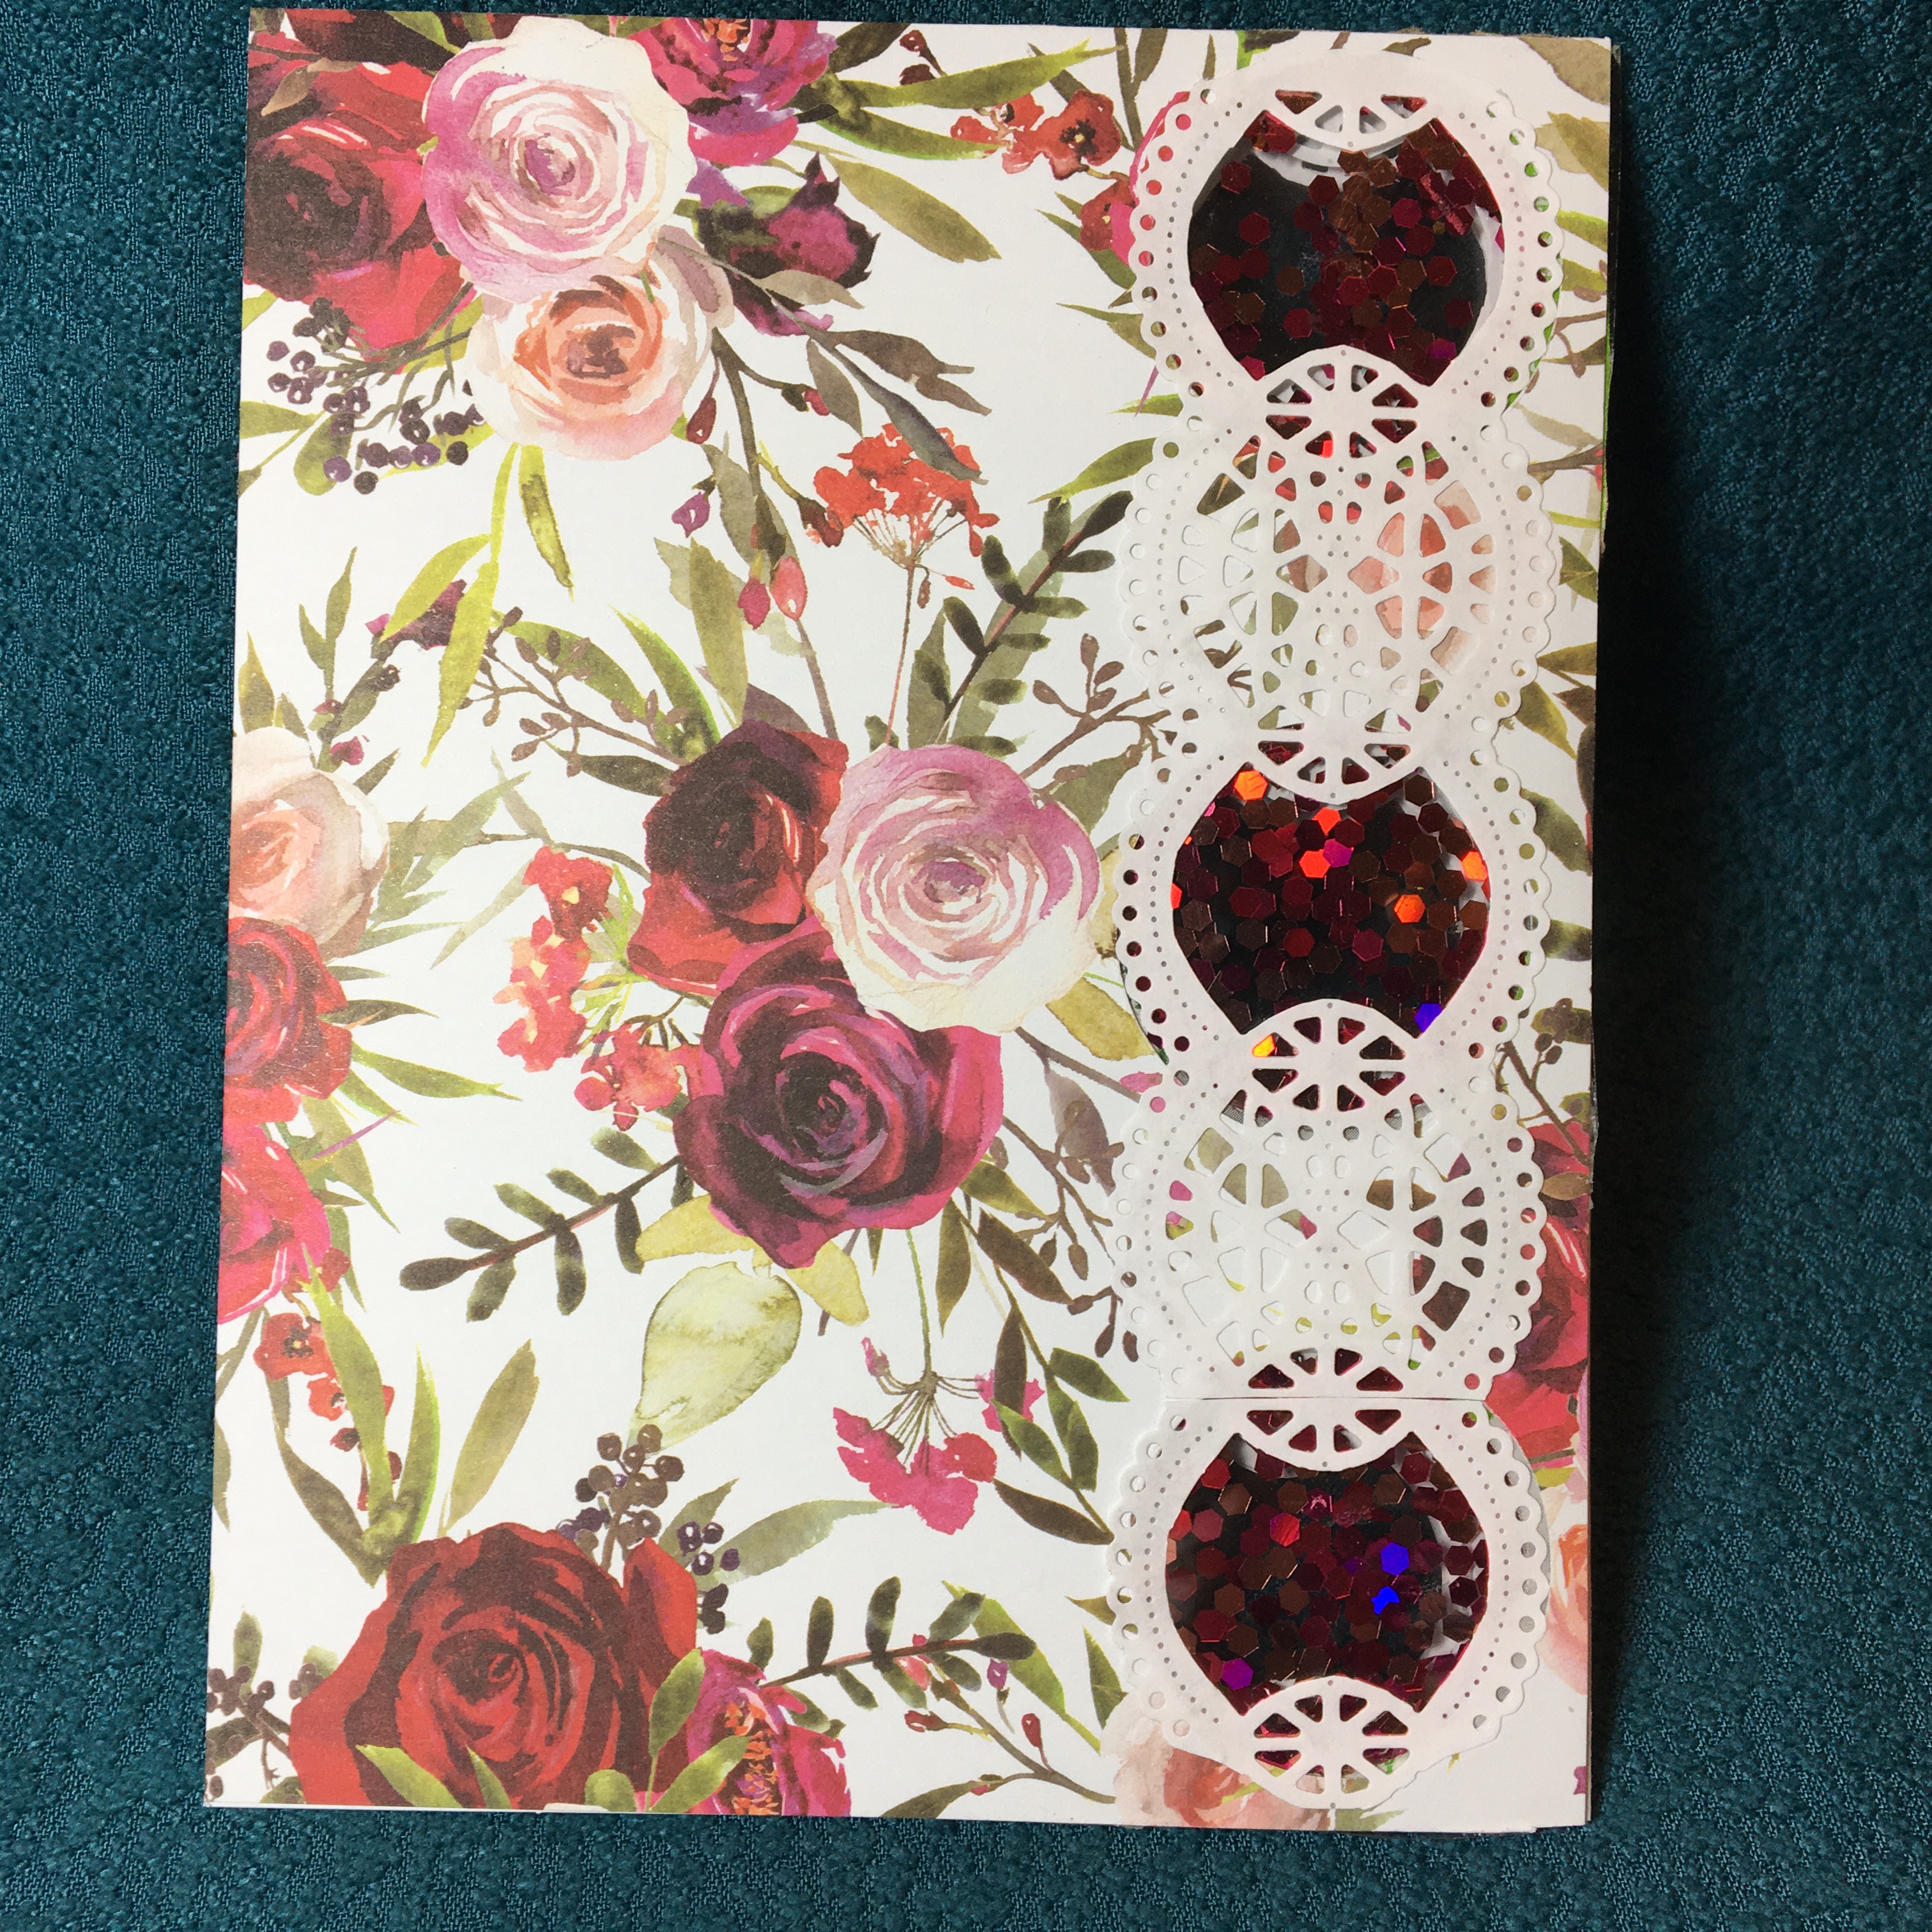 Next, I traced as best I could the shaker circles onto the back side of the two outer printed cardstock panels and the two inner patterned paper pieces. With printed sides place together and taped with removable tape, I cut both outer panels together. Repeated the same process with inner pattern paper. Using double-sided tape and a few drops of glue, I adhered the outer panels and the inner papers lining up all the shaker holes. To hide the small gaps, I die cut four strips of scalloped lace from thin white paper using an un-named die by Joanna Sheen in my stash. There are five circles in the lace, I cut out the top, middle and bottom inner circles to correspond with the shaker circles. I glued the four lace pieces over the inner and outer panels’ circles.
 The front of the card has a die cut scalloped oval with “Happy Mother’s Day” die cut from a recycled chocolate’s box. A multi-looped button is from tiny grosgrain red ribbon from my stash.
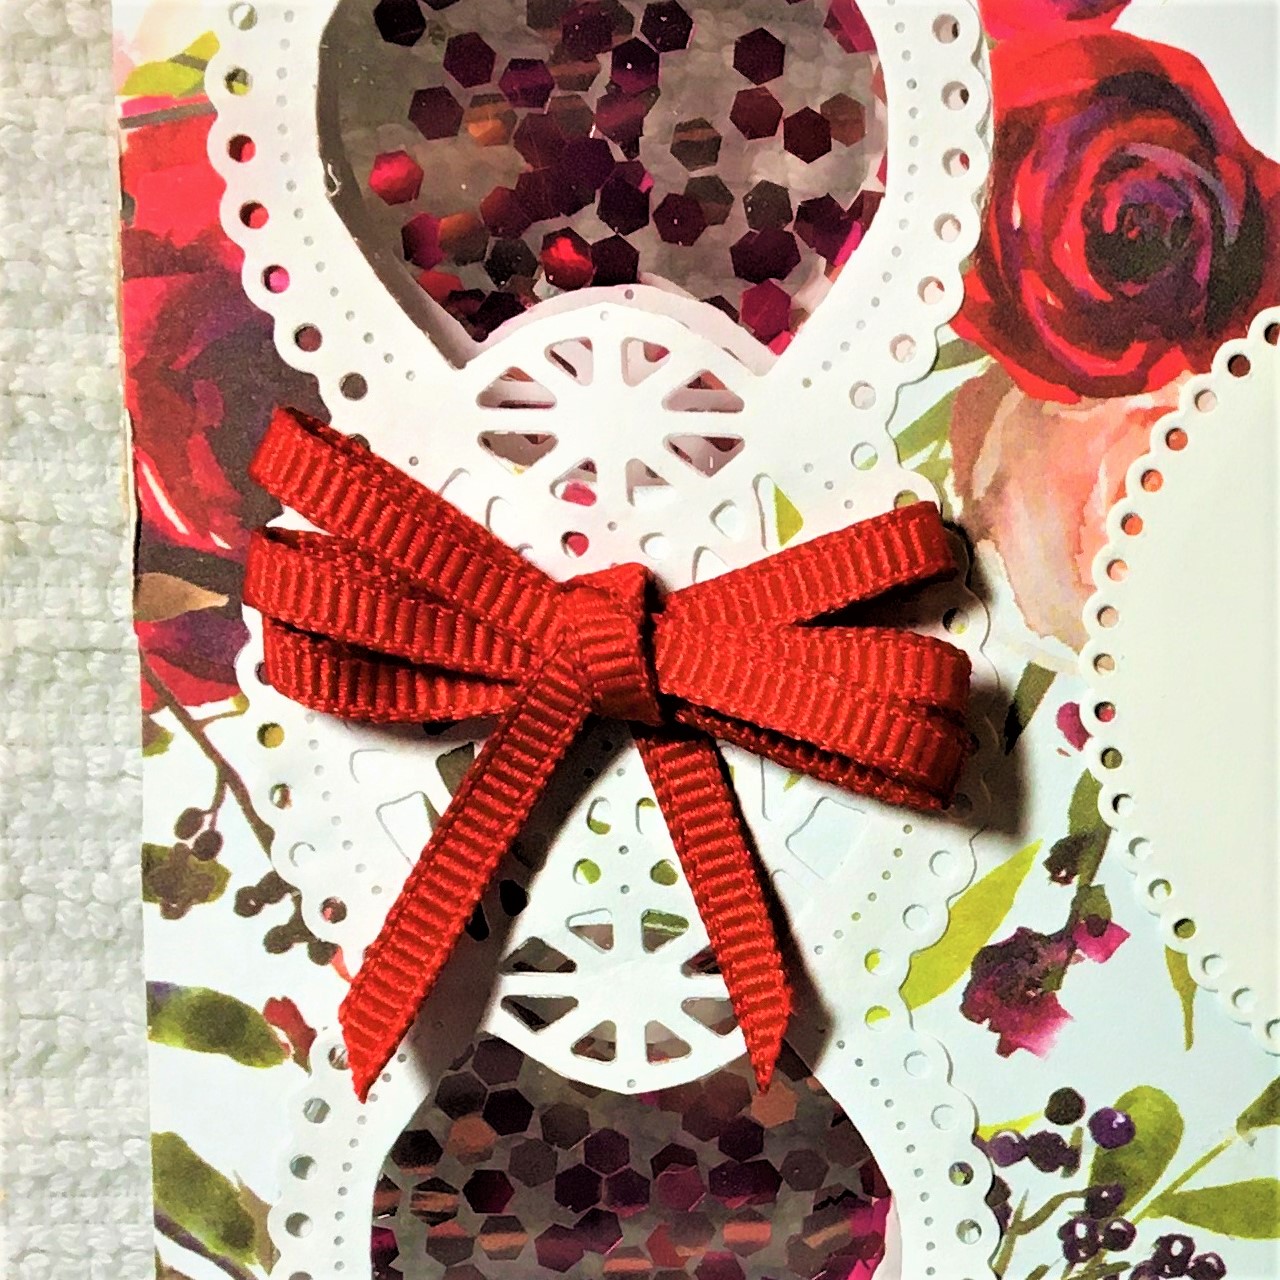 Materials:


