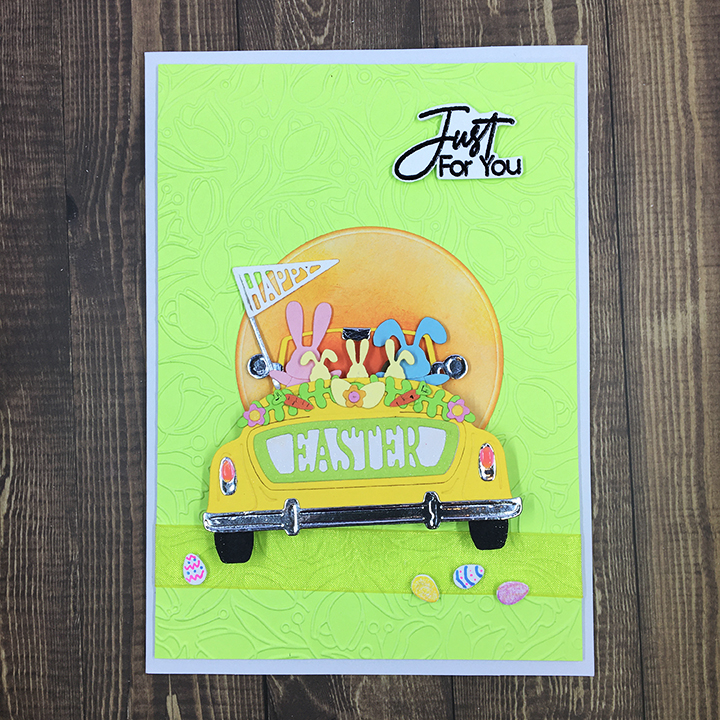
Knock, knock. Who’s there? Hoppy Day the dancing bunny of spring.
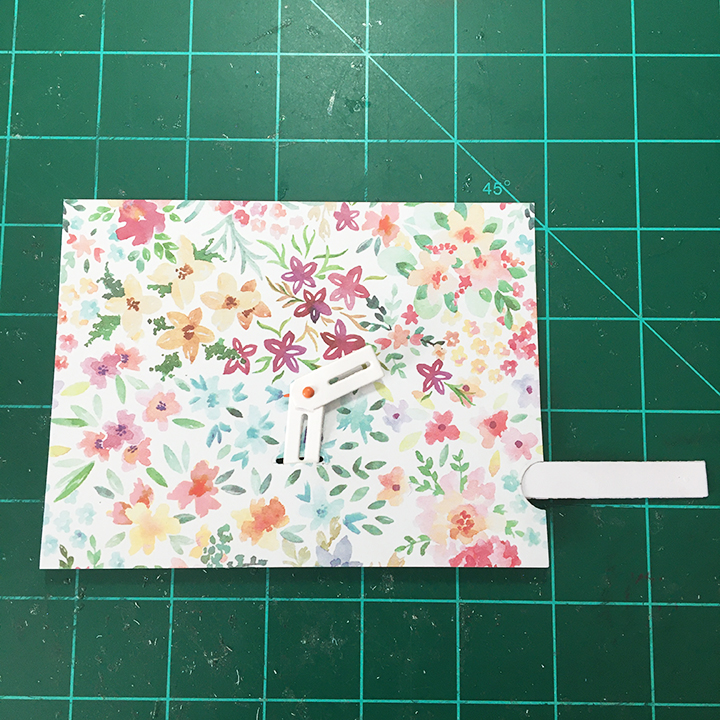
Interactive cards are fun and creating one with layers adds to the excitement. Hints of Easter baskets filled with eggs flank a blue door that when opened, reveals a cute white bunny that will dance when the pull tab is moved back and forth.

Both the doorway and bunny are craft die sets by Spellbinders. The doorway is the Open House Door Base using the door mat from the Open House Spring die set. (I have found that you can save on bundles from Scrapbook.com for the Spellbinder’s Open House collection.) For the dancing bunny, the March 2021 Large Die of the Month set Spring Together with Lever Pull die set was used. (I watched the assembly video for this die set before making this card.)


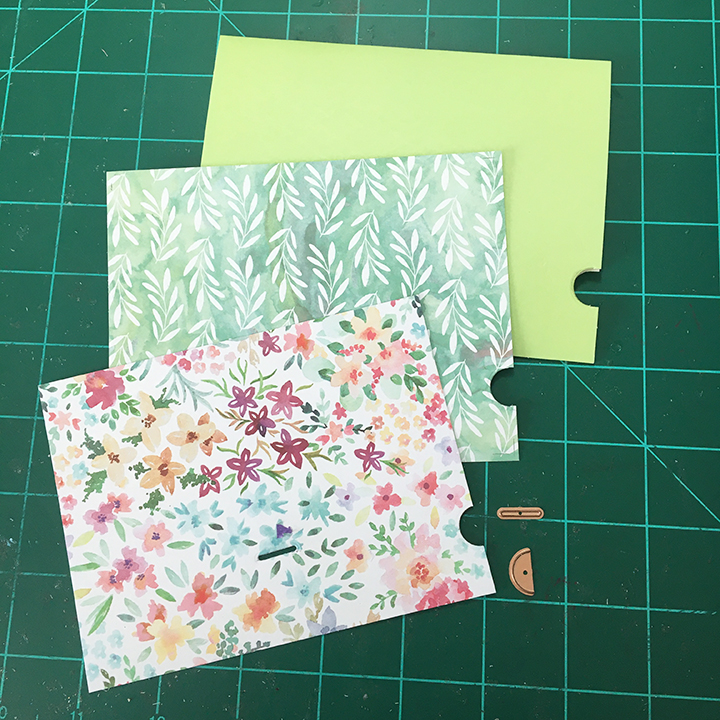
Die-cut the door from blue cardstock and then die cut the windows from the door. Using the door, mark its placement with pencil and then cut the three sides using a metal straight edge and craft knife. Trace the window placement from blue door to pink door and die cut the windows.

Die cut four door windows and a transom window from white cardstock. Use the large transom window die to cut window opening in the pink card front. Adhere the vellum to back of pink card and then glue white window frame into window opening and onto vellum. The door windows are created by sandwiching the vellum between the blue and pink doors. Glue the white door window frames to the front of blue and back of pink doors.

Cut two of the mail slots and four of the doorknobs from silver foil cardstock. Adhere the mail slots to each side of the door and three doorknobs to the front blue side and one knob to the pink side of door. Mark the door opening with pencil onto the background paper. This will let you figure out the placement of the bunny.


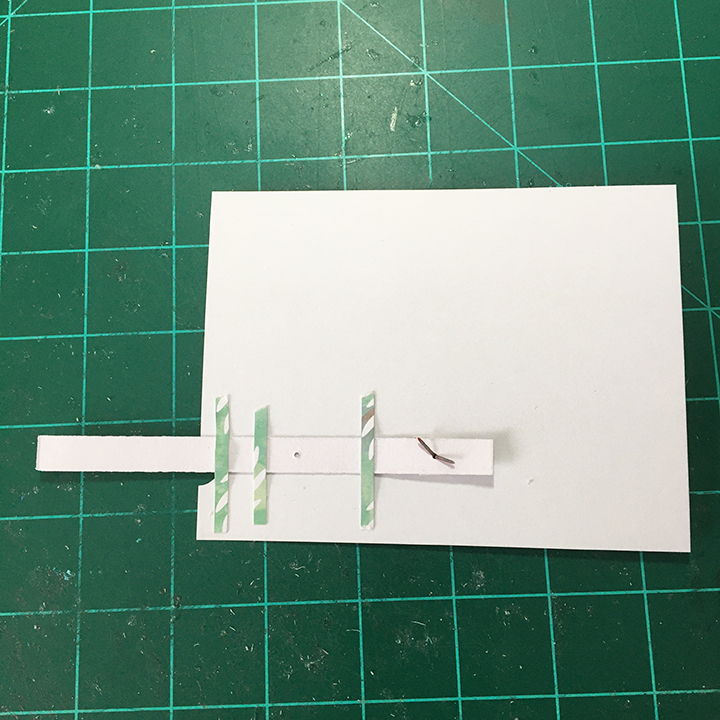
Once the lever pieces are double cut and glued together for strength, they can be linked used tiny brads. Using the assembled level to position the line die, cut the slit for the mechanism to slip into the backing paper. Thread the level through the slot and add additional brads to affix the mechanism to front of card.

Adhere the bunny body first with foam strips and then the head. Cut the semi-circle notch on the top and background layers of the card as well as the card base before assembling the card front.

Using foam strips adhere the pink card with door to background piece avoiding the lever mechanism.

The door mat is colored brown cardstock with Aged Mahogany Distressed Ink with a black backing for the letters. Die-cut the half-circle for the pull lever on the card base before adhering front layered piece to card base.

The Easter baskets used the large eggshell from the Spring Together set with green foliage from the Open House Spring die set and freehand eggs and handles. The flowers are finished with dots of Nuvo Drops and a pink flower sequin.

Decorate the back of the card with scrap pieces.
Thank you for reading this blog post. Please like and leave comments 😊
Click here to see more dancing animals using these dies.
Click here to see see another door card using these dies.
Click here to see other door cards.
Materials Used:
Dies
- Spellbinders – Open House Door Base Cutting Dies – S4-1131
- Spellbinders – Open House Spring Cutting Dies – S4-1181
- Spellbinders – March 2021 Large Die of the Month set Spring Together with Lever Pull Cutting Dies – DOML-MAR21
Stamping
- Simon Says Stamp – So Talkative Clear Stamp Set – sss202385
- Craft Consortium -English Garden Clear Stamps by Hackney & Co.
- Stampin’ Up – Classic Stampin’ Pad – Pear Pizzazz
- Simon Says Stamp – Pawsitively Saturated Ink – Sunbeam
- Ranger – Tim Holtz Distress Ink – Aged Mahogany
Papers
- Craftwork Cards- Flying High 8×8” Paper Pad
- Colored cardstock scraps
- Clear vellum scraps
- A7 white card base and envelope
Miscellaneous
- Cosmic Shimmer – Specialist Acrylic Glue – 125ml
- Sizzix – Big Shot PLUS die cutting Machine
- Fineline 20 Gauge Applicator & Bottle
- Nuvo Vintage Drops – Yellow Brick Road
- Button Galore& More – Sparkletz – Pink Flamingo – SPK130
- Recollections – Mini Brads
- Foam strips