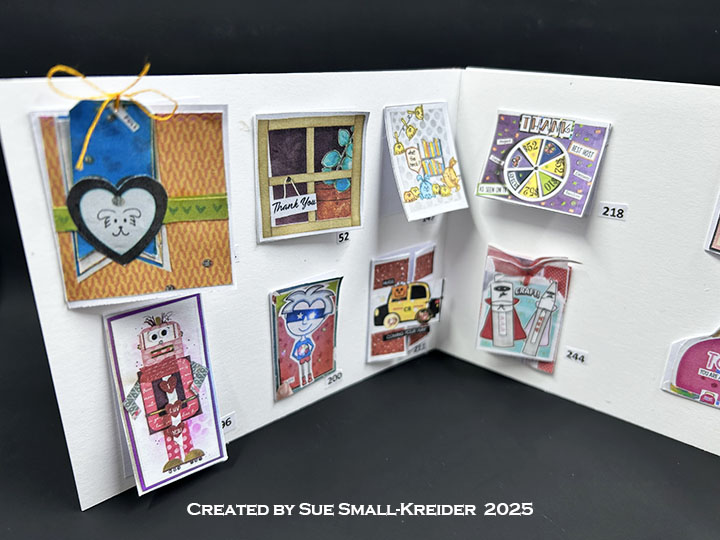
This card was made for Craft Roulette #264 whose parameters included a card for an influencer, dreamy colors, crafts/crafters, and off center.
Watch the process video to see how I made this card.
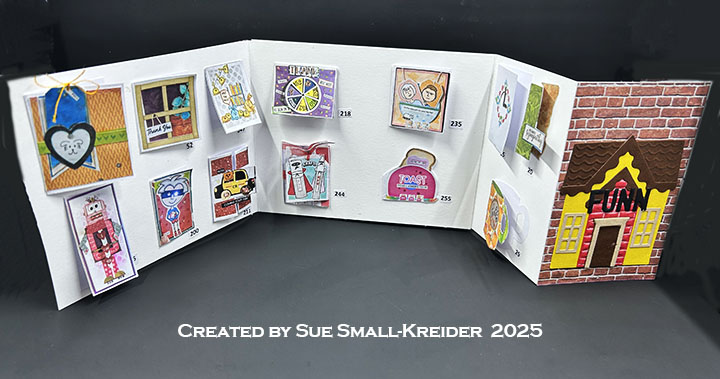
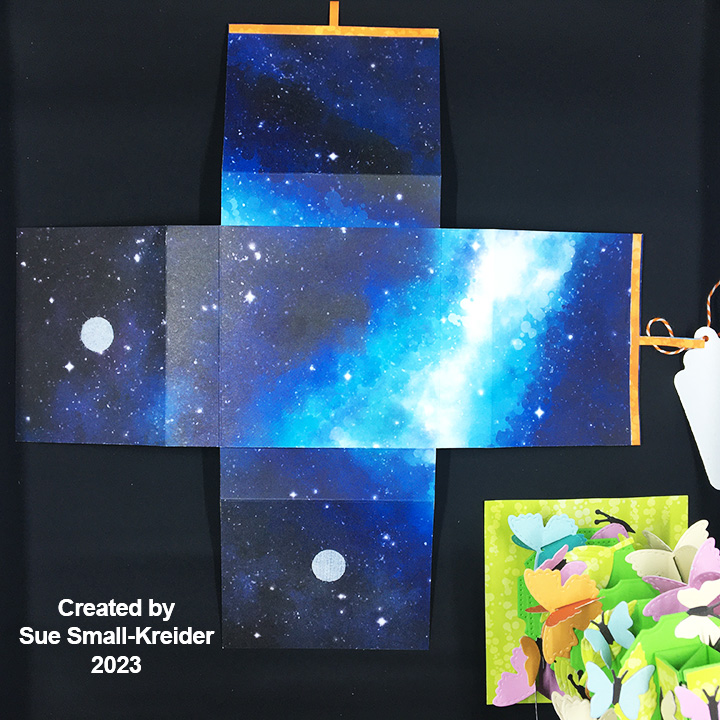
Cardbase: Cut an 8.5×11-inch piece of heavy white cardstock into two pieces that at 4.25×11-inches. Score and fold in half at 5.5-inches both pieces. On one piece score and fold at 2.75-inches. Glue the two cards together with the large rectangle panels overlapping as shown in the video. Cards: Because this card is going to Mary Gunn, I used images from her Craft Roulette Community Showcase gallery, picking cards that are iconic to the show. I tried to recreate some of the fun folds and bookmark cards.
Guide Sheet to Cards: This sheet is folded and tucked in a pocket on the back of the card.
Envelope: The card fits into an A2 (4.25x 5.5-inches) size envelope.
________________________________
Thank you for experiencing this blog post.
I hope this inspires you and makes you smile.
Please like and leave comments 😊
______________________________
Disclaimer: Karen Burniston products are provided free of charge by the manufacturer for review and use. All other items were personally purchased. Compensated affiliate links used where or when possible, meaning I will receive a small percentage commission from these manufacturers at no cost to you. This will allow me to add more content to my YouTube channel and help out a lot. Thank you.
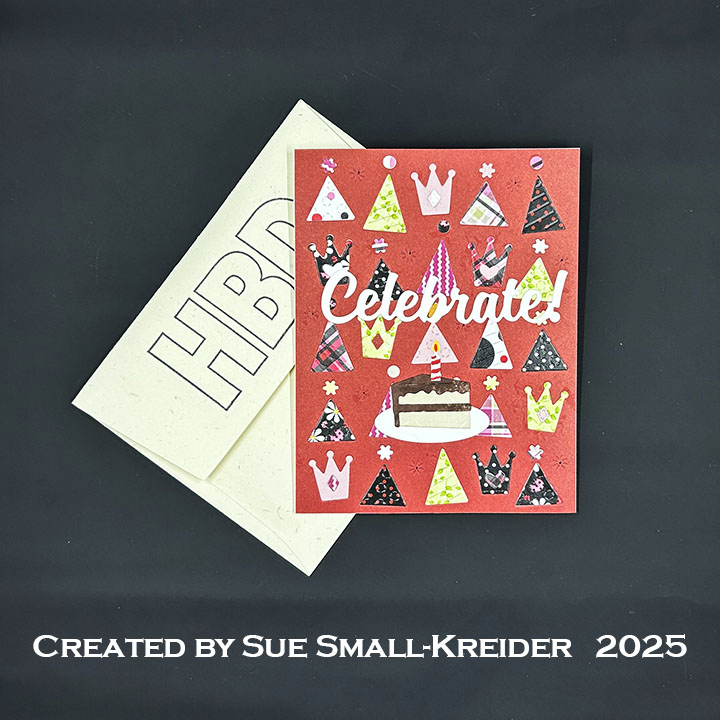
When needing a large number of birthday cards, making multiple inlay die-cut backgrounds is the way to go.
Watch the video below to see how I made these cards.
Cardbase: I made eight A2 size cardbases by folding 8.5×5.5-inch rectangles of white cardstock in half.
Card Front: The card front uses Concord & 9th’s Party Hats inlay die along with the slice of cake from Karen Burniston’s Big Birthday Charms.
Sentiments: The sentiments were stamped in black ink using the Craft Roulette’s Funn Sentiments #01 stamp set and Karen Burniston’s Celebrate, Happy Birthday and Shadow dies along with her Katherine Label Pop-Up die set.
Envelope: The card fits into an A3 (4.25x 5.5-inches) size envelope stamped with a sentiment or a hand-drawn heart.
___________________________________
Thank you for experiencing this blog post. I hope this inspires you and makes you smile. Please like and leave comments 😊
___________________________________
Disclaimer: Karen Burniston products are provided free of charge by the manufacturer for review and use. All other items were personally purchased. Compensated affiliate links used where or when possible, meaning I will receive a small percentage commission from these manufacturers at no cost to you. This will allow me to add more content to my YouTube channel and help out a lot. Thank you.
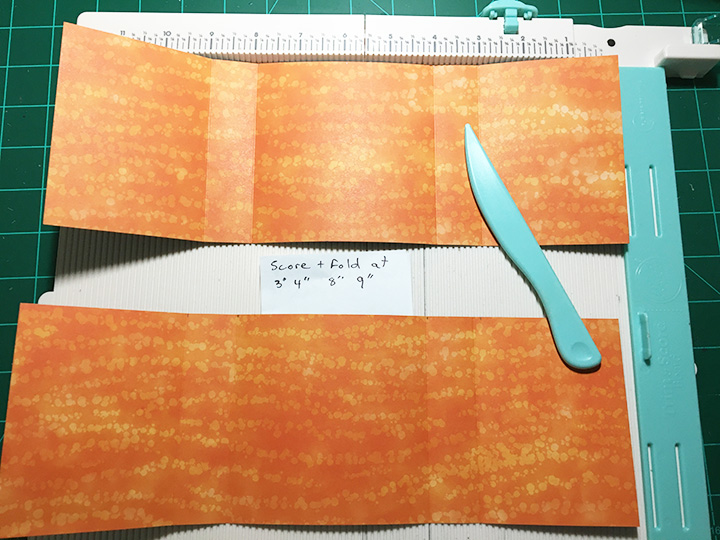
Box: The box is made of double-sided decorative cardstock cut into two 12 x 4 inches rectangles scored and folded at 3 inches, 4 inches, 8 inches and 9 inches. The middle squares are glued together to form a cross. Using strips of decorative paper for pull ribbons glued to the middle of each flap, I glued the remainder of the strips as a bottom flap border. Two adhesive-backed hook and ladder fasteners are the closures.
Tree: Utilizing the Bam Box die set, I cut six of the bam box strips, 13 of the bam box decorative rectangles and three each of the largest two fancy circles in the set from green cardstock. Because I like to let the glue dry before adding the rubber bands to bam boxes, I glue in stages. (See assembly video located at the bottom of the linked page and source of tiny rubber bands.)
Glue the decorative panels to the sides of each bam box for added thickness. (By sides I mean the sides that have the diagonal flap beside them. Not the side that has the smiley face or its parallel side.) These will be the sides seen between the layers of circles.
To assemble the tree, mark in pencil the location of the bam boxes on the bottom of each circle except one of the largest. Glue bam boxes to bottoms of five circles. The sixth bam box will be the top and the leftover, large circle will be the bottom.
To finish the tree assembly, alternate the direction of the diagonal inside flaps of the bam boxes, so that they make a zig-zag pattern when looked at from the side. By alternating the direction, the bam boxes will fold flat, and the tree will flatten into an oval shape. Use glue to attach each level. Once the tree is assembled, close or flatten the tree to position it on to a 4-inch square of green decorative paper that acts as the base for when the tree is in the box. Glue the tree to the square base.
Butterflies: (Watch the video at the bottom the linked page before starting.) Using the Butterfly Collage Add-ons die set, die cut all the dies from one color of doubled sided paper. Repeat with three other colors of paper. Die cut from black all non-moving butterflies four times.
Assembling the non-moving butterflies, use the black pieces as the base that the trimmed colored paper wings are glued to. On the double-winged one bend the wings up from the black body.
To attach the butteries to the tree, play with the positioning of the fluttering large butterflies on the tree in the closed position. If the butterfly stays within the green square base, it can be glued in place. I found that the flutter butterfly piece with the slot cut into it needs to be the piece glued to the tree, making sure the slot is not obstructed so the other piece can freely flutter.
I used green leaves cut from the decorative base paper to fill-in areas of the circles that were too close to the square’s edge when closed. Add in non-moving butterflies checking their position when tree is closed and that they are not creating catchpoints for fluttering butterflies.
Tag: My favorite gift tag to use for sentiments is in the Tag Book Pop-Up set. I stamped and heat embossed the sentiment. Baker’s twine was used to tie the tag onto the pull-up loop.
Thank you for reading this blog post. I hope it has provided some inspiration.
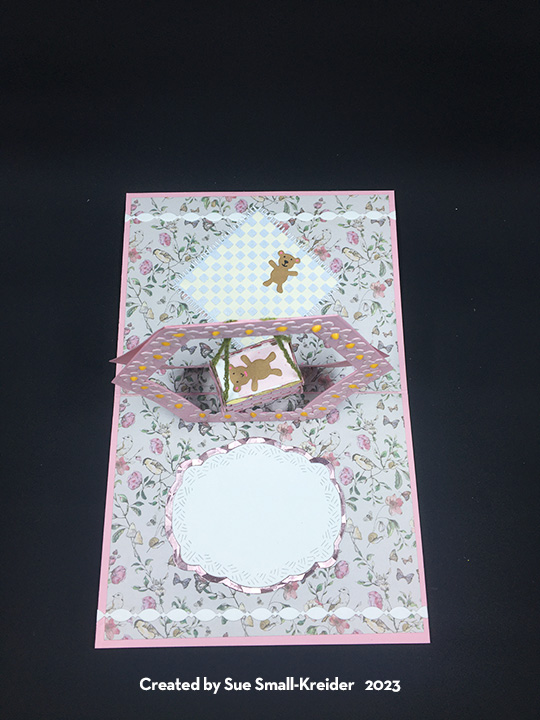
It’s time for the Karen Burniston Design Team Challenge for June. We were asked to use the theme of wedding or baby. I have chosen to welcome a new baby.
Cardbase and Pop-Stands: Cut an 11×4.25-inch piece of pink cardstock and fold to form a 5.5×4.25-inch top fold cardbase. (Watch Christmas tree pop-stand assembly videoat the bottom of the die’s page.) Cut two pieces of decorative paper as 5.25×4-inches and use clear tape on the back side for placement in card. Use the hexagon for the cradle stand to determine placement of the pop-stand die-cuts. Using decorative paper scraps, cover the four holes that pop-stands leave on back side of paper.
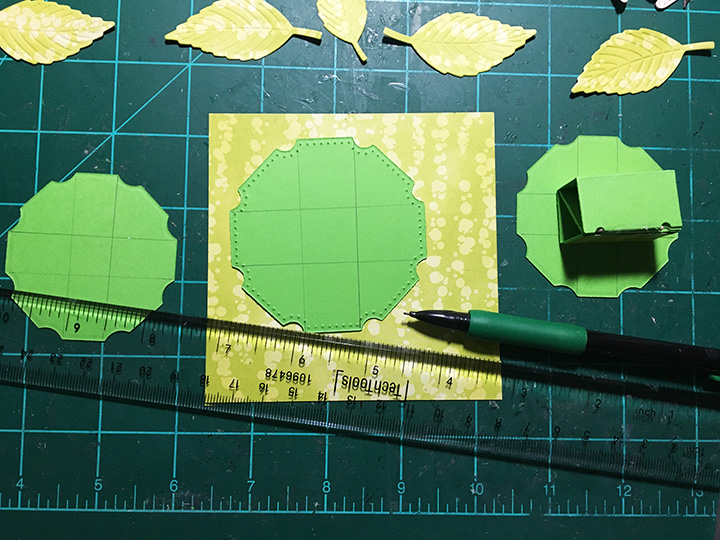
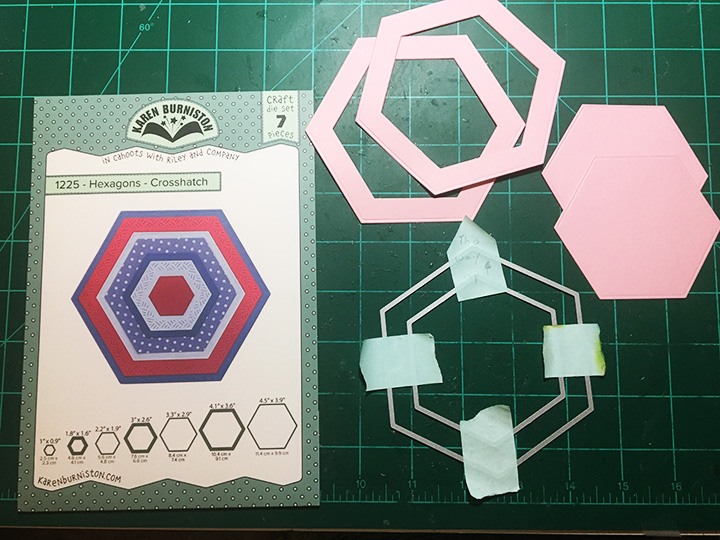
Cradle Stand: taping the largest two plain hexagons from the crosshatch hexagon set, die cut two from heavy pink cardstock. Trim bottom edge .25-inch so that it will measure 4.25-inches or less to fit into cardbase.
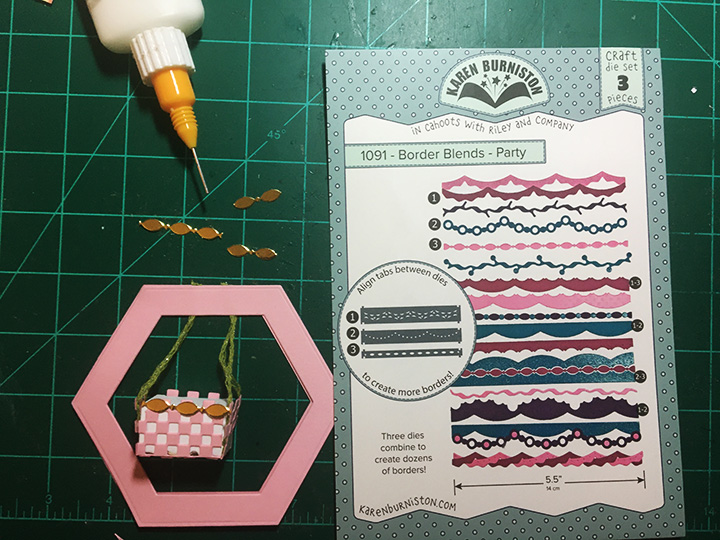
Cradle: From the two leftover hexagons, die cut the checker grid from the blanket in the picnic elements set. (Watch assembly video at the bottom of the bam boxpage.) Create a white bam box and cut four pieces of the checker grid to be the sides of the bam box cradle. Cut two 6-inch pieces of green floss or cord. Glue floss/cord to bottom of bam box. Tape square pink end pieces to bottom of bam box with the floss glued to checker grid pieces. (I would recommend cord as the floss unraveled on me. Also I would glue the checker grid onto thin white copier paper to make less catch-points on the cradle.) Glue longer pink sides to bam box sides to form cradle. Use a border from the party border blends to create a finished edge of the cradle from gold foil cardstock. Glue the floss between the top bar of the two hexagons. Pull floss to make cradle hang straight before glue sets. Trim off excess floss once glue has dried. Cut one bam box decorator side piece from pink speckled paper and trim to fit the cradle as a blanket.
To make the cradle close, flatten bam box and fold in the square ends with floss. Hold flat as card is closed.
Blanket and Bears: Cut from pearlescent paper the fringed picnic blanket and from cream paper the checkered grid. glue together. Cut three teddy bears from light brown cardstock using bear die from the holiday charms set. Using the stencil features in the bear die, ink in eyes, nose and mouth with a black gel pen and the ears with a pink gel pen. One bear is in the cradle and other is on the blanket. The last bear is on the envelope flap.
Decorations: Flower borders cut from pink speckle paper using the long nature borders 2 set, are used on the cradle stand frame and card front and back. (Front with yellow Nuvo drops centers and back with pink gel pen stenciling.) More of the party border blends borders,cut from white cardstock, are used on all card panels. (See assembly video explaining how to get the border on the card back.)
Personal Message Label: The largest crosshatch label die from the rectangles and labels die set was cut in white.The thin metallic pink frame was made by using the largest label frame and the crosshatch label dies taped together. (This was a leftover piece I had saved from another project.)
Sentiment: Two sentiments were used to create the “Welcome BABY” on the card front. Welcome is its own die set with word (white) and shadow (pink speckle) dies. BABY is from the baby charms set which was cut once each from white and from pink and blue speckled papers. The blocks base is cut from white. Some paper piecing was done using pieces from the different papers to created the colorful blocks.
Envelope: The card fits an A2 size envelope.with the back flap decorated with a strip of the decorative paper and the last teddy bear.
Thank you for reading this blog post. I hope this inspires you and makes you smile. Please like and leave comments 😊
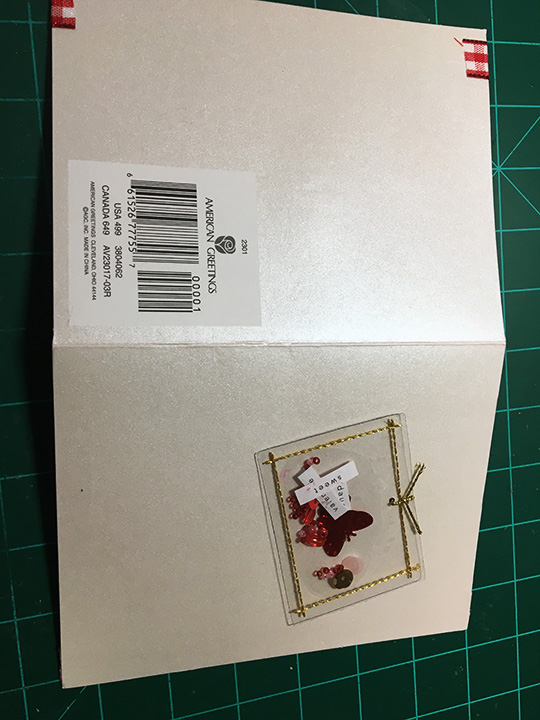
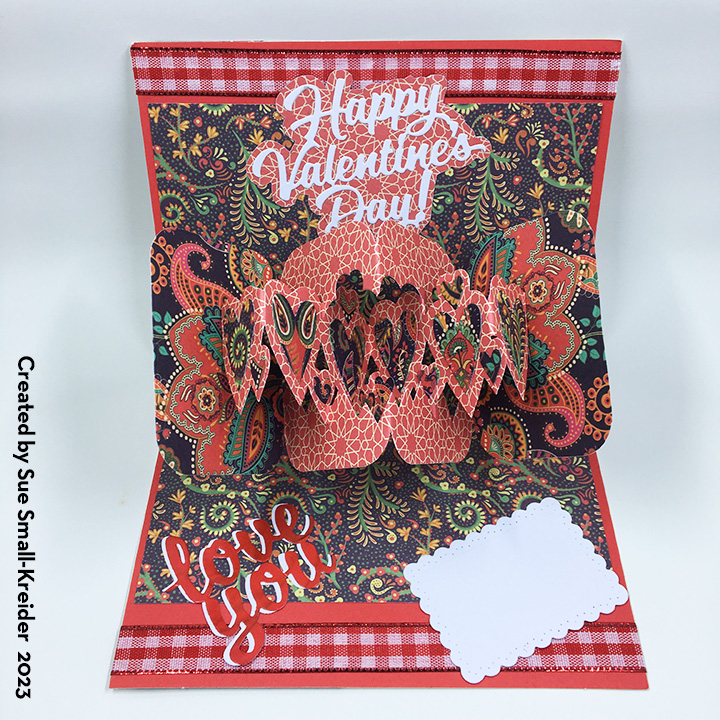
In cleaning up my craft room after the holidays, I came across a purchased Valentine I’d been sent many years ago with a stitched see-thru pouch with beads, sequins and the words “daughter,” sweet” and “valentine.” I decided to upcycle the card base with the pouch attached for a new Valentine.
The card base was an A6 size (5×6.5 inches). Ivory pearlescent on the outside and red on the inside. There were some tears of white on the inside where a sentiment sheet had been removed. (I hid the tears with red gingham ribbon adhered with double-sided tape.)
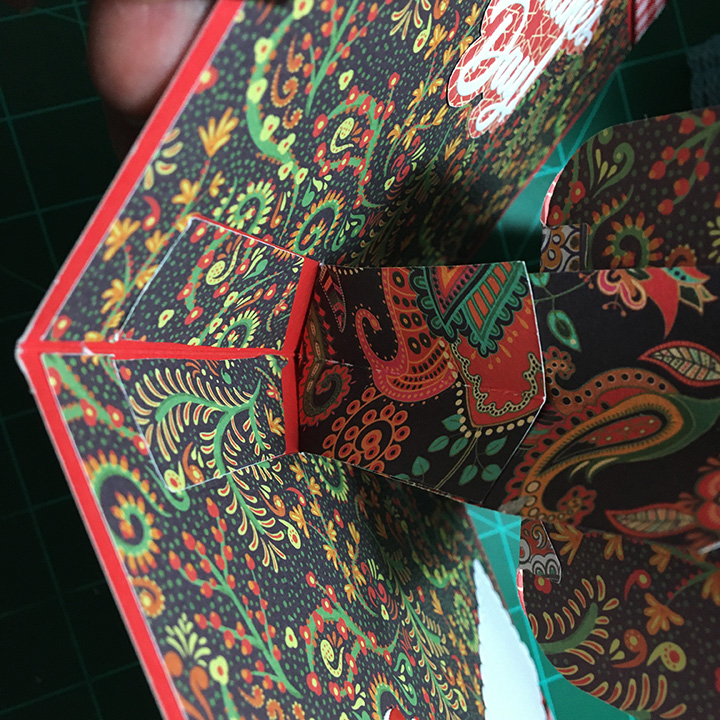
Using Karen Burniston’s Twist Panel Pop-Up and Heart Pivot Panels along with some of her word set dies, I recreated the card using two sheets of double-sided, printed cardstock from Craft Consortium.
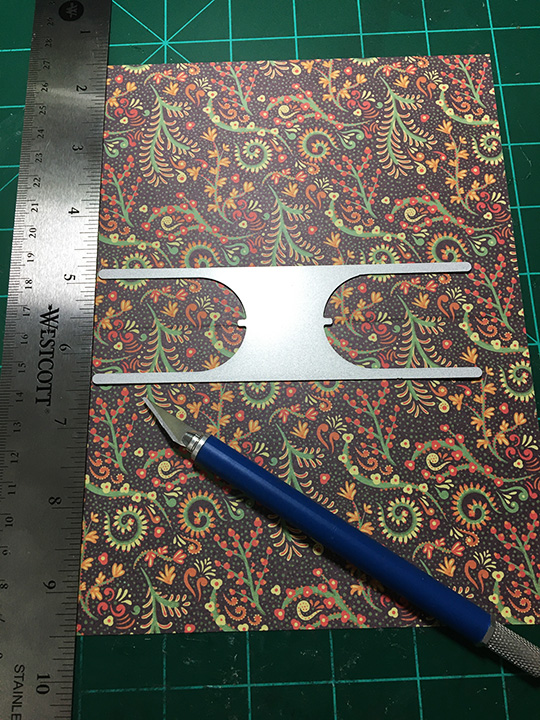
Because I opted for an 8 x6 1/4-inches cardstock insert, I had to use a craft knife with a metal ruler to cut the ends of the mechanism arms free from the insert. I also die-cut a third arm from the insert cardstock which I cut-in half twice to make four strips to cover the red card base where the insert mechanism arms are cut from.
The assembly of the end panels and heart pivot panels were done as per the assembly video. Cutting the decorative hearts from the intricate paisley cardstock makes for a somewhat non-traditional Valentine.
The sentiments inside were both cut from white cardstock but finished differently. The “love you” was also cut from a red glossy magazine page and glued off-set with the white underneath. The “Happy Valentine’s Day” had a shadow added underneath it. The shadow is cut by tracing the outside of the sentiment die on the back side of the decorative cardstock and fussy cutting. The white scalloped rectangle is cut using a decorative panel die from the Twist Panel Pop-Up set. It serves as a place for a personal message.
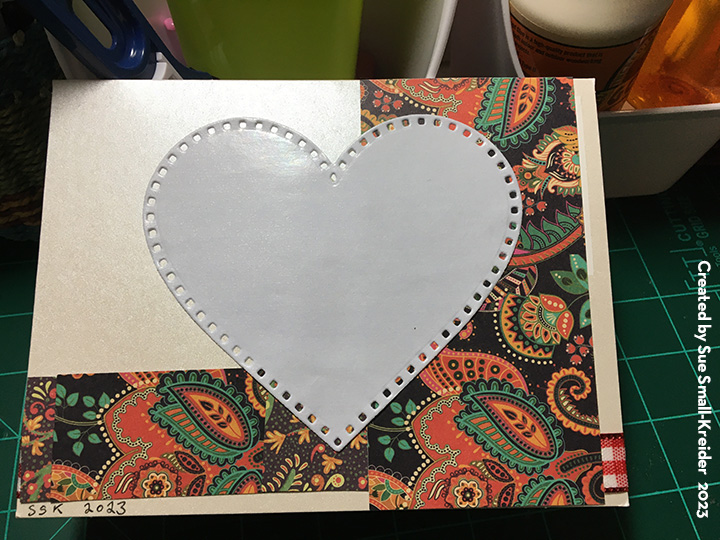
The outside of the card was decorated with leftover scraps of decorative cardstock and a die-cut heart I had in my stash. Because I changed the orientation of the card from a side-fold to a top-fold, I secured the see-thru pouch with glue dots and added tiny hearts to reflect the orientation.
The card will fit in an A6 size envelope. (I used an A7 envelope as I was out of A6s.) It may require extra US postage for its thickness.
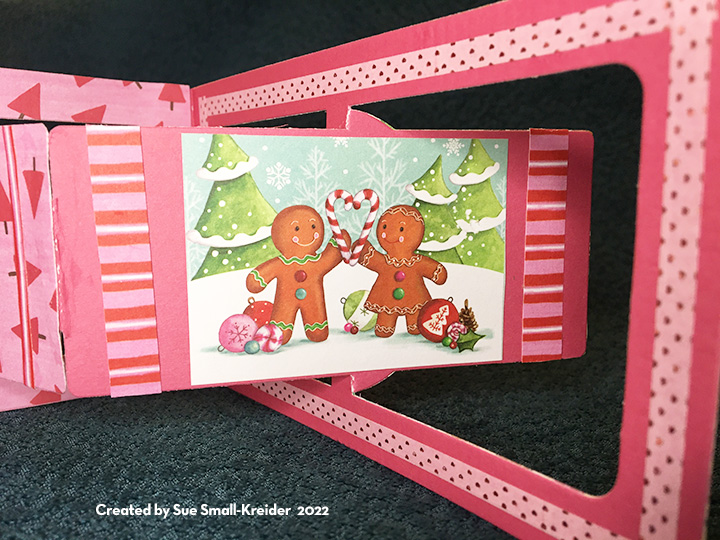
I followed the assembly video for the accordion fold card. (I found it useful to layout the card and its decorative pieces before gluing as sometimes a tab that connects the various panels needs to be hidden by a decorative piece so the order of gluing all the tabs together needs to be thought through before assembly.) The base is cut twice – once from solid pink cardstock and again from decorative papers and glued together.
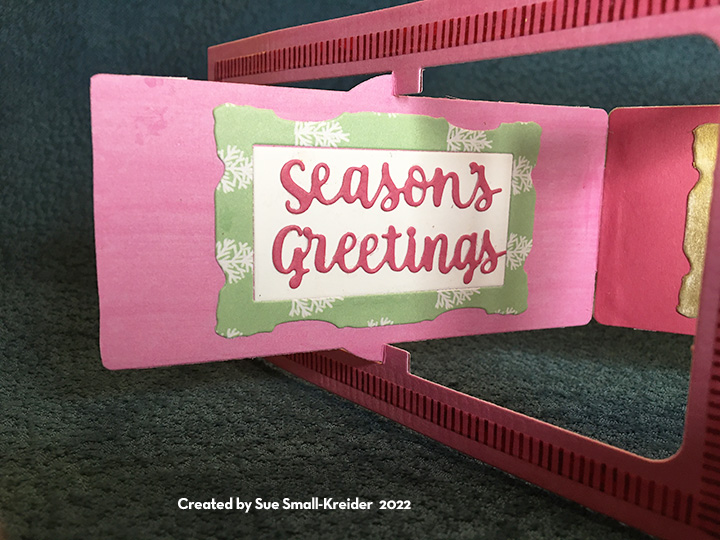
Leftover striped pieces and decorative frames are the finishing touches along with narrow washi tape make the accordion frames standout. The one fancy frame was gilded using Distress Foundry Wax which requires a heat tool to set the gilding.
The card fits into a A7 envelope which has been stamped on the back with a stamp of the gingerbread train in pink ink. The stamp is also from the Candy Christmas Collection by Heitz Cuppleditch for Craft Consortium.
Thank you for reading this blog post. Please like and leave comments 😊
Here is a sneak peak of the August 2022 Release of Karen Burniston dies.
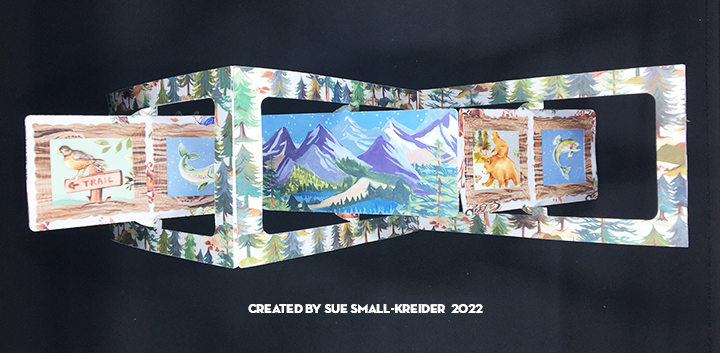
Designed for a gentleman who use to take his sons up to a mountain cabin in the 1960s, this card should help evoke memories of good father and son times.
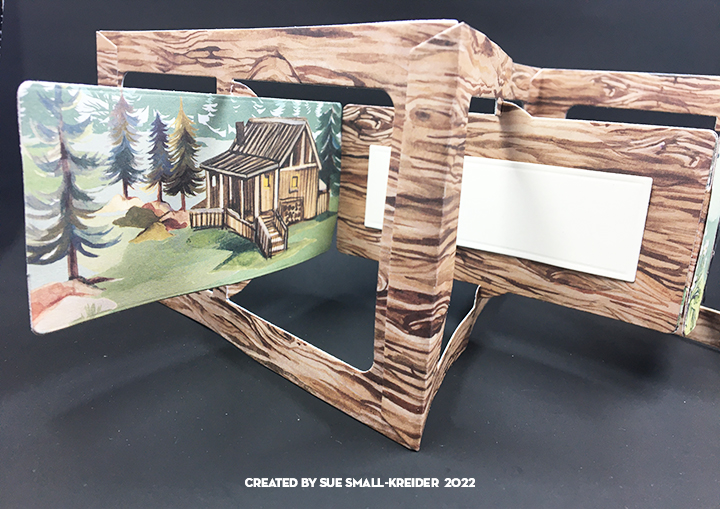
The mechanism for this triple panel accordion card is by Karen Burniston. The 12-inch by 12- inch double-sided paper pad in the In The Forest Collection by Clare Therese for Craft Consortium has a page with three narrow panorama scenes that work for the main panels. The smaller framed animals are from the cover of the 6-inch by 6-inch pad of papers from the same collection while the wood grain paper is from the larger pad. The large panorama scenes were cut with scissors from the die-cut frames and glued to the woodgrain frames’ center panels that pivot.
To make the card frame sturdy the woodgrain paper was glued to the back of the scenic paper. I followed the assembly video for the accordion fold card. (I found it useful to layout the card and its decorative pieces before gluing as sometimes a tab that connects the various panels needs to be hidden by a decorative piece so the order of gluing all the tabs together needs to be thought through before assembly.)
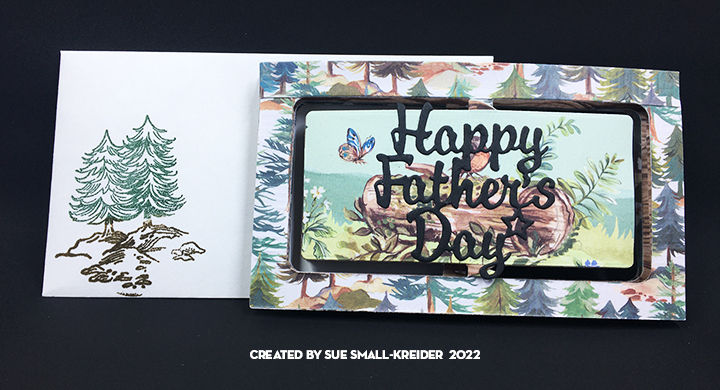
For the black “Happy Father’s Day” I used another Karen Burniston die and glued it in place letting the edges of some letters overhang the panel but making sure they would not impede the pivot mechanism. The small white rectangle can be written on with a personal message and then glued to the card. It is cut with a rectangle die from another coordinating Karen Burniston die set.
The card fits into a mini slimline envelope which has been stamped on the front with pine trees in both green and brown ink. The back of the envelope has a trail signpost stamped in brown ink. The stamps are coordinating ones from the In The Forest Collection by Clare Therese for Craft Consortium.
Thank you for reading this blog post. Please like and leave comments 😊
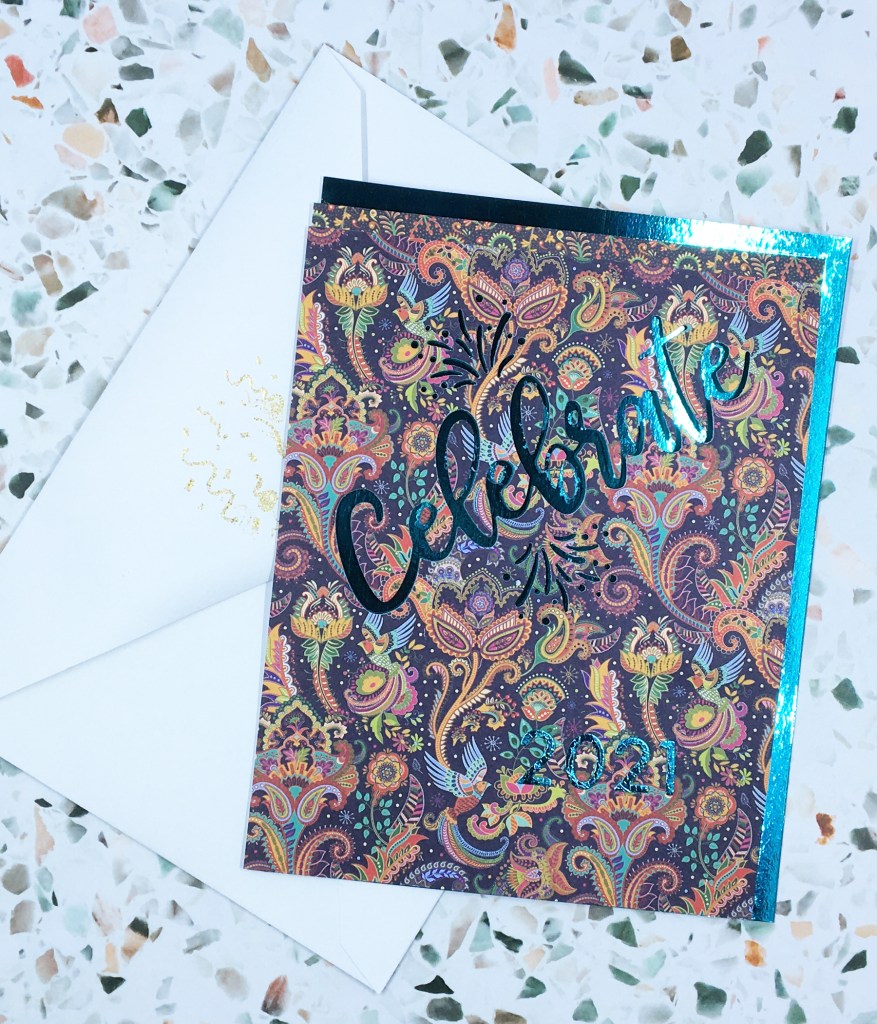
A new year is almost here and the celebration of it should be festive even if we can’t celebrate together.
This card is made with the “Let’s Celebrate!” die set from Die-cutting Essentials issue 72 and the “Fabulous Fizz” stamp set from Simply Cards & Papercrafts issue 212, along with a pre-cut and scored 5 inches x 6 ½ inches card base and envelope.
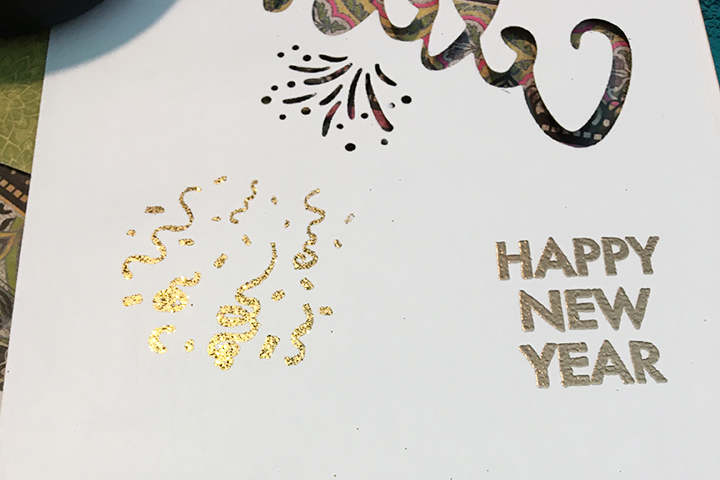
Mirror card is used as the background that peaks through the die cute sentiment on this card. The card front, after it was covered in a patterned paper, was trimmed to 4 ¾ inches x 6 ¼ inches so that the mirror card border would show. When the word “Celebrate” was cut out the waste from the loops was saved and glued on to the mirror card. The year 2021 was cut from mirror card and glued to the front of the card.
Inside the sentiment was stamped with Versamark Watermark ink and heat embossed with a matte gold embossing powder from Ranger. The confetti was heat embossed with gold tinsel embossing powder.
To add interest to the mirror card inside, a champagne glass was cut from vellum and the glue applied to mimic a liquid filled glass. Bubble made from Glossy Accents were added over the glass.
The closed card, after the glossy accents had dried for several hours, was rolled between cutting plates on a die cutting machine to emboss the “Celebrate” and “2021” into the mirror card.
The back flap of the envelop was also heat embossed with clear gold sparkle confetti to hint at the celebration to come. The card could be filled with sequins when being placed in the envelope to add to the card recipient’s experience. (In my case, knowing the recipient will not appreciate the mess to clean up, I am omitting this step.)
Thank you for reading this blog post. Please like and leave comments 😊
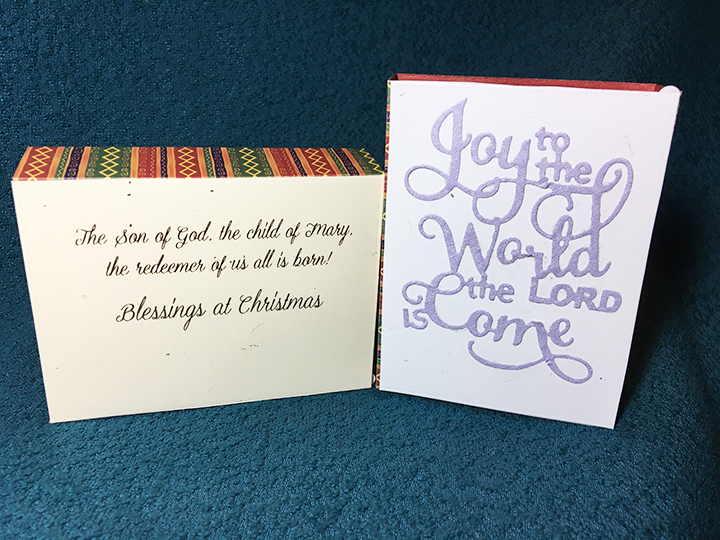
Children’s Christmas pageants that re-enact the birth of the Christ child are the theme of these quickly made decoupaged pop-up cards.
In less than two hours I was able to make these cute cards using Craft Consortium’s Nativity collection designed by Hetz Cuppleditch. Using the 10 sheets of the pre-cut decoupaged scenes which are labeled with the layer number for each piece it is super simple to glue up these scenes matching pieces to the layer below. (You could use foam pads, but if you plan to mail these cards in the USA, you will pay extra postage because of the thickness.)
The box-like stage is created by using the Hunkydory Final Shadow Box die set using the largest of the rectangular window dies to cut from the double-sided paper also from the Craft Consortium Nativity collection. The back of the stage is cut from scrap packaging with the “Joy to the World” die cut from a purple scrap envelope (or sentiments from old Christmas cards).
An old Kaisercraft sentiment stamp set was used to stamp the back flaps of the envelopes for these cards to foretell what is inside.
Thank you for reading about these cards. Please hit the like button or leave a comment.