A Joy Shaker

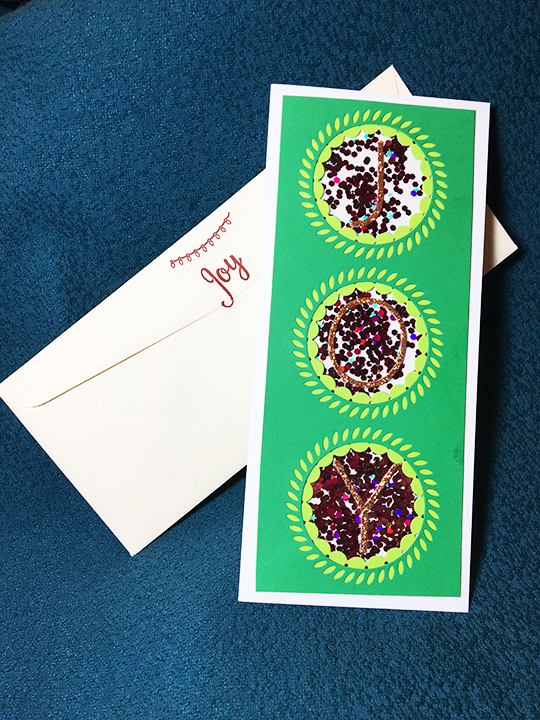
Everyone needs some joy around the end of the year holiday season.  This contemporary slimline card wishes the recipient that the simple joys of the season are theirs.

I used two of Pink Fresh Studio’s Essential Slimline Cuts dies to make the trio of circles in two shades of green that form the main design element of this card. Pink and magenta halo glitter were sandwiched between two sheets of acetate using double sided tape. San serif letters cut from a bronze glitter sheet spell out “JOY” and are glued to the acetate windows.

Inside the card is stamped with a string of lights and the main sentiment. The same cherry red ink is used to stamp the string of lights and the word “Joy” on the back envelop flap hinting what’s to come.

Hoping you enjoyed seeing this card. Thank you for reading. Please like and leave a comment.

Materials Used:

Dies

Stamps

Inks

Papers

Miscellaneous

Sunshine Tower

Sunshine on a dreary dull day is the theme of this card meant to brighten someone’s mood.

I had gotten Sam Calcott’s Terrific Tower dies set and some new Buttons Galore shaker elements and know I wanted to combine them into one card.

(There isn’t a good assembly video for the Terrific Towers die set but there is a new release video that will give you some ideas how to make the tower card.)

Back side of tower card with space for a personal message.
Close-up of shaker

Using the Pink Fresh Studio slimline circle apertures dies with the My Favorite Things 2-inch circle shaker pouches works well. The only thing I had to do was to snip in between each scallop to allow the pouch to fit through. I cut the circles apart and rounded the corners. Had to use some teal mirror card to suggest water or sky. After gluing the teal mirror card and lemon-yellow layer together, I glued the shaker pouches to the lemon-yellow layer, filled the pouches and then glued the pale-yellow backing to each. (Remember to use an antic static pad to wipe the inside of pouch to cut down on the static cling of sequins to the plastic.)

The Towers die set comes with all the rectangular matting layer panels. The base card is cut in a grapefruit orange and the panels are in a pale yellow and a lemon yellow.

The stars/suns are made from the Made to Surprise Excellent Edges die set by cutting the bottom star from orange and the top from pale yellow. The tiny 3D red and pink flowers and greenery are decorative elements I had left over from another project and are cut from the Spellbinders 3D Fun Time Cruiser die set.

Finishing touches are the stamping of the sentiment and the back-envelope flap from the What the Doodle Sun stamp set.

Supplies:

Stamps

Dies/Punches

Papers

Inks

Miscellaneous

Day 3 of Mini Challenge – N is for Nuts

This was a quick card for my post to The Alphabet Game on Craftworld.com for the letter N and the third day in my challenge to myself to make five cards from the Autumn Days stamp set from the most recent Simply Cards and Papercrafts magazine. I had recently gotten two slimline panel circle dies that I also wanted to try out. I grabbed the darkest, what I thought was brown embossing powder from my stash, but when I heated it up it was this lovely smooth gold. (I need to write Craftstash to find out what brand of powder this is, as I highly recommend it for its smooth detail.)

After heat embossing the acorns, I used a brown watercolor pencil waterbrush to color them.

I cut the center circle out of the card base and placed the stamped/embossed sentiment on the inside. This will make a lovely Thanksgiving card with plenty of space inside for a personal note.

The envelope is stamped with brown ink on its back flap.

DAY 1 – Winter Joys

DAY 2 – Looking Up and Letting Go

DAY 3 – N is for Nuts

DAY 4 – Autumn Leaves and Letting Go

Supplies:

Dies

Stamps

Papers

Inks/Embossing Powder

Miscellaneous

Day 1 of Mini Challenge – Winter Joys

I set myself a challenge to make five cards with the Autumn Days stamp set from the most recent Simply Cards and Papercrafts magazine. I made a number of backgrounds using fall colors, but I also did two with the pine branches and berries in greens and red for the winter holidays.

I did a design that I’ve used in the past of positioning the pine branches in a circular wreath-like fashion with the red berries as accents. The vertical card I inadvertently turned two of the branches in opposing direction in the corners and had to cover the stem bases with red berries. The “Joy” toppers are circular scraps from my greens scrap bin that where gold heat embossed and adhered with foam pads.

The inside sentiment comes from an older Kaisercraft stamp set, while the “Joy” came from a Love Cardmaking magazine stamp set.  I stamped the pinecone stamp from Autumn Days on the envelope flap in brown ink.

I thank Mandy78 from Craftworld.com for the idea of a mini challenge for myself.

DAY 1 – Winter Joys

DAY 2 – Looking Up and Letting Go

DAY 3 – N is for Nuts

DAY 4 – Autumn Leaves and Letting Go

Supplies:

Stamps

Dies

Papers

Inks/Embossing Powder

Miscellaneous