Happy Christmas Basket

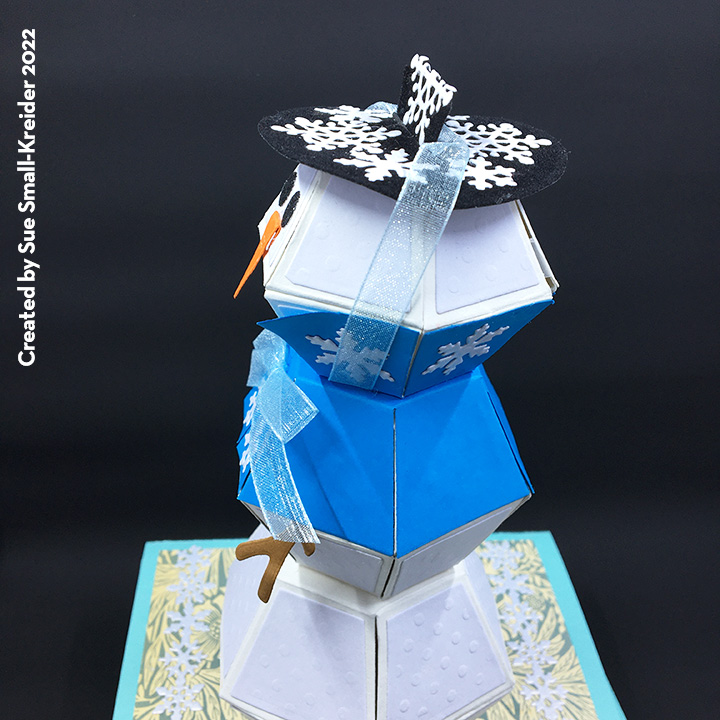
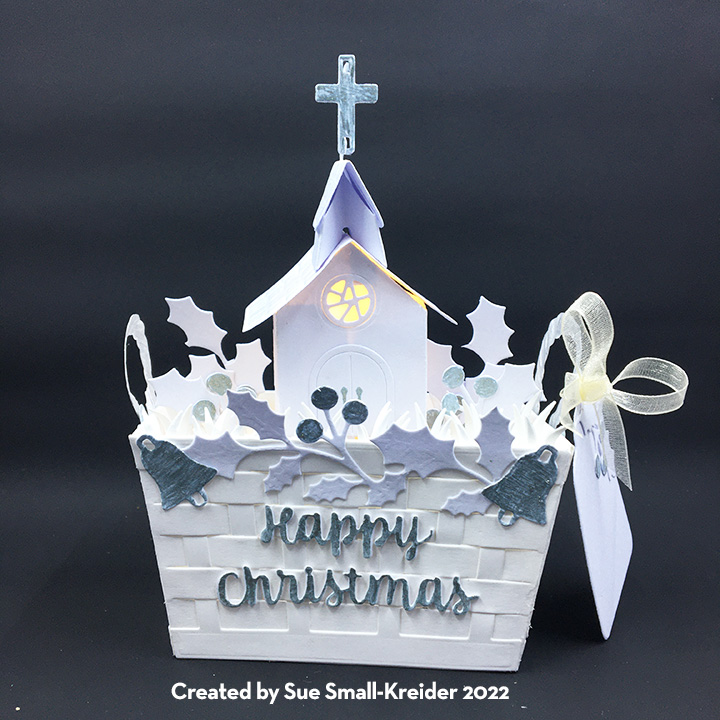
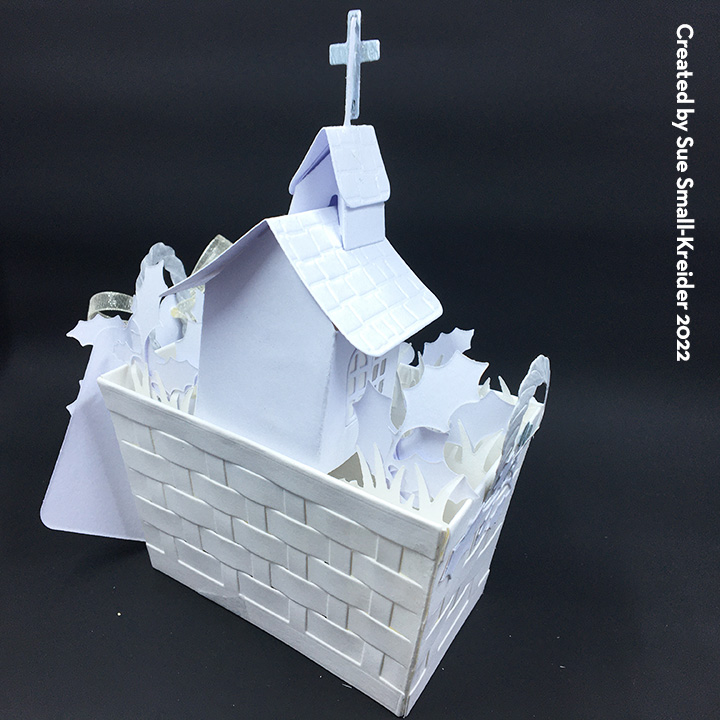
There is something magical about going to a Christmas Eve Candlelight church service on a frosty evening. That is the feeling this basket card is hoping to invoke.

This Christmas card features some of Karen Burniston’s December 2022 release die sets – Wide Woven Basket Box Card, Church School Tiny House Add-ons and Bam Box. All of the pieces were cut from two types of white cardstock with silver ink added to some pieces. Vellum was used behind the windows.

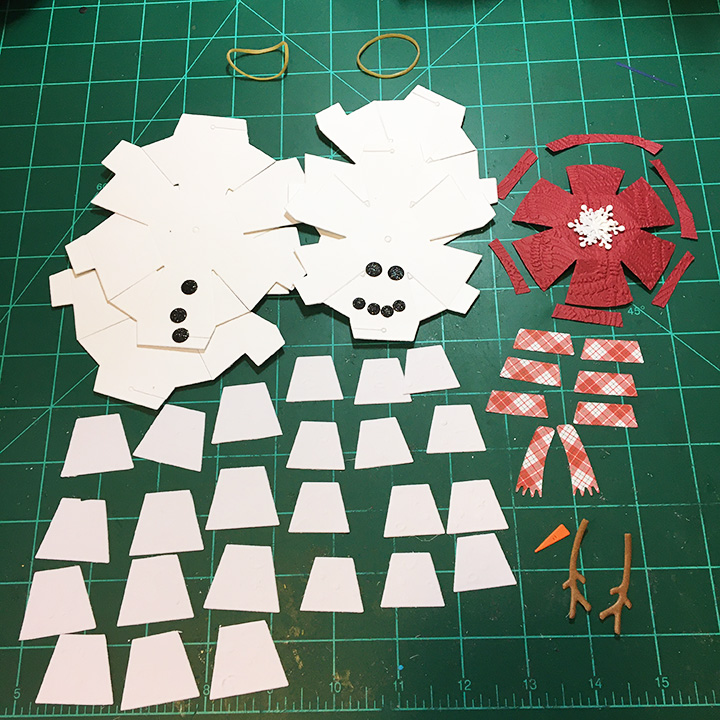
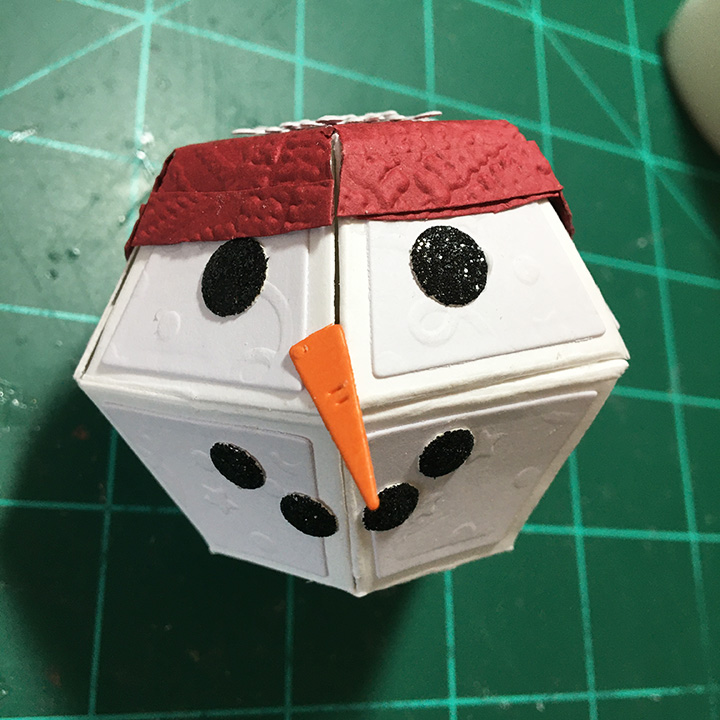
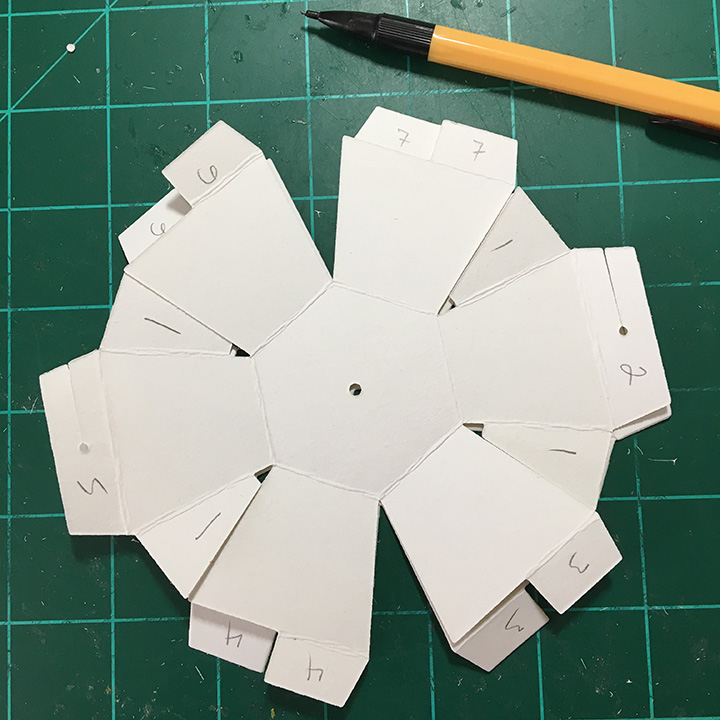
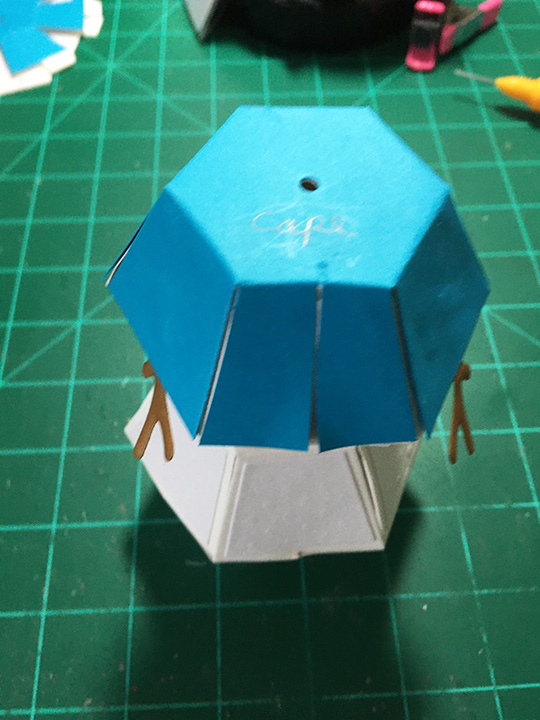
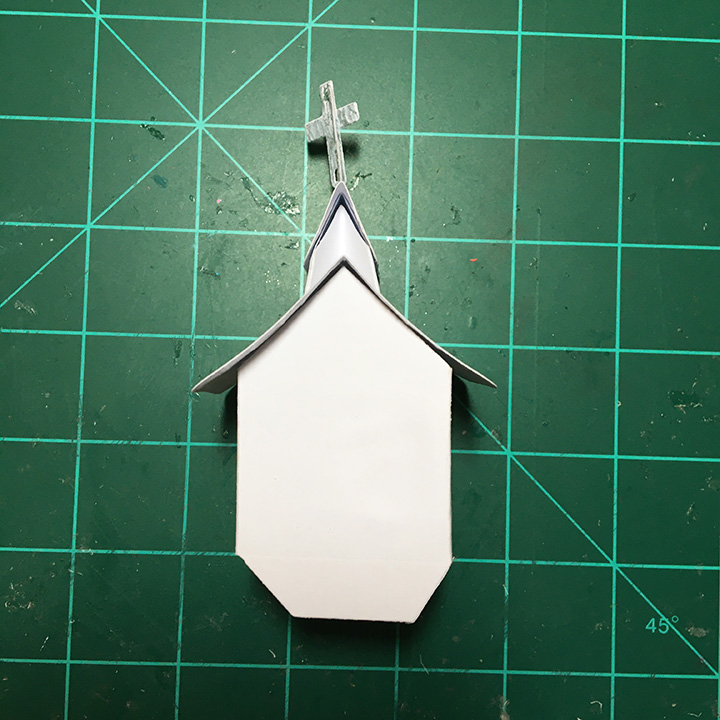
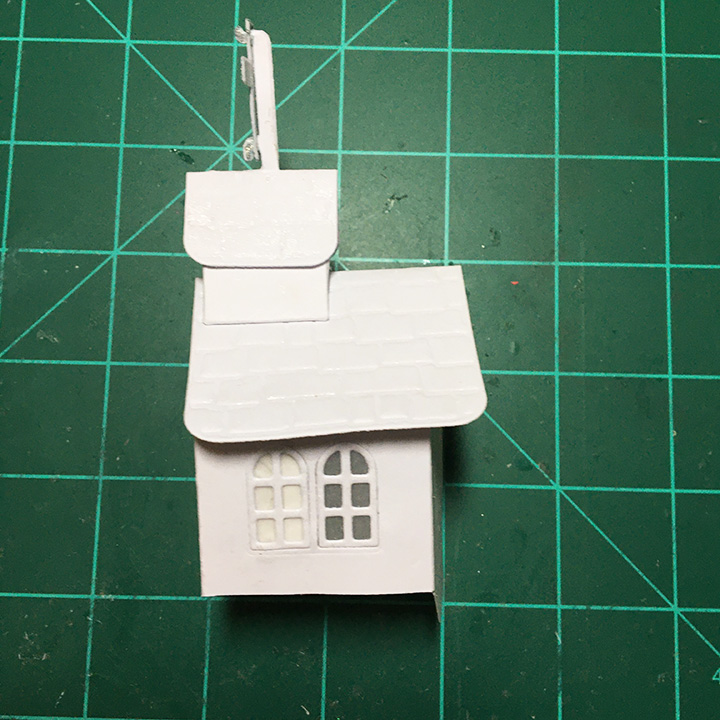
Church: The assembly of the church starts with the Tiny House base with its windows cut out while still flat. (Save the window frames to glue back into openings.) Cut rectangles of clear vellum to be glued on the inside of the church over the window openings. Trim excess vellum away from round window as needed. Coat the two roofs with glitter gloss. Coat window frames and door frame with glitter gloss. Using door die as a stencil, color door handles silver. Color the two crosses silver and glue together. Color the two halves of the tall charm holder on the church tower silver.

Assemble the tiny house as directed in assembly video. Don’t fold back bottom tabs, but rather trim off the tab on the house side, leaving the back or pointed side’s tab attached. Follow assembly video for the church tower. After adding the Bam Boxes, cut a rectangle to fit on the inside of the church to cover the other half of the church front. (This piece will stabilize the church when attached to the basket and will block light if you add LED lights.)

Wide Woven Basket: This die set makes it easy to create a rectangular pop-up basket. (Prior to this set you had to die cut an extra set of pieces to widen the basket sides and grass.

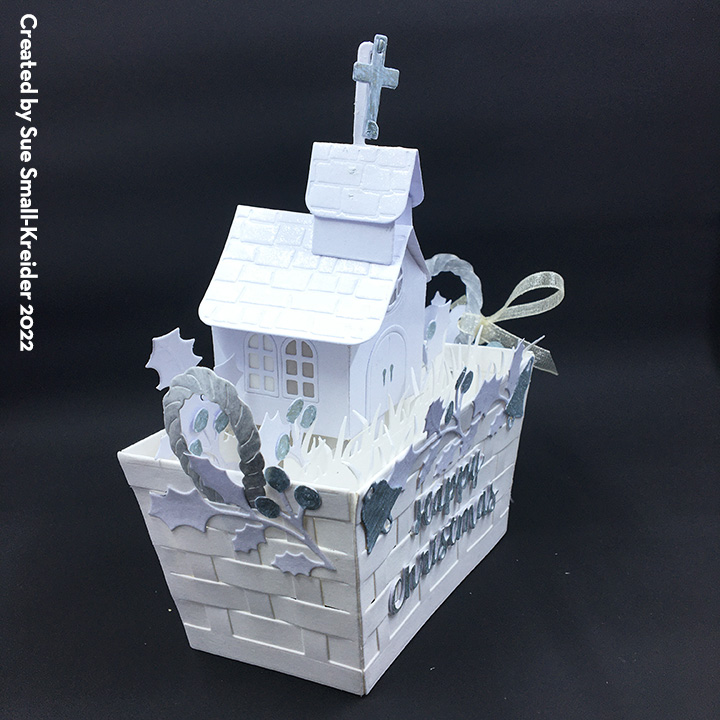
When used with the previously released Woven Basket Box Card, you cut two sets of the original size sides and two sets of the wide size sides. Follow the directions on the package or the assembly video to weave the basket and join the sides together. (I colored both sides of the ropes with silver metallic pen and then coated with a glitter gloss brush pen before attaching them.)

Adding Crossbars of Grass: The Wide Woven Basket Box Card includes the wide grass crossbars. (I cut four to make a full basket.) I trimmed away the grass leaves where the church would be. The front tab on the church is NOT attached to the crossbar, but rather acts as a guide for when the church and basket are folded closed.

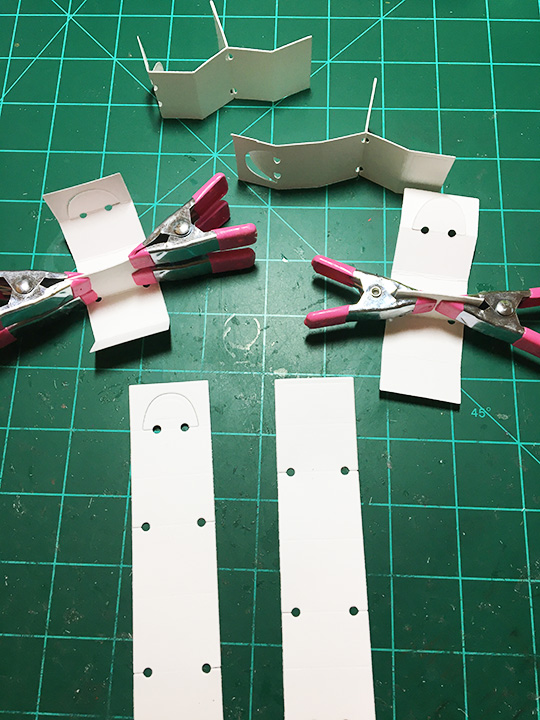
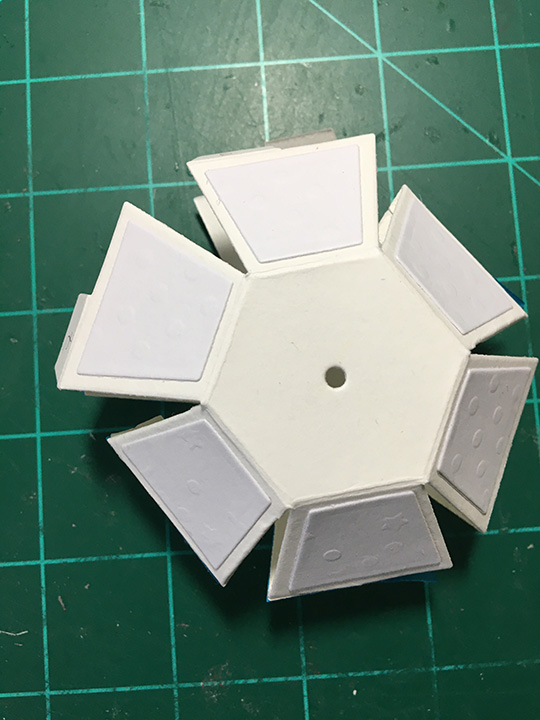
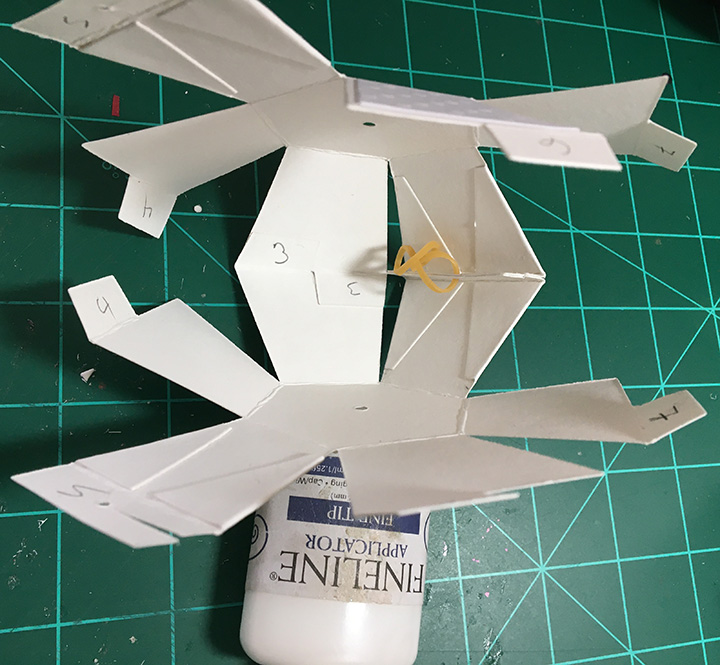
Bam Boxes: To animate the basket when it comes out of the envelope and pops into shape, two small β€œBam Boxes” were used. Watch the assembly video first. The church also uses two Bam Boxes. These easy to make rectangular boxes are powered by a small rubber band. (I used #8 size bands.) These go in diagonally opposite corners of the basket or church. Once glued in, the basket or church will only fold flat in one direction, so make sure both church and basket fold in the same direction. (I recommend using a heavy weight cardstock for bam boxes and letting each stage of gluing dry before moving onto the next step. I found that making a bunch of Bam Boxes at one time is useful for having some ready made to use on other projects.)

Tag, Bells, Holly and Berries: A tag is tied to the handle of the basket for a personal message. It is cut using the tag die from the Karen Burniston Tag Book die set. The bells are charms from the Church School Tiny House Add-ons colored with a silver gel pen. Karen Burniston’s Pattern Plate of Holly was coated a glitter gloss while the berries were colored with a silver gel pen. The holly leaves and berries were cut apart for decorations on the basket, tag and in the basket grass.
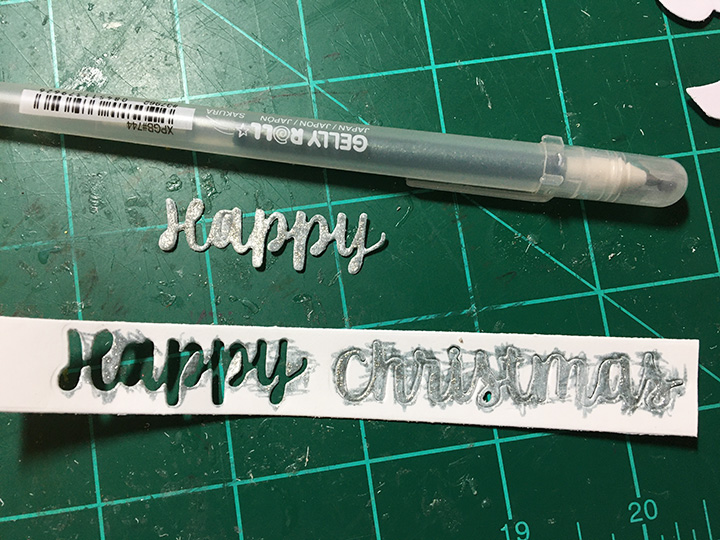
Sentiment: The β€œHappy Christmas” is from the Karen Burniston Word Set 3 -Holiday. It was cut three times from white, and the top layer was not weeded out of its original piece of cardstock while it was being colored with a silver gel pen. The three layers were glued together before being attached to the front of the basket.

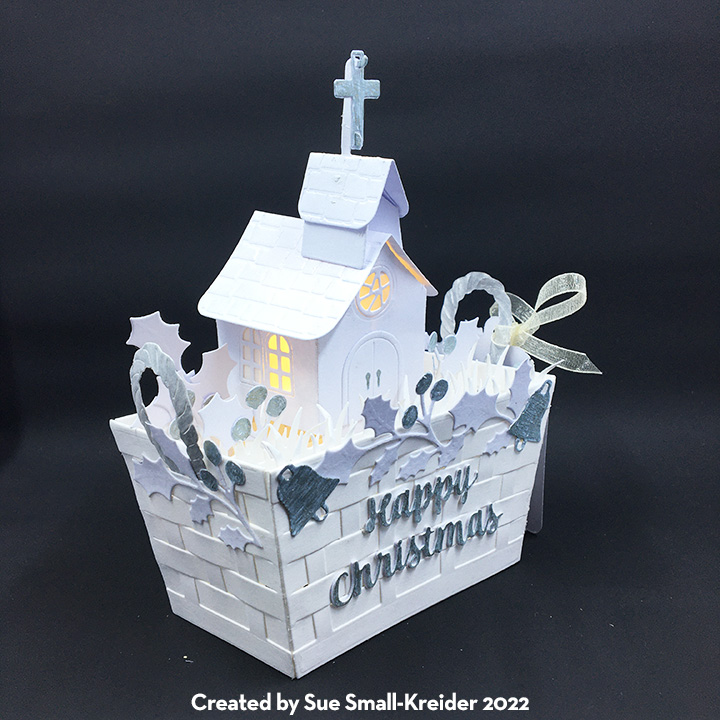
Lights: I added an inexpensive string of LED fairy lights to the inside of the church. (You can find these at Dollartree and Poundland stores.) Because the lights restrict the movement of the Bam Boxes inside the church, the lights need to be removed to fold flat.

Thank you for reading this blog post. Please like and leave comments 😊

Materials Used:

Dies

Papers

  • Brazzill – 12×12 Smooth Cardstock – Coconut Swirl
  • White Heavy Weight Cardstock

Pens & Brushes

  • American Crafts Metallic Marker – Silver
  • Gelly Roll – Gel Pen – Silver
  • Nuvo – Aqua Shimmer Brush Pen – Glitter Gloss

Miscellaneous

Thank You To Our Mail Carrier

For all the packages and envelopes that our mail carrier has so carefully placed in our mail box or placed by our front door, I wanted to say thank you to her. So, a mail truck thank you ornament was created.

I primarily used Spellbinder’s Food Truck and Sunday Drive collection dies to create this mail truck.

I cut two of the food truck die from an 8.5 x 11-inch sheet of white cardstock. I next cut panels that were 2.75 inches wide and scored at 3/8 inches on each side. (See downloadable PDF file of templates.)

The top of the windshield strip is .25 inches tall which is not on the template. The front panel is scored across at .875 inches and the side tabs are cut away. This forms the front slanted hood.

Glue all the panels to one of the truck pieces as shown in the photo making sure that all panels are parallel to each other and tabs are all on the inside of the truck.

Glue up a mail carrier using people dies from the Sunday Drive collection (I used the Sunday Sunset Drive for this and freehand cut the hat which our mail carrier wears.) Attach mail carrier to seat panel. (It is easier at this point to letters and packages to the seat panel at this point than to add them once the truck side is attached to the panels.)

Glue the panels to the second truck piece starting at the front and working towards the back.

The roof panels as shown on the template have tow holes punched into them for a string to tie them shut and form a loop to hang the truck from.  I had to notch my tabs to fit over the cab panel. You could avoid this by attaching the roof panels first and then the other panels.

The truck is designed to fold flat, so allow enough string to allow for it being flat.

I decorated the truck using the circle dies in the Food Truck set and the steering wheel from the Sunday Drive set. The strips were cut from some scrap strips of red and blue papers. The headlights and taillights use the smallest circle die from the Food truck set. (I used yellow glitter cardstock for the headlights.)

The β€œUS MAIL” on the sides and the β€œTHANK YOU” on the back were cut using Karen Burniston’s Mini Alphabet.Β  (I cut three β€œO”s glued together to make a slider on the string to help keep the roof shut.)

Thank you for reading this blog. Please like and leave comments. 😊

Go Bears Father’s Day Card

It’s time for another Karen Burniston Design Team Challenge. This month we were asked to use the Fireplace Pop-up die set to celebrate a specific holiday.

I have Father’s Day, which in the USA is in June which is not necessarily when American football is played, but once a fan of a sports team, always a fan of a team. GO Bears!

Card Base: The card base is an A7 size. I took a medium weight piece cardstock cut to 10 x 7 inches and folded in half. The base was what I glued decorative papers to as well as attaching the fireplace pop-up mechanism and floor flap.

Bears and Accessories: The bears, their football helmets and footballs, beer mug, and pizza are all Karen Burniston dies – colored to match the Chicago bear’s uniforms. Beer mug is made from Coffee Charms (mug) and Happy Hour Charms (foam) and a pizza (circle from a snowman set). Pizza box is my own creation. (You could change up the sport by using any of the new Sports Charms.)

TV:  The TV is the fireplace mechanism with a print of bears game covering the top portion while the bottom portion acts a table.

Flip Floor: I have made another flip floor for a Halloween card using the furniture from the family room die set. What I learned from my previous card is to use strong tape. I used duct tape on this card and full pieces of suede paper (for carpet) and wood-grain to make the flap have a sturdy hinge. The flap is cut to stop just before the TV table and locks under the right end table.

Lamps:  To make the lamps feel in proportion to the size of the room, I placed them on end table cubes which also act as the locking device for the flip floor. The lamps are part of the Karen Burniston Family Room die set. I placed a thin foam square under the lamp shades to made them curve round.

Furniture: I turned the chair of the Family Room dies set into a table by gluing a rectangle over the arm rests instead of adding the seat back. The back of the sofa is just the seat portion left flat. I cut pieces to cover the black base of the sofa.

Sentiments: Using contrasting colors to cut background plaques for the front sentiment of β€œGO Wild!” makes them standout on the busy patterned paper. The Father’s Day sentiment comes with its own shadow background in the die set.

CRX Sheet: Because of the flip floor and locking mechanism being atypical for what most card recipients expect, I have included a sheet with directions for opening and locking the card open. (You can download for free.)

Thank you for reading this blog post. Please like and leave comments 😊

Materials Used:

Dies

Papers

  • Photoplay Paper – 12 x12 Double-sided coated cardstock – 1st and Goal-FBL3192
  • Hot Off The Press – 8.5 x 11 – Smoke Suede – 10434
  • Spellbinders – Santa Lane – 6×6 Paper Pad – Wood Boards
  • EKSuccess – Martha Stewart Crafts – 12×12 Double-sided Paper Pad – Gothic Manor – 48-20301Colored Cardstock Scraps
  • Computer and color printer
  • White A7 Envelope

Pens & Inks

  • Blue, Red, Yellow and Blue Fine-Tipped Markers
  • Gelly Roll 08 Pen – White
  • Pigma Micron 05 – Archival Ink .045mm – Dark Brown
  • Ranger – Tim Holtz – Distress Ink – Antique Linen and Fossilized Amber

Miscellaneous

Gingerbread Holidays

Gingerbread is a sweet treat and holiday cards that smell of sweet baked goods make these two variations on gingerbread house pop-up cards a treat for the senses.

Karen Burniston’s Tiny House Pop-up die set and add-ons feature strong in these two cards. Primarily the Gingerbread add-ons are used, but the rounded door is from the Mushroom add-ons set.

The main difference to these two cards is the position of the two tabs that attach the tiny house to the card base and therefore, where the extension bar is attached on the house – front or back. The tree is a Winter Charm.

White hearts cut from the crosshatch hearts die set are places to write a personal message.

To give the cards their sweet scents, Nuvo Aroma Drops were used – red Strawberry Tart as the red candies on the roof and Vanilla Cupcake as light brown icing on the window panes and door frame.

Card backs are just as important as fronts. These are decorated with left over strips to mimic ribbon on gift boxes.

The envelope back hints at what’s to come when the card is opened. The stamps are from the same Lisa Horton Crafts Premium Magazine kit as the inside cookies and candy canes paper and front foiled paper sentiment topper.

Like the Tiny House? See more tiny house sets by clicking here.

Thank you for reading this blog post. Please like and leave comments 😊

Materials Used:

Dies

Papers

  • Echo Park Paper Co. – 12 x12 Double-Sided Cardstock – I Love Christmas by Lori Whitlock – Here Comes Santa
  • Stampin’ Up – Doubled-Sided Cardstock from my stash –
  • Colored Cardstock Scraps
  • Pink A2 Envelope

Pens, Inks & Embellishment Drops

Miscellaneous

Brr, It’s Cold Outside!

Sometimes it’s nice just to watch it snow with a warm cup of coffee or hot coco.

This fun mini-slim sized card is a blend of stenciled coffee cups and a die-cut snowflake collage pop-up. All the dies used are by Karen Burniston while the layered stencil is by Pretty Posh Pink. The coffee cups by both designers are similar in size and work well together.

I went through all my Karen Burniston die sets to find as many different single snowflakes as possible to use for the swirling collage mechanism inside the card. (I recommend watching the assembly video before starting your card. The video has useful tips and card base minimum sizes that will help you design your card.)

The sentiments all come from Karen Burniston’s Word Set 13 – Snow and include the shadow dies for the large words of β€œBrr!” and β€œSnow.” The mug and travel coffee cup inside are all die-cuts inked similar to the stenciled ones on the card front.

As with all my cards that are sent in an envelope, I have decorated the back flap with a hint of what’s inside. This time I stenciled a coffee mug on the flap.

See more coffee themed cards by clicking here.

Thank you for reading this blog post. Please like and leave comments 😊

Materials Used:

Dies

Stencils

  • Pretty Pink Posh – 6×6 Stencil – Layered Coffee Cups

Ink

  • Ranger – Tim Holtz – Distress Oxides – Festive Berries, Saltwater Taffy, Ground Espresso, Pumice Stone, Hickory Smoke, Mowed Lawn, Crushed Olive, Prize Ribbon and Tumbled Glass

Papers

  • Stampin’ Up – 6’ x6” Specialty Designer Series paper – Lights Aglow
  • Blue and White Medium Weight Cardstock
  • Simon Says Stamp – Mini Slimline envelope – Grocery Gag

Miscellaneous

Thanksgiving Leaves

November winds are working the last of the leaves off the trees as we go to celebrate Thanksgiving.

A fun little pop-up card using Karen Burniston dies and some thread to dangle fallen leaves from in the two open ovals. The pop-up mechanism, small trees, small ovals, and grass are from the Oval Frames Pop-up set.

The leaves and large tree are from the Tiny Trees Pop-up set. And the large oval and frame are made using the Oval Crosshatch dies. While acorns are from the Autumn Elements die set, the grass pieces are scraps from another project.

I glued two leaves together with a bit of cotton thread between them and then sandwiched the threads between two of the oval pop-up frames.

The sentiment is cut from two different shades of brown using the Autumn word set.

For a place to write a personal message, I used medium crosshatched ovals with two leaves as decoration.

As with all my cards that are sent in an envelope, I have decorated the back flap with a large oak leaf from the Autumn Elements die set.

Thank you for reading this blog post. Please like and leave comments 😊

Materials Used:

Dies

Papers

  • Rubbernecker – 6 x6 Paper Pad Double-Sided Papers 80# Cardstock – Autumn Leaves
  • A2 Brown Kraft Paper Card and Envelope

Miscellaneous

  • White Cotton Thread

Happy Autumn Colors

Autumn can be such a happy, colorful time with much to be thankful for in life.

This card uses Karen Burniston’s Label Charm Pop-Up and her Autumn word set. Colorful double-sided paper makes this card pop.

I decided to make a cardbase mistake into a proper card. I had cut the main pivot Label Charm Pop-Up die through both front and back of an A6 cardbase (6 1/4 x 4 1/2 inches) and used the smallest fancy label die from the set with two small strips to connect the two pivot labels.

My favorite way to make the Label Charm Pop-Up is to figure out the mechanics with a thin cardbase and then cover it with decorative papers. The frames around the pivots are the waste from cutting the out. Because of catch-points the frames create, the sharp points of the frame are trimmed to allow the fancy label to pivot freely.

Double cut the sentiments from different colors and stagger the layers to create shadows as well as some dimension.

Final elements on the card are decorative strips from the paper collection.

Continuing with the autumn leaf theme, I stenciled colorful leaves onto the back of the envelope.

Thank you for reading this blog post. Please like and leave comments 😊

Materials Used:

Dies

Papers

  • Sunny Studio – Double-Sided 6×6 Cardstock – Critter Country
  • Park Lane Paperie – A6 Cardbase and Envelope – Ivory

Inks & Stencil

  • AlteNew – Grape Leaves Mask Stencil
  • Ranger – Tim Holtz’s Distress Oxide – Barn Door, Mustard Seed and Ripe Persimmon

Miscellaneous

Meet the Snow Family – Baby Snow

This card is part of the Karen Burniston Design Team snowmen challenge for November.

Today, I’m show you how to Baby Snow.

Baby Snow is comprised of the Mini Ball Pop-Up and the Bitty Ball Pop-Up with his coal features and scarf from the Snowman Add-Ons. His smaller carrot nose and stick arms are from the Snowman Twist Circle set while his cap is custom made.

Cut two of the Bitty Ball halves and two of the Mini Ball halves. (I was able to get all the pieces from a single sheet of 8.5×11 inch cardstock.) I find watching the assembly videos for the balls very useful. (Bitty Balls, Mini-Balls) Numbering the order of gluing the tabs is useful for the assemble of the balls. I cut all the trapezoid panels from an embossed white cardstock. And the ball halves are cut from a 100 lb. smooth white cardstock.

Assemble the balls as shown on videos, including a brad in the bottom of the Bitty Ball. (I didn’t have a brad when I made Baby Snow, so I improvised with a pipe-cleaner. I works, thin wire would be a better choice as the pipecleander adds bulk to the bottom of the card.)

Add facial features to the mini ball. The hat is one half mini ball cut in red, embossed with a knitted pattern embossing fold, and then trimmed down to fit the head. Once glued on, a three snowflake pom-pom was added to the top.

The scarf pieces are glued to the top of the Bitty ball edges and a full-size hexagon is traced using the die to cover the top of the body.

The ear flap and bill of the hat were free handed pieces cut first from scrap paper and once correct size traced onto the red cardstock and fussy cut. Some red and white twine was added when gluing on the ear flaps.

Once the decorations are complete attach Baby Snow to the card base.

Learn more about how each member of the Snow Family was created in these blogs:

Thank you for reading this blog post. Please like and leave comments 😊

Materials Used:

Dies

Papers

  • Spellbinders – 100 lb cardstock – Waterfall
  • Hot Off the Press – Black Suede
  • Hot off the Press – Black Glitter Cardstock
  • Blue, orange, brown, red and white cardstock scraps
  • Recollections – 8.5×11 White gold shimmer cardstock
  • Staples – 8.5×11 Printable glitter paper

Miscellaneous

Meet the Snow Family – Mama Snow

This card is part of the Karen Burniston Design Team snowmen challenge for November.

Today, I’m show you how to make Mama Snow.

Mama Snow is comprised of all three balls – the Mini Ball Pop-Up, the Bitty Ball Pop-Up and the Surprise Ball Pop-Up with all her facial features, hat and stick arms from the Snowman Add-Ons. Her cape is made from the Mini Ball and Bitty Ball dies and her hat is cut down from the Snowman Add-ons set.

I find watching the assembly videos for the balls very useful. (Bitty Balls, Mini-Balls and Surprise Balls) Numbering the order of gluing the tabs is useful for the assemble of the balls. I cut all the trapezoid panels from an embossed white cardstock. And the ball halves are cut from a 100 lb. smooth white cardstock.

Assemble the base Surprise Ball in all white with a brad threaded through the bottom hole. The middle and head balls are of graduating size and are decorated with the blue cape and collar pieces before assembling.

The blue cape is made by cutting one half of a Mini Ball in blue and trimming as shown in the photos. I glued it to the bottom of the ball first before assembling the ball. (Note that one panel of blue was cut off and the corners facing the missing panel were curved and not glued down. The missing panel area is where the mouth will be for the face.)

The cape is cut using the same blue cardstock using one half of a Bitty Ball. Cut a thin stripe out of the front of the cape and curve the bottom corners. Glue down stick arms to sides of Bitty Ball. Glue all of the cape to the top of the bitty ball, except for the curved corners.

Glue on facial features of coal eyes and mouth cut from glitter cardstock and an orange carrot nose. Docorate the cape and collar with snowflakes.

To assemble the hat, trim the tall top piece down to about 1/2 inch above the tab. Decorate brim with snowflakes from Snowman Add-Ons, Snowman Twist Circle or Snowman set.  Glue top of hat flap through the slot in brim. Glue hat onto top of head. Cut a piece of ribbon long enough to go over hat brim and under the head plus 2 inches. Glue middle of ribbon to top of hat and them flatten head and glue ends of ribbon to the bottom of head ball. (You will need this slack in the ribbon to allow the ball to fold flat.)

Now you can glue the three balls together to make Mama Snow. I glued the ribbon bow on after I had assembled her to get the correct placement.

You can now added her to the card base using the brad.

Learn more about how each member of the Snow Family was created in these blogs:

Thank you for reading this blog post. Please like and leave comments 😊

Materials Used:

Dies

Papers

  • Spellbinders – 100 lb. cardstock – Waterfall
  • Hot Off the Press – Black Suede
  • Hot off the Press – Black Glitter Cardstock
  • Blue, orange, brown, and white cardstock scraps
  • Staples – 8.5×11 Printable glitter paper

Miscellaneous