Making a gingerbread house always involves candy and white icing. Half the fun of making a gingerbread creation is sampling the construction elements.

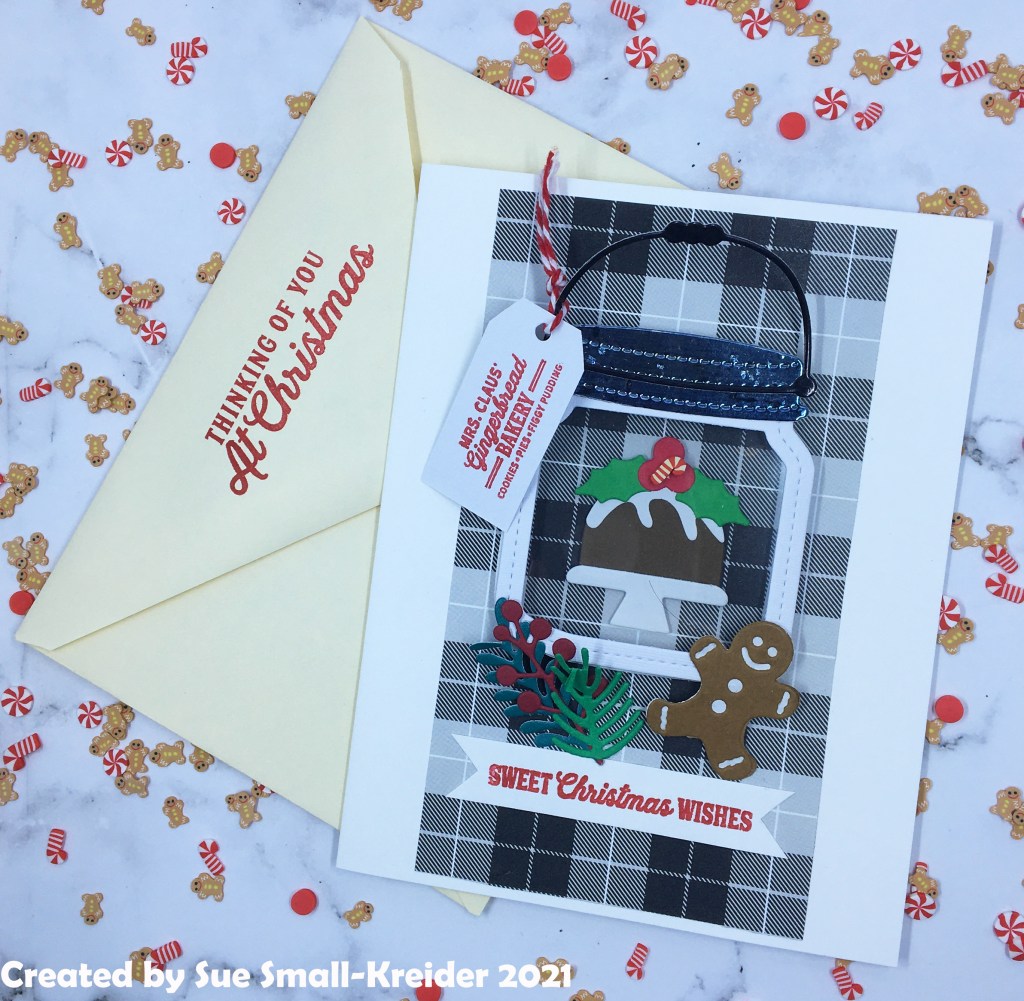
This Christmas card is one that I hope the recipients won’t try and taste the ingredients. I used Queen & Co.’s Holiday House Kit to make this shaker card. In the kit you get dies to decorate the foam shaker base with pre-cut acetate window cover as either a gingerbread house or a Victorian house. I chose to use polymer clay shaker elements that are from Queen & Co. but not included in the kit. (There are solid color shaker beads included in the kit as well as stamps.)

Cardbase: I used a purchase brown kraft cardstock and matching envelope in an A7 size. The card I cut it down to a 6×4 3/4-inch side-fold card so that there would be room in the envelope for the foam shaker. The front panel was covered with a 4 1/2×5 3/4-inch piece of patterned red paper from the Queen & Co. Happy Holly Days mat stack. The inside white panel is the same size cut from white copier paper.

House: Brown patterned paper from Queen & Co. Homemade Holiday mat stack was use for the gingerbread house and man. The white icing and candies were cut from white cardstock and made sparkly with a wash of a glitter gloss aqua brush. The stripes on the candy can were drawn on with a red marker while the round peppermint candies have a die to cut the red swirl. Gum drops on the roof ridge were cut using a die in the kit and brushed with glitter gloss. The tiny peppermint candies are polymer clay shaker elements from Buttons Galore More.
Once the house front is made, position the foam frame on the cardbase to allow for the gingerbread man and candy cane to hang off the house, but not the card. Adhere foam to cardbase. Add strips of leftover foam to the inside of the frame to section off areas where the windows are. Add shaker elements to the sections. Place the acetate piece over the foam frame to seal in the elements. Color the exposed sides of white foam with a brown marker. Using double-sided tape, attach the decorated house front to the acetate piece.
Decorations: Glue candy pieces to decorate the house. The gingerbread man is cut in two pieces – bottom white with glitter gloss and the top from the brown patterned paper. Attach the man with thin foam squares to fit over the polymer clay candies.
Sentiment: The inside sentiment is a clear stamp included in the kit stamped in red ink.

Envelope: A gingerbread man from a Joanna Sheen card making kit was stamped in dark brown ink and brushed over with glitter gloss on the back flap.
Thank you for reading this blog post. I hope this inspires you and makes you smile. Please like and leave comments 😊
Materials Used:
Dies
- Queen & Co. – Holiday House Kit – Dies
Stamps
- Craft Essential Series issue 09 – Joanna Sheen Cardmaking Collection
- Queen & Co. – Holiday House Kit – Sentiment Stamps
Papers
- Queen & Co. – 6×6 Mat Stack of Double-Sided Papers – Homemade Holiday
- Queen & Co. – 6×6 Mat Stack of Double-Sided Papers – Happy Holly Days
- White Cardstock
- American Crafts – A7 Cardbase and Envelope – Kraft
Shaker
- Queen & Co. – Holiday House Kit – Foam Frames
- Queen & Co. – Holiday House Kit – Acetate
- Queen & Co. – Polymer Clay Shaker Elements – Holiday Fusion Fudgy
Ink
- Stampin’ Up – Classic Stampin’ Pad – Early Espresso and Real Red
- Sharpie – Permanent Marker – Ultra Fine Tip – Red
- Stampin’ Up – Stampin’ Write Dual tipped Marker – Chocolate Chip
- Nuvo – Aqua Shimmer – Glitter Gloss
Adhesives
- Neutral PH Adhesive by LINECO
- Fine-Tip Glue Bottle
- Double-Sided Tape -1/8-inch wide
- Queen & Co. – Holiday House Kit – Foam Shaker Frame and Foam Scraps
- Thin Foam Squares
Tools
- Die Cutting Machine
- We R Memories – QuickStick
- Stamping Platform
- LDRS – Stampendable Stamping Tool
- Stamping Cloth
- Scissors