This card was made for Craft Roulette #252 whose parameters included a card for a teenager, morning colors, fairy (fairies), and bow(s). I choose to interpret fairy as fairy lights and bow as a bow of a ship.
Watch the process video to see how I made this card.
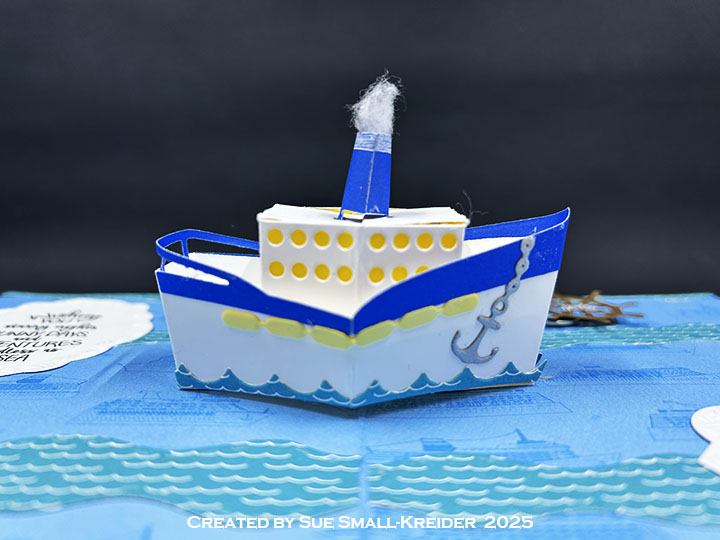
Cardbase: My double sided paper from Carta Bella was cut into a 6.5×10-inch rectangle and folded in-half. The wave decorations were cut using Karen Burniston’s Ocean Edges die set.
Cruise Ship Pop-Up: The cruise ship is made with two die sets by Karen Burniston – Boat Pop-Up and Cruise Ship Add-ons. (You can watch assembly videos for both sets by clicking on their links and going to the bottom of the linked pages.)
Pear Blossom Press Twinkle Lights were used to light-up the ship and the ship’s wheel (from Karen Burniston’s Cruise Charms die set with Pear Blossom Press’ “push” stamp) covers the battery and indicates where to press to turn on the lights.
Sentiments: The “Wishing you…” sentiment is from Karen Burniston’s Cruise Greetings stamp set and the “HBD!” is from Craft Roulette’s Funn Friends #02 stamp set. The sentiments are stamped in black ink on labels cut from Karen Burniston’s Rectangles and Labels – Crosshatch and Labels – Crosshatch die sets. You can download the paperclip slip.
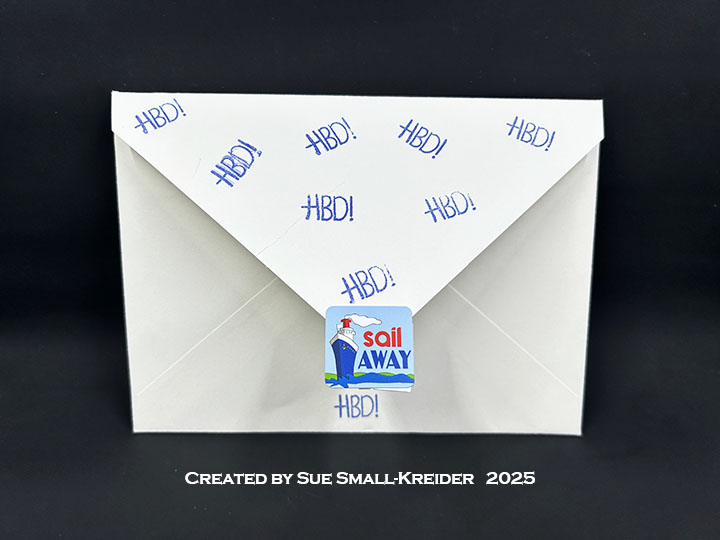
Envelope: The card fits into an A7 (5x 7-inches) size envelope with “HBD!” stamped all over the back flap and sealed with a sticker from the paper collection.
___________________________________
Thank you for experiencing this blog post.
I hope this inspires you and makes you smile.
Please like and leave comments 😊
___________________________________
Disclaimer: Karen Burniston products are provided free of charge by the manufacturer for review and use. All other items were personally purchased. Compensated affiliate links used where or when possible, meaning I will receive a small percentage commission from these manufacturers at no cost to you. This will allow me to add more content to my YouTube channel and help out a lot. Thank you.
Watch the process video to see how I made this card.
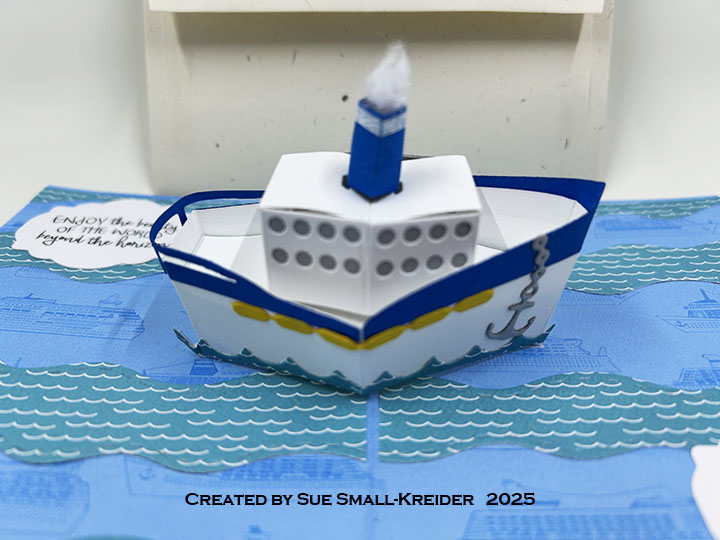
Cardbase: Using a 8.5×5.5-inch rectangle of double-sided patterned cardstock, fold rectangle in half to form a 4.25-inch wide by 5.5-inch tall side fold card. Decorate the inside with wavy ripples using the Ocean Edges dies. (I choose to let the cardbase paper pattern be one shade of the ocean waves while the other waves are cut from decorative cardstock with white water ripples on them. If you make several layers of waves the card will be very thick and hard to close. If this happens use the special die in the Cruise Ship Add-On set to cut two slots on either side of the fold to slide a paper clip through to hold the card open.)
Cruise Ship: Follow the directions to assemble the basic Boat Pop-Up (Assembly video at the bottom of the die set’s linked page.) Watch the video above for how to assemble the Cruise Ship Add-Ons. (I had an issue the first time I glued in the ship to the card. So, there are also tips on how to fix bent U-support pieces and ship’s tabs in the video.)
Sentiments: The inside stamped sentiments are from the Cruise Greetings stamp set and the fancy labels are the smaller label die in the Rectangles and Labels – Crosshatch set. Decorative paper journaling cards are the outside card sentiments.
Envelope: The card fits into an A2 (4.25x 5.5-inches) size envelope with an anchor and chain glued to the back flap. The anchor is from the Cruise Add-Ons die set.
___________________________________
Thank you for experiencing this blog post.
I hope this inspires you and makes you smile.
Please like and leave comments 😊
___________________________________
Disclaimer: Karen Burniston products are provided free of charge by the manufacturer for review and use. All other items were personally purchased. Compensated affiliate links used where or when possible, meaning I will receive a small percentage commission from these manufacturers at no cost to you. This will allow me to add more content to my YouTube channel and help out a lot. Thank you.
Karen Burniston’s Boat Pop-Up can become many different types of boats and ships using her different add-on sets. In her January 2025 there are two new add-on sets – Fishing Boat Add-Ons and Cruise Ship Add-Ons. There is also a new Paper People so you can add people to your cards.
Click on the pictures to see their posts. The last image will have will be posted in March.
This card was made for Craft Roulette #248 whose parameters included a tag(s) , Disney colors, January element, and branch (es) or (ing). I used a Craft Roulette stamp set and two Karen Burniston dies die sets.
Watch the process video to see how I made this card.
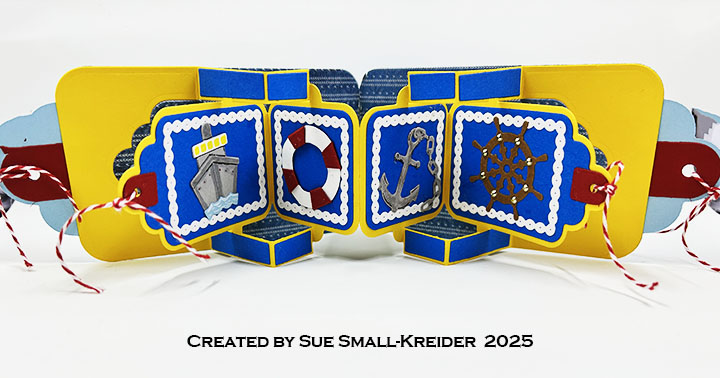
Cardbase: Using Karen Burniston’s Tag Book Pop-Up die set, I cut two of the large tag frames from heavy weight light blue cardstock and two more from darker blue lightweight cardstock. The rectangular hinge die I cut once from light blue cardstock. The dark blue pieces I trimmed a 1/16-inch off all edges and then glued the dark blue on top of the light blue. The hinge was glued onto the inside of the light blue panels. (Watch Karen’s assembly video for her Tag Book Pop-Up.) You can cut two of the large tags from patterned paper to cover over the hinge on the inside. (It is easier to do the patterned paper background now than after you’ve glued in the yellow pop-up piece as I show in the process video above.) There are a number of decorator dies that come in the Tag Book Pop-Up Set such as the chain rope and hole protectors.
Pop-Up Panels:Cut two of the inside die piece from lightweight yellow cardstock. Cut two sets of the decorating strips die from dark blue. Follow the assembly instructions in her video.
Nautical Elements: The nautical elements of a ship, life preserver, anchor and ship’s wheel are all die cut and stenciled using dies from Karen Burniston’s Cruse Charms. (You can watch Karen’s assembly video for these charms at the bottom of this linked pageCruse Charms.) The chain rope borders and dark blue background mats are all dies in the Tag Book Pop-Up die set. The tags have red and white baker’s twine tied to them.
Sentiments: The “Happy Birthday” and HBD sign are stamps in the Craft Roulette Funn Friend #1 stamp set. The “HBD” letters and yellow shade were cut using the stamp set’s coordinating dies.
Envelope: The card fits into a purchased A6 (4.5x 6-inches) size envelope or larger.
Below is the Craft Roulette Community Showcase show on which I originally made this card.
___________________________________
Thank you for experiencing this blog post.
I hope this inspires you and makes you smile.
Please like and leave comments 😊
___________________________________
Disclaimer: Karen Burniston products are provided free of charge by the manufacturer for review and use. All other items were personally purchased. Compensated affiliate links used where or when possible, meaning I will receive a small percentage commission from these manufacturers at no cost to you. This will allow me to add more content to my YouTube channel and help out a lot. Thank you.
Cardbase: The cardbase is an A9 side fold (5 1/2 x 8 1/2-inch) with two floor flaps. I took an 8 1/2 x 11-inch sheet of 65 lb. cardstock and folded it in half. The floor flaps are 2 5/8 x 4 1/4-inch that are scored and folded at 1/4-inch to form a tab for 4-inch-long flaps.
Cake Pop-Up Ship: This ship was designed by John Watterson using four Karen Burniston dies that were released before June 2024. It utilizes a vertical fold and is placed in the center of the card.
Boat Pop-Up Ships: The two smaller ships were designed by Karen Burniston and in this card utilize the horizontal folds of the floor flaps. They use only two die sets. Watch Karen’s assembly video located at the bottom of the Boat Pop-Up’s page.
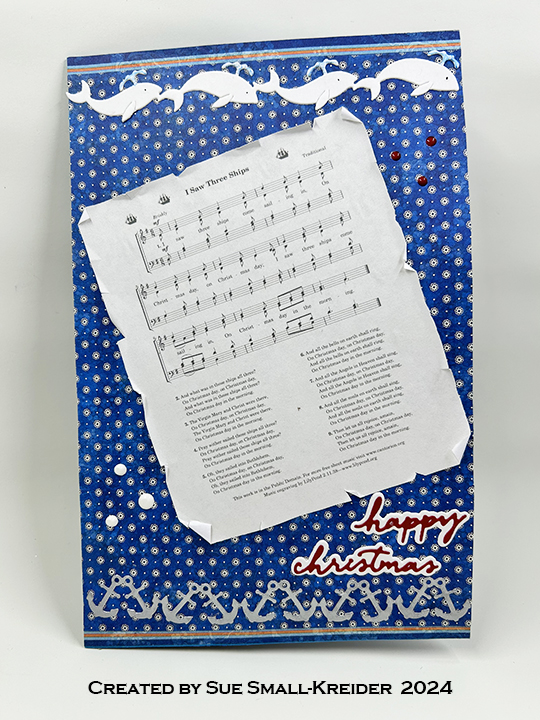
Card Front: The copyright free sheet music was computer generated and the edges distressed. The white whale and silver anchor borders are from the Set Sail Borders. I added white and red enamel drops along with the “Happy Christmas” sentiment made using the Small Script -Halloween and Small Script – Christmas die sets.
Inside: The water is created with a paper from the graphic45 Sun Kissed collection. I used the sun die in the Beach Elementsset and several sizes of theCrosshatch Circles for the labels for personal messages.
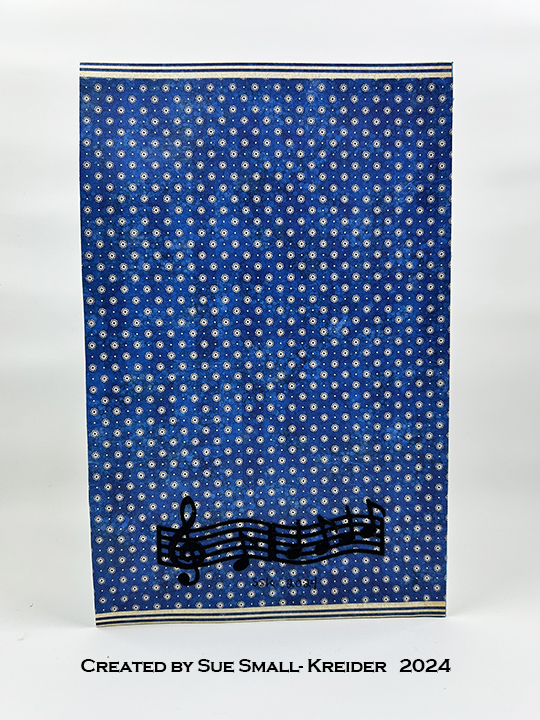
Card Back: The music decorating the card back are the first two bars of the carol. It is made with dies from the Music Charms set.
Envelope: The card fits into a 6×9-inch catalog envelope. I decorated the back flap with die-cut musical notes.
It’s Sneak Peek Week for Karen Burniston’s February 2024 release. These dies will be available for purchase on February 19, 2024 on the KB Riley LLC website.
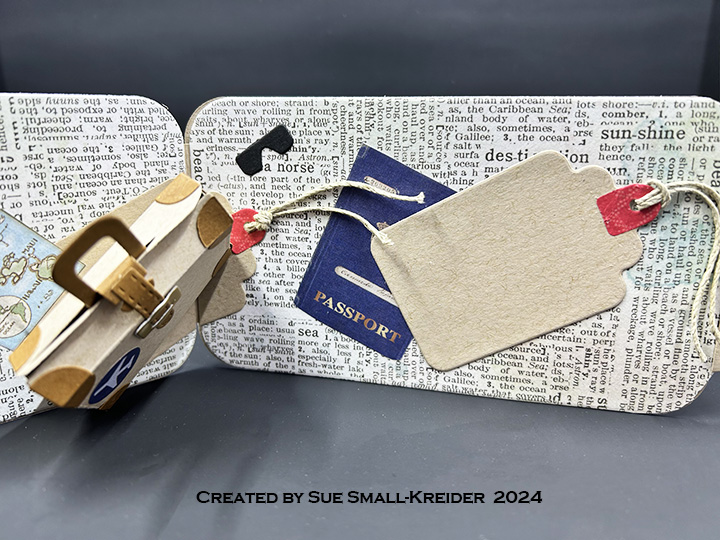
Who doesn’t enjoy a vacation and this tag card is sure to let those going on a cruise vacation know they are in for some fun.
Tag Cardbase: Cut two of the largest tags in the Topper Tags die set from kraft cardstock. Use the hinge die in the Tag Book Pop-Up or cut a rectangle of 1.5×3.5-inch and fold in half for the card hinge that is glued to the inside of the two tags. Cut two large tags of decorative cardstock and glue over the inside of the tags and hinge. Cut another two large tags of decorative papers and glue to the front and back of the card. (My inside decorative cardstock did not cover the entire tag, so I cut the top scalloped section of the tag from kraft cardstock.)
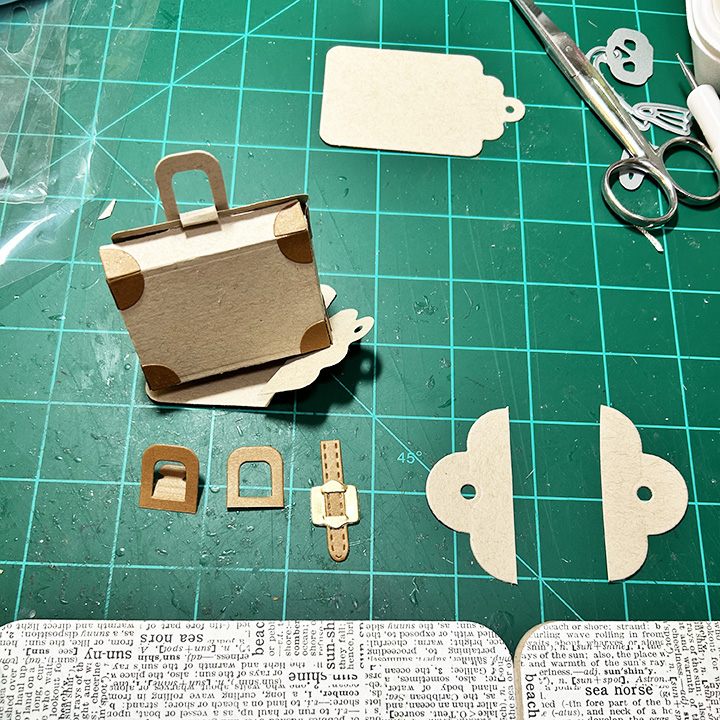
Pop-Up Suitcase: Follow the assembly video at the bottom of the Purse Pop-Up page link instructions to make the suitcase on a small tag cut from the Tab Book Pop-Up set. I cut the handle again twice, strap once and 20 of the corner pieces from dark brown. Cut the buckle from gold cardstock. (I used a bit of gold foil packaging form some chocolates.) The strap can be glued to the rolled under piece as long as it doesn’t block the movement of the handle as it slides open and closed.
Scuba Gear and Decorations: Using the Tiny Accessories 4 die set, cut the mask and snorkel once from black and once from blue. trim off the top and bottom knobs of the blue snorkel and glue on the black snorkel. Glue the blue mask onto the black mask to give it depth. Save the black center section of the mask to use as sunglasses. Cut a pair of flippers from black. (I had images of a passport and a map of tropical islands that I glued to the inside of the card as well as the airplane sticker on the suitcase. More travel images were added to the back and front of the card.)
Sentiments: The ship and “bon voyage” sentiment on the card from come from the Cruise Charms set while the inside tags come from the Tag Book Pop-Up set. Hemp cord is tied to the tags.
Envelope: The tag card easily fits in a #10 business envelope which I used a paper image to decorate the back flap.
Thank you for reading this blog post. I hope this inspires you and makes you smile. Please like and leave comments 😊
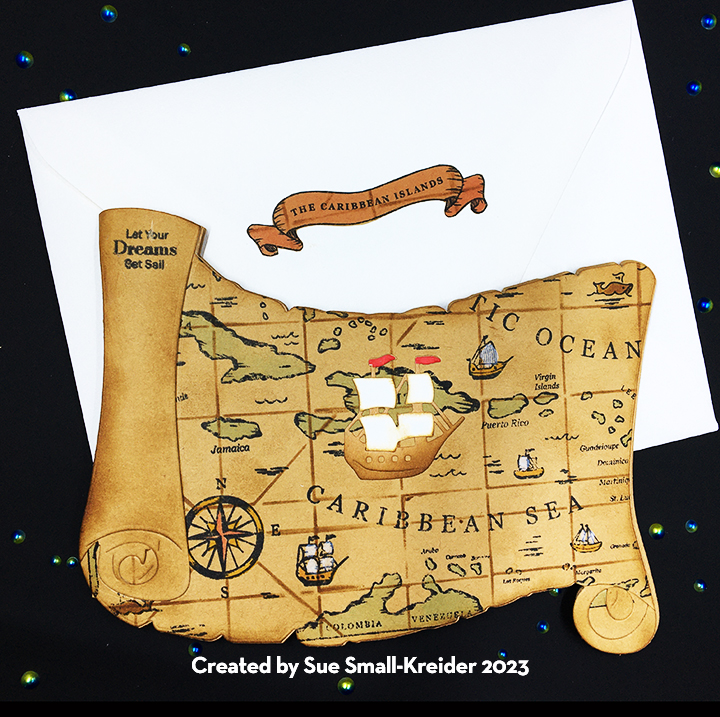
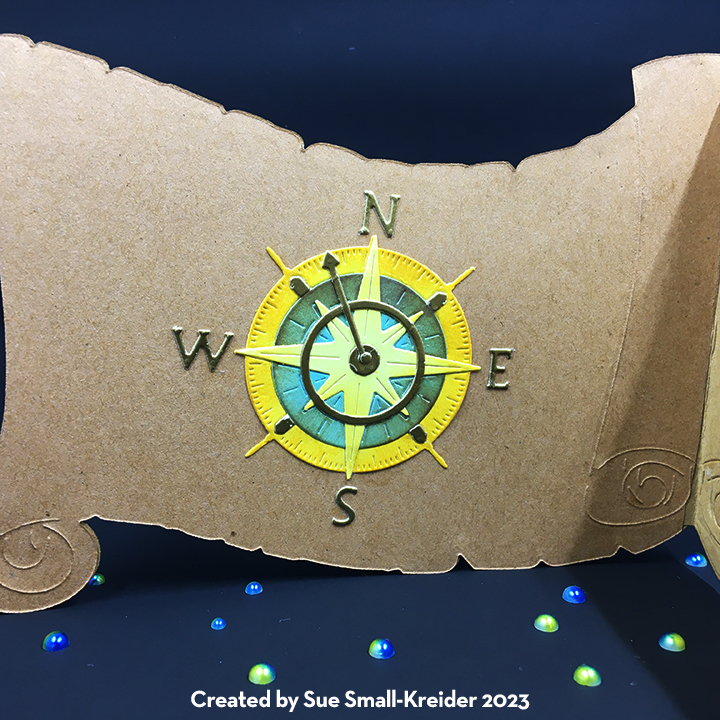
Map: Stamp on kraft paper the Caribbean Map Stamp. Using the coordinating stencil set –Layering Caribbean Map Trio, start with the grid stencil and brown ink. Use the next two stencils to add color to the land masses, ships, whales and compass. (I found it easier to use a white opaque marker to color the sails than use the stencil.) I used the A7 Compass Scroll die to cup the map making sure the words of “Caribbean Sea” were visible. To create the rolled back of the scroll, I die cut just the scroll portions of the die from kraft paper and trimmed to fit the map. I daubed brown ink to shade and age the scroll and map.
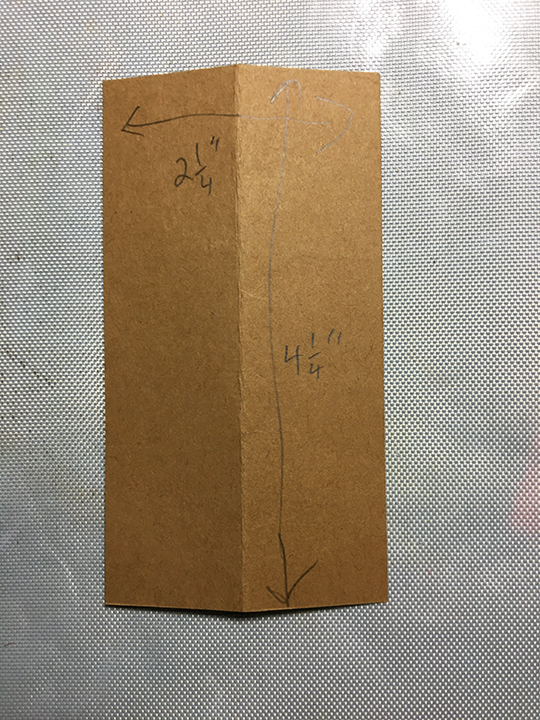
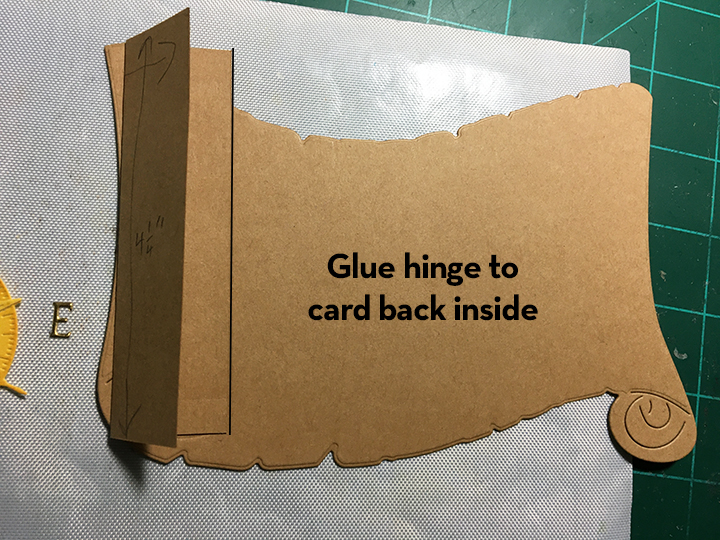
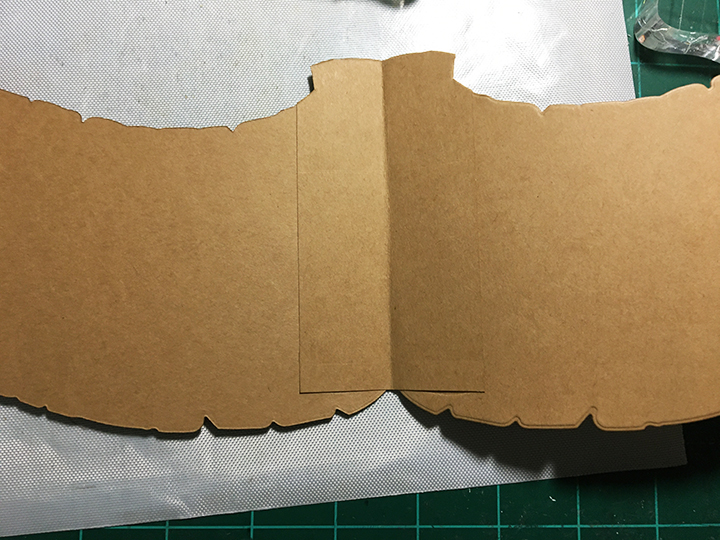
Cardbase: Cut three scrolls from kraft paper using the A7 Compass Scroll die. Cut a 2 1/4-inch x 4 1/4-inch rectangle from kraft paper and fold in half longwise for the card hinge. Glue the hinge to one of the scrolls to be the cardback as shown in photo. Glue hinge to back of map scroll, matching the shape edges.
Trim over hanging bits of hinge. Glue the scroll edges together at hinge fold. Trim the remaining two kraft scrolls to fit inside the card and cover hinge.
Compass: Cut the nine dies that make up the compass from the A7 Compass Scroll die set. Use lightweight colored cardstock for the three main parts and ink them to provide depth and shading. Cut the smaller bits from gold cardstock. Glue completed compass to inside of card.
Sentiment: Stamp in black, the “Let your dreams set sail” from the Set Sail stamp set on the top left of the map scroll.
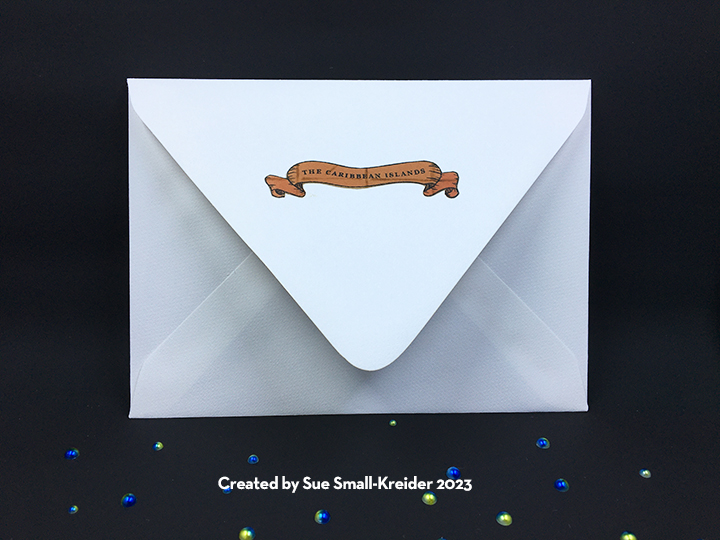
Envelope: The card fits into an A7 envelope that I decorated the back flap with the Caribbean Islands banner fussy cut from the map.
Thank you for reading this blog post. I hope this inspires you and makes you smile. Please like and leave comments 😊
Want to see more of the Scrappy Tails nautical collection? Check out my blog posts:
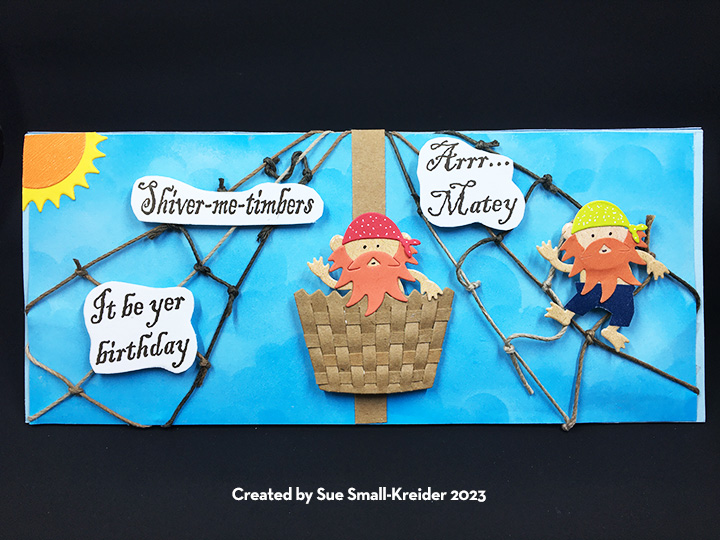
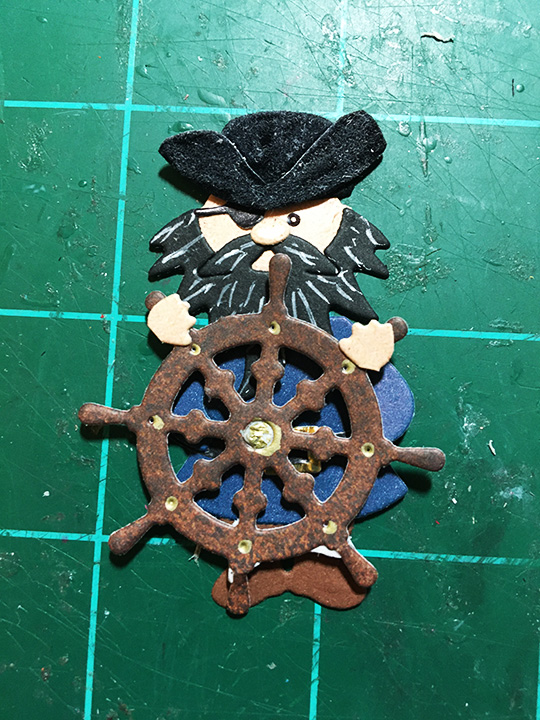
I love playing with the mechanical pop-up mechanisms designed by Karen Burniston. Her Facebook page Karen Burniston Pop-Up Peeps is a place for people to post their projects using her dies. Many talented people post wonderful and creative cards and projects. One such person is John Watterson who has created several cards featuring pirates using Karen Burniston dies. His work is the inspiration for this card, and I give him all credit for the pirate figures and pirate sail. I took inspiration for the crow’s nest from him as well.
Backgrounds: For the blue skies background on the card front, I took a piece of sky-blue cardstock and inked it using a cloud stencil, white ink and a small blending brush. Because the front scene is of a ship’s crow’s nest the viewpoint would be closer to the sky and sun, so everything would look bigger. The inside sky what also done with the white ink and just the blending brush for a more distant look of the clouds and sun. The suns are just one sun made from the Landscape Scene cut in half and the glued to the corners and trimmed again.
Rigging and Crow’s Nest: I raided my jewelry making supplies for some brown cord to make the rigging going up the main mast. The crow’s nest is made from the larger cupcake holder from the Cupcake Pop-Up set with thin strips of the same brown paper woven through the slits and glued. I used my fingers to put a curve in the crow’s nest.
Pirate Crew: (Click here to see John Watterson’s marooned pirate post.) While John’s pirate is on a deserted island and dancing a jig, my pirate crew are scouting the waters from the crow’s nest. I used the Monkey die set for the body and head of my pirates, took the beard from the Gnome and Santa set, and the bandana head covering from Tiny Accessories 1. The pants I fussy cut by tracing around the legs and body and cutting a bit wider than the pencils lines. The pirate is glued to the back of the crow’s nest and then adhered to the mast with foam tape.
Pirate Captain: (Click here to see John Watterson’s pirate captain post.) John’s pirate captain sails with a spotted dog and a black cat in a basket ship. I followed John’s lead using the Gnome and Santa dies for the head, beard, coat and boots. Since John made his own hat, I did similar but used the bowler hat from the Tiny Accessories 1 for its base. The hat is cut from suede paper that I brushed with a white opaque marker to age it. I also used the eye patch from this Tiny Accessories set. The ship’s wheel is from the Cruise Charms and attached to the captain with small foam squares. His hands are from the Gnome set but glued to the wheel. I also added some white gel pen to the beard to make it stand out. My final touch was to add a parrot to the captain’s shoulder using one of the birds from the Tiny Tree set. The captain is glued to the top platform on the mini pops platform.
Ship: The ship is based on two pop-up mechanisms – the Bam Box and the Mini Pops Pop-Up set and two of the smallest crosshatch long rectangles. The main deck base and mast are cut from a 6 1/2 x 3 1/4 inch piece of double-sided woodgrain cardstock scored and folded at 2 7/8 for the center fold using the tiered platform from the Mini Pops set. (The longer side of the cardstock is the top of the platform.) Train the large platform and top platform to pop-up as shown in the assembly video, but leave the two outer platforms as part of the base.
The main deck is a custom fitted piece cut from one of the crosshatch rectangles. And added after the bam box and its deck have been attached and tested.
The other crosshatch rectangle is folded in half and a bam box glued to the inside just at the fold. (Bam Box assembly video) (The bam box needs to fold out, away from the main deck platform so make sure to attach the box with the arched tab on top with the rubber band side next to the rectangle.) This piece now becomes the bow or front of the ship. Position the tip of the bam box so it just touches the main deck platform. Test to see that the bam box will fold down correctly before gluing in place and that the triangular point of the bow is in the center of the main deck. Cut a 90-degree triangle from the wood grain cardstock that has 2-inch sides. Trim to fit as the deck covering the bam box.
Train the bam box to open and close checking for catchpoints and trimming triangle as needed.
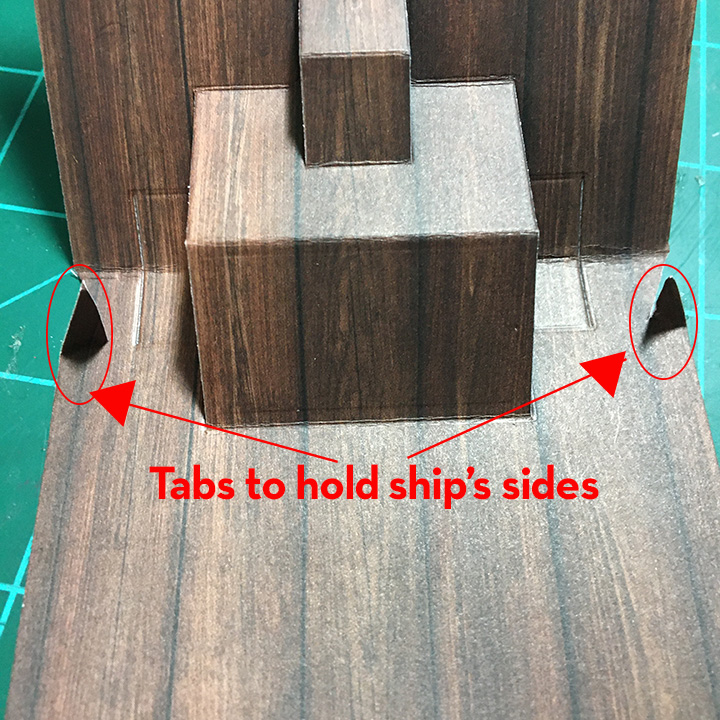
You will need to cut two diagonal tabs in the base bottom to hold the ship sides in place once the card is open.
Attach the main deck to its platform. Trim the back of the base to form a center mast, leaving a back railing at the height of the ship sides or taller. Trim the bottom of the base to 1/8 inch around the ship sides. Add waves to bottom of shop sides. The ship is now ready to be attached to the cardbase. Add waves to hide ship base.
Raft: The raft is a place to write a personal message. It was made by using the thinnest die in the Long Rectangles die set to cut the planks which were trim down to approximately 3 1/4 inches. Bamboo cord was used to lash the planks together with the ends taped to the backside of the planks. Foam squares adhere the raft to the card. The stamped sentiment was fussy cut and attached to the fancy label which was cut using a die from the Label Charm Pop-Up set.
Shark & Waves: By using a wave patterned paper, creating the ocean was easy. The waves under the ship and at the horizon line at the card’s center fold were cut using the Tropical Scene dies from light blue cardstock and inked with white ink. The gentler light blue waves in the corners were the off cuts from the waves. The shark is cut from gray cardstock and a scrap of white for his teeth using the Sea Animals set.
Sentiments: The pirate birthday sentiments are rubber stamps by Crackerbox Stamps and were stamped in brown ink and fussy cut. Thick foam tape was used to pop the sentiments on the front of the card, while double-sided tape was used for adhering “Happy Birthday” to the raft inside.
Envelope: While this card is designed as an 8 3/4 x 3 3/4 inch slimline card, its thickness of 1/2 inches makes it too thick to mail in a regular envelope and would need its own box or padded envelope.
Thank you for reading this blog post. I hope it provides inspiration and joy. Please like and leave comments 😊
This card can be for a birthday or another special day for a nautical person.
Ship -in-the-Bottle: Using the Tutti Designs Ship in A Bottle die, cut four times from light blue, brown, white, and oatmeal. Only cut the whole die from blue. The other colors cut the sections needed from scraps. Using distress inks, color the various die-cut sections of the bottle and paper piece as needed. Glue bottle outline to a piece of acetate on the front side. Cut out the bottle shape. Glue rope to outside of bottle neck.
Background: Die cut the rope background from oatmeal cardstock making such al the chads are removed from the image. Glue to a dark piece of wood grained cardstock cut to 4 inches x 5 ¼ inches.
Assembly of Card: Position sentiment strip, ship and then the bottle on to rope background. Glue ship down followed by bottle. Adhere sentiment strip with foam squares. Attached front panel to bard base with foam squares.
Sentiments: The foiled sentiment strip was one I had made during a batch foiling session using up scraps. It was die-cut into a ribbon. The inside stamp sentiment is from a favorite nautical stamp set by Sara Davies.
As is my style, I stamped the back of the envelope with the lighthouse image from the Sara Davies stamp set to hint as to what is inside.
Thank you for reading this blog post. Please like and leave a comment. 😊