I love playing with the mechanical pop-up mechanisms designed by Karen Burniston. Her Facebook page Karen Burniston Pop-Up Peeps is a place for people to post their projects using her dies. Many talented people post wonderful and creative cards and projects. One such person is John Watterson who has created several cards featuring pirates using Karen Burniston dies. His work is the inspiration for this card, and I give him all credit for the pirate figures and pirate sail. I took inspiration for the crow’s nest from him as well.
Backgrounds: For the blue skies background on the card front, I took a piece of sky-blue cardstock and inked it using a cloud stencil, white ink and a small blending brush. Because the front scene is of a ship’s crow’s nest the viewpoint would be closer to the sky and sun, so everything would look bigger. The inside sky what also done with the white ink and just the blending brush for a more distant look of the clouds and sun. The suns are just one sun made from the Landscape Scene cut in half and the glued to the corners and trimmed again.
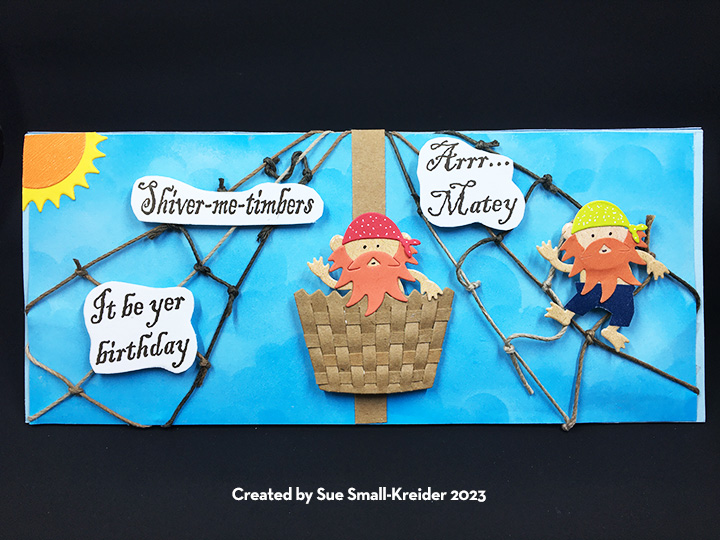

Rigging and Crow’s Nest: I raided my jewelry making supplies for some brown cord to make the rigging going up the main mast. The crow’s nest is made from the larger cupcake holder from the Cupcake Pop-Up set with thin strips of the same brown paper woven through the slits and glued. I used my fingers to put a curve in the crow’s nest.


Pirate Crew: (Click here to see John Watterson’s marooned pirate post.) While John’s pirate is on a deserted island and dancing a jig, my pirate crew are scouting the waters from the crow’s nest. I used the Monkey die set for the body and head of my pirates, took the beard from the Gnome and Santa set, and the bandana head covering from Tiny Accessories 1. The pants I fussy cut by tracing around the legs and body and cutting a bit wider than the pencils lines. The pirate is glued to the back of the crow’s nest and then adhered to the mast with foam tape.
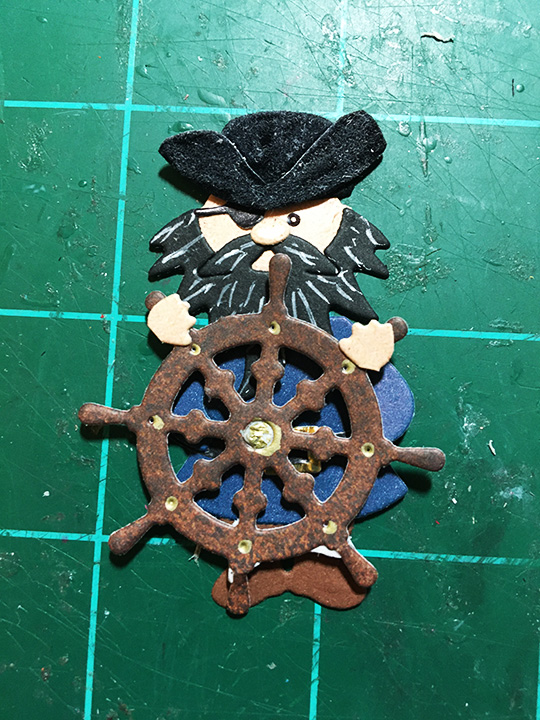


Pirate Captain: (Click here to see John Watterson’s pirate captain post.) John’s pirate captain sails with a spotted dog and a black cat in a basket ship. I followed John’s lead using the Gnome and Santa dies for the head, beard, coat and boots. Since John made his own hat, I did similar but used the bowler hat from the Tiny Accessories 1 for its base. The hat is cut from suede paper that I brushed with a white opaque marker to age it. I also used the eye patch from this Tiny Accessories set. The ship’s wheel is from the Cruise Charms and attached to the captain with small foam squares. His hands are from the Gnome set but glued to the wheel. I also added some white gel pen to the beard to make it stand out. My final touch was to add a parrot to the captain’s shoulder using one of the birds from the Tiny Tree set. The captain is glued to the top platform on the mini pops platform.

Ship: The ship is based on two pop-up mechanisms – the Bam Box and the Mini Pops Pop-Up set and two of the smallest crosshatch long rectangles. The main deck base and mast are cut from a 6 1/2 x 3 1/4 inch piece of double-sided woodgrain cardstock scored and folded at 2 7/8 for the center fold using the tiered platform from the Mini Pops set. (The longer side of the cardstock is the top of the platform.) Train the large platform and top platform to pop-up as shown in the assembly video, but leave the two outer platforms as part of the base.


The main deck is a custom fitted piece cut from one of the crosshatch rectangles. And added after the bam box and its deck have been attached and tested.

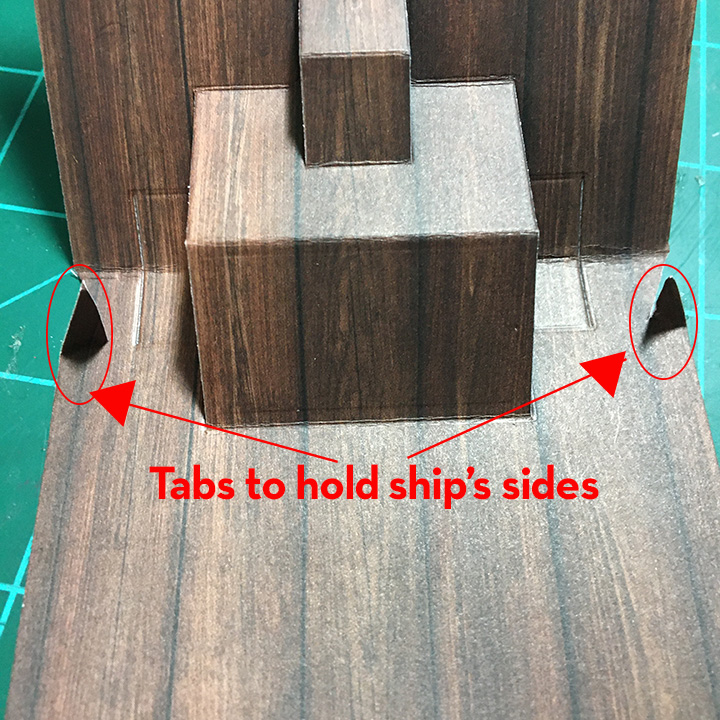
The other crosshatch rectangle is folded in half and a bam box glued to the inside just at the fold. (Bam Box assembly video) (The bam box needs to fold out, away from the main deck platform so make sure to attach the box with the arched tab on top with the rubber band side next to the rectangle.) This piece now becomes the bow or front of the ship. Position the tip of the bam box so it just touches the main deck platform. Test to see that the bam box will fold down correctly before gluing in place and that the triangular point of the bow is in the center of the main deck. Cut a 90-degree triangle from the wood grain cardstock that has 2-inch sides. Trim to fit as the deck covering the bam box.

Train the bam box to open and close checking for catchpoints and trimming triangle as needed.
You will need to cut two diagonal tabs in the base bottom to hold the ship sides in place once the card is open.

Attach the main deck to its platform. Trim the back of the base to form a center mast, leaving a back railing at the height of the ship sides or taller. Trim the bottom of the base to 1/8 inch around the ship sides. Add waves to bottom of shop sides. The ship is now ready to be attached to the cardbase. Add waves to hide ship base.


Raft: The raft is a place to write a personal message. It was made by using the thinnest die in the Long Rectangles die set to cut the planks which were trim down to approximately 3 1/4 inches. Bamboo cord was used to lash the planks together with the ends taped to the backside of the planks. Foam squares adhere the raft to the card. The stamped sentiment was fussy cut and attached to the fancy label which was cut using a die from the Label Charm Pop-Up set.

Shark & Waves: By using a wave patterned paper, creating the ocean was easy. The waves under the ship and at the horizon line at the card’s center fold were cut using the Tropical Scene dies from light blue cardstock and inked with white ink. The gentler light blue waves in the corners were the off cuts from the waves. The shark is cut from gray cardstock and a scrap of white for his teeth using the Sea Animals set.
Sentiments: The pirate birthday sentiments are rubber stamps by Crackerbox Stamps and were stamped in brown ink and fussy cut. Thick foam tape was used to pop the sentiments on the front of the card, while double-sided tape was used for adhering “Happy Birthday” to the raft inside.
Envelope: While this card is designed as an 8 3/4 x 3 3/4 inch slimline card, its thickness of 1/2 inches makes it too thick to mail in a regular envelope and would need its own box or padded envelope.
Thank you for reading this blog post. I hope it provides inspiration and joy. Please like and leave comments 😊
Supplies Used:
Dies
- Karen Burniston in cahoots with Riley and Company – Bam Box Pop-Up – 1222
- Karen Burniston in cahoots with Riley and Company – Doghouse Tiny House Add-Ons – 1221
- Karen Burniston in cahoots with Riley and Company – Label Charm Pop-Up – 1209
- Karen Burniston in cahoots with Riley and Company – Skelton and Bat – 1206
- Karen Burniston in cahoots with Riley and Company – Monkey and Lion – 1187
- Karen Burniston in cahoots with Riley and Company – Tiny Trees Pop-Up – 1156
- Karen Burniston in cahoots with Riley and Company – Long Rectangles – Crosshatch – 1151
- Karen Burniston in cahoots with Riley and Company – Mini Pops Pop-Up – 1146
- Karen Burniston in cahoots with Riley and Company – Landscape Scene – 1141
- Karen Burniston in cahoots with Riley and Company – Gnome and Santa – 1129
- Karen Burniston in cahoots with Riley and Company – Cruise Charms- 1119
- Karen Burniston in cahoots with Riley and Company – Tropical Scene – 1038
- Karen Burniston in cahoots with Riley and Company – Sea Animals – 1037
- Karen Burniston in cahoots with Riley and Company – Tiny Accessories 1- 1025
- Karen Burniston in cahoots with Riley and Company – Cupcake Pop-Up – 1008
Stamps
- Crackerbox Stamps – Arrr Pirate Sayings set of 4
Papers
- Colored Cardstock and Packaging Scraps
- Hot Off the Press – Black Suede
Pens & Inks
- Sakura – Gelly Roll Pen – Medium – White
- Sharpie Permanent Marker – Ultra Fine Point – Black
- Green, Orange and Yellow Fine-Tipped Markers
- Crafter’s Square – Metallic Marker – Gold – .05 in (1.2 mm)
- Recollections Opaque Marker – Snow
- Stampin’ Up – Classic Stampin’ Pad – Early Espresso
- Simon Says Stamp – Premium Pigment Ink – White
Adhesives
- Neutral PH Adhesive by LINECO
- Fine-Tip Glue Bottle
- Scrapebook.com – Double-Sided Permanent Tape ¼-Inch Wide
- Foam Squares
- Queen & Co. – Foam Refill Scraps (Foam Tape)
- Clear Removable Tape
Tools
- Quickstik Tool
- Die Cutting Machine
- Scissors
- Craft Knife
- Tweezers
- Pencil
- T-Ruler
- Stamping Platform
- LDRS Creative – Stampendable Stamping Tool
- Simon Says Stamp – Blending Brush – Small
- Craftin Desert Diva – Cloud and Pathway Stencil
Miscellaneous
• Darice – Bamboo Cord

One thought on “A Pirate Ship Birthday”