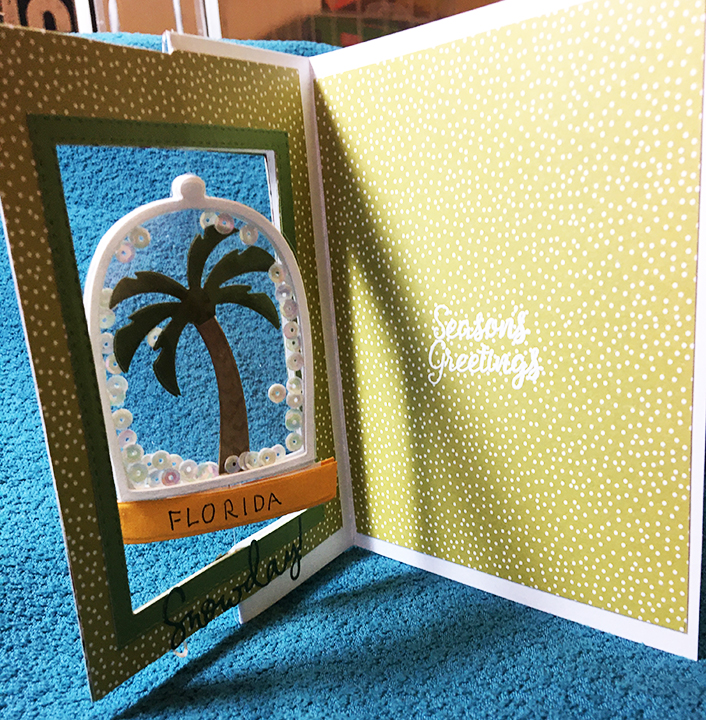
What’s a Florida snow day? Well, one version is a snow globe with a palm tree that says Florida.
This card was inspired by Sharon-Elaine Jone’s spinning shaker card on Craftworld.com, Spellbinder’s Santa’s Workshop die set’s snow globe and one very hot and humid day in Florida.
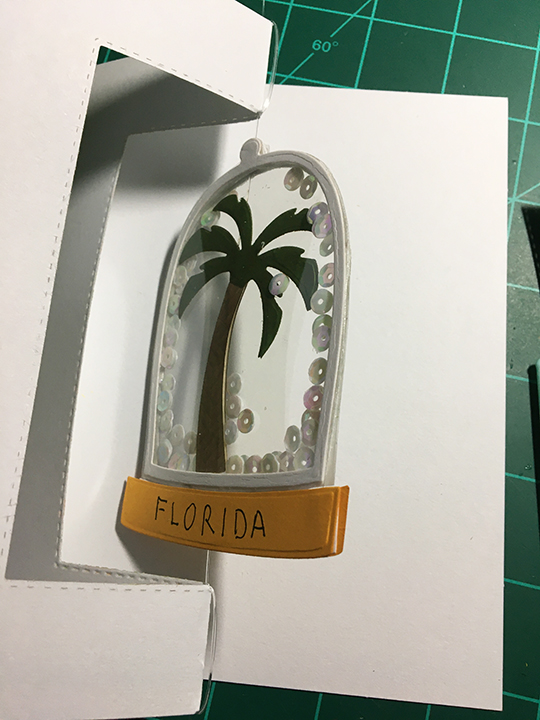
A. Die Cut – 2 trees (I used textured paper for trunk), 2 globes from white cardstock, 2 globes from acetate , 2 globes from foam (I put double-sided adhesive sheets on both sides of foam before cutting.), 2 globe bases from orange cardstock and 2 “Snowday” sentiment.
B. Snow globe
-
- Palm tree
- Glue one branches onto top of tree trunk.
- Glue backside of tree to monofilament. Glue second tree trunk to encase monofilament line. Glue remaining branches to tree.
- Distress ink tree.
- Assemble snow globe
- Glue 1 paper globe to1 acetate globe and let dry. Repeat with second globe paper and acetate pieces.
- Peeling back only the top knob off adhesive on foam globe, adhere to inside of one acetate globe. Peel, align and slowly adhere all of one foam globe to one acetate globe. Repeat with second foam globe and other acetate globe.
- Filling snow globe
- Using the grid on a craft mat, lay the palm tree on top of one acetate globe against foam side. Tape aligned monofilament line to the craft mat above and below globe
- Loosen backing paper from top of globe and press monofilament into sticky foam. Do not take off any other backing paper but globe knob.
- Sprinkle sequins into center of globe, pushing some under and over palm tree. Keep sequins away from foam edges.
- Lay second acetate globe over first globe, foam side to foam side. Slowly, remove backing paper from both foam sides, aligning edges together a little bit at a time until globe is sealed.
- Pull monofilament taunt and test the spinning action of globe shaker.
- Using scrape foam with double-sided adhesive as foam tape, adhere orange globe bases to globe on monofilament. (Write “FLORIDA” on bases before adhering.)
- Palm tree
C. Card Base
-
- Select decorative papers (three pieces – two at 6 x 4 ½ inches for front frame and one at 6 x 4 ¾ inches for inside back)
- Tape one of the small decorative paper pieces to front of card base and tape rectangle die (Needs to be large enough for globe to freely spin inside of) to over both paper and base. Die cut out rectangle. Remove tape and use decorative paper to trace in pencil the placement of die for other piece of decorative paper and cut out rectangle. (I cut the frames separately, so any die embossing/decorative piercing is prominent on both fronts of frame pieces.)
- If you want, you can cut a narrow border frame for the opening as I did.
- With a pencil, lightly mark the center point of the rectangular opening at the top and bottom of the card base. Using the marks, score the card base and fold the right front half of base to the left to make a valley fold.
- Select decorative papers (three pieces – two at 6 x 4 ½ inches for front frame and one at 6 x 4 ¾ inches for inside back)
D. Attaching globe spinner
-
- Open card base open so “frame” section is flat and the top and bottom fold creases are aligned on craft mat grid. Aline the globe shaker’s monofilament line with fold creases on card base extending the line to match craft mat grid line. Tape extended line to mat to hold firmly in place.
-
- Glue monofilament line to the top and bottom of card base frame. Let glue dry 1-2 hours or overnight.

-
- Once glue is dry, wrap extra line around frame at fold. Tape over wrapped line with clear tape on inside of fold.

E. Decorating Card
- Adhere one of the 6 x 4 ½ inches decorative paper frames to the front of card alining the opening with the halved card base frame. Adhere on the inside of card the other decorative frame piece so that the two decorative pieces from a front and back frame for the snow globe to spin inside of.
- If you cut a border frame adhere it now.
- Add “Snowday” sentiment at bottom on each side of frame.
- Aline the third piece of decorative paper on inside back of card base with the front frame.
- Mark the corners of where the decorative paper should go lightly with pencil on card base.
- With the decorative paper laying on card base, position inside greeting stamp and tape stamp in place with removable tape.
- Carefully remove the paper to be stamped and place in a stamping platform to stamp with Versamark Watermark ink. Remember to wipe paper with an antistatic bag or tool before stamping.
- Once stamped, use white embossing powder and heat emboss sentiment.
- Adhere embossed paper to inside of card using pencil alinement marks.

Decorate the back of card (This may be the place you choose to write your personal message at.)
I stamped the back of the envelope with what I hope would be taken as a palm tree, using what stamps I had since I don’t have a palm tree stamp.
Supplies
Dies
- Spellbinders – Santa’s Workshop – S4-1014
- Karen Burniston in cahoots with Riley and Company – Palm Tree – 1039
- Art Impressions – Steel Dies-A2 Rectangle Double Stitched – 5063
Stamps
- Pink Fresh Studio – Photopolymer Clear Stamp Set – Leafy Backdrop – PFCS3618
- Sheena Douglass – Winter Woodland – from Creative Stamping, issue 62, December 2018
Paper
- Dura-Lar .0005 Clear Film acetate
- My Mind’s Eye – Cozy Christmas – 6 x 6 Paper Pad
- Textured and colored scraps from my stash
- 6 ½ x 5 inch cardbase and envelope – Recollections
Inks
- Ranger – Distress Inks – Walnut Stain
- Stampin’ Up – Classic Stampin’ Pad – Chocolate Chip & Always Artichoke
- VersaMark – Watermark Stamp Pad
- Hero Arts – Embossing Powder – White – PW110
- Sandford Uni-Ball pen – Micro Point – Black
Miscellaneous
- PVA Glue – Cosmic Shimmer Acrylic Glue
- Elizabeth Craft Designs – Clear double-sided tear tape
- Elizabeth Craft Designs – Clear Double Sided Adhesive – 6×6 inches
- Zebco – OmniFlex – 20 lb. 9.1 kg Line – monofilament fishing line
- White iridescent sequins from stash
- Clear tape like Scotch Brand Magic tape

Love spinner cards. This is a really cute one. Good design for FL Christmas! Thanks for sharing with us.
LikeLiked by 1 person
So gorgeous and fun, just love it. Emma
LikeLiked by 1 person
This is such a fabulous card! I saw it on a FB group page and started following you. I so meant to comment on it before now….☺️
LikeLiked by 1 person