It’s time for the Karen Burniston June 2024 Design Team Challenge with the theme of using border dies.
I wanted to get a jump on my end-of-the-year holiday cards by making a baking themed card with pies and gingerbread men from the Baking Borders and Christmas Borders 1 set. The rolling pin and chef’s hat are also in the Baking Borders set. Additional die sets used were: Oven Pop-Up, Tiny Gnomes, and the Fancy Label Accordion. (A 1 3/4-inch square die was used from the Frame Pull Pop-Up set, but any 1 3/4-inch square die could be used. This was the one I had handy.)
Watch my tutorial YouTube video to see how the card was made.
(TIP: Access the assembly videos for any of the dies used by clicking on the die link and scrolling towards the bottom of the linked page for the video.)

Cardbase: Cut three of the largest die in the Fancy Label Accordion set from a butterscotch-colored heavy cardstock. Work the scored fold-lines. Wait to until after making and attaching the oven shaker to glue the frames together.
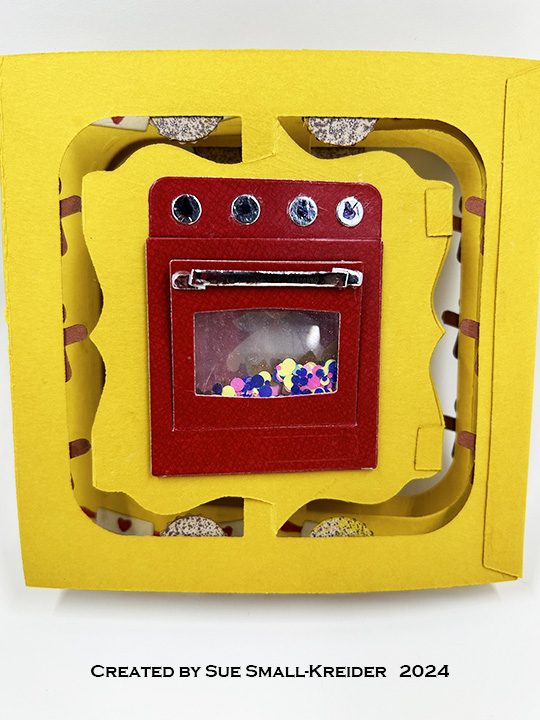
Shaker Oven: Cut ten ovens from red cardstock and two additional ovens from coated red cardstock using the oven die from the Oven Pop-Up set. Trim off stove top section on all 12 pieces. From the two coated cardstock stove top pieces, trim off the back where knobs go and save. Layout oven with stove back on one panel of the cardbase. Mark the outside edges of oven lightly with pencil. Center 1 3/4-inch square die within the oven square and die cut. (You may want to use a ruler to find the center of the fancy label and center the die left to right with the center line. The die will be below the true center up and down because of the stove back piece.)
Glue five of the plain cardstock oven pieces to either side of the cardbase over the square opening. This will form the shaker base. Cut two 2-inch square pieces of clear acetate/plastic. Attach one piece of acetate/plastic with double-sided tape to the top of stacked oven pieces. Turn over and fill shaker with confetti and tiny cookie shapes from the Oven Pop-Up set. Attach the second piece of acetate/plastic with double-sided tape to seal up the oven shaker.
Cut two 1 1/2-inch square pieces of clear acetate/plastic. Adhere to the back of oven doors on the remaining two coated oven pieces using double-sided tape. With more double-sided tape added to the outer edges of the oven pieces, attach them over the shaker acetate/plastic. Glue the stove back with knobs attached to the cardbase above the ovens on both sides.

Pies, Gingerbread Men and Rolling Pins: Cut two strips of pie bases from the Baking Borders set. Color one strip all red .(I used a red glitter brush.) Color four orange and four baked apple yellow on the other strip. Cut out four of each of the pie tops. Ink the pie top to look like browned crusts with maybe some burnt tips of the crusts. Glue lattice pie crust to apple yellow pies, the open ring crust onto the pumpkin orange pies and the flower shaped crusts onto the red pies. Cut all the pies into separate circular pieces. Glue pies to the top and bottom of the front and back panel frames of the card base.
Cut two strips of gingerbread men using the die in the Christmas Borders 1 set. Using a white gel pen with a fine tip, trace the icing onto the men using the stencil feature of the die. Cut men apart and glue to sides of the front and back panel frames of the card base.
Cut two strips of the rolling pins from a kraft colored cardstock using the die from the Baking Borders set. With a red fine-tipped marker stencil on the hearts and color all the handles. Trim the strips to fit the top and bottom of the middle panel frame. Save one of the leftover rolling pins for the chef to hold.
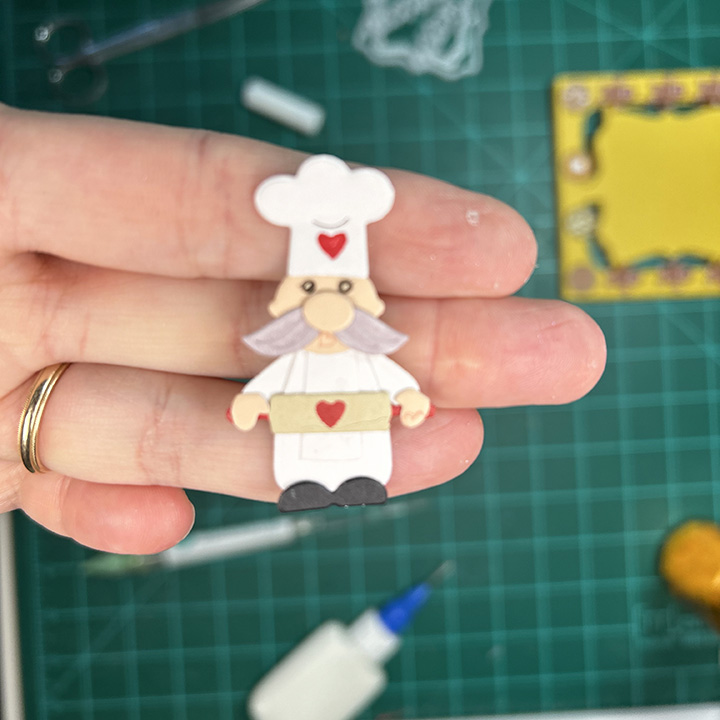
Chef: From the Tiny Gnomes set, cut two of the body piece and one mustache from white cardstock. From flesh colored cardstock cut the head, nose and hands. From black cardstock cut the shoes. With a fine tipped pen, trace the eyes using the stencil feature of the head die. Color the mustache brown or gray. Cut one chef’s hat from white using the die in the Baking Borders set. Using the rolling pin die to stencil a red heart onto the chef’s hat.
To assemble, cut one body piece to have an apron in the center and an arm on either side. (See video for visuals of this.) Glue apron onto other body piece and then head. Added mustache then nose to head. Glue arms onto back of body wide enough to hold a rolling pin. Glue rolling pin to end of arms and then add hands on top of rolling pin handles. Attach shoes and hat.

Sentiments: “Happy Holidays” comes from Word Set 3-Holidays. The labels behind it and the chef are from the decorator dies in the Fancy Label Accordion set. Personal messages can be written on the back of the panels.
Envelope: The card fits into an A7 size envelope decorated with leftover pies and rolling pins on the back flap.
___________________________________
Thank you for experiencing this blog post.
I hope this inspires you and makes you smile.
Please like and leave comments 😊
___________________________________
Materials Used:
Dies
- Karen Burniston in cahoots with Riley and Company – Baking Borders – 1267
- Karen Burniston in cahoots with Riley and Company – Oven Pop-Up – 1250
- Karen Burniston in cahoots with Riley and Company – Christmas Borders 1 – 1245
- Karen Burniston in cahoots with Riley and Company – Tiny Gnomes – 1165
- Karen Burniston in cahoots with Riley and Company – Frame Pull Pop-Up – 1070
- Karen Burniston in cahoots with Riley and Company – Fancy Label Accordion – 1043
- Karen Burniston in cahoots with Riley and Company – Word Set 3 – Holiday – 1022
Papers
- Fun Stampers Journey – 8.5×11 inch Cardstock – Cranberry Bliss & Oatmeal Cookie
- Grafix – 8.5×11 Dura-Lar Acetate .005 – Clear Film
- Keep It Simple – 6×9 Double-Sided Coated Cardstock – Back to Basics – Ruby
- My Favorite Things – 8.5×11 inch 110 lb. Cardstock – Butterscotch
- Stampin’ Up –8.5×11 inch Cardstock – Copper Clay
- Silver Foil Cardstock
- Browns, Tan and White Cardstock
Ink
- Creative Craft Products – Dual Tip Alcohol Markers -mWG1 – Warm Grey
- Pigma – Mircon 01 Fine Tip Pen – Black
- Ranger – Tim Holtz – Distress Ink- Antique Linen & Gathered Twigs
- Sakura – Gelly Roll Pen – Medium – White
- Scrapbook.com – Glitter Brush Marker – Orange Juice, Red Shimmer and Sunshine Yellow
- Sharpie – Permanent Marker – Ultra Fine Tip – Black & Red
Adhesives
- Neutral PH Adhesive by LINECO
- Fine-Tip Glue Bottle
- Double-Sided Tape – 1/8-inch wide
Tools
- Die Cutting Machine
- Bone Folder
- Stamping Blocks used as paperweights
- Scissors
- Pencil
- We R Memories – QuickStick
- Ruler
- Pencil
- Tombow – Mono – Sand Eraser -512A
- Craft Mat
- Craft Clips
- This Calls for Confetti – It’s No Secret Anti-Static Powder Tool
Miscellaneous
- This Calls for Confetti – Gen Xer – Dazzle Dots

Awesome card and fun border treatment! That Chef, though! He’s next-level! Go team Lake!
LikeLiked by 1 person
Glad you enjoyed the card. I’m team beach.
LikeLike
This card really inspired me. I Love your chief. I’m a lake girl.
LikeLiked by 1 person
Thank you. I’m team beach.
LikeLike
OMG, so cute, thank you for the video and all the instructions.. appreciate you sharing it with us! Being this is more of a fall card, I’m going to have to go with team BEACH🏖️!! And thank you for the video and instructions
LikeLiked by 1 person
I really love the fall borders dies . It’s a toss up between the gingerman border and the baked pies, border. But ones things for sure with these fall dies.. I’m going to have to go with team beach! 🏖️
LikeLiked by 1 person
One of my favorite dies – the fancy label accordion. And I love the shaker oven.
I think I missed something along the way, but can I be team water? I’ll take either the beach or lake!
LikeLiked by 1 person
oh so many details and such a creative use of so many border dies! Love this card!
LikeLiked by 1 person