Over the Moon Birthday

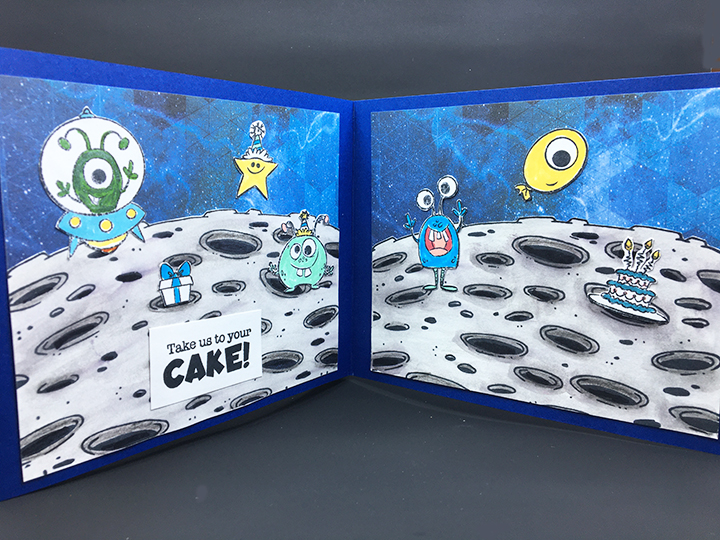
Sometimes we just feel like being out there in space when it comes to celebrating birthdays. This interactive space themed birthday card is made with Whimsy Stamps “Over The Moon” stamp set and kinetic dies.

Having watched Jennifer Dove’s video on Whimsy Stamps kinetic dies, I proceeded in making a similar card to the one she made, but I expanded the card into a tri-fold card letting the viewer find the cake.

Because this was the first time, I had used the kinetic dies, I made a few mistakes – the first being I have the rocket moving backwards when you first pull the strip. My second mistake was that I should have used thicker cardstock or cut two and glued together for the pull strip. And my third mistake was allowing the moon to warp when I watercolored it.

I stamped the images with black Memento Fade-Resistant Dye Ink onto white cardstock. The images are colored with Spectrum Noir Sparkle Glitter Brush-Pens and a Faber-Castell white India ink pen. Once dry, the images were fussy cut and ready to use for decorations.

The moon background was colored using Nuvo Watercolour Pencils in gray and black tones as well as a black Spectrum Noir Sparkle Glitter Brush Pen. I used a heat tool to dry the second and third moon backgrounds which did not warp as badly as the first moon which I let air dry overnight.

I recommend watching the assembly video for all the steps in assembling the No-See Kinetic mechanism. Because I followed the video’s directions forgetting that my rocket image went the opposite direction from the one in the video, my rocket goes backwards. Doubling up the foam tape is a must so that it matches the height of the foam dot.

The navy blue card base is made up of two panels 5 1/2 x 6 1/2 inches with tabs scored and folded at 1/4 inches on the short side. The tabs are then glued to a 5 1/2 x 6 inches panel to create the tri-fold card base.

My card uses all the stamps in the set for the three panels. It would be an ideal card for a child.

The card fits folded into an A7 envelope which is stamped on the back with the last of the three sentiments included in the stamp set – “I’m over the MOON for you!”

Thank you for reading. If you enjoyed this blog post, please like it and follow the blog. 😊

Supplies Used:

Mother and Daughter Cards

Mothers and daughters can be so alike and yet not see it.  Here are two cards made for a woman who has recently received a job promotion and a birthday card for her 13-year-old daughter.

Both cards are made using a Studio Light stamp and die set designed by Karin Joan called Betty. It is much like creating paper dolls. The main head and shoulders die cuts four individual pieces -head, 2 ears and the neck and shoulders. I laid out the position of the hair, ears, facial features stamps as well as the jewelry stamps before I did anything else. Next, I stamped and heat embossed the facial features.

The three hair dies can be combined in a multitude of ways to create different looks. Both the mother and daughter cards use the back full hair piece placed at different heights to create long or short hair. The front bangs pieces are different. The daughter’s hair is accentuated by a large bow.

The set comes with several collar line options. I have used the V-neck for the mother and the off-the-shoulder cut for the daughter. For jewelry on the mother, I’ve used a flower hair pin stamp for the earrings (stamped and heat embossed before the head was glued over the hair) and the heart and chain stamps for the necklace.

For the sentiment on the mother’s card, I used the sentiment stamp included in the Betty set to stamp and heat emboss the “She believed she could, so she did!” and die-cut the “Happy Birthday.” (The words on the stamp “so she did!” are so fine, I found that they didn’t heat emboss well, so I stamped that line in black ink and then cut it out and glued over the blurred embossed one.) Next the sentiment was die-cut using a scalloped stitched rectangle from Tutti Designs. For the daughter’s card, a Poppy Stamps “Happy Birthday” die was used.

Both cards used layered mats of printed papers on both the front and back covers. Inside the cards have been left blank for personal messages.

Thank you for reading. If you enjoyed this blog post, please like it and follow the blog. 😊

Supplies Used:

A July 4th Birthday

Today we are making a 3-dimensional ice cream sundae card to fit in a mini slimline envelope using dies from Dies R Us.

1. You will need:

  • One card base 11 inches x 3 3/8 inches from heavy white cardstock
  • One outside star paper 11 inches x 3 3/8 inches
  • One red and white strip inside back paper 4 3/4 inches x 3 3/8 inches
  • One wood-grained inside base paper 6 1/4 inches x 3 3/8 inches
  • One ice cream dish cut from vellum with details colored with white ink
  • Five ice cream scoops (I used 2 pinks, two white confetti and one chocolate)
  • Two chocolate toppings (I coated mine with a clear glaze to make it shiny)
  • One whipped cream topping (I used a shiny coated white scrap)
  • One red cherry (I cut from red card stock, added white gel pen accent, brown cardstock stem and coated with a clear glaze to make it shiny)
  • Two spoons (I cut mine from silver mirror cardstock)
  • Two sets of “You’re Sweet” sentiment – one red and one black or navy blue
  • Two sets of “Happy Birthday” sentiment – one white and one red
  • Stars and circles for hanging banner and decorations
  • One paper doily cut in half, 6 inches baker’s twine and clay red, white and blue confetti pieces

2. Fold the card base at 6 ¼ inches and place pop-up sundae die on fold per package instructions.

3. Follow the photos on working the folds. Start with bottom tier, then second tier and finally the two angled fold on first tier.

4. Glue narrow support piece to back of dish stem as marked in photo.

5. Glue white scrap to fill in rectangular hole in pop-up dish base, if covering with a vellum dish.

6. Place striped inside back and base papers behind/under card base and trace opening with pencil and cut out as shown in photo.

7. Adhere star paper to outside of card base.

8. Adhere inside striped papers to inside of card. Attach the cut-out sections as well.

9. Glue two scoops to pop-up dish and then add glue to back side of vellum dish where white inked decorations are so glue won’t show through vellum. Position vellum dish over pop-up dish base.

10. Attach ice cream scoops, toppings, cherry and one spoon to tiers, making sure that the movement of pop-up is not impaired by these decorations. Add clay confetti sprinkles.

11. Trim and fit a half paper doily under dish. Secure to base with dots of glue at three points.

12.Position and trim the other half of doily to front of card.

13. Glue the two sentiments together off-setting the darker shade in back to create a shadow effect.

14. Position and attach sentiments on front and inside card base.

15. Glue-up stars and circles banner on baker’s twine and glue in the corners over ice cream. Decorate with additional spoon, clay confetti sprinkles and paper stars.

Hope this sweet card has put a smile on your face and provided some inspiration for your crafting.

For another Ice Cream Sundae card I’ve made click here

Thank you for reading this blog post. Please like and leave a comment. 😊

SUPPLIES Used from Dies R Us:

Additional supplies used:

  • Ranger’s Glossy Accents
  • The Paper Studio – Crackled Stars 665976, Patriotic Woodgrain 847111 and XXl Stripe-Red/White 690587
  • The Paper Studio – Printable Vellum Paper – 8 1/2″ x 11″
  • Buttons Galore & More – Star Spangled Sprinkletez – NK114
  • BoBunny -I Heart Stars Stamp set – 121054444
  • Stampin’ Up Classic Stampin’ Pad – Dapper Denim ink
  • Taylored Expressions – Mini Slim Envelopes

Don’t forget to come join in the fun at the Dies R Us Challenge Blog. There’s a new challenge theme offered on the 1st and 15th of each month and one lucky randomly drawn winner will receive a gift voucher prize to the Dies R Us Store.  

 For your convenience, all the important Dies R Us links are provided below.

click below for:

STORE

CHALLENGE BLOG

FACEBOOK

INSPIRATION BLOG

FRIENDS OF DIES R US PINTEREST PAGE

Under The Sea

Hi it’s Sue of Dies R Us design team with an underwater tunnel card.

The card uses three of the Memory Box Collage dies to create the gradually smaller frames that make up the tunnel of an underwater world of bubbles, seaweed and coral.  (You could use just one of the dies to cut the three frames and decorate each layer differently.)

I started with two different shades of cut 7 x 5 1/2 inches and scored at 1 inch, 2/3 inch and 1/3 inch from each edge. I cut a third shade of blue 7 x 4 1/2 inches and scored at 1/3 inch form both edges. Folded darkest at 1 inch scoring on both side. Folded the next two pieces at all of the scored lines.

Next I inked up the seaweed and tinted around the edges of the openings with two shades of green Distress inks.

While I cut and inked a number of decorative pieces from the Collage and School of Fish dies, I ended up only using a few them in this card. (I often cut and prepare extra decorative pieces in a batch fashion and keep with the dies to save time later.)

The octopus is a two piece die that lends itself to being on an Action Wobble Spring. By adhering the two parts together with a foam dot, the eight tentacles are at different levels. The spring comes with self-adhesive and is stuck to the back of the octopus’ head. A black pen colors his eye. (I found that adding an extra foam dot to the back of the spring made it so the octopus could be in front of the last frame of seaweed.)

To assemble the tunnel box, I took the card base with the shell front shown in a previous blog and adhered a printed paper to left inside of card base. Then with the sticky red double-sided tape to the left flap of the outside die-cut panel with the largest opening, I adhered it to the inside of the card. (I glued in placed a glitter net over the front of this panel before I adhered it inside the card.) Place red tape on both side flaps between the 1 inch and 2/3 inch score lines on both flaps. Attach the left flap to inside of first panel’s left flap lining up with 2/3 inch score line on first panel. Attach third panel to inside of second panel’s left flap lining up with 2/3 inch score line on second panel.

Adhere a background to the card base back inside before attaching the octopus. Peel tape on right flap of middle panel and adhere to inside of first panel at 2/3 inch score line. With octopus over the last panel, peel and adhere the right flap to inside of middle panel flap at 2/3 inch score line.

The inside sentiment was stamped on vellum and attached to the inside of the card with glue dots.

See the front of this card by going to One Shell of A Party

Hope this fun card has provided some inspiration for your crafting. 😊

SUPPLIES Used from Dies R Us:

Other Supplies:

  • Colored cardstock and clear vellum scraps
  • Three shades of blue sheets of card stock
  • Underwater patterned paper
  • 5 x 7 inches white card base
  • Foam squares
  • Red-backed, super sticky double-sided tape
  • Glue dots
  • Green and brown ink cubes
  • Tuxedo Black Memento dye ink
  • White glitter netting
  • 9 x6 inch catalog envelope
  • Sara Davies Nautical Collection stamp set from Simply Cards & Papercraft, issue 207
  • Stampin’ Up Dapper Denim ink pad

Don’t forget to come join in the fun at the Dies R Us Challenge Blog. There’s a new challenge theme offered on the 1st and 15th of each month and one lucky randomly drawn winner will receive a gift voucher prize to the Dies R Us Store.  

 For your convenience, all the important Dies R Us links are provided below.

click below for:

STORE

CHALLENGE BLOG

FACEBOOK

INSPIRATION BLOG

FRIENDS OF DIES R US PINTEREST PAGE

One Shell of A Party

Hi it’s Sue of the Dies R Us Design Team with a beachy kind of birthday card.

For this card front I used three of Memory Box new dies –Wood Grain Planks, End of My Rope Set and Grand Spiral Shell.

The card base is a white 7 x 10 inches rectangle fold to 7 x 5 inches. The three shades of blue mats are 6 5/8 x 4 1/2 inches, 6 3/8 x 4 1/4 inches, and 6 x 4 inches.

The wooden planks were cut on gray paper and aged with white and brown ink cubes. Cut from an oatmeal cardstock, the rope frame was inked with a dark brown ink.

The shell has a base cut from mother of pearl holographic cardstock and its top detail piece from white shimmer cardstock. A green gem was glued to the spiral center.

Assembly of the card is mat layers, wooden planks, a glitter white netting, sentiment and shell adhered with foam squares, and finally confetti sequins glued down with a few green gems.

The sentiment is a recycled one from another card.

See the inside of this card by going to Under The Sea.

Hope this fun card has provided some inspiration for your crafting. 😊

SUPPLIES Used from Dies R Us:

Don’t forget to come join in the fun at the Dies R Us Challenge Blog. There’s a new challenge theme offered on the 1st and 15th of each month and one lucky randomly drawn winner will receive a gift voucher prize to the Dies R Us Store.  

 For your convenience, all the important Dies R Us links are provided below.

click below for:

STORE

CHALLENGE BLOG

FACEBOOK

INSPIRATION BLOG

FRIENDS OF DIES R US PINTEREST PAGE

Vested Tags

Cards for men can be fun to make when they use a small die set by Leane Creatief which includes a suit jacket, a vest, shirt collar, two ties and a BBQ apron as well as a tag box. The box makes up to a little over 4 ½ inches tall by 1 ¾ inches wide and 3/8 inches deep. Perfect for tucking a note, tickets to a sporting event, or folded money.

(I purchased this die from Dies R Us when they had one of their special European dies sales, but it sold out quickly. You can get some lovely dies from around the world in these sales, but you must act quickly when you see one you like.)

For the card background I used two Poppystamps border dies to create a layered set of circles using oatmeal cookie and a dark brown scrap of cardstock for the layers under the plaid paper. Oatmeal cookie was used to cut the tags out of and a cream piece of Recollections cardstock was used to make a mini slimline card base (5 ½ inches x 3 ½ inches).

The “Happy Birthday” sentiment was cut once from a light color and once from a dark brown scrap and glued together a bit off set to give depth. A third layer was cut and glued to the back not be seen, but to raise the words up.

The vest was cut from a plaid paper. The buttons and pockets were stenciled on through the die. The tag is attached using foam squares.

A mustache was stamped using an older Sizzix stamp set in a dark brown on the back of the envelope.

Thank you for reading this post. Please like, comment, and follow this blog. 🌞

Supplies:

Dies

Stamps

Papers

Inks

Miscellaneous

When Pigs Fly

In honor of all newly minted sixty-year-olds, this card is in tribute to you (whether you want to believe it or not.)

Flying Pig:  Bonnie Krebs has designed this delightful flying pig as one of Art Impressions Flutters cards. The set comes with dies to cut out the pig and the two wings as well as punching holes in the pull strip and cutting the slot for the pull arm. This pig and wings were stamped in permanent black ink and colored with watercolor pencils. The instructions on the packaging are good, but watching a video or two helps with the exact assembly using the tiny brads that are included in the stamp and die set and either twine or thread. The pull arm is a piece of heavy cardstock that is ¾ inch wide and at least 6 inches long. (You can trim the arm shorter once the card is assembled.)

Card base:  The foiled pink plaid card base is one from a boxed set of 50 cards and envelopes size A2. Once the pig was assembled onto its pull arm, a slot was cut using the slot die and the half circle finger hole was cut through the front and back of the card base. (I recommend laying-out and pencil marking where the inside insert papers will be and cutting the half circles on them, before you do the final assembly of the flying pig pull arm onto the card base.) The pig is adhered to the card front using tiny foam squares, once the pull arm is through the slot in the card base.

Front decorations – 60 and Pull Here:  The 60 was cut from a foiled chocolate box using dies designed to be birthday cake candles. The flame and stand were trimmed off the 6 and 0. Once the pull arm has been installed to the card base, trim it off to fit inside the card base and round the corners with a corner punch. Stamp or write “Pull” with a directional arrow. (The stamp used here was from Concord & 9th)

Inside:  With the flying pig mechanism installed, adhere the inside papers using double-side tape making sure to leave a gap for the pull arm to move through freely. Add the die-cut birthday sentiment using glue.

Envelope:  I stamped the back of the envelope with birthday cake stamp to set the stage for this milestone birthday card.

Thank you for reading this blog post. Please like and leave a comment. 😊

Supplies

Dies/Stamps

Ink

Paper

Miscellaneous

A Birthday with Swirls

I really like using this Karen Burniston Swirls pattern plate die with background papers that I made with Nuvo Shimmer Powders.

A thin cursive “Happy Birthday” in black doesn’t overpower the swirls.

The swirls die-cut is 4 ¼ inches x 5 ½ inches. So I cut rectangles of orange (4 ¼ inches x 5 ½ inches), blue (4 ½ inches x5 ¾ inches) and yellow (4 ¾ inches x 6 ¼ inches) to back and mat the swirls. Glue was used to adhere all pieces of this card together.

To add additional interest to the card, I covered the orange, blue and yellow paper with Aqua Shimmer Glitter Gloss.

Thank you for reading this blog post. Please like and leave a comment. 😊

SUPPLIES:

Dies

Papers

Color Pigments

Miscellaneous

Ship-In-A-Bottle II

This card can be for a birthday or another special day for a nautical person.

Ship -in-the-Bottle:  Using the Tutti Designs Ship in A Bottle die, cut four times from light blue, brown, white, and oatmeal. Only cut the whole die from blue. The other colors cut the sections needed from scraps. Using distress inks, color the various die-cut sections of the bottle and paper piece as needed. Glue bottle outline to a piece of acetate on the front side. Cut out the bottle shape. Glue rope to outside of bottle neck.

Background:  Die cut the rope background from oatmeal cardstock making such al the chads are removed from the image. Glue to a dark piece of wood grained cardstock cut to 4 inches x 5 ¼ inches.

Assembly of Card:  Position sentiment strip, ship and then the bottle on to rope background. Glue ship down followed by bottle. Adhere sentiment strip with foam squares. Attached front panel to bard base with foam squares.

Sentiments:  The foiled sentiment strip was one I had made during a batch foiling session using up scraps. It was die-cut into a ribbon. The inside stamp sentiment is from a favorite nautical stamp set by Sara Davies.

As is my style, I stamped the back of the envelope with the lighthouse image from the Sara Davies stamp set to hint as to what is inside.

Thank you for reading this blog post. Please like and leave a comment. 😊

Materials Used:

Dies

Stamps

Ink

Papers

Foiling Plates

Miscellaneous