The warm fruity smell of spices and icing sugar as it cools means that Christmas is in the air.
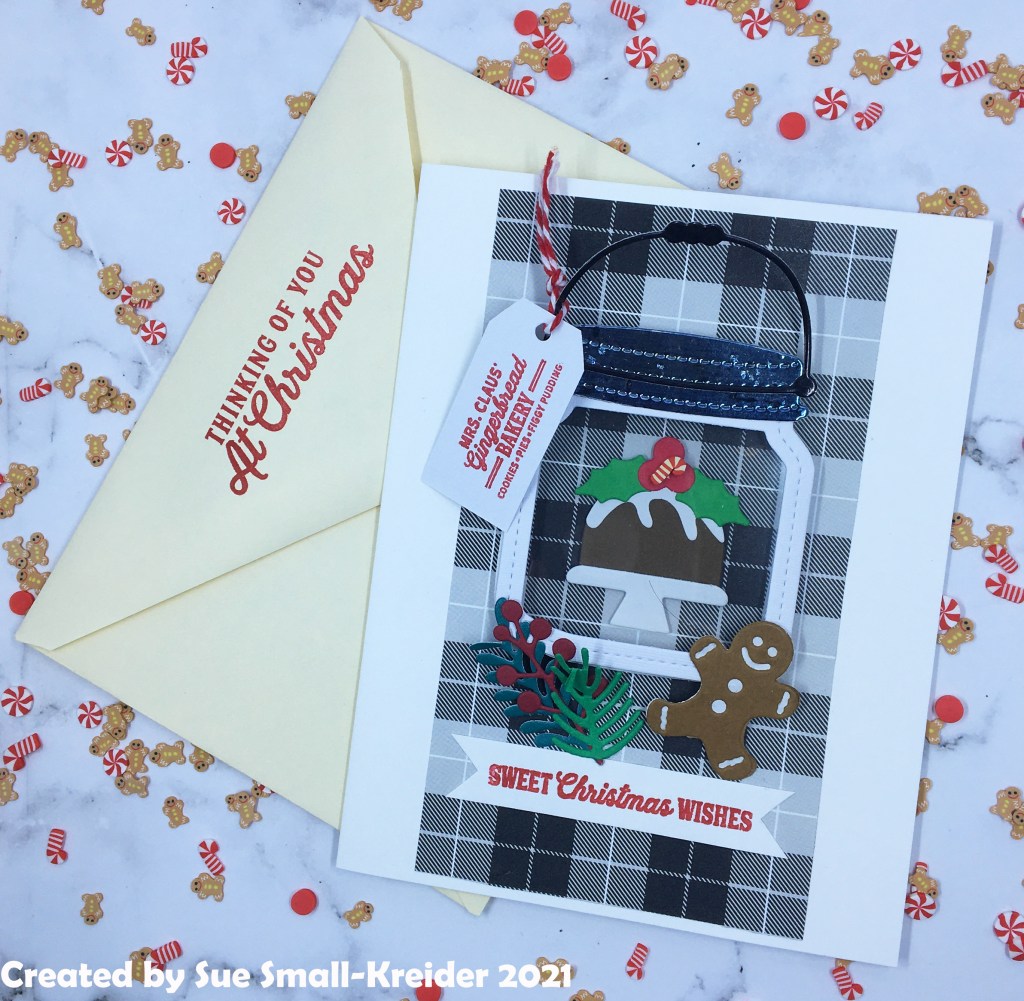
These dimensional cards are made from a Queen & Co. Holiday Jar kit which include the patterned paper, sentiment stamps, dies, foam jar shakers and pre-cut acetate. Colored cardstock scraps and heavy white cardstock card bases and envelopes were the only things besides red ink, glue, baker’s twine and tiny candy canes that were not in the kit.
The tiny tag says “Mrs. Claus’ Gingerbread Bakery, Cookie, Pies, Figgy Pudding” and is one of the tag stamps in the set. both the outside sentiment “Sweet Christmas Wishes and the inside sentiment of “Have yourself A merry little Christmas” are also included in the kit.
For the jar lids I used Hunkydory mirri card from the oxidized metals collection. The jar handle is cut from shiny black cardstock and the white stitched jar frame white linen textured cardstock both from a DCWV “The Spooky Time Cardstock Matstack.”
The envelope flaps are stamped with the same Stampin’ Up Real Red ink as the cards and the sentiment “Thinking of you at Christmas” sets the tone for the card.
I also made one other design from this kit using a fir tree theme complete with a pine scent air freshener tucked inside the card.
PLEASE NOTE: Queen & Co. makes these kits in small batches and when they sell out they may not bring the items back. I usually purchase a kit and several of the refill foam sets when a new kit comes out.
Everyone needs sunshine and the feeling that someone is thinking of them. This flippy flappy card uses dies by Lawn Fawn for the pop-up mechanism as well as the sunshine motifs.
When I began this card, I made a prototype card first to figure out how the mechanism worked. I watched an assembly video and still got it wrong by putting assembling from the front instead of the back. (See photo below.) The pop-up ended up working, but the flap was too long. (I recommend watching the assembly video several times or assemble the mechanism going step by step with video.)
For my actual card I changed up some of the design to make the sunshine really pop. Adding some ink to the background die cut helps emphasize the sun rays . The sun frame is cut from yellow, and the back sun outline is cut from orange with its center circle taped into the hole in the inked background.
The “Hello Sunshine” sentiment is cut twice from a darker orange cardstock to add some dimension. A fine tipped glue bottle makes gluing the fine lines of the letters easy.
The pop-up sun face is adhered to a strip cut from some clear plastic packaging.
To give the card recipient a hint at what is inside the envelope, I stamped the back of the envelope with a background sun burst pattern stamp from Hero Arts using a brown ink onto an orange envelope.
Thank you for reading. If you enjoyed this blog post, please like it and follow the blog. 😊
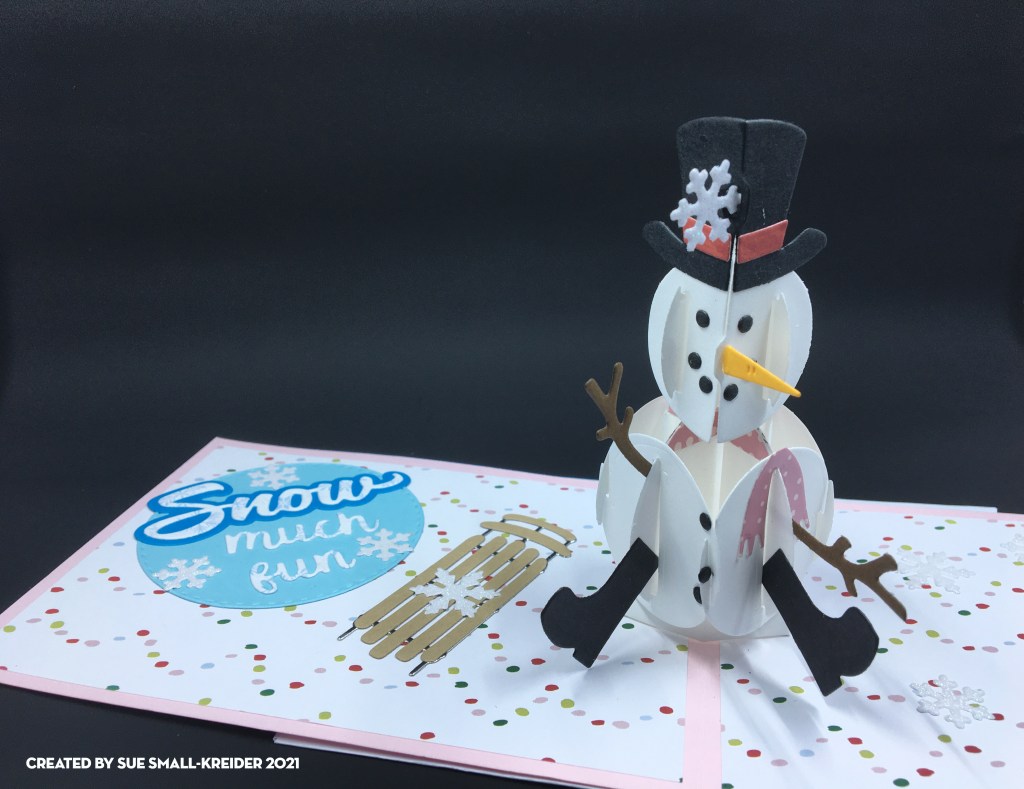
What North American children hasn’t hoped for a school closing day due to a snowstorm. This is a card celebrating a snowy day in lighthearted pastels. Karen Burniston dies are used for the card.
To make this A2 size card, cut a rectangle 4 ¼ x 11 inches of pink heavy cardstock and fold in in the middle to make a 4 ½ inches tall by 5 ½ inches wide card base. Cut four decorative paper panels at 4 x 5 ¼ inches. Adhere these panels to front, back and insides of the card base.
It is easiest to die cut all the pieces you will need to make both the inside and outside snowmen at the same time so that they are similar in colors and papers used. Also cut three circles or other label shapes on which to mount your sentiments. (For the personalized message circle, I added a smaller white circle.) Think about using contrasting colors for your words and their backgrounds. (I used blue to make the mostly white with snowflake paper I used for the words standout.)
After watching the assembly video on the inside snowman assemble as directed. Once the snowman is adhered to the card base, you can begin to decorate the card. (I used a sled die-cut from Memory Box to add to the snow time activities.) Remember to balance out the position of decorations from one side of the card to the other. There are two different snowflakes in the two snowmen die sets by Karen Burniston. They make wonderful filler decorations for the card.
Because I could not make up my mind on which stamp to use on the back of the envelope, I stamped two envelopes with hints as to the card’s theme. The word cloud is from Stampendous while the snowman is from Art Impressions.
Thank you for reading. If you enjoyed this blog post, please like it and follow the blog. 😊
Hello, it’s Sue of the Dies R Us Design Team and today we are making a summer pop-up card for a vegetable gardener using Karen Burniston dies.
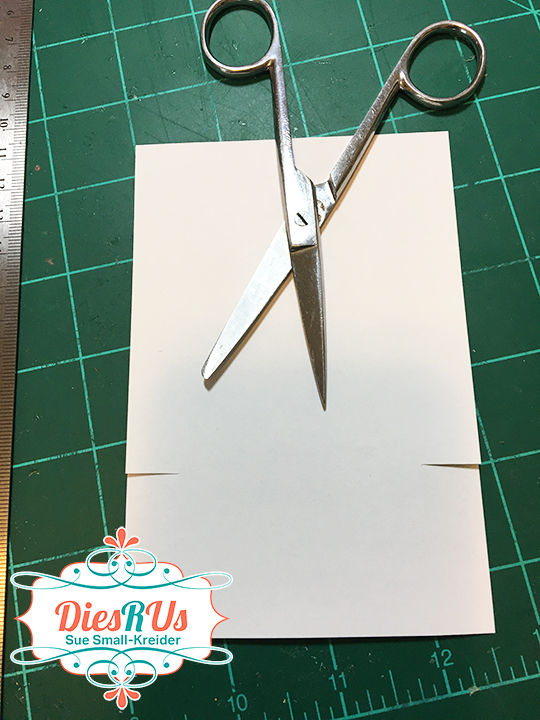
The chair die just fits in a 3 ½ inch x 6-inch mini slimline card. I started by cutting a 3 ½ inch by 11-inch piece of lightweight white card stock and folded it in half.
Next, I cut piece of patterned background paper slightly larger than 3 ½ inch by 5 ½ inch and marked with a pencil where the chair arms connect with the card back on the patterned paper and cut slits so that the printed paper could be slid into place behind the chair. Using the same technique, I cut a piece of green grassy card stock 3 ½ inch by 6-inch for the ground, cutting slots for the chair feet. Glue both decorative papers to card base.
Cut chair, arms and seat from woodgrain paper. (I made my own woodgrain paper using a woodgrain stamp that I heat embossed with watermark ink and clear embossing powder.)
Fold woodgrain chair folds as shown on packaging. Glue wood grain chair to patterned paper chair matching up the seat, back, arms and leg pieces. Train the chair to pop-up by opening and closing card a few times.
Decorate card with the Garden Charm set cutting off the charm loops. To make the basket of corn and tomatoes, use the basket from the Picnic Elements set and the fruit from the Tree Fruit set. (I had corn and red apples already cut from a Rubberneck Stamps dies set which I use turning the apples sideways to look like tomatoes.)
On the card back I cut a patterned piece of green card stock 3 ½ inch by 6-inch and glued to the card base. For the card front I cut a 3 ½ inch by 7 ½ inch piece of green printed paper and glued it onto the card base folding over onto the back of the bard. I added a small decorative topper to finish the back of the card. For the front of the card I used some of the garden charms to hint at what is inside.
Papers by Recollections, Die-Cutting Essential issue 32, white, mirror and colored from my stash
Rubbernecker – Apples, Pears and Corn Die-5215-06D
Distress ink – Walnut Stain & Vintage Photo
VersaMark – Watermark Stamp Pad
Stampin’ Pad – Rubber Stamp – Hardwood
Recollections – Detail Embossing Powder – Clear
Stampin’ Up – Ink Pad – Pear Pizzazz
Stampin’ Pad – Rubber Stamp – Garden Goodness
Don’t forget to come join in the fun at the Dies R Us Challenge Blog. There’s a new challenge theme offered on the 1st and 15th of each month and one lucky randomly drawn winner will receive a gift voucher prize to the Dies R Us Store.
For your convenience, all the important Dies R Us links are provided below.
Cut the two printed papers to 4 15/16 inches x 7 inches. Position them inside the card base so that there is a gap between the papers where the fold can be seen. Using removable tape, tape them together and place the chair die with the nibs over the fold.
Run taped papers with die through die-cutting machine. Cut chair, arms and seat from woodgrain paper. (I aged the chair with white ink pad rubbed over the grain.)
Glue printed papers inside card base, adding matching scraps of papers to cover the brown spaces let where chair is cut away. Fold woodgrain chair folds as shown on packaging. Glue wood grain chair to patterned paper chair matching up the seat, back, arms and leg pieces. Train the chair to pop-up by opening and closing card a few times.
Decorate card with the garden charm set cutting off the charm loops. (I dirtied-up the tools and gloves with brown ink.) The pink flowers are made with the flowers from the Tiny Trees Pop-Up set.
Fold up all the petals on the flowers and then glue a smaller flower on top of a larger flower. Add a yellow Nuvo Drop center to flower. Let dry overnight before gluing on to card.
The front of the card is made with scrap rectangles of green patterned paper with another watering can cut on the back side of the mirror cardstock and rounded with my fingers so that it pours from the left. The sentiment is a also a Karen Burniston die.
Hope this fun card has put a smile on your face and provided some inspiration for your crafting. 😊
John Next Door by John Lockwood – Clear Stamps – Garden Tools
VersaMark – Watermark Stamp Pad
Recollections – Detail Embossing Powder – Clear
Don’t forget to come join in the fun at the Dies R Us Challenge Blog. There’s a new challenge theme offered on the 1st and 15th of each month and one lucky randomly drawn winner will receive a gift voucher prize to the Dies R Us Store.
For your convenience, all the important Dies R Us links are provided below.
For the next four days I have a mini chair series focusing on a pop-up chair die by Karen Burniston.
Today’s chair uses the Adirondack Chair Pop-Up with a slip cover to make it into a big overstuffed chair, perfect for cats to nap in! You can access this post and the ones in this week’s seasonal chair posts below as they become live posts.
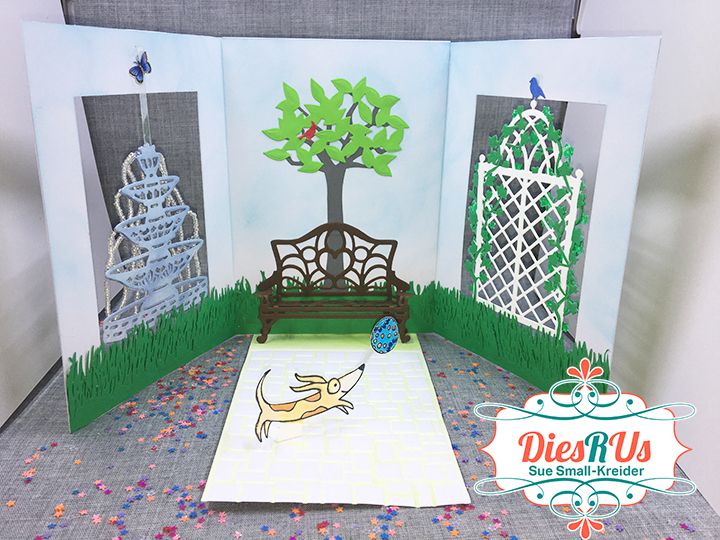
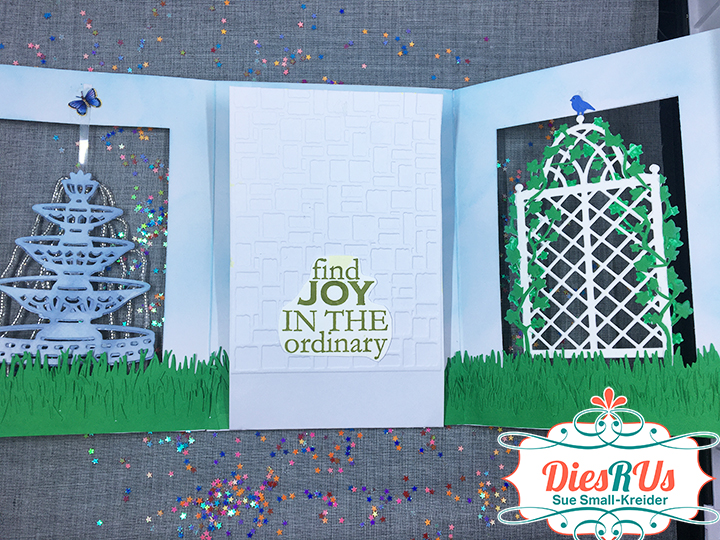
I created a quad fold card base by taking two 10 x 7 inch heavy card bases and cut one into a 5 ½ x 7 inch piece and a 4 1/5 x 7 inch piece. The larger piece is scored and folded at ½ inch along long side to form a tab to glue behind the other card base that in scored and folded in the middle. This creates a tri-fold card. Cut rectangular apertures from each side large enough to fit the fountain and trellis dies. Apertures should match up when folded closed.
Now is a good time to use Distress Oxide inks and a blending brush to color the inside of the trifold card a sky blue.
Spritz lightly the 4 ½ x 7 inch piece of card base with water to make it more pliable and use a cobblestone embossing folder to create the textured “floor” of this card. Score and fold ½ inch along short side of piece. Paint or decorated the textured area before gluing tab to center back of tri-fold card.
Cut two fountains from white card stock and ink both sides of each piece using Distress Oxide inks and a blending brush. (Adding the beads is optional.) Using a needle and thread, string seed beads and then adhere with glue to fountain. Glue beaded fountain to front of card aperture, glue second fountain to inside of front aperture matching up with front fountain and hiding the threads of the beading. (My aperture was bigger than the fountain and trellis, so I used thin stirps of clear plastic that I cut form packaging to act as extensions for the bases and tops of the fountain and trellis so that I could glue them to the card base.)
Cut two trellises from white card stock and two from green paper. Cut out the ivy from the green pieces and glue to the white trellis pieces. (An alterative is to color the ivy with green markers on the white trellis.) Adhere one trellis to the second aperture on the card base and then glue the second trellis to the back of aperture matching up lattice work.
Cut a tree and leaves from the Karen Burniston Tree Pop-Up die set. Cut a number of strips of grass from green paper and glue in layers to the inside of card. Position the tree behind the bench on the center panel. (I had to cut a second trunk to make the tree taller.) Glue down the tree then layers of grass. Decorate with birds cut from Karen Burniston’s Tiny Trees Pop-Up die set.
Cut two of the benches out of heavy brown card stock. Save the four strips that are waste from the die cutting of bench. Cut the top of bench back off one piece as shown. Snip the arm rest from the back of the same piece and trim off extra angled piece. Fold the cut back down to form seat of bench.
Fold down the cut arms. Take the wider of the saved four strips and fold in a rectangle that is 1/ 2 x 3/8 inches and glue ends together. Glue the bench seat to the whole bench piece which becomes the bench’s back. Glue the rectangles between the front curved bench legs and the back curved bench legs. Take one of the thin strips and cut in half. Fold each half into an “L” shape. Glue the “L”s under the fold arm rests and adhere “L” strip to the bench back.
Train the bench to fold up, before gluing on to card base. To glue the bench into the card. Add glue first to rectangle bottom strips and position the onto the card “floor” near the fold. Glue bench back on to center panel of card. Move the bench while glue is still wet for best positioning.
To add some activity to the card, I stamped and colored a Funky Fossil dog stamp I had with Distress Oxide – Rusty Hinge with a water brush. The ball was colored with markers and attached to the dog with a strip of clear plastic cut from some packaging. The dog was then attached to the cobblestone flap by cutting a strip of cardstock and folding into an “L” shape and gluing to back of dog and onto cobblestones.
I covered the fronts of the aperture panels and the back center panel with green patterned paper before adding sentiments.
Sentiments are foiled Spellbinders sentiments I had in my stash and a Riley & Co. sentiment that is stamped on white card stock scrap in green ink, fussy cut and adhered to the back of cobblestone panel.
Hope this fun card has provided some inspiration for your crafting. 😊
Funky Fossil Designs – Clear stamps – More Furry Friends
Foiled sentiment strips from Spellbinders Glimmer System foils and plates
Riley & Company -inspirations – Find joy in the ordinary – INS-111
Stampin’Up Classic ink pad – Pear Pizzazz
Don’t forget to come join in the fun at the Dies R Us Challenge Blog. There’s a new challenge theme offered on the 1st and 15th of each month and one lucky randomly drawn winner will receive a gift voucher prize to the Dies R Us Store.
For your convenience, all the important Dies R Us links are provided below.
This slimline easel card was inspired by some made by Jennifer McGuire. Elements from both sets were used to create the paperdoll and an action wobble spring.
To assemble the paperdoll, begin by stamping and heat embossing the facial features using the stamps from the Tasha set. (I colored the tongue with a pink gel pen and the teeth and eye highlights with a white gel pen.) Play with the layout of the hair pieces, ears and head. Once you have the position using a pencil, mark the location of the head and ears on the long hair piece. Glue the ears in place using a fine tipped glue bottle then glue bangs in place. Glue top half of head to long hair piece making sure to leave the lower half without glue.
Adhere collar and button placket to front of blouse. Glue blouse to shoulders and neck piece. (I used Nuvo drops for the buttons and let the piece dry overnight before going to the next step.) Using the fine tipped glue bottle, attached the head to the neck. Glue the long hair to back of shoulders.
Assemble arm and sleeve as directed on cutting instructions. (You may want to cut an additional sleeve and cuff if it will be seen on the backside.) Add the action wobble spring to the back of the arm.
To make the card base cut two piece of patterned cardstock 8 1/2 x 4 inches. Score one piece across the short end 1/2 inch. Fold and glue the tab to the end of the other piece. Score and fold the top flap of card base at 2 3/4 inches to form the easel.
Glue three hellos together to form the easel stop that will be glued to lower card base. The fourth hello will be used for decoration on the card front when closed.
Position paperdoll and arm piece on the easel portion of card front. Make sure that the hand is within the card front when closed. Adhere paperdoll and arm to card making sure to only glue lower half of paperdoll to easel. The arm’s elbow needs to not touch or catch on the card base. (I ended up having to trim a small tip of the elbow on this card to make it wave smoothly.)
Now you have a card that will wave a cheery hello.
“A truly great friend is hard to find, difficult to leave and impossible to forget,” is the sentiment stamped on the back of the envelope.
Hope this fun card has put a smile on your face and provided some inspiration for your crafting. 😊
1 – cowboy hat from yellow – color with distress inks and markers
2 – Howdy! – one from white and one from yellow
Cut horses and color using stencils on dies and Distress Oxide inks using large Pink & Main blender brush. (This was my first time using this larger inking brush and I was delighted with the ease of inking up the large horse pieces. The ink blending went smoothly unlike when I use sponge inking tools.)
Glue white “X” frames to window cut outs to form a hay loft door. Using clear tape hinge door onto loft. Glue on roof trim to front and back barn pieces. Glue weather vane to inside back piece.
To assemble the sliding doors, weave the top bar end of the red door piece through the white door railing piece fold the red bar over the railing where indicated and glue bar onto top of door making sure no glue is on the railing. Glue white “X” frame over door. Repeat with second door.
The card base is a 10 x7 inch white heavy weight card stock folded in half to form a 5 x 7 inches card. Panels of printed paper were cut to cover the front and back panels (5 x 7 inches, front and 5 ½ x 7 inches, back).
The inside panels are 4 ¾ x 6 ¾ inches. I positioned and taped the inside panels with clear removable tape so that I could die cut the pop-up flaps to anchor the barn to. Using Scor-tape, I adhered the paper panels to the card base removing the clear tape once all panels were adhered.
Glue barn pieces to pop-up tabs. Cut a 1-inch strip of paper fold in half and fold to create tabs on both bottom edges. Glue two hay bales and pitchfork to one side and glue tabs down inside barn, over the card fold. This will be seen when the barn doors are opened. Glue remaining hay bale behind barn hay loft door.
Glue matching printed papers to cover over tabs inside barn. Using only a small dot of glue at inside top of barn glue barn pieces together. Fold fences in half and glue ends inside barn. Glue decorated horses to fence.
Decorate the inside and outside of card with grass and hills cut using Farm Edges die set. (I trimmed off the tractor from my hills and had to cut and move the die to get a longer hill for my 7-inch card.)
The front sentiment is cut twice and slightly off set. I used Distress Oxide ink to color the yellow layer.
Stamped a vintage stamp of a horse on the back flap of envelope.
Hope this fun card has provided some inspiration for your crafting. 😊
Don’t forget to come join in the fun at the Dies R Us Challenge Blog. There’s a new challenge theme offered on the 1st and 15th of each month and one lucky randomly drawn winner will receive a gift voucher prize to the Dies R Us Store.
For your convenience, all the important Dies R Us links are provided below.


