CRX – Card Recipient Experience

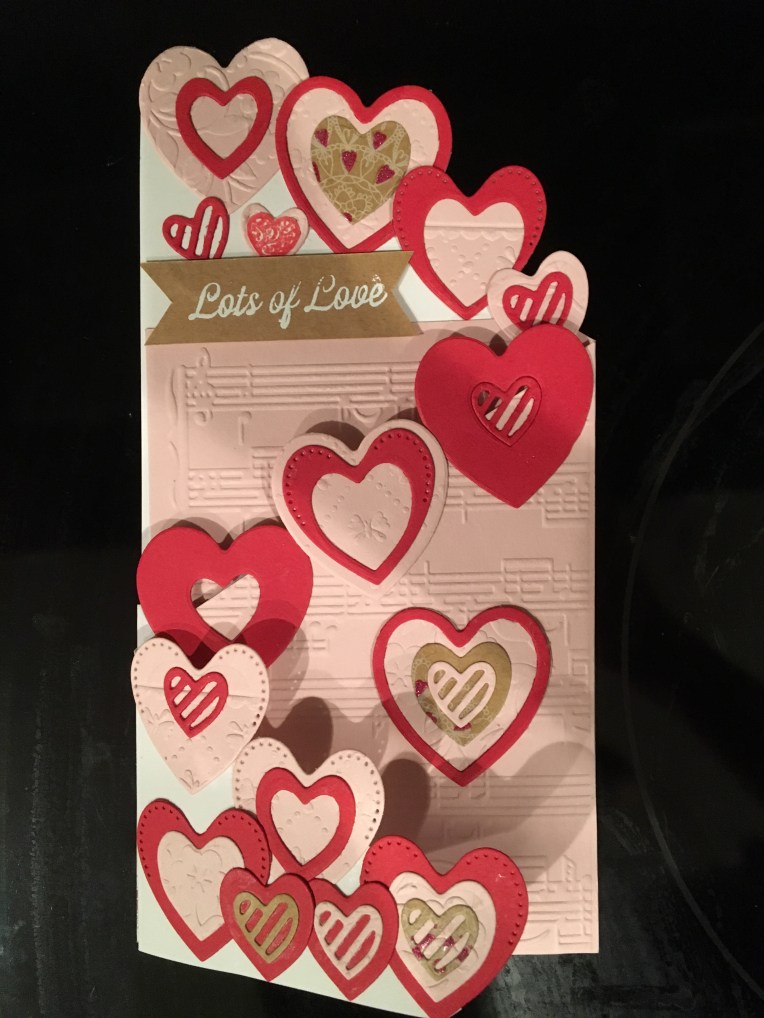
You create the most delightful card that moves went you pull a slider or you create a box card that folds flat, and the recipient of the card gets it in the mail and has no idea how to make it work.  This is not the ideal card recipient experience (CRX) you want.

In the web designers world, they talk about User Experience (UX). For us in the not so digital field of card designers, we need to think about CRX or how we let our users know how to operate the card if the recipient is not use to receiving interactive cards.

Arrows indicating direction to pull a slider tab are common.  Including a diagram of how a box card should look when completed is simple enough. Or you can get creative and string a “pull here” tag on a thread that can be removed once used.

A great card is both beautiful to the eye of the beholder and easily explained if it involves moving parts.

Dies/Stamps Used:

You’re In My Thoughts Box of Flowers

Lawn Fawn Scalloped Box Card Pop-Up

Build -A-Bouquet Stamp Collection for Papercrafter magazine issue 118 

Stamped in black ink and colored with Crayola Signature Brush & Detail Dual-ended Markers

Tea and Tulips Box of Flowers

Lawn Fawn Scalloped Box Card Pop-Up

Stampin’ Up’s Tearoom Copper Vinyl Stickers

Stampin’ Up’s Tea Room Specialty Designer Series Paper

Tea Room Memories & More Card Pack.

Shaded Tulip Stamp & Layer set by Susan Bates for Papercraft Inspirations magazine, issue 182

CraftSmart and Hampton Art mini ink pads.

Paris Easel Card

Paris in the Springtime Die set from Die Cutting essentials  issue 49

Karen Burniston’s Pop It Ups for Elizabeth Craft Designs 1104-Hanging Charm Pull Tab die set

“Pull Here” stamp from Concord and Ninth’s Mail Drop Stamp Collection

Two Fish, One Fish

Fish bowl 4

Two fish, one fish, is that a cat I see?

This is meant as a fun card. Ever since I saw the Die-cutting essentials magazine issue 36 Underwater Friends die set, I have been planning to make some sort of interactive card with it.

Fish bowl 2 - Copy

Finding the Karen Burniston Pop It Ups’ Oval landscape Accordion -1108 die set by Elizabeth Craft Designs gave me the idea on how to proceed to tell a story through a card.

Fish bowl 1 - Copy

First there are two fish. Then there is one fish. then there is a cat’s face watching intently.

Fish bowl 5 - Copy

Did the cat do anything beyond watching? What do you think happened?

Fishbowl-envelope

The cat’s face has a slit at the top and bottom so that it can slip off the pivot points and be signed or a greeting added.  I used Grafix Dura-Lar .005 Clear Film, an archival polyester film to die cut 3 of the accordion sections. I then die cut 6 of the blue cardstock accordion sections and then all the fish and greenery pieces. I used a combination of Tombow Aqua Mono Liquid Glue for around the blue oval frames because I could easily clean-up any messes with a damp paper towel. I used Tombow Multi Mono Liquid Glue for adhering the blue frames to the clear film because it needed to be a strong adherence for a sturdy frame.


Roses and Apple Blossoms for Mother

Flowers on Mother’s Day is a time-honored tradition. When combined with the new washi tape petals and leaves and craft papers from the Victoria & Albert Museum in London this Mother’s Day card is nostalgic.

The pop-up mechanism inside is made with Karen Burniston for Sizzix Platform, Circle & Ribbon 3-D Bigz die. The washi tape petals feel like real pressed flowers, so I decided to make it look like a pressed apple blossom complete with yellow sewing thread stamen.
I used a variety of double-sided tape to adhere the layers and Tombow aqua mono liquid glue to put the inside mechanism together. Foam tape was used to attach the sentiment doily which was cut out using the pop-up gatefold die from Papercraft inspirations issue 188.


Envelope Mothers Day card

I had been watching the PBS show Victoria and reading up on the show’s newsletter on-line and for once the pop-up ads had something, I might not have found otherwise – the V&A Collection of paper crafts. The V&A is the Victoria and Albert Museum in London which has one of the best textiles and graphics collections in the world for the 19thand early 20thcenturies. I purchased my supplies from Hobbycraft, but there are other UK suppliers of the collection.
Envelope was stamped with Hampton Arts ink pad and Inkadinkado 60-30380 Modern Flower Flourish stamp

Cat in the Window

IMG_5625

Cats pop-up everywhere and this card is no exception. The inspiration for this card comes from Juliet and Romeo the two cats who live with the recipient of this card.  The overstuffed chair is one that has been passed down in her family and a favorite of Romeo to curl up and sleep.

IMG_5621The chair is made from Karen Burniston’s 1071-Adirondack Chair with a custom fit slipcover cut from paper inside a large business envelop. The round blue pillow is cut from the front of the envelope and adhered to chair with foam tape. Romeo’s picture was supplied by his human companion and has a tab running thru the chair and attached to the floor. The afghan throw is from Echo Park’s A Perfect Summer by Lori Whitlock and is also attached to chair with foam tape. Wallpaper is from Colorbők’s Brights Photo Mats. The flooring is from Ms. Sparkle & Co. Paperie’s Woodgrain Neutral paper pad. The “Happy Birthday” was cut from black cardstock using Momenta Firefly’s Celebrate Happy Birthday die set 35516 R7. The floorboard molding on wallpaper was a scrap piece of white cardstock scored at the top and bottom edge.

IMG_5615

Front of card has Juliet looking out a window. The window, shutters, flowers and flowerbox are from Poppy Stamps Small Madison Window set no. 1137 and decorated with white gel pen. The window glass is cut from the glassine window of the large business envelope that was upcycled to slipcover chair.  The cat is cut from white cardstock using Karen Burniston’s 1024 – Cat die and then ink blended to get Juliet’s wolf-like grey fur. The “popping up to say” lettering comes from Karen Burniston’s 1027-Word Set 4- Just a Note. The letters were dotted with a black fine point felt tip pen.

See more chair cards below:

Other supplies used:

Stampin’ Up Cards – Sympathy

Sympathy-2

I went to a workshop this past week with Donna Butler, a Stampin’ Up demonstrator.       I really enjoyed learning more about the proper way to stamp. And, I loved the feel of the cling stamps. They were soft and required a lighter touch than some of the clear polymer stamps I have been using.

Here is one of the cards we made using a design of Donna’s. Note that each of her cards are designed with an interior panel that can be removed if the card needs to be repurposed.

Sympathy inside

Donna’s list of supplies:

Stamp sets:

Cardstock:

Inks:

Blends:

Accessories:

It’s Baseball Season

IMG_4951

I have a Coach K in my life who has coach hundreds of young men to excel in the game of baseball from Little League through high school teams.  His baseball hero is Roberto Clemente. So when I saw the Carta Bella Paper’s Baseball series I immediately thought of Coach K.IMG_4945

I made an A2 size card with a fold-out shadow box inside including a dangling baseball made from two plastic baseball embellishment stickers stuck together encasing the thread. The batter was cut out as a rectangle with strips add to the sides to adhere using double-sided tape.  A circle die was used to cut the hole for the shadow box.

IMG_4946

I used the scoreboard card for the background of the batter. The Home Run hotdogs sign became the ads you often see around the fences and walls of baseball stadiums. The happy birthday sign was computer generated to match the style of the cards.

The concept of the open center box card was inspired by a MayMay Made it you tube video.


Frustrating Glue

IMG_5645I was working on this card with intricate borders to glue down and used Tombow Multi Mono Liquid Glue. I had a little glue ooze out from the delicate edges. Usually glue dries and you can flake it off, but this glue is still tacky after two weeks.

It ended up that I remade the card using 6-inch sheets of double-sided adhesive instead of glue.  First, I cut cardstock to the width of the border dies and then adhered one side of the adhesive sheet to the cardstock.  Then I ran the adhered cardstock through my Sizzix Big Shot machine to cut the border frames.  I cut scrap paper with dies between cuts of adhered cardstock to help remove adhesive from die. This method worked much better as well as being faster as there was no drying time needed between steps.

I used the double-sided adhesive sheet to adhere the light blue label with fish. See how smooth it is and no shiny adhesive showing.

In the future I plan to use this method of adhering my accordion cards using double-sided sheets/tape for all aspects rather than glue.

Supplies Used:

Karen Burniston  in cahoots with Riley and Company dies:        karenburniston.com

  • 1043 – Fancy Label Accordion
  • 1044 Fancy Flourish Frames

Scrapbook.com:       https://www.scrapbook.com/store/uc-adh-1036.html

  • Clear Double-Sided Adhesive Sheets 6×6 inch sheets

Fish die was in my swap bundle. Don’t know manufacturer.


The Upside to Playing

IMG_4989

The upside to playing with new materials is you don’t have to perfect, just have fun with the materials and be creative.  This little pop-up box card has gotten embellished when I’ve gotten some new materials. First, the brown box was just to test out the Lawn Fawn Scalloped Box die set. I had a jar full of tiny rubber stamps I gotten from one of the big craft store chains and used the “Hi!” “celebrate” and “smile” stamps to decorate the side flaps. A new box of neon colored pencils came into play around the stamps.

I set the box on my Inspiration Shelf and forgot about for several months until I got a new box of Prima watercolor pencils (the kind you color and then go over with a wet brush to blend the colors.) I needed something to color and found the Lawn Fawn Little Town Hillside die cut in my bits and pieces stash to color.

Again the box went back on the Inspiration Shelf until I got a tiny snow fall stamp which I tried out on the hillside. (Not sure of the brand or where it is on my crafting desk at this point.)

IMG_5141

My Inspiration Shelf of cards people have sent me, purchased or test cards like the box.

IMG_4989

Lots of Love

IMG_3744

You can never send enough love.  This card was created to send to family far away.  The recipient is very musical so the musical score embossing folder was the basis for this z-fold card. I took the rest of my inspiration from the magazine that the dies came from Papercraft inspirations issue 176.

IMG_3742

I used the pink and red cardstock from my January 2019 Hero Arts kit and a white piece of cardstock cut diagonally from one corner to a point about 2 inches from the opposing corner. The pink hearts were cut from cardstock I had embossed with the folder from the Cardmaking & Papercraft issue 178 “Make an Impression” set. I used the “lots of love” stamp from the same set to stamp and then heat emboss with white embossing powder on to a brown craft paper. The heart stamps were from a  rubber Lil’ Stamps of hearts by Inque Boutique (c)2007. Cards from a Tea Room Memories & More Card Pack were also used for the inside sentiment.

Other Supplies:

  • Scotch Foam Tape
  • Tombow Mono Aqua Liquid Glue
  • Colorbok Glitter Craft Papers
  • Recollections Detail Embossing Powder – Snow
  • Hampton Arts pigment inks of red and silver