I have been collecting and making oven cards for several years now. Here is a collection of all my ovens blog posts. Click on an image to see details of the oven.
(Images are posted from the earliest release of dies/stamps/kits 2016 to newest 2023.)
____________________________
Thank you for experiencing this blog post.
I hope this inspires you and makes you smile.
Please like and leave comments 😊
___________________________________
Disclaimer: Karen Burniston products are provided free of charge by the manufacturer for review and use. All other items were personally purchased. Compensated affiliate links used where or when possible, meaning I will receive a small percentage commission from these manufacturers at no cost to you. This will allow me to add more content to my YouTube channel and help out a lot. Thank you.
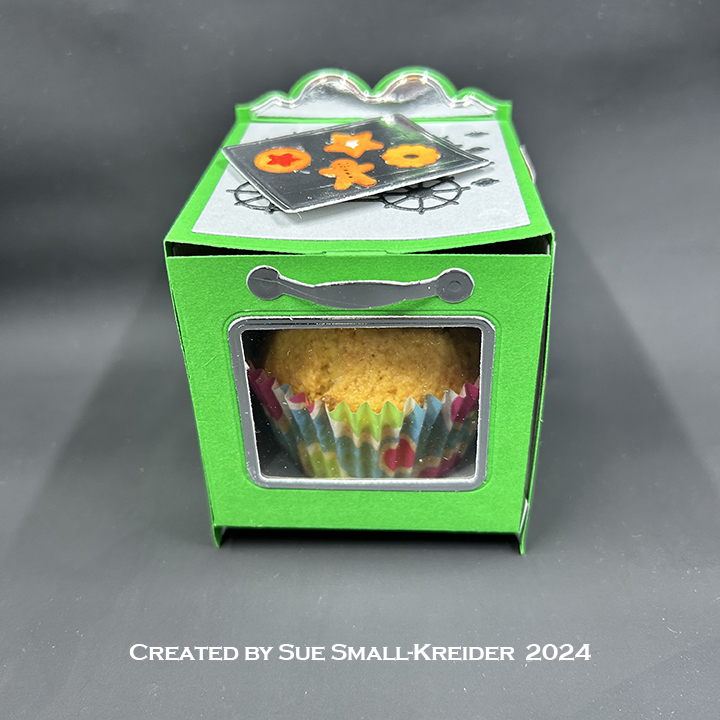
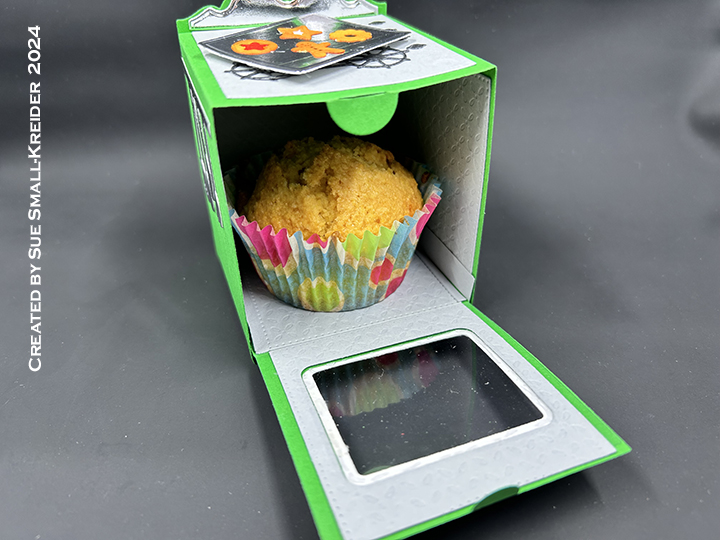
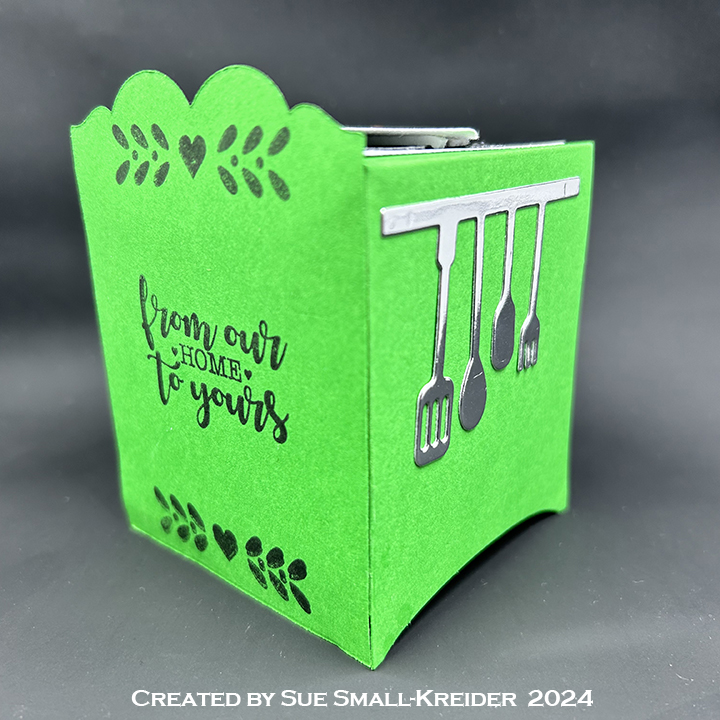
I’m using Tonic Studios showcase set Baked with Love that includes dies and stamps to make this Christmas oven treat box..
Watch video above for a tutorial on how to make the card.
___________________________________
Thank you for experiencing this blog post.
I hope this inspires you and makes you smile.
Please like and leave comments 😊
___________________________________
Disclaimer: Karen Burniston products are provided free of charge by the manufacturer for review and use. All other items were personally purchased. Compensated affiliate links used where or when possible, meaning I will receive a small percentage commission from these manufacturers at no cost to you. This will allow me to add more content to my YouTube channel and help out a lot. Thank you.
Materials Used:
Dies
Tonic Studios – Die Set – Baked With Love
Stamps
Tonic Studios – Clear Stamp Set – Baked With Love
Papers
Silver Foil Cardstock
Acetate/Clear Plastic
Black, Gray, Green and White Cardstock
Ink
Hero Arts – Alcohol-Marker Friendly Ink Pad – Intense Black
This card was made for Craft Roulette #211 whose parameters included good tidings, summer colors, mechanical element and tie closure.
This is a retirement card for someone who loves working with mechanical action.
(Please note that the Tonic Craft Kit 59 used in this card is no longer available. The Karen Burniston dies however are still available and links are provided to them.)
Cardbase: I used a purchased A7 (5×7-inch) cardbase and matching envelope. Each of the four panels were covered with coordinating papers in either watermelon pink or rind green. The circle was cut thru the front panel using the clock dial circle die.
Clock: Using three different green cardstock, they were cut with the main clock base die from the Tonic Craft Kit 59. The darkest green was trimmed to just the bottom and side trims, while the green patterned paper had the clock dial circle cut out and two bottom art-deco corner die-cut as well. Matching up the patterned green piece with the light green piece, the clock dial circle was cut in the light green piece. The dark green trim was attached to the patterned green piece before having a piece of clear plastic packaging adhered with thin double-sided tape to its backside. Sandwiching the plastic between the patterned green piece and light green piece by using double-sided tape again. The clock was glued onto the card front matching up the circle apertures.
Moving Gears: I watched Karen Burniston’s Double Spinner video at the bottom of her Mailbox Pop-Up page before adding the spinning gears pop-up to my card. I switched out gear dies from the Tonic Craft Kit 59 set for her fancy labels and gardening charms, but I followed her technique exactly to create the spinning gears. Gears were cut from steel blue and cooper oxidized foil cardstock.
Sentiments: All the sentiments on the front of the card “Time flies when you’re having fun,” and “Happy Retirement” are from the Tonic Craft Kit 59. All stamped in black ink. The sentiments were stamped before the inside mechanical pop-ups were added. The personal message circle uses a large gear cut in blue oxidized metal foil cardstock (Tonic Craft Kit die) and a circle of pale gray cardstock using Karen Burniston’s Crosshatch Circles die set.
Envelope: The back flap was stamped in black ink “TIME to celebrate.”
Thank you for reading this blog post. I hope this inspires you and makes you smile. Please like and leave comments 😊
This card was made for Craft Roulette #204 whose parameters included: thinking of you project, fairy tale colors, hear(s) or ear(s) element and stamped background.
To learn how I made the card, watch this process video.
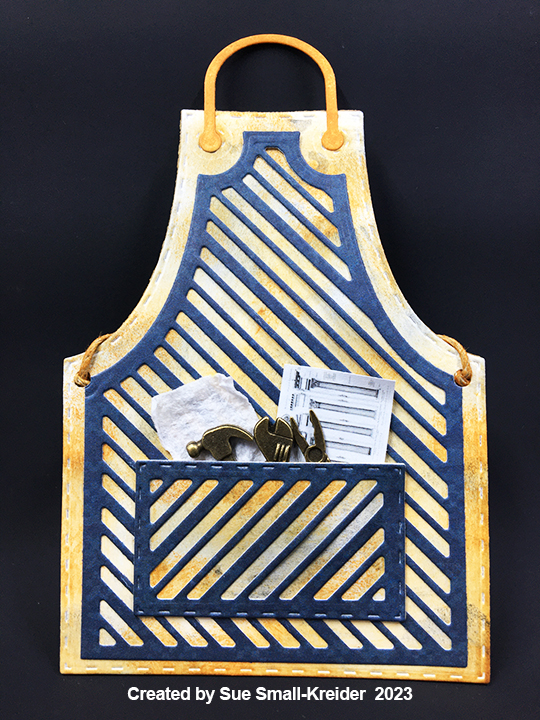
This card was made for Craft Roulette #185 whose parameters included a card a pocket, fresh and clean colors, element(s) that rhyme with “-ool” and columns.
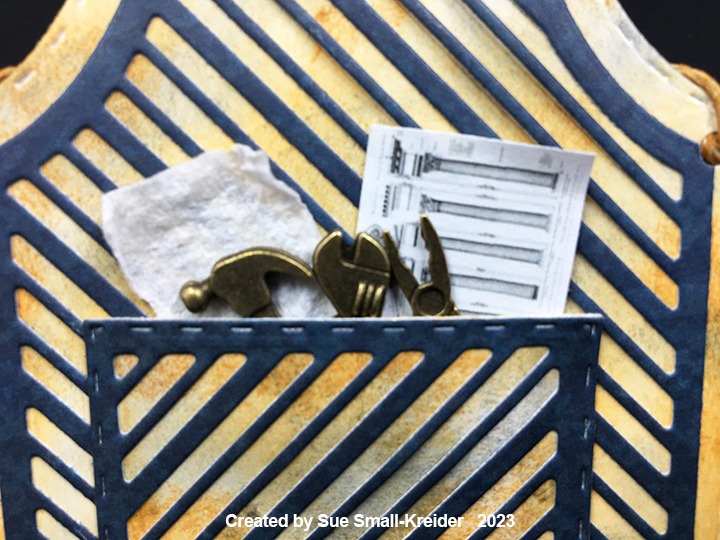
These parameters suggested a Father’s Day card to me with a wood shop apron, tools in a pocket and plans for Greek columns. For the apron, I used the Country Apron Tonic Craft Kit with its stripe inset for both the pocket and apron.
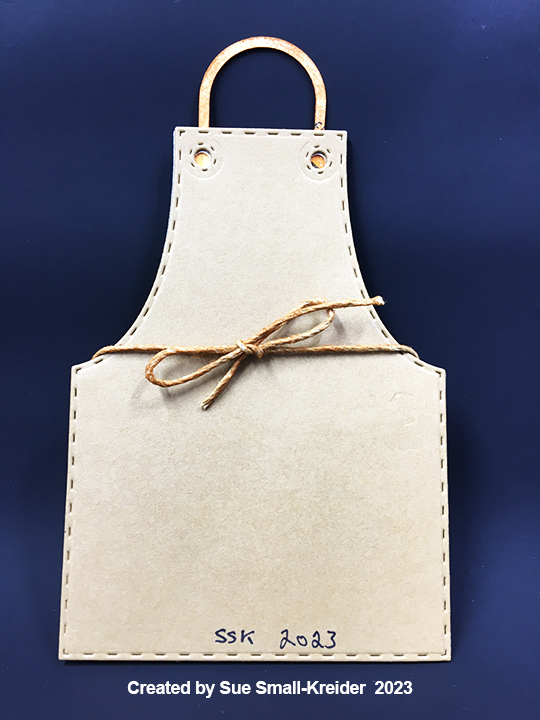
Cardbase: Fold a 4 1/2-inch tall by 7-inch rectangle of brown kraft paper in half for a 4 1/2-inch by 3 1/2-inch cardbase. Using the die for the apron base die cut the folded cardbase with the left die edge just off the fold, but with the stitching part of the die on the fold.
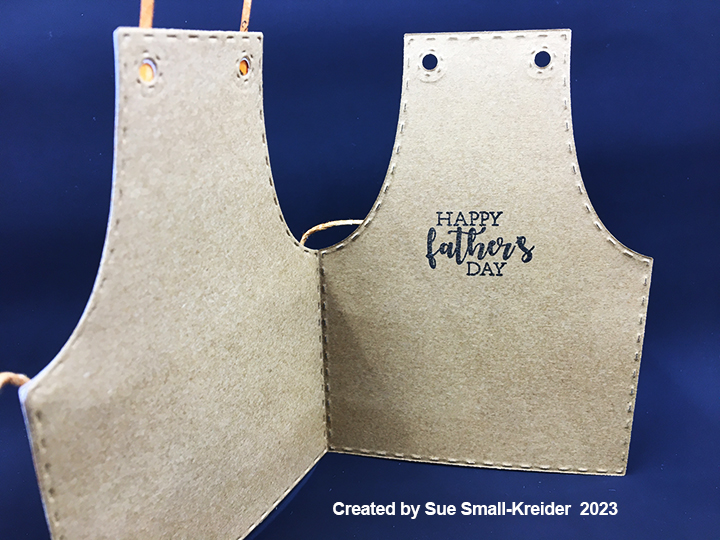
Apron: The apron base was die cut from white cardstock and inked along the edges for wear. The neck loop was inked to resemble a leather strap. Holes were punched for the apron ties and linen string was also inked brown to imitate leather. The string ties around the back of the card and keeps it closed until untied. Once the apron was assembled it was glued to the front of the card base.
Tools and Column Plan: The tools are metal charms by Docrsaft Papermania/ West Design Products of UK. The Greek columns were digitally produced. A piece of kitchen towel is also in the pocket.
Sentiment: “Happy Father’s Day” was stamped in black ink inside the card using a stamp included in the kit.
Envelope: The card will fit in an A2 envelope.
Thank you for reading this blog post. I hope this inspires you and makes you smile. Please like and leave comments 😊
Materials Used:
Dies
Tonic Studios – Tonic Craft Kit – Country Apron
Stamps
Tonic Studios – Tonic Craft Kit – Country Apron
Papers
Photoplay – 12×12 Double-Sided Paper Pad – Stars and Strips Collection – Soda Bottles
White and Kraft Cardstock
Ink
Ranger – Tim Holtz – Distress Ink- Rusty Hinge and Black Soot
It is the Karen Burniston Design Challenge for January 2023 featuring pop-ups using a rubber band!
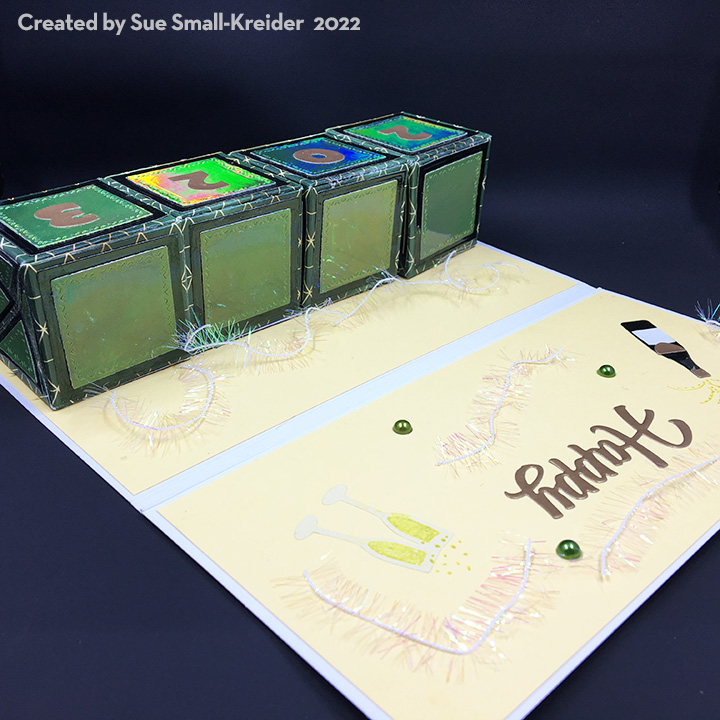
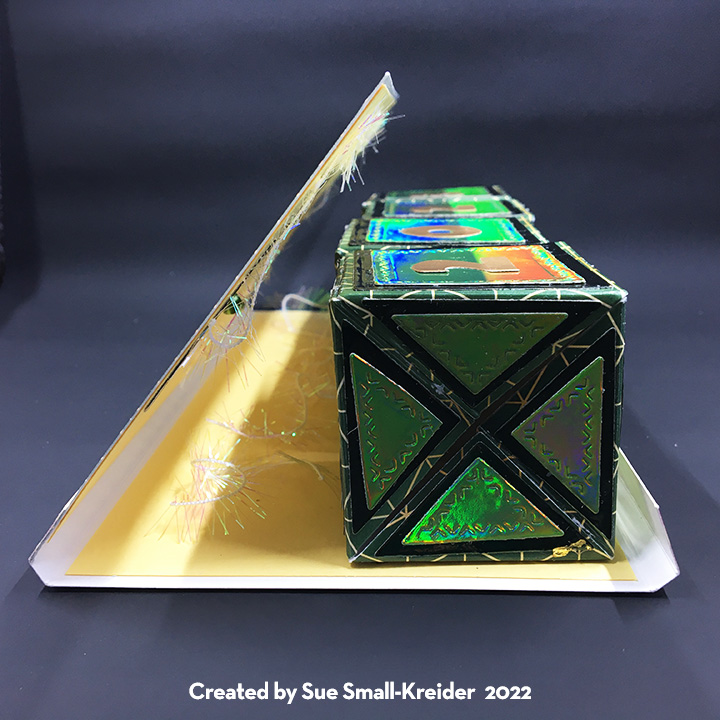
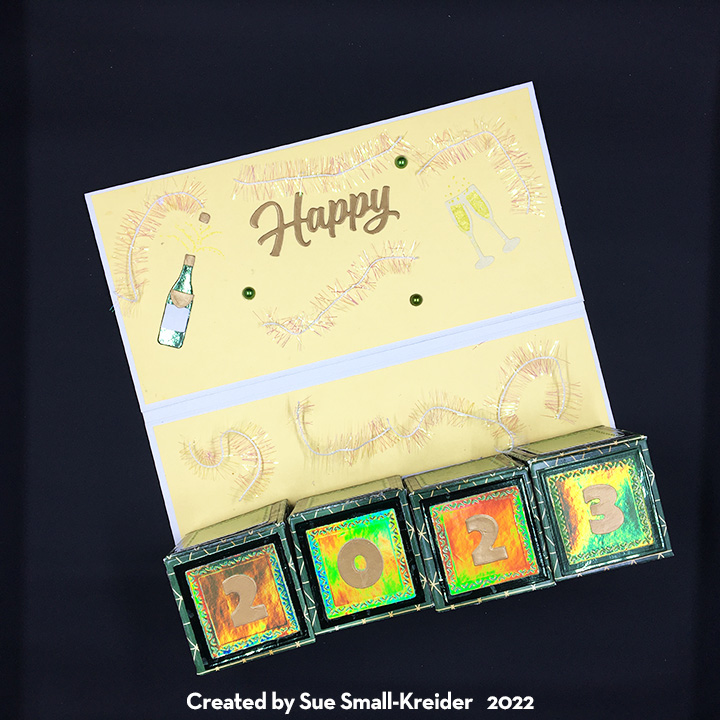
For this New Year’s card, I featured Karen Burniston’s Surprise Cube Pop-Up in a slimline card.
For the pop-up cubes I watched the assembly video before starting. Because I used specialty printed cardstock and mirror cardstock all of which have slick finishes, I had to glue, clamp, wait for glue to dry before moving onto the next step. Double-sided tape ended up working better on these cardstocks. I decorated the sides while the main pieces were still flat.
I cut two sets of the numbers for “2023” from a scrap of matte gold paper. These were glued on the top and sides of the cubes once I had glued the cubes to the card base.
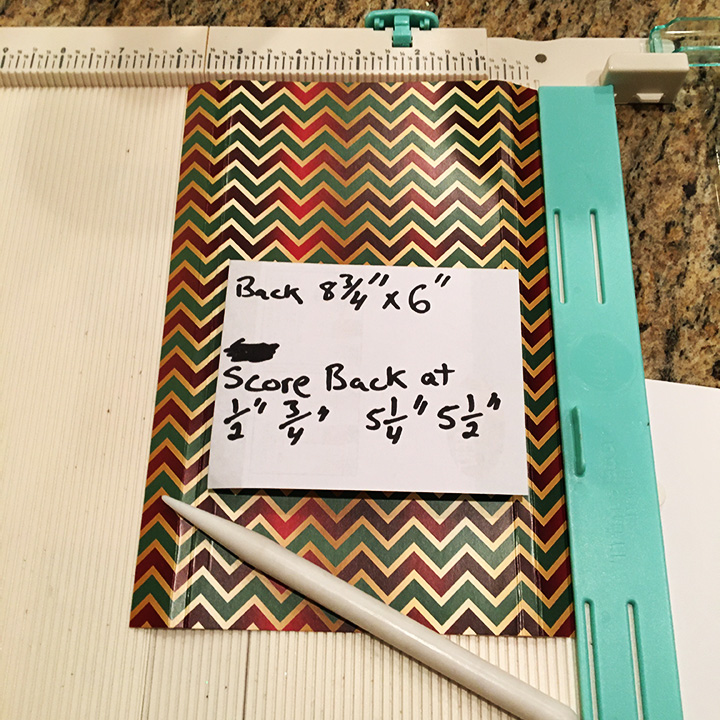
The card base is custom made from two pieces of the patterned specialty cardstock. The front piece is 4 x 8 3/4 inches while the back piece is 6 x 8 3/4 inches. The back piece is scored at 1/2 inch, 3/4 inch, 5 1/4 inches and 5 1/2 inches.
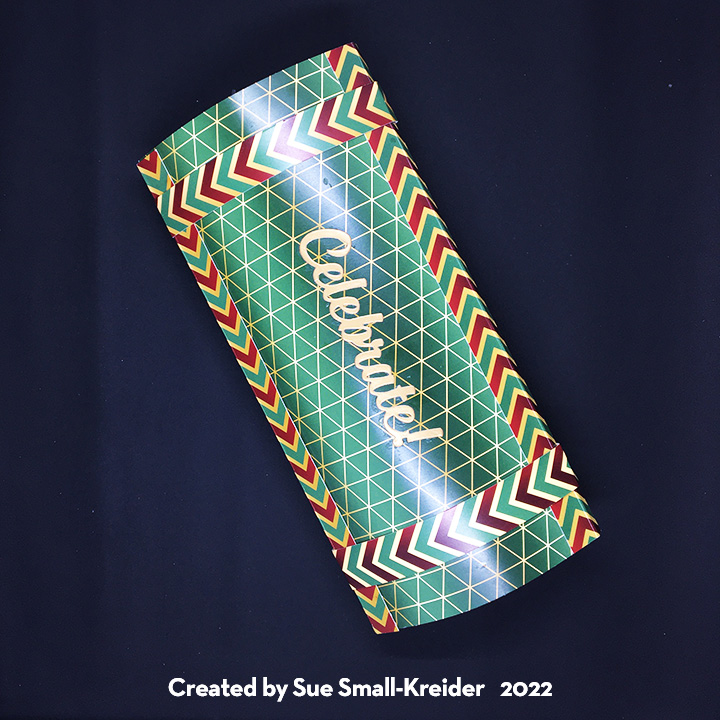
The front piece is glued under the back’s tab. When closed, the back piece’s front tab wraps over the front’s bottom edge. Two bands hold the card shut. Instructions to slide the bands off are on the back of the bands.
“Celebrate” is the front sentiment that hints at what’s to come when the card is opened. I used the largest of all the “Happy”s in Karen Burniston’s dies. It comes from the Happy Birthday die set. The champagne bottle comes from the Wine Charms set while the clicking champagne glasses are from the Wedding Charms set. The bubbly effects of the popping cork and from the glasses were made with a gold gel pen. Some holographic strands of tinsel finish off the decorations inside.
There is space behind the cubes to write a personal message and then place the loose tinsel strands over it.
Thank you for reading this blog post. Please like and leave comments 😊
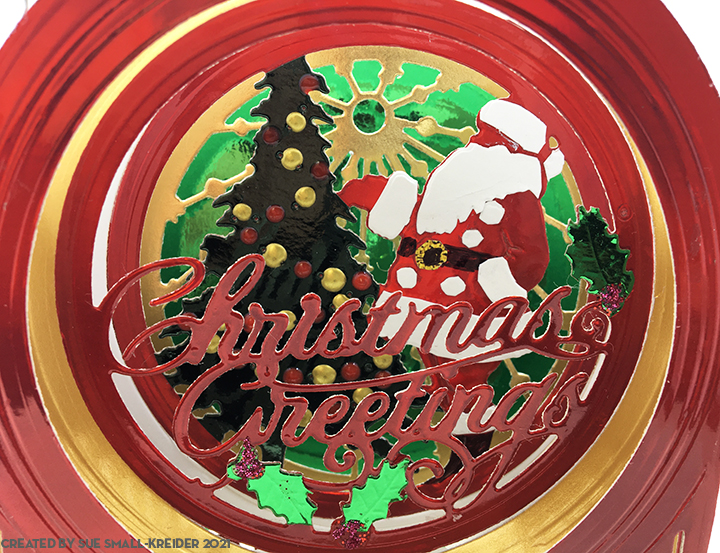
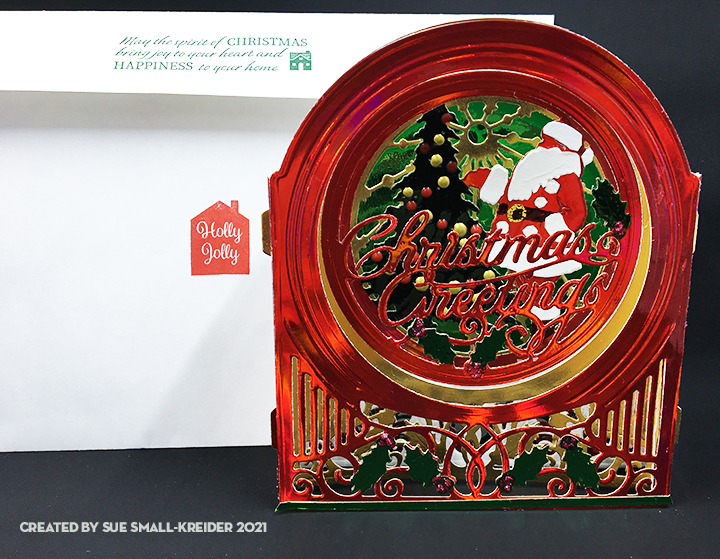
What a jolly feeling the “Ho Ho Ho” of Santa brings to anyone who hears or sees it. This 3D snow globe designed by Becca Feeken for Spellbinders makes you hear the jolly old elf.
This was my first time using these die sets. I focused on using just four colors of red, green, white and gold and mostly mirror or foiled cardstock.
My Santa and tree are based off of the picture on the packaging using Nuvo Drops instead of jewels. I die cut several layers of the Santa and tree using up scraps to fussy cut the various pieces of the scene which are glued onto a red base. The belt and boots are colored with a fined-tipped black permanent marker. The belt buckle is a freehanded square of gold paper.
The holly leaves are fussy cut and glued onto the sentiment and front layers. The red berries are red glitter glue. I added a thin green stripe at the bottom of the front layer for interest.
As is my style, I stamped the back of the envelope with hints of what’s inside using red and green ink and Christmas sentiment stamps from Paper Discovery. I used a new stamping tool with my stamping platform for an even and easy stamped image. I highly recommend the Stampendable Stamping Tool.
Thank you for reading. If you enjoyed this blog post, please like it and follow the blog. 😊
What kind of a thank you card do you make for someone who has sent an amazing gift and loves tigers? You make them a four-panel card that can act as a candle shade or screen.
Tonic Studios Tropical Rainforest silhouette die set was a perfect match for the card that cats as something more than a card. I had seen on Pinterest a lantern made from some of the Tonic Studios other forest silhouette dies sets and knew from my experience of making a house luminary Christmas card, that this die set would be easy to make a four-panel card/candle shade.
I cut four vellum panels and then using three shades of green cardstock and a sheet of brown, I cut the silhouette frames using the lightest shades for the front panels and the darkest as the panels at the back. I cut the panel with the tiger and toucan bird from white scrap cardstock and colored with markers. Next, I fussy cut them and glued in place on their panel. I also cut and colored a butterfly from white cardstock scrap.
The vellum panels were laid out in a row and taped together using clear removable tape on the back side of the vellum. Next the silhouette panels were glued on to the vellum.
As a finishing touch, I die cut the words “Thank You” to glue to card. Next, I pieced together from words in the same Moonstone word die set the name of the recipient. The card fits into a mini slim envelope.
Thank you for reading this blog post. Please like and leave comments. 😊