Staying off Santa’s naughty list can be a challenge sometimes. This fun shutter card featuring a retro Santa die-cut and papers is sure to bring back childhood memories of the holidays.

Based on a card in the Die-cutting Essentials, issue 82, by Sharon-Elaine Jones, the card uses the free dies and printable papers and sentiments from the magazine. I had to convert the template from 20cm x 30cm to fit an 8 ½ inches x 11 inches card base. It took me several tries to get the correct measurements and folds, but in the end I got there. (See template).

You will need to cut:
- One rectangle from white cardstock 8 ½ inches x 3 ¾ inches for the card back
- Six 1 ¾ inch squares from red cardstock
- Two rectangles 1 ¾ inches x 1 3/8 inches from red cardstock
- Two rectangles 3 3/8 inches x 4 ¼ inches from red cardstock
- One rectangle 3 ½ inches x 4 ¼ inches from green cardstock
- Two rectangles 3 inches x 1 ¾ inches from green cardstock
- Two rectangles 2 ¾ inches x 1 ½ inches from white cardstock
- One rectangle 3 1/3 inches x 4 inches from white cardstock (to be embossed)
- One rectangle 3 ¼ inches x 4 inches from patterned paper
- Two rectangle 1 1/3 inches x 1 1/2 inches from patterned paper
- Six 1 ½ inch squares from patterned paper
Die-cut:
- Six of the holly die from white cardstock
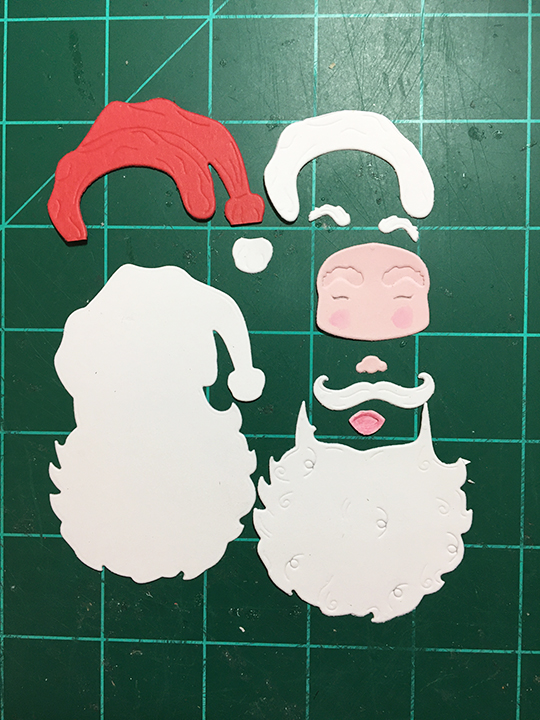
- One of the Santa outline from white cardstock
- One hat from white cardstock (Fussy cut just the fir trim and ball to be glued on to red hat.)
- One beard, mustache and eyebrows from white cardstock
- One hat from red cardstock
- One of face, nose and mouth from pink cardstock (Using a watercolour pencil and water brush, color the cheeks and mouth pieces rosy pink. Then using a fine-tipped pencil or maker, highlight the eyes.)
Print and fussy cut from sentiments:
- One oval sentiment topper
- One rectangular Santa’s naughty list sentiment
To emboss the background of the Santa panel, lightly mist the white card stock (3 1/3 x 4 inches) with water before placing in embossing folder. This will allow the paper fibers to bend in the embossing folder rather than break and tear. Set emboss piece aside to dry before gluing onto red matting piece (1 3/8 x 1 ¾ inches).

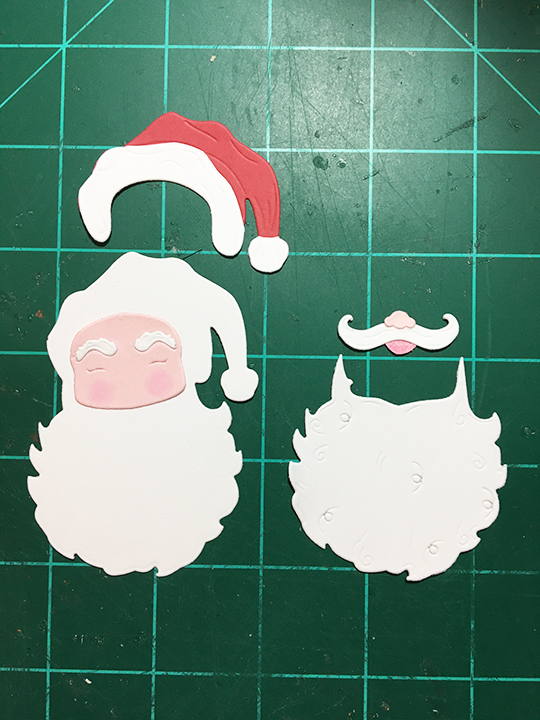
Assembling Santa: Position the face piece on the Santa outline backing piece with the bread and hat over it. Mark position of face with pencil. Glue eyebrows on to face in indentations. Glue white fur pieces to red hat. Attach nose on top of mustache and mouth under it. Adhere face on to backing using pencil markings. Glue beard onto backing and just up to face. Attach hat over face matching it up with same shape on backing. Glue on mustache with nose and mouth attached. Glue assembled Santa onto embossed panel that was already glued to red mat.


Faux Embossing of Holly Panels: Glue three of the holly die cuts and three of the berries on to one of the white rectangles (2 ¾ x 1 ½ inches). Adhere white panel onto a green rectangle mat (3 x 1 ¾ inches). Repeat with another three holly die-cuts, white rectangle and green mat.
Other Panels: Glue the six square pattern papers on to six red square mats. Glue the two small pattern paper rectangles onto the two small red rectangle mats. Glue the large patterned paper rectangle to the large green mat and then glue the Santa’s naughty list sentiment onto the center of the patterned paper.
To Assemble Card: Take white card base that has been cut, scored and folded into shutter card and open-out flat. Glue red squares and rectangles in the areas shown in photo. The large rectangle for the card front will have its topper sentiment glued on after the squares have been glued down. Adhere the green rectangles into the appropriate spaces in the center of card base. Fold-up and glue large white rectangle piece to back of card. This back piece will be where you can write a personal message as well as helping stablish the card when opened and set on display.
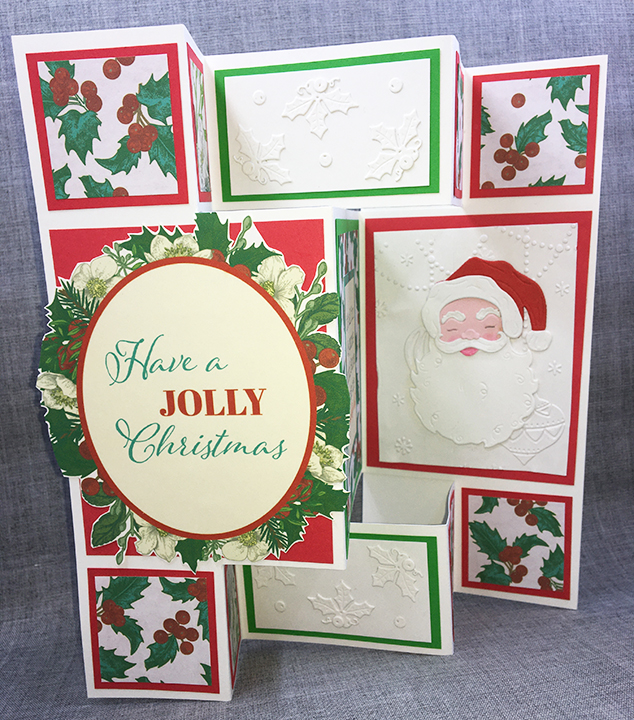
Envelope: The card folds to fit inside a #10 business size envelope. To hint at what is inside the envelope, I stamped the flap with a sentiment “Have a Holly Jolly Christmas” and below it a Santa’s sleigh with reindeer.
Thank you for reading. If you enjoyed this blog post, please like it and follow the blog. 😊
Dies & Embossing Folder:
- Retro Santa from Die-cutting Essentials, issue 82, October 2021
- Cut & Emboss Baubles from Papercraft Essentials, issue 192, November 2020
Papers
- Printable papers from Die-cutting Essentials, issue 82, October 2021
- Printable Sentiments Die-cutting Essentials, issue 82, October 2021
- Red, green, pink and white cardstock from my stash
- Heavy weight 8 ½ inches x 11 inches white cardstock
- #10 Business envelope
Stamps and Ink
- LeCrea Design by Leane de Graaf – Combi Stamps – Santa & Small Christmas Trees – 55.3707
- Have A Holly Jolly Christmas Stamps and Dies from Cardmaking & Papercraft, issue 202 November 2019
- Stampin’ Up – Classic Stampin’ Pad – Tranquil Tide
Additional Supplies:
- Cosmic Shimmer – Specialist Acrylic Glue – 125ml
- Sizzix – Big Shot PLUS die cutting Machine
- Fineline 20 Gauge Applicator & Bottle
- Scoring board and tool
- Paper cutter
- Metal ruler
- Craft knife
- Nuvo Watercolour Pencils
- Waterbrush
