It’s time for the Karen Burniston April 2024 Design Team Challenge with the theme of Thirst Quencher. I chose lemonade as my thirst quencher and a card theme of a summer fete (festival or fair).

At a fete, there are generally small booths selling baked goods, drinks and other trinkets or handicrafts, so my card is a slimline (3 3/4 x 8 1/2-inch) card with three food booths using Karen Burniston dies.

Cardbase: Start with an 8 1/2 x 7 1/2-inch rectangle of a thick cardstock. (I used white.) Score at 3 1/2-inches and fold in half to create a top-fold 3 3/4 x 8 1/2-inch card base.
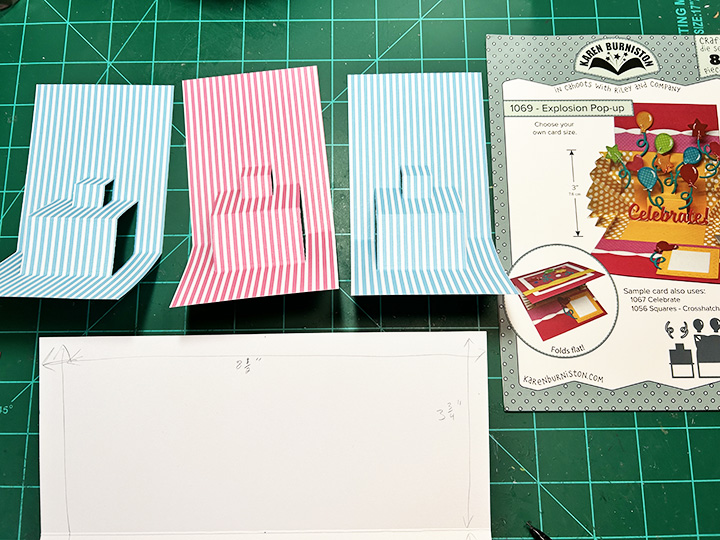
Booths: Cut three 6×3-inch panels of striped paper. (If you have longer than 6-inch striped paper cut them 7 1/2×3-inches.) Score and fold each panel at 3 3/4-inches. Using the pop-up center die from the Explosion Pop-Up, center the die on the fold of each panel. Train the folds as directed in the assembly video for the die set located at the bottom of the linked page. Glue pop-up panels inside card with the long side attaching to the inside top panel. Cover the bottom panel with grassy patterned paper. (I cut strips of the 6×6-inch patterned paper 1-inch wide to go through the pop-ups and cover over the striped paper.) I used a border print card layer to created the tablecloths on each booth table.

Posts and Banners: The posts are cut from glossy white cardstock using the Street Lantern die with the scrolling arms cut off. The pendant banners are made using the die from the Twist Panel Pop-Up set and threading them onto baker’s twine. The twine was wrapped around the knob top of a post before gluing it in place. (The two ends of twine can be taped to the front of the card to be covered over by the front panel.) The green bows that cover the looped twine on the posts are from the Street Lantern Pop-Up set. (I found it helped with the opening and closing of the card to place a small drop of glue at the top back center of each pendant to keep them from becoming catch-points, but still allowing them some dimension.) I used computer generated “Pies,” Lemonade” and “Cakes” printed on coiper paper and cut out with the banner label from the Lorna Label Pop-Up set.

Card Front: You will need to create a panel to hide the banner twine ends under. Cut a 3 3/4 x 8 1/2-inch of blue cardstock and a 3 3/8x 8 1/4-inch rectangle of dotted printed paper. Glue the dotted paper on top of the blue cardstock with an even border all around. Cut ten fishtailed banners from decorative paper using the die from the Twist Panel Pop-Up set. Cut the letters and shadows to spell out “SUMMER FETE” using the Mini Alphabet die set. Glue the letters onto the shadows and shadows onto the banners being careful not to cover the holes at the top of the banners.

Thread the two words on two separate pieces of twine. Die cut the “Enjoy the” from different colors using the Enjoy The Ride set. Once the placement of the words and banners have been established, tape the banner twine ends to the back of the panel. Glue the words and banners down onto the panel. Attach panel to cardbase front. (I used glue and double-side ½-inch tape.)

Pies: I created four pies using two different die sets. The top view lattice cherry pie and the key lime pie were created using the pie dies in the Baking Borders set. (I brushed the cherry pie red with a red glitter brush pen for some shine.) The horizontal pies were made with the pie die from the Picnic Elements set with the base piece cut from red and the crust cut from brown. All pie crust were inked with a light brown ink. The horizontal pie crusts had their slits inked red with an ultra-fine tipped red marker. I attached the horizontal pies using a foam square and a pop-up cube from a strip of white cardstock. (You could use the pop-up cube from the Oven Extras die set instead of making your own.)

Lemonade: The pitcher and glasses of lemonade were created from clear vellum with yellow cardstock behind. All the pieces were cut using the Picnic Elements die set. The pitcher is adhered to the pop-up base with a foam square and a drop of glue. The glasses are attached to a strip of clear packaging plastic with double sided tape all along the strip. The strip was threaded through the pop-up base and attached to the backside of the pop-up. (I covered the exposed adhesive on the strip with anti-static powder.)

Cakes: For these small cakes, I used the cupcakes in the Baking Borders set. I left the border base layer attached and trimmed off the excess behind the frosting. The bottom row has its center cake glued to the pop-up base while the upper row is attached to a pop-up cube.
Message Labels: The two white scalloped labels inside the card are for a personal message and are cut using the die from the Twist Panel Pop-Up set. (I did two to hide the seams of my patterned paper.)
Envelope: The card will fit into a #10 business size envelope.
_______________________________________
Thank you for reading this blog post.
I hope this inspires you and makes you smile.
Please like and leave comments 😊
_______________________________________
Materials Used:
Dies
- Karen Burniston in cahoots with Riley and Company – Baking Borders – 1267
- Karen Burniston in cahoots with Riley and Company – Lorna Label Pop-Up – 1266
- Karen Burniston in cahoots with Riley and Company – Mini Alphabet and Numbers – 1197
- Karen Burniston in cahoots with Riley and Company – Street Lantern Pop-Up – 1171
- Karen Burniston in cahoots with Riley and Company – Picnic Elements – 1159
- Karen Burniston in cahoots with Riley and Company – Enjoy The Ride – 1103
- Karen Burniston in cahoots with Riley and Company – Explosion Pop-Up – 1069
- Karen Burniston in cahoots with Riley and Company – Twist Panel Pop-Up – 1009
Papers
- Ink N’ Splatter – 6×6 Double-Sided Paper Pack – Strawberry Fields
- Queen & Co. – 6×6 inch Double-Sided Papers – Simple Stripes
- Stampin’ Up – 8.5×11 Thick Cardstock – Basic White
- The Paper Cut – 8.5×11 Glossy 10 PT Kromekote Cardstock – White
- The Paper Studio – 8.5×11 Printed Paper – Random Dot – Robin’s Egg Blue
- The Paper Studio – 8.5×11 Clear Vellum
- Anna Griffin – All Occasion Pretty Paintings Card Making Kit – Layer Card
- Clear Plastic Packaging
- Colored Cardstock
- #10 Business Envelope
Ink
- Ranger – Tim Holtz – Distress Ink- Frayed Burlap
- Scrapbook.com – Glitter Brush Marker – Red
- Sharpie – Permanent Marker – Fine Tip – Red
- Sharpie – Permanent Marker – Ultra Fine Tip – Red
- Pigma – Mircon 01 Fine Tip Pen – Black
Adhesives
- Neutral PH Adhesive by LINECO
- Fine-Tip Glue Bottle
- Double-Sided Tape – 1/8-inch wide
- Double-Sided Tape – 1/2-inch wide
- Foam Squares
Tools
- Die Cutting Machine
- Scoring Board
- Bone Folder
- Craft Mat
- Paper Trimmer
- We R Memories – QuickStick
- Craft Clips
- Sponge Dauber
- Stamping Blocks used as paperweights
- This Calls For Confetti – It’s No Secret – Anti-Static Powder Tool
- Scissors
- T-Ruler
- Pencil
- Tombow – Mono – Sand Eraser -512A
Miscellaneous
- Baker’s Twine – Yellow and White

Such a cute idea for a slimline. I love those little pies and cupcakes…and the tablecloths!!!
LikeLiked by 1 person
Tablecloths are front and printed border cardstock I had.
LikeLike
Your card is very creative and reminds me of a summer fair. My favorite beverage is a diet coke.
LikeLiked by 1 person
What an adorable card! The little detail make it a super festive card! Thank you for sharing!!
LikeLiked by 1 person
Cute as can be! I love all the booths with the goodies! Such a fun card!
LikeLiked by 1 person