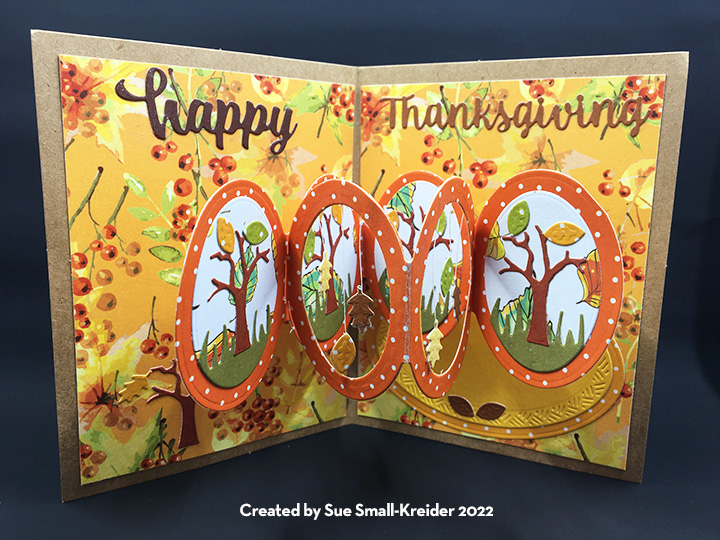
November winds are working the last of the leaves off the trees as we go to celebrate Thanksgiving.
A fun little pop-up card using Karen Burniston dies and some thread to dangle fallen leaves from in the two open ovals. The pop-up mechanism, small trees, small ovals, and grass are from the Oval Frames Pop-up set.
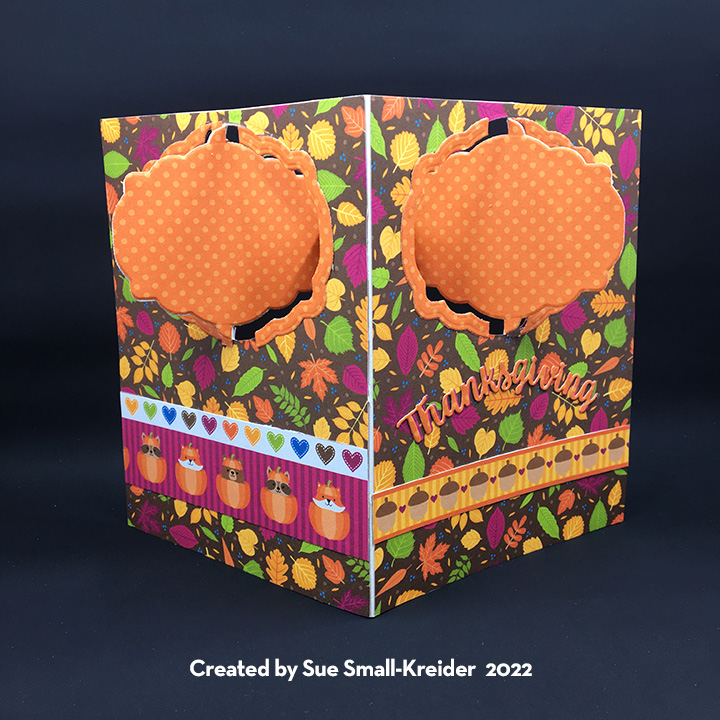
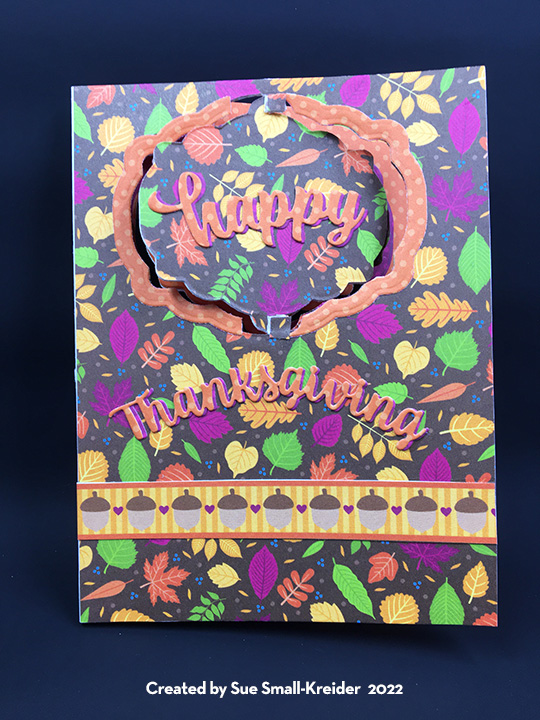
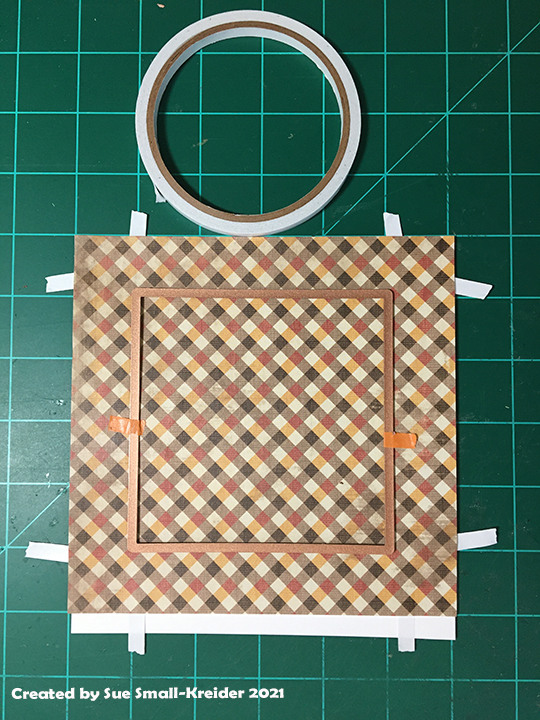
I decided to make a cardbase mistake into a proper card. I had cut the main pivot Label Charm Pop-Up die through both front and back of an A6 cardbase (6 1/4 x 4 1/2 inches) and used the smallest fancy label die from the set with two small strips to connect the two pivot labels.
My favorite way to make the Label Charm Pop-Up is to figure out the mechanics with a thin cardbase and then cover it with decorative papers. The frames around the pivots are the waste from cutting the out. Because of catch-points the frames create, the sharp points of the frame are trimmed to allow the fancy label to pivot freely.
Double cut the sentiments from different colors and stagger the layers to create shadows as well as some dimension.
Final elements on the card are decorative strips from the paper collection.
Continuing with the autumn leaf theme, I stenciled colorful leaves onto the back of the envelope.
Thank you for reading this blog post. Please like and leave comments 😊
Sometimes spending a holiday alone in a place far from home means that one must adapt and make new traditions, friends and feasts.
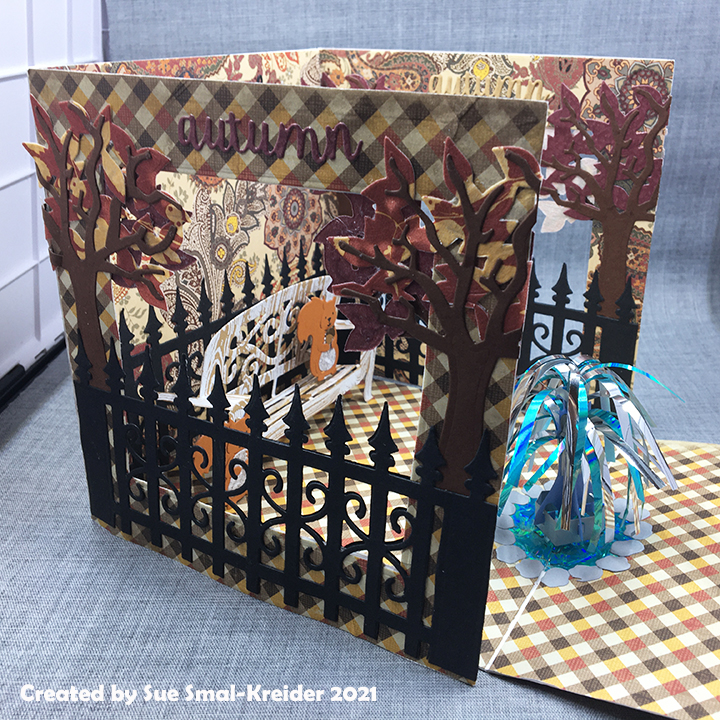
This penta-fold aperture card opens out to form a park scene complete with a water fountain and squirrels sharing acorns. Karen Burniston dies are used for all but the 4 inch square apertures.
Card base: Cut four pieces of heavy weight cardstock 6 inches x 6 ¼ inches and one piece 6 inches by 3 inches. Score and fold all the 6 ¼ inches sides at ¼ inch to form tabs.
Adhere decorative papers to the front and back of two of the tabbed squares. (I used double-sided tape at the outer edges of paper.) Center a 4-inch square die over the patterned paper and secure with removable tape. (Remember if you are using different papers for the inside and outside of your card to test that you have the papers on the correct sides of your tabbed card base panels before you cut the apertures.)
Glue the aperture side panels to the 6-inch sides of the back panel whose tab is glued to the floor panel. The floor panel’s tab is glued to the 6-inch side of the 6 inch x 3inch piece. Adhere decorative paper onto all panels on the card base.
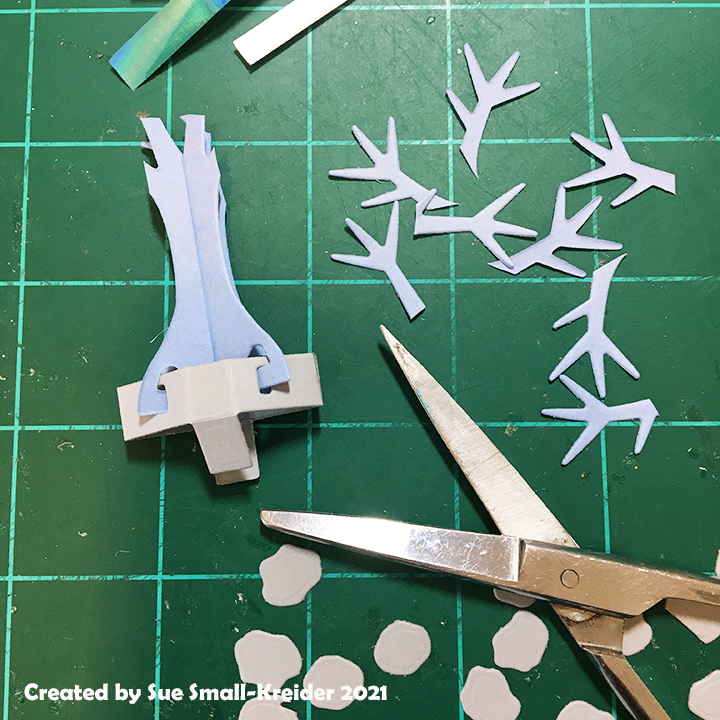
Trees: Cut four tree trunks using Tree Pop-Up die set. Cut four leaves dies. Glue trunks to leaves. Use a fence piece to position each tree trunk on the sides of the apertures, gluing the overlapping leaves together in the aperture opening. Repeat all steps for other aperture panel.
Fence: Cut ten fence panels from the Iron Fence Pop-Up die set. (I cut twelve fence piece incase I made a mistake in cutting, which I did.) Trim five fence panels at the sixth post from the left. Trim the remaining fence panels at the sixth post from the right. Trim off sixth post tip and scrolls at the right of post on left panel as shown in photo. Glue right panel over left panel. Take one elongated fence panel and adhere to the back panel. Glue fences over aperture panels front and back matching up fence tips.
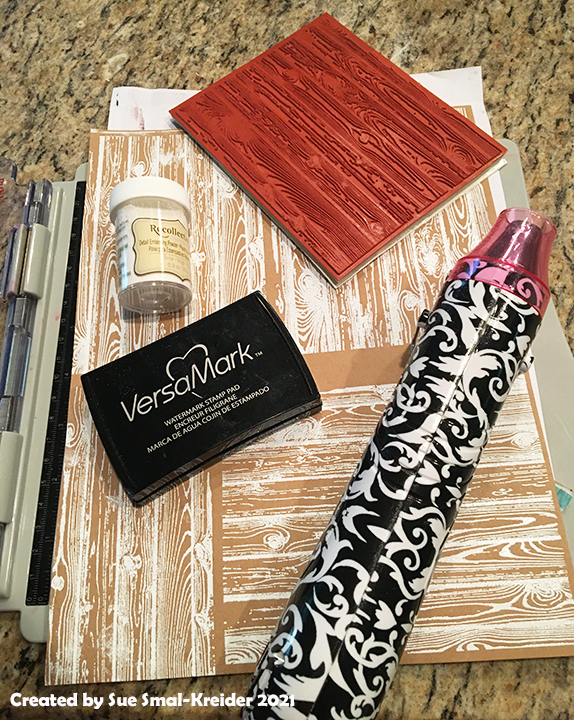
Bench: Stamp with woodgrain stamp onto brown kraft card stock and heat emboss with white embossing powder.
Die cut one whole bench using the Garden Bench Pop-Up die set. Cut the seat section again with the woodgrain going with the seat planks. Save two of the scrolling out-cuts from the bench back to glue onto the front of bench arms. Glue seat onto bench matching up planks. Follow package directions to attach the bench to the back and floor panels.
Fountain: Cut one of each of the two pieces of tree trunk from Tiny Trees Pop-Up die set of blue card stock. Cut tree base from gray card stock. Cut two sets of rocks from Tent Pop Up die set.
Assemble tree as per package directions. Trim the tips of branches off
Trim two colors of mylar foil into 1/8 inch wide strips. (I used the Spellbinders Quick Trimmer) Glue two color strips to each side of the trimmed tree trunk.
Cut a circle of blue foil and glue to fold made by the floor panel and the 6×3 inch panel. Cover edges with gray rocks. Attach the tiny tree foundation per directions on package.
Squirrels: Cut two squirrels and the tummy fur from two different colors. Cut two acorns from a light brown and two acorn tops from a dark brown. Assemble squirrels and acorns per package directions. Cut one of the long pop-up platforms from the bench pop-up die set. Attach to bench per directions on package. Glue squirrel to platform.
Sentiments: “autumn colors”, “happy autumn” , “Happy Thanksgiving” and “Thinking of you” are sentiments from two of Karen Burniston Word die sets – Greetings and Autumn Word Set.
Thank you for reading. If you enjoyed this blog post, please like it and follow the blog. 😊
I like making Thanksgiving Day cards for my family to let them know how thankful and blessed I feel to have them in my life.
This card was inspired by one that Nicky Gilburt made in Die-cutting Essentials, issue 81 using a hexagon base. I used a 3 ¼ inch circle die-cut base since I don’t own any hexagon dies and followed Nicky’s general instructions cutting apart the foliage corner die-cuts.
I colored the die-cuts with Distress oxide inks using sponge ink blender tools and a cotton swab for the tin acorn caps.
The thankful sentiment was die-cut three times (two orange and one yellow that was inked brown) and glued together with the top layer slightly off to have an orange shadow. (I find that using a fine tipped glue bottle really makes gluing tiny die-cuts easy.)
The top layer of large leaves, pumpkins and acorns were adhered with a variety of thickness foam squares and glue dots. The entire wreath is attached to the 5 x4 ¼ inch cardbase with thick foam squares. For the final elements, I used Nuvo drops for the red berries.
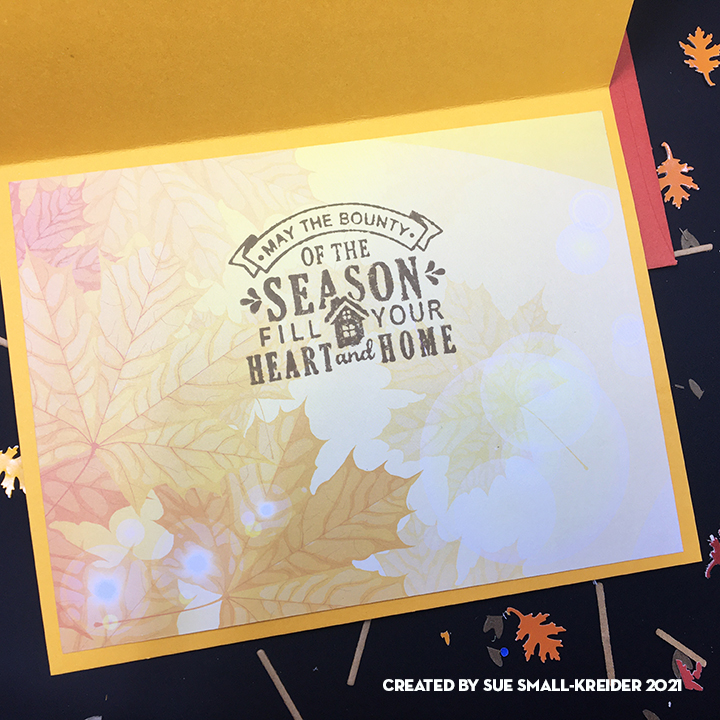
Inside an old LDRS autumn sentiment stamp was inked onto autumn leaves insert paper from the Sweater Weather foiled collection, Papercraft Essentials, issue 202.
To hint at what is inside the burnt orange envelope, I stamped the flap with a sentiment from this August’s Simply Cards & Papercraft, issue 220 and the pumpkin and leaves are from last year’s Simply Cards & Papercraft, issue 208 all in a brown ink from Memento.
Thank you for reading. If you enjoyed this blog post, please like it and follow the blog. 😊
Dies:
Autumn Wishes die set from Die-cutting Essentials, issue 81, September 2021
Stamps & Inks
Autumn Blessings from Simply Cards & Papercraft, issue 220, August 2021
Autumn Days from Simply Cards & Papercraft, issue 208, August 2020
LDRS Creative – Clear Stamps – Happy Fall Sentiments
Memento – Fade-Resistant Dye Ink Pad – Rich Cocoa
Ranger – Distress Oxides – Barn Door, Ground Espresso, Mowed lawn, Ripe persimmon, Rusty Hinge
Papers
Yellow and Orange cardstock from my stash
Insert paper from Sweater Weather foiled collection, Papercraft Essentials, issue 202, August 2021
A2 burnt orange envelope from Taylored Expressions
“May the bounty of the season fill your heart and home” is the message of this layered Thanksgiving card. It uses the October 2020 Large Die of the Month by Spellbinders as well as a variety of other brands’ elements to make a 6 ½ x 5 inches card with matching envelope.
I started by using an older Tim Holtz brick stencil with his fired brick Distress Ink on a 6 x 4 ½ inches brick red cardstock. I went through my paper scrap bins for the paper that I cut the rest of the scene’s elements, much of it coming from junk mail advertisements and envelopes. The brass letter slot and doorknob where from a candy box.
The window was cut twice from white and black cardstock and pieced together. All the white elements were cut from shiny coated packaging. Several years ago, I employed a tiny Fiskars oak leaf punch to cut the colorful leaves from junk mail. The leaves were used to make the door wreath which uses the wreath from the die set as a base. The welcome mat is cut from a brown craft paper.
By laying out the doorway pieces on the stenciled red panel I knew where to glue the bottom step piece and then the left column, red door and right column followed by the top piece. (I recommend watching the assembly video to understand how the pieces all go together.) A sticky tip tool is especially useful in assembling this doorway scene’s tiny pieces.
After the glue on the front panel was dry, I took a soft glue eraser to the white sections to erase the glue smudges.
I stamped the inside sentiment using paper masks (from sticky note paper) to allow only the intended sections to be stamped using three colors. The order of stamping was light to darkest ink – orange, green, brown. I placed a fussy-cut mask of the pumpkin after the orange layer was stamped which is hard to see in the photos showing what I masked for each stamping layer. Before I stamped the sentiment stamp in brown, I removed the pumpkin vine stamp from the stamping platform.
As is my style, I like to stamp the envelope flap with a hint of what’s inside.
This is the fourth and final day of the challenge I set myself to make five cards with the Autumn Days stamp set from the most recent Simply Cards and Papercrafts magazine.
There was a terrible rain storm going on outside when I started stamping with the Autumn Days stamp set from the most recent Simply Cards and Papercrafts magazine. I made a number of backgrounds using a color palette ranging from a mustard yellow to a muddy red. This card uses one made with the tiny individual leaf stamps and the pile of leaves stamp.
The sentiment was heat embossed in a shiny black on light orange cardstock, fussy cut and raised up with foam pads.
Using a large sycamore leaf stamp, I stamped the envelope flap in brown ink.
This will make a lovely Thanksgiving card with plenty of space inside for a personal note.
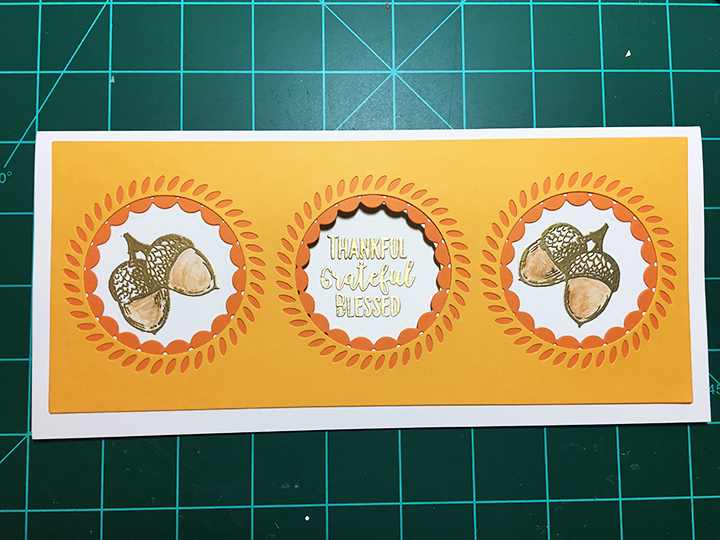
This was a quick card for my post to The Alphabet Game on Craftworld.com for the letter N and the third day in my challenge to myself to make five cards from the Autumn Days stamp set from the most recent Simply Cards and Papercrafts magazine. I had recently gotten two slimline panel circle dies that I also wanted to try out. I grabbed the darkest, what I thought was brown embossing powder from my stash, but when I heated it up it was this lovely smooth gold. (I need to write Craftstash to find out what brand of powder this is, as I highly recommend it for its smooth detail.)
After heat embossing the acorns, I used a brown watercolor pencil waterbrush to color them.
I cut the center circle out of the card base and placed the stamped/embossed sentiment on the inside. This will make a lovely Thanksgiving card with plenty of space inside for a personal note.
The envelope is stamped with brown ink on its back flap.
Walking in the woods you smell the crisp fall air and looking up see the falling leaves swirling down from the treetops. This is the memory I hope this card evokes.
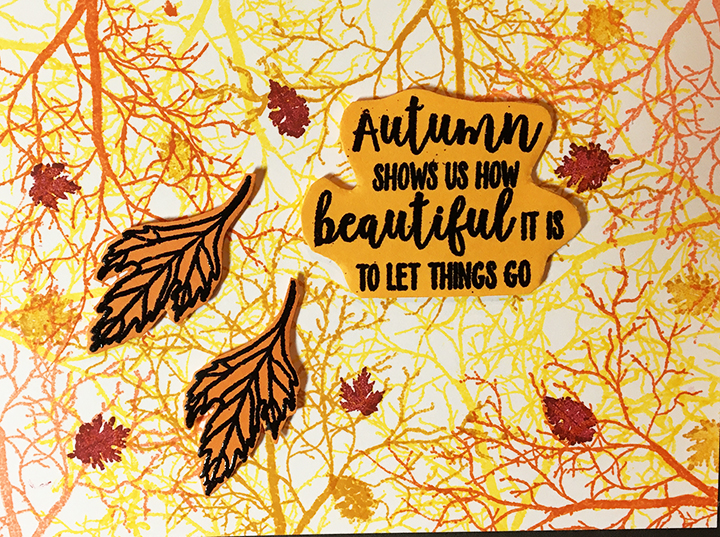
This is Day 2 of the challenge I set myself to make five cards with the Autumn Days stamp set from the most recent Simply Cards and Papercrafts magazine.
I had stamped a bunch of backgrounds with the Autumn Days stamp set from the most recent Simply Cards and Papercrafts magazine a color palette ranging from a bright yellow to a muddy red. This card uses one made with the tiny individual leaf stamps and the single tree stamp. The background was inspired by a card I had seen on Craftworld.com by Mandy78.
The sentiment and leaves were heat embossed in a shiny black on several shades of orange cardstock, fussy cut and adhered with foam pads.
This will make a lovely Thanksgiving card with plenty of space inside for a personal note.
Using a large sycamore leaf stamp, I stamped the envelope flap in brown ink.


 Autumn leaves are falling. This simple shadow box card is made using
