Welcome to our Karen Burniston Products – KB Riley LLC February 2023 Release Blog Hop. (See details at the end of this post and blog list.)
A destination beach wedding can be fun. This card came with the design brief for a grandmother unable to attend her granddaughter’s beach wedding. It must reflect the beach theme, be unique and have a place to hold a monetary gift either as a gift card or check.
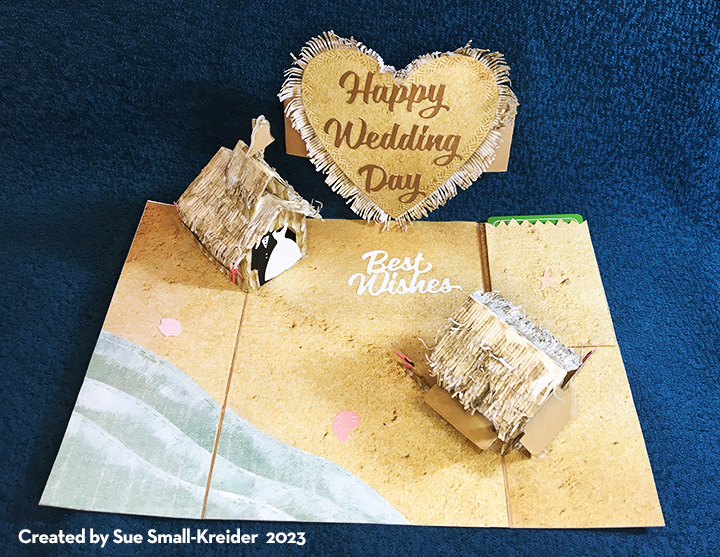
Using Karen Burniston’s new February 2023 release which has a Beach Bar Add-ons set that converts her previously released Tiny House Pop-up into a topical hut with a thatched roof, I was able to make a beach village scene with a chapel and tiki bar hut. The new release also has a Beach Borders set that provided the flamingos and dancing crabs used on the back of the card. One other new die set in the release provides a 5×7 inch Crosshatch Rectangle and a Label used on the fronts of the card and box.
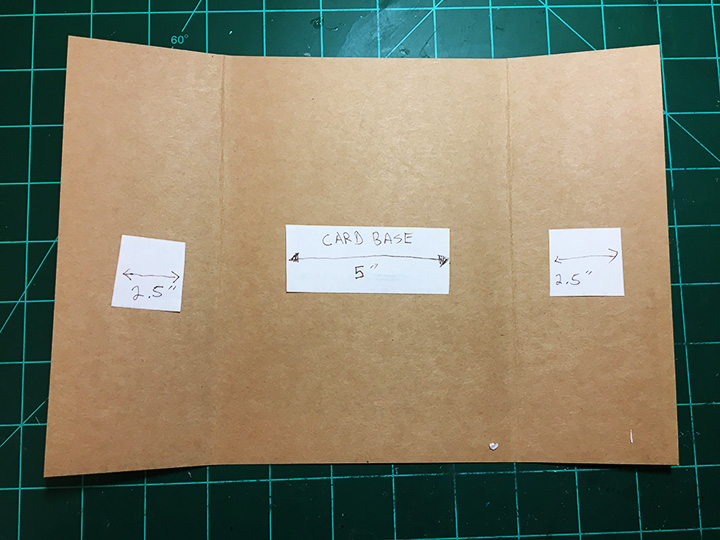
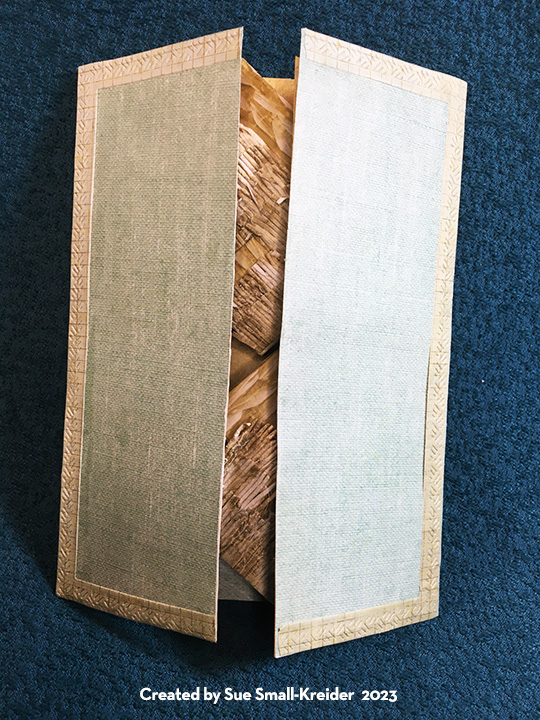
Card Base: Cut a 10×7 inch cardstock rectangle and score at 2 1/2-inches and 7 1/2-inches. Fold the side panels inward to make a 5×7 inch gate-fold card base. Cut a 10×7 inch decorative paper rectangle and then cut into panels as shown below and adhere to inside of card. Cut similar panels of decorative paper for the outside of card. (My paper had a path of sand going diagonal through the center panel. This determined the path of the waves and placement of buildings on the card.)
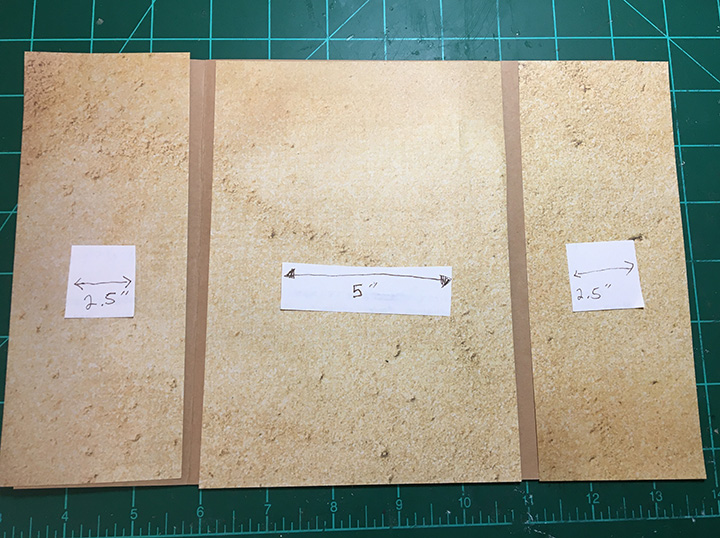
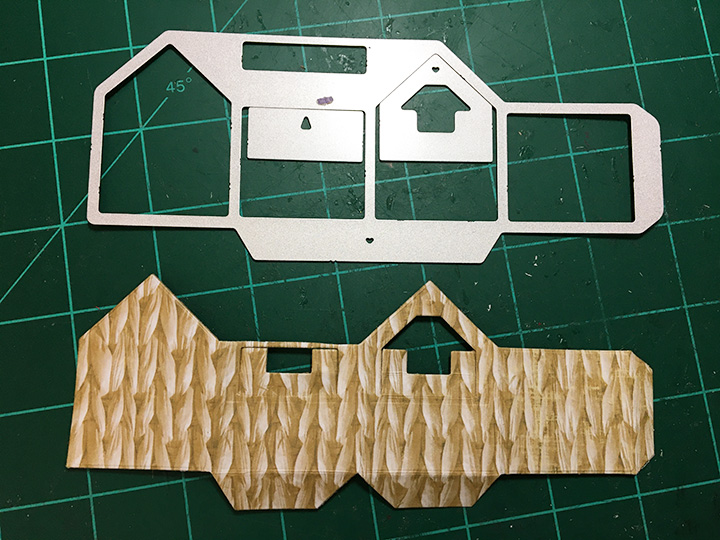
Paper Prep: Because my decorative papers were thin paper, I used a sheet of double-sided adhesive to adhere the paper to a piece of cardstock before cutting out the roofs and tiny house pieces of for the chapel and tiki hut.

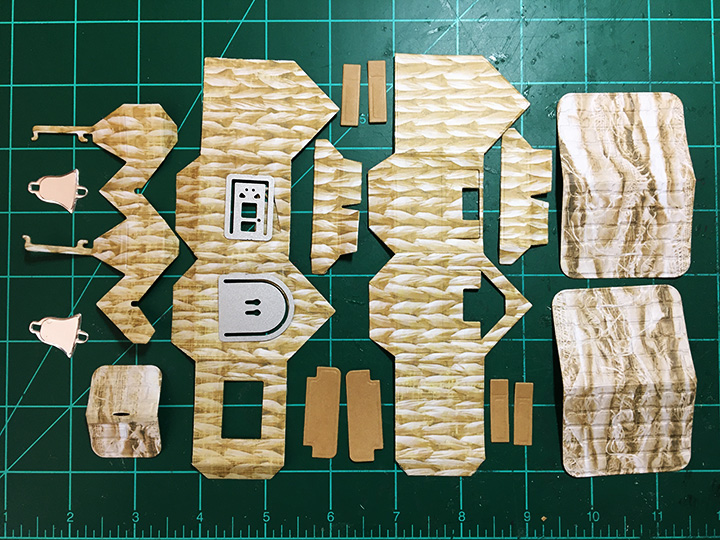
Chapel: The assembly of the chapel starts with the Tiny House base with its windows and doorway cut out while still flat using the arched door from the Church School Tiny House Add-ons for the doorway and the rectangular door from the Tiny House Pop-Up for the windows.(Make sure you cut the front door from the gabled side with the bottom tab to make this building open in the direction shown.) I cut the bell from some silver foil packaging I’d saved.
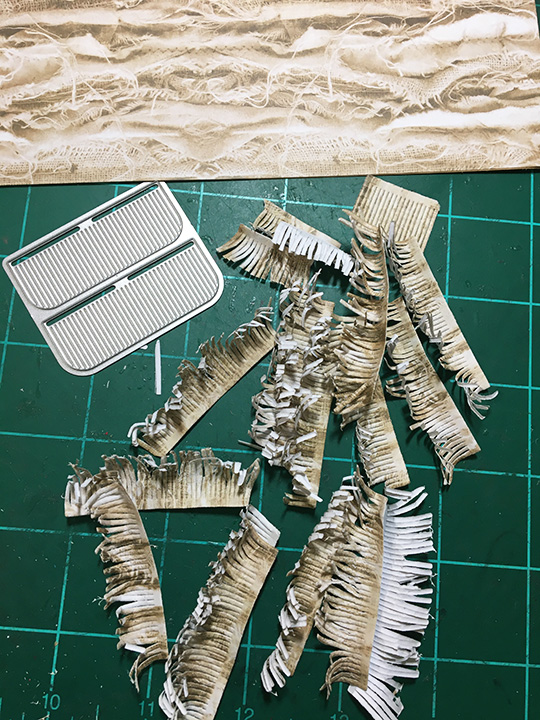
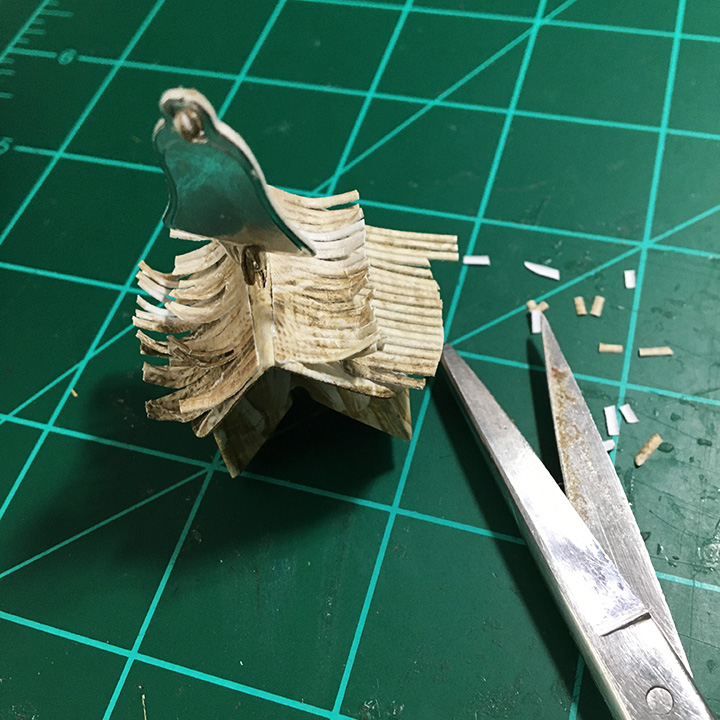
Assemble the tiny house as directed in assembly video. Follow assembly video for the church tower. Add the roof fringe after the roofs are attached to their bases. I used four layers of fringe for the main roof and two layers for the tower roof. I trimmed the tower roof fringe to almost half. (Wait to adhere your buildings to your card until both are completed. It is a tight fit with the bell resting on top of the tiki hut when the are folded closed.)
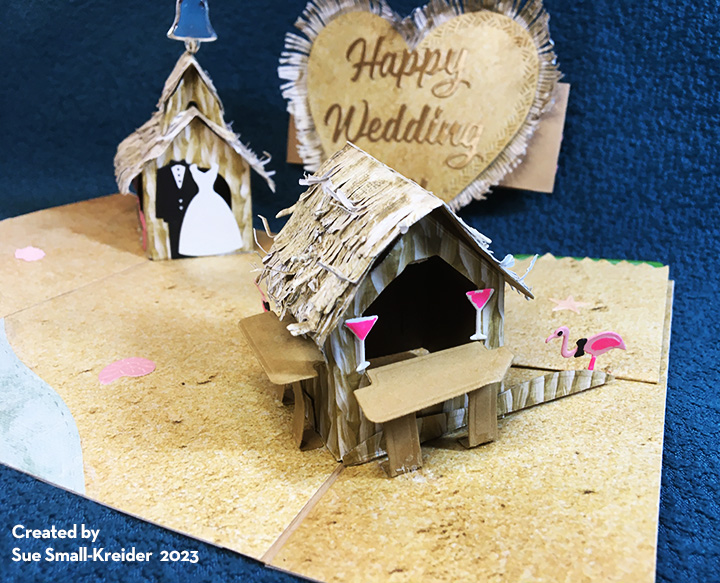
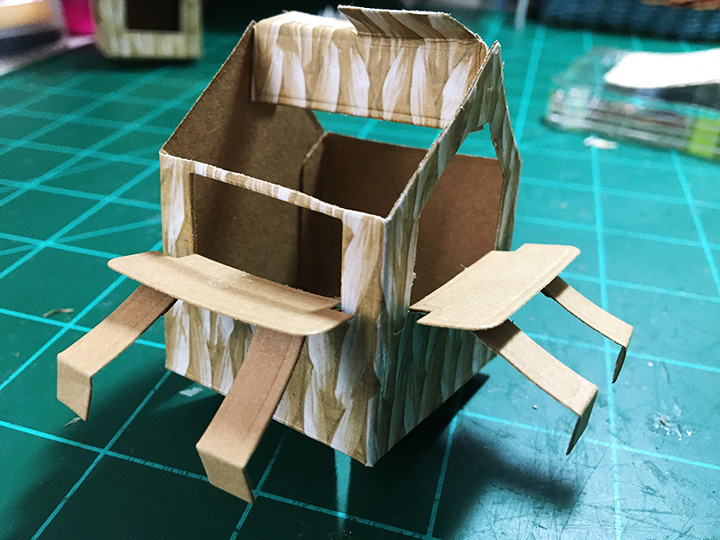
Tiki Hut: Assemble the tiny house as directed in assembly video. Follow assembly video for the beach bar hut. I used three layers of fringe for the hut roof. The hut’s counters and their posts are cut from brown cardstock. The glasses are part of the Beach Bar Add-ons set which I colored the drink onto and glued to the window frames. There is a sand dune die that will let you add the flamingos or other decorations off the sides of the hut. (The sides must be the ones that have the bottom tabs that attach the hut to the card.)
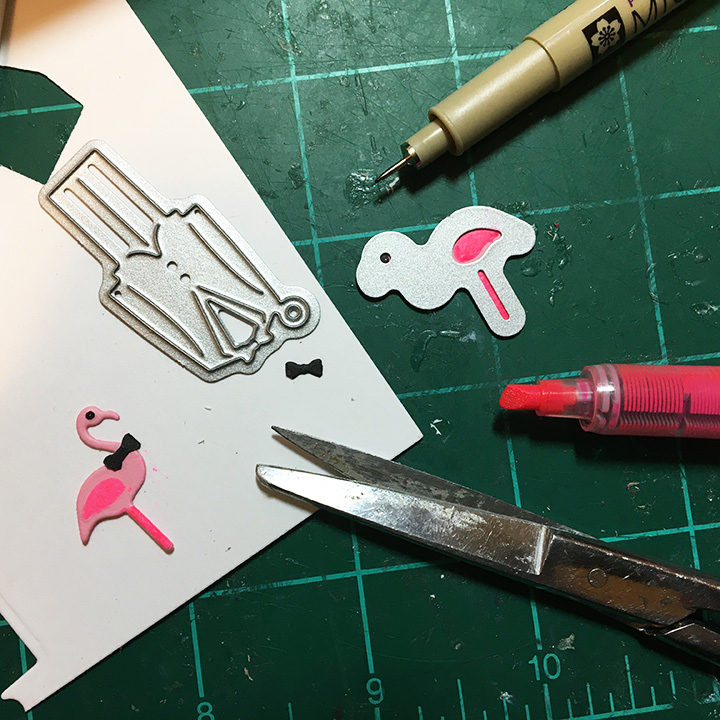
Flamingos: Each of the buildings has two flamingos attached. The Beach Bar Add-ons set has two different flamingos which come with a stencil feature to the dies to color their wings, eyes and legs. I used the bow tie from the Wedding Charms’ groom to make these flamingos into wedding guests.
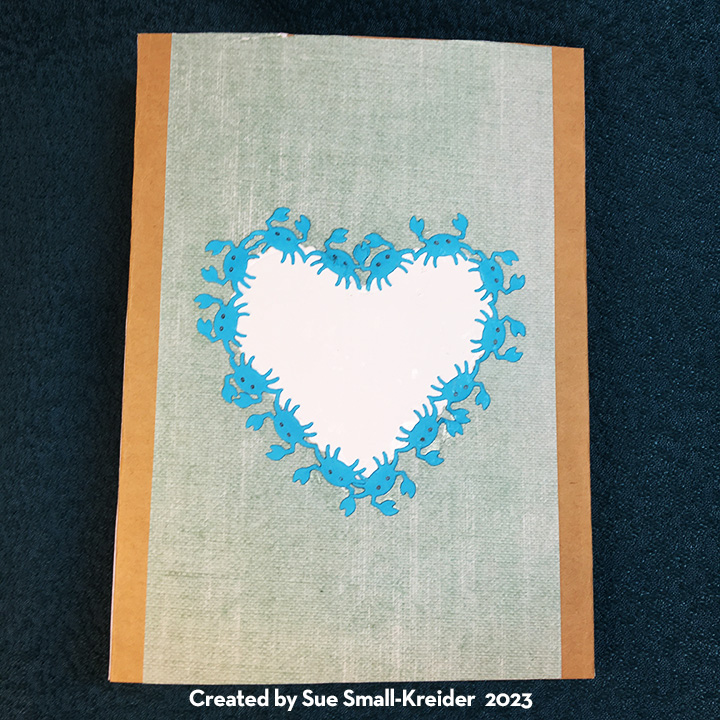
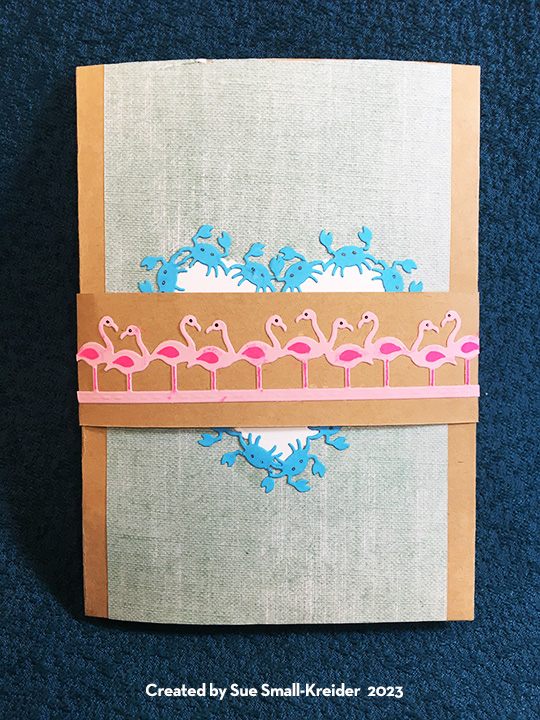
Card Back: A personal message can be written on the back of the card in the dancing blue crabs heart. The crabs are part of the Beach Borders set along with the flamingos used on the back of the closure band.
Card Front: The front two panels were first covered in blue paper and then a crosshatch frame was added to the outer edges. The frame was cut using the two largest dies in the Rectangles and Labels Crosshatch set.
See tomorrow’s Beach Wedding Card – Part 2 for instructions on making the gift bag, waves, closure band and box as well as the materials used list.
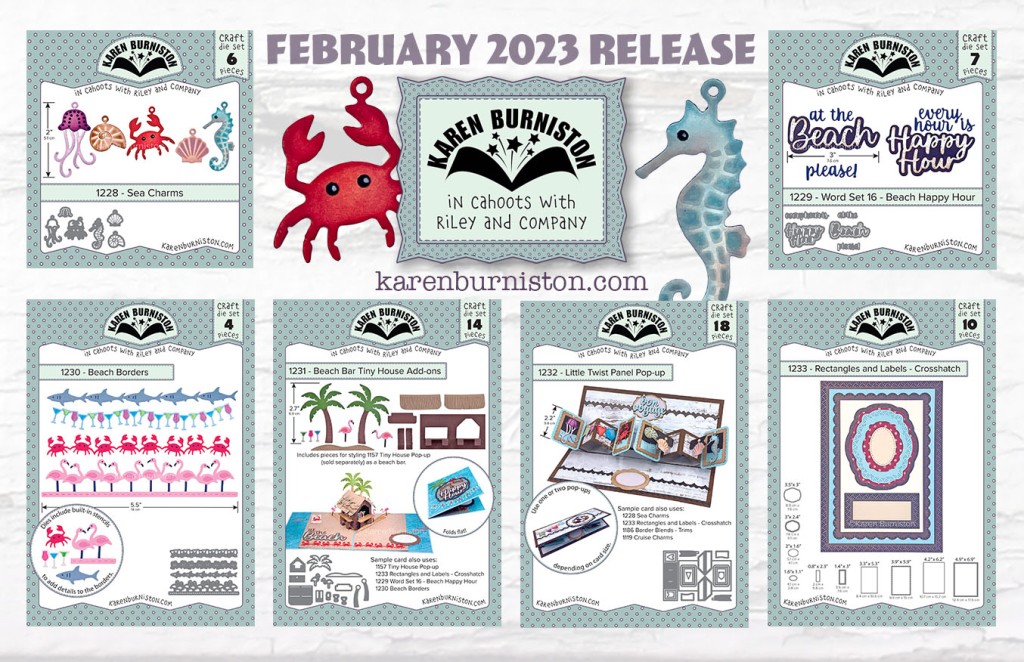
Welcome to our Karen Burniston Products – KB Riley LLC February Release Blog Hop. The Design Team have come together with Karen today for a fun blog hop to celebrate the release of 6 new dies. Sneak peeks of the new release started last week, and the dies are available to order NOW!
This release includes:
- 1 new Charm die sets
- 1 new Word set
- 1 new Tiny House Add-Ons sets
- 1 new Pop-up die sets
- 1 new Crosshatch die sets
- 1 new Border die set
Dies are available to order now on the website.
GIVEAWAY:
To celebrate the release Karen Burniston and each of the Karen Burniston – KB Riley LLC Design Team members will be giving away a $25 Gift Certificate to some lucky person who comments on our blog posts, so make sure you join the hop and comment on everyone’s blog post. Winners will be randomly chosen from ALL of the blog hop comments received on our blog posts by Monday, 27th of February 2023. Lots of chances to win some goodies, so just leave a comment on this post or any other blog hop posts to enter! Don’t forget to leave some way for us to contact you, in case you are a lucky winner!
Sue Small-Kreider – YOU are HERE

Beautiful card
LikeLiked by 1 person
Wow. Nice !
LikeLiked by 1 person
Lovely card!
LikeLiked by 1 person
The beach wedding theme is awesome! Can’t wait to get my Beach Bar add-ons!
LikeLiked by 1 person
Your creativity is endless. Love, love, love this one.
LikeLiked by 1 person
Lovely! thank you for inspiration.
LikeLiked by 1 person
Love the beach style wedding. Wonderful job.
LikeLiked by 1 person
Such a creative card. Love how you used the roof thatching all around. It just screams beach.
LikeLiked by 1 person
I love how you used two huts to create an adorable scene. I love the textured paper you used. Such a great card!!
LikeLike
Thank you for the step by step! I LOVE the texture and the darling beach scene!
LikeLiked by 1 person
Very clever how you created everything! The roof thatch is amazing!
LikeLiked by 1 person
So clever! Loving the thatched roof.
LikeLiked by 1 person
This is simply BRILLIANT!!!
LikeLiked by 1 person
So much detail. I love it!
LikeLiked by 1 person
Wonderful destination wedding card!
LikeLiked by 1 person
What a darling card
and great design for
it. Love the Flamingos!
Carla from Arizona
LikeLiked by 1 person
Fantastic card! I hope I’ll get invited to a beach wedding some day and then I’ll copy Your card.😍
LikeLiked by 1 person
Perfect card for a beach wedding. Thank you for the step by step photos—it really showcases all of the dies you used and the efforts you put in to make your card.
LikeLiked by 1 person
Ingenious!
LikeLiked by 1 person
A great card
LikeLiked by 1 person
Wonderful way to personalize the wedding card in such a special way. Great paper choices. vrc(at)prodigy(dot)net
LikeLiked by 1 person
Love the card and the steps to make it
LikeLiked by 1 person
Love the card and the steps to make it can’t wait for dies to arrive
LikeLiked by 1 person
This beach themed wedding card is amazing.
LikeLiked by 1 person
So much detail on your card, I love it. I love the blue crab going around the heart.
You can get me on Facebook, on Karen Burniston page or the peeps page. Or you can email me.
LikeLiked by 1 person
Unique wedding card with the beach theme. I like the pocket for the gift card.
slrdowney at hotmail dot com
LikeLiked by 1 person
Son got married on beach so such a cute card for anniversary
LikeLiked by 1 person
I really love your card, there is so much going on. The choice of paper and the way you made the fringe around the heart. Great job.
LikeLiked by 1 person
This is an adorable beach scene. You did a really great creation.
LikeLiked by 1 person
Ordered all my goodies, hopefully can get some more charm dies later.
Love the products!!!
Thanks for tutorials.
LikeLiked by 1 person
Cute card. That’s out of the box thinking. I would never have thought of using it for a wedding.
LikeLiked by 1 person
Fabulous card! I love these cute beach huts so much!
LikeLiked by 1 person
Such a lovely wedding card
LikeLiked by 1 person
What a unique idea for a wedding card.
LikeLiked by 1 person