Sweet Queen Bee

This fun easel card was inspired by Sharon-Elaine Jones’s floral wreaths and spinner cards on Craftworld.com, Sandy Diller’s recent crosshatch label and tag book card and a challenge to myself to make an interactive card with Karen Burniston’s fancy shaped labels that didn’t involve them being used as flat labels.

This spinning honeycomb with bees in a floral wreath easel card, uses the label dies in three different ways. The largest dis where used to create the wreath and its white inner frame. The smallest die was cut four times, each folded in half and glue together around a string. The second smallest die was used to cut the raised “Queen BEE” label that acts as the easel stop.
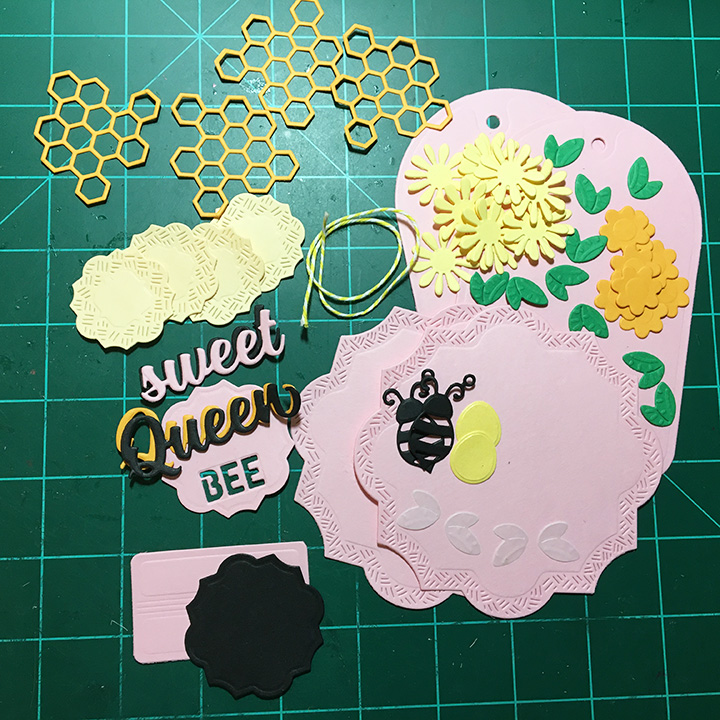
Using Karen Burniston’s Flutter Charms die set cut enough pieces for two bees and four honeycombs. Cut two of the largest label crosshatch die in pink. From Karen’s tag book die set cut two of the tags and one of the rectangle spine piece in pink.  
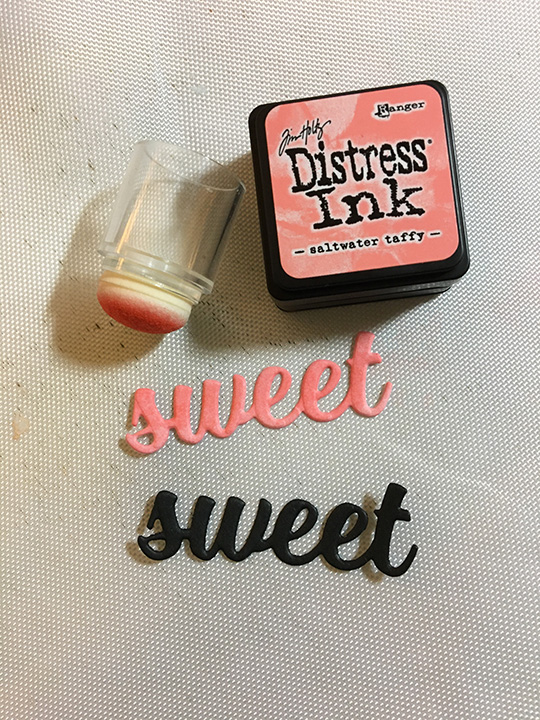
Cut from black the words “Queen” from Karen’s Word Set 5 and “sweet” from Word Set 6. Cut “Queen” a second time from orange and “sweet” from white. Ink the white “Sweet into a dark pink with Distress Ink. Glue the pair of words to create shadows or highlights by off-setting the words slightly.

Cut eight of the daisy flowers and four of the smaller butter cup flowers. Cut four pairs of the bee wings in green for leaves. Glue two of the daisy flowers one on top of the other alternating the petals. Repeat with remaining daisy flowers to end with four flowers.  Add flower centers using contrasting colors of Nuvo drops. Keep the flowers on a flat surface for at least 12 hours until they are hardened. (I was glad I had made a few extra as I accidentally flatten one of the orange daisy centers before it had hardened.)

Trim off the excess honeycomb to leave a 6 petal flower-like honeycomb that will fit inside the small yellow labels.
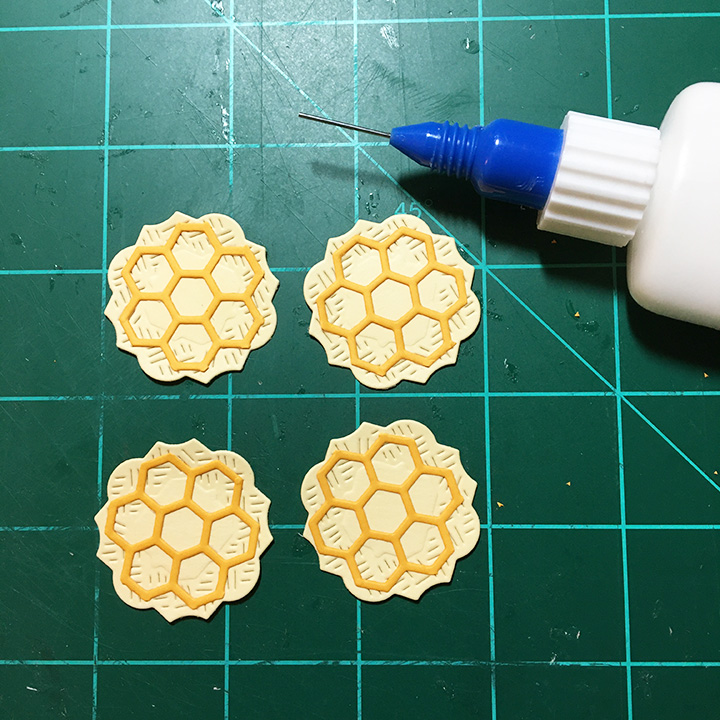
Glue honeycomb flowers to yellow labels.

Fold labels in half.

Glue two labels together on one folded half. Repeat with other two labels.
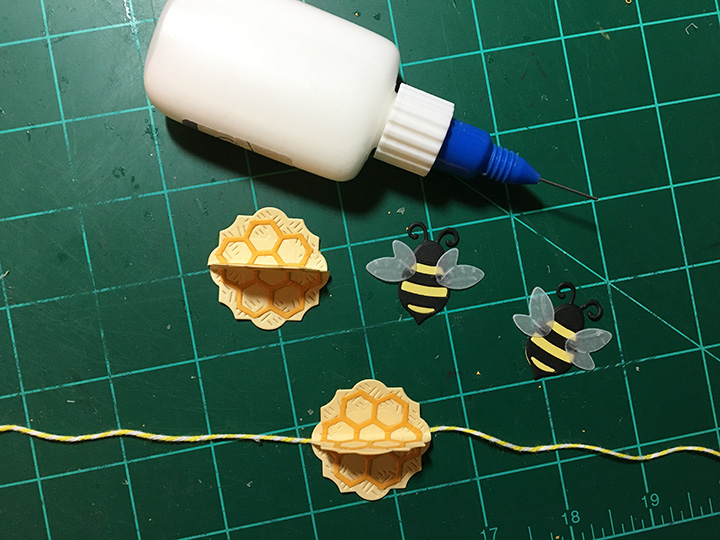
Glue piece of twine in the middle of the joined label halves.
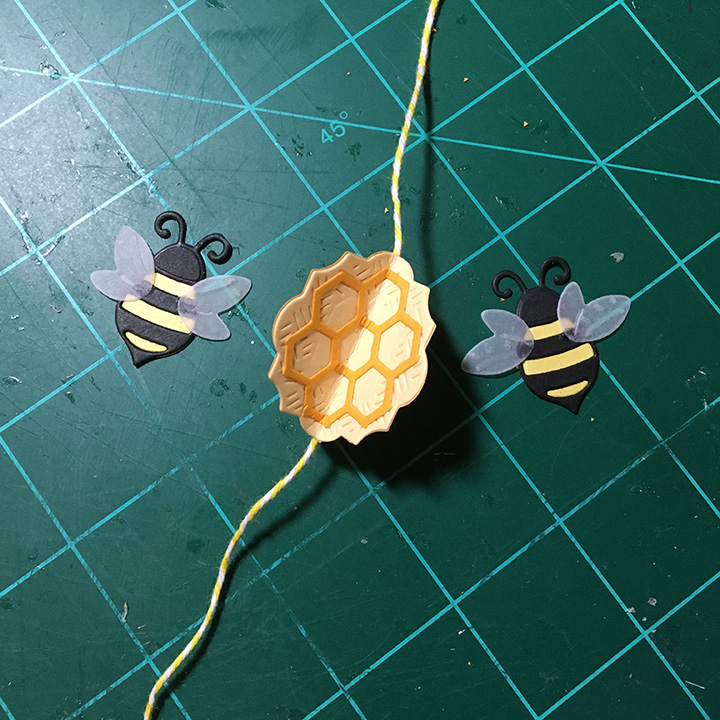
Glue the other half of label to sandwich the twine in the middle. Let dry. Glue the egg shapes to the back of the bee bodies. Trim the charm circle off antenna.  Glue vellum wings to the bee body. (See assembly video.)

Position one of the large pink labels on the front of a tag. Using a pencil trace the outline of the tag onto the back of the label.

With removable tape, attach the tag to label.
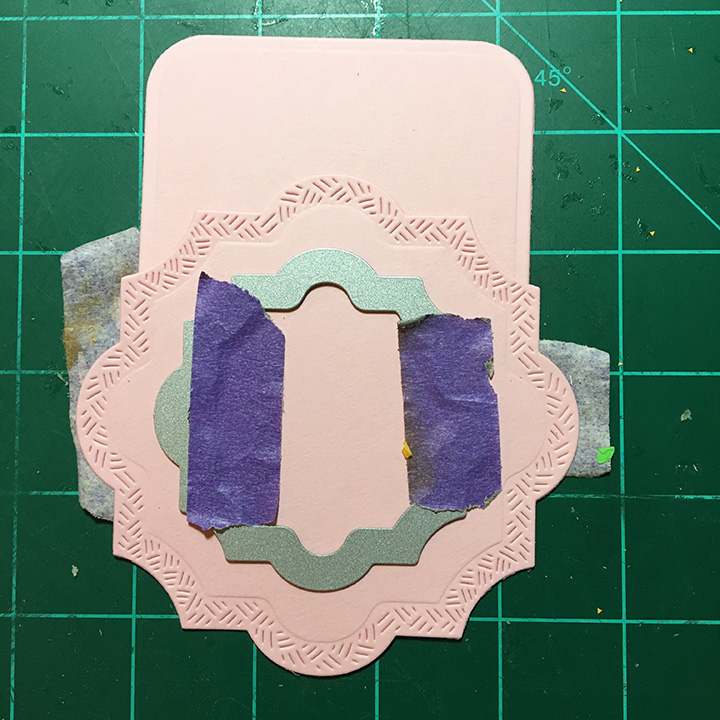
On the front of the label, tape the third largest die to center of label.  Die cut through both label and tag. Using the first cut label as a guide to cut the second label’s center out.

I had to photoshop this picture to let you know to cut the entire label out and not partial as I did for my original picture.)

Fold the tag book so that the cut-out is fold in half. put glue only below the fold on the tag book piece. Glue the large label with pencil markings to the wreath to the front tag.
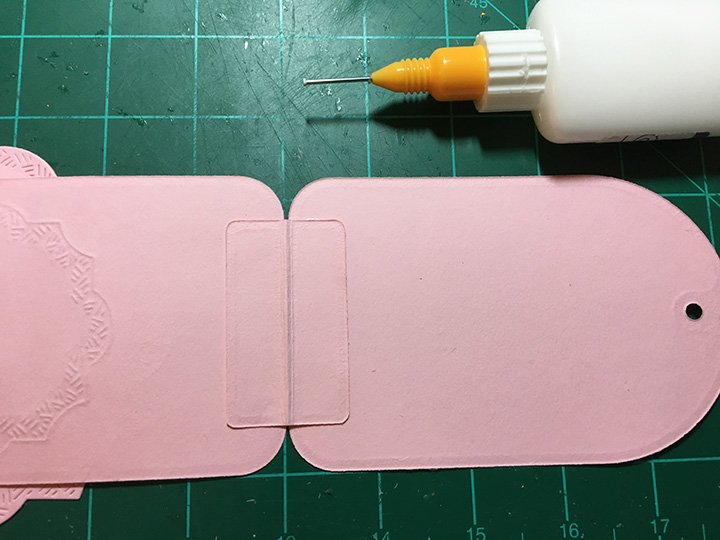
Glue the two tags together with the rectangle spine piece. (You can review the tag book assembly video for tips in assembling the book.)

Spread glue on the inside of pink wreath that is glued to card base. Stretch the twine centering the honeycomb with the bees glued to it. Using small pieces of permanent tape, adhere the twine in place making sure the twine is moderately taunt. Place the top pink wreath in place and press together make a tight seal to the two layers of wreath especially around the twine.

(Tip: Glue the bees on opposite sections of the honeycomb labels to have balanced weight. I made the mistake of gluing them both on the same side and it spins a bit lopsided.)
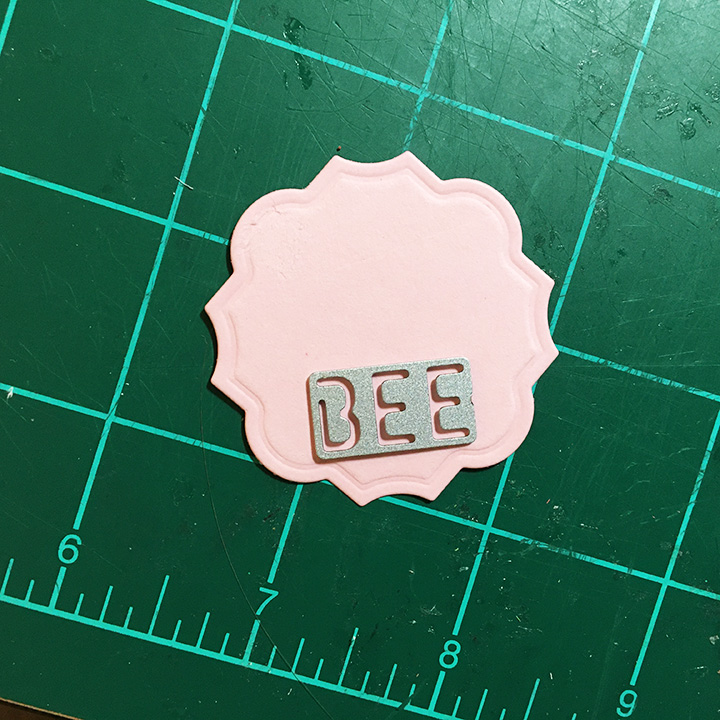
For the easel stop, cut two of the second smallest label dies once in pink and once in black. Die cut the word “BEE” from Word Set 5 in the pink label. Glue the black label to back.
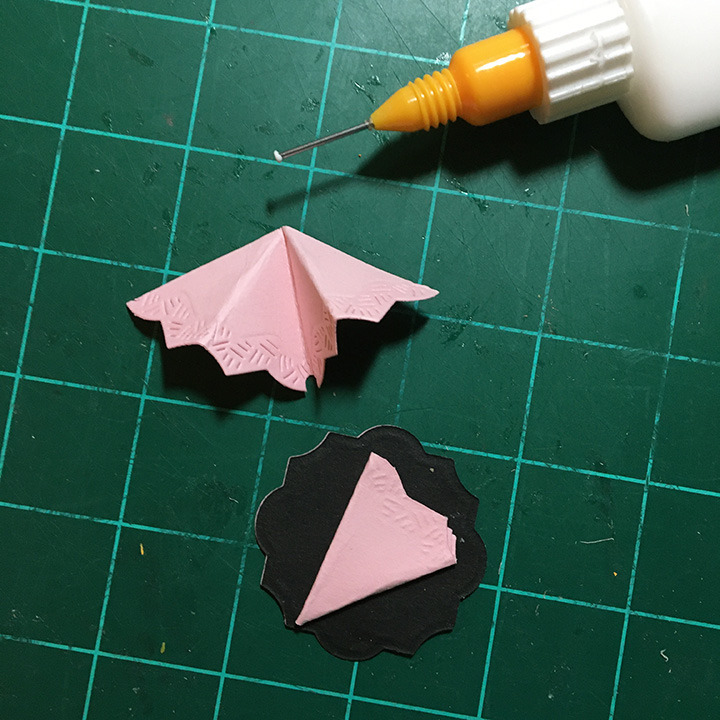
I used half of the label that I cut from the large label, fold in half and half again to use as the spacer under the Bee label. (You could also use foam tape or foam dots.)

The card folds flat to fit into an A2 size envelope which I stamped the back flap with a bee in flight from Apple Blossom in black ink.

Thank you for reading this blog post. Please like and leave comments 😊

Materials Used:

Dies

Stamps

  • Apple Blossom – Bee Happy stamp set from Die-Cutting Essentials magazine issue 89

Inks & Pigments

  • Ranger – Jim Holtz Distress Ink – Saltwater Taffy
  • Memento Fade -Resistant Dye Ink – Tuxedo Black

Papers

  • Heavy weight pink cardstock from my stash
  • Yellow, orange, green and black cardstock scraps
  • White-gold shimmer paper scrap
  • Clear vellum

Miscellaneous

Sapphire 65th Anniversary

Sixty-five years together is a wonderful celebration. Traditionally, this wedding anniversary is blue sapphire. This card was for a long-distance celebration, so it has a pocket inside to tuck a gift.

When I start a card such as this one with a specific theme of sapphire blue, shiny and wedding-like, I pull all the materials I think might work such as blue mirror cardstock, white gold shimmer cardstock, 6 and 5 shaker elements with cutting dies, blue gems and gel dots, as well as heart dies, embossing folders and anniversary sentiments. I had a purchased card base made from pale gold pearlescence cardstock and came folded like an envelope with an inside pocket.

Using several embossing folders, I created some floral and heart textured pieces that became backgrounds and decorative elements for the card using white gold shimmer cardstock. I found I had coordinating heart dies by Sue Wilson that cut the lattice heart from shimmer cardstock and the vellum heart that the inside sentiment was stamped onto.

The “65” and “Happy Anniversary” needed to be cut from the blue mirror cardstock. Because of the intricacy of the sentiment die, I found I had to pass it through my die-cutting machine several times to ensure all was cut crisply.

To assemble, a panel of floral embossed shimmer cardstock was cut 1/4 inch smaller than the folded card base’s dimensions and adhered to the front of the card using double-sided tape. The blue sentiment die-cut was spot glued to the embossed panel. The lattice heart and numbers where glued together before being glued to the card flap.  The embossed heart was glued to the inside pocket.

For the inside sentiment, I stamped a white adhesive backed piece of vellum with the anniversary message using StazOn black ink. I waited overnight for the ink to dry before I die-cut the heart from the stamped vellum. Once I knew the positioning of the vellum heart inside the card, I peeled the top edge of the backing paper from the heart and adhered the top edge before peeling all of the backing off and pressing onto the card base.

Blue jelly dots and Nuvo drops were used to embellish the card. (I tried the new aroma scented Nuvo drops that has a mild floral scent. They caution that the scent will fade, so it won’t overpower the card receiver.)

The envelope back was stamped in blue with the “Wishing you Happiness on your special day” sentiment stamp from PoppyStamps.

Thank you for reading this blog post. Please like and leave comments 😊

Materials Used:

Dies

Embossing Folders

Stamps

Inks & Pigments

  • StazOn Solvent Ink – Jet Black
  • Stampin’ Up – Classic Stampin’ Pad – Blueberry Bushel

Papers

  • Recollections – Shimmer Cardstock 65 lb. 8.5in x 11 in– White Gold
  • Joy Craft Mirror Cardstock
  • Xcut – Xtras Adhesive Vellum Sheets – White
  • Mrs. Sparkle & Co. – A7 Shimmer All-in-One – Card and Envelope

Miscellaneous

Bee-utiful Flowery Painting

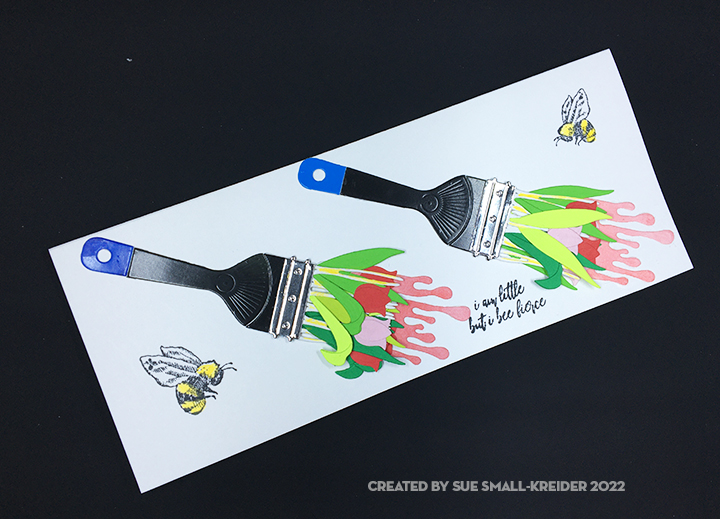
Bees, fresh paint and tulips seem like harbingers of Spring as we humans come out of winter hibernation.  I had some of the paint brush die sets from the Spellbinder’s Paint Your World Collection by Vicky Papaioannou as well as the Picket Fence Studio’s I Bee Fierce stamp set by Nicole Peterson on my crafting desk and thought they went well together. 

Having die-cut four sets of paint brushes from three of the die sets, I set about assembling the brushes noting that the handle pieces are not interchangeable, but all three sets have the same bristles die. I glued one layer of bristles to the back of each handle and another layer of bristles to the back of the silver band. Next, I studied the packaging for decorative ideas on the placement of the tulips within the bristles. I glued in place the leaves and flowers once I had figured out their placement in the two layers of bristles. I decided to ink blend some pink Distress Ink onto white cardstock scraps before die-cutting the paint drips.  I applied glue the silver band layer just on the back of the band and then placed it on top of the handle layer matching up the two lines on the band with the lines on the handle. Once the paint drips were dry, they were glued to the back of the assembled paint brushes.

Following the design rule of odd numbers of elements, I knew I had to stamp three elements to make the card front flow. Another design trick is to suggest movement by placing things on the diagonal.

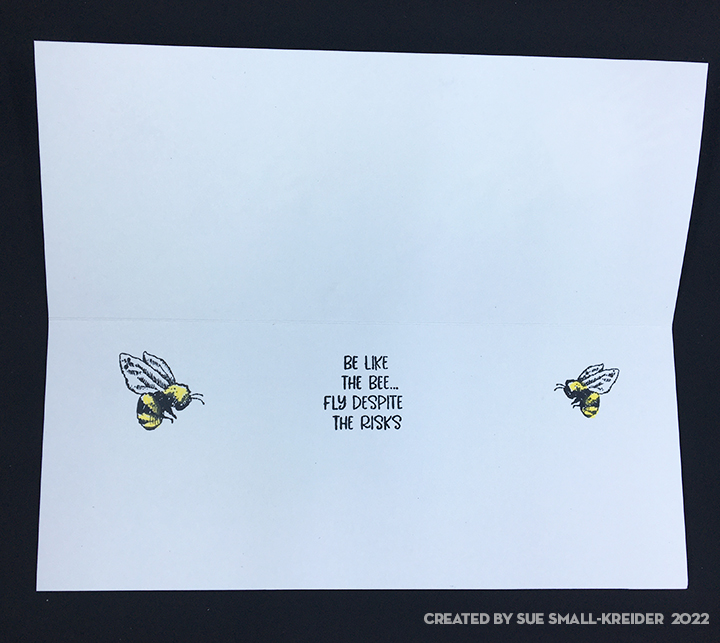
I stamped the front, back and inside of the card before I adhered the paint brushes to the card. Stamping is easy when you use a stamping platform with stamping tool to help apply even pressure to the stamps. The back of the card is stamped using a Technique Tuesday stamp set.

The front sentiment is “I am little but I bee fierce,” while the inside says, “Be like the bee… fly despite the risks.” The back of the card states “This is a random act of cardiness.”

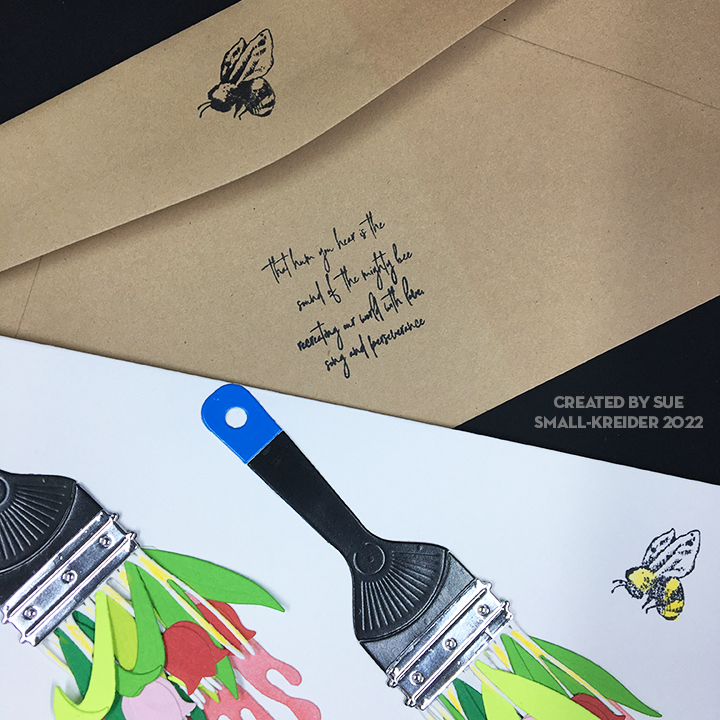
The envelope back was stamped with another sentiment from the Picket Fence set as well as the smaller bee. It says “that hum you hear is the sound of the mighty bee recreating our world with love, song and perseverance.”

Thank you for reading this blog post. Please like and leave comments 😊

Materials Used:

Dies

Stamps

Inks & Pigments

  • Ranger – Jim Holtz’s Distress Oxide Ink – Abandon Coral
  • Memento Fade-Resistant Dye Ink – Tuxedo Black
  • Nuvo Highly Pigmented Watercolour Pencil – Golden Canary

Papers

  • Heavyweight white cardstock
  • Colored cardstock scraps
  • Coated cardstock from junk mail
  • Silver mirrored cardstock from packaging
  • Brown #10 business envelope

Miscellaneous

Layered Crosses – Part 1

Sunrise means a new day and new beginnings. Using Divinity Designs layered cross die set and a stenciled sunrise, I hope to convey this elated feeling of gladness in this z-fold Easter card.

Using five different shades of browns from tan to espresso cut one of each of the cross dies in each color. Lay out the various layers so that when assembled no cross has two of the same color.

Glue the layers together to form five crosses.

Cut a 4 1/4 x 11 inch piece of sky blue cardstock. Score and fold at 5 1/2 inches (valley fold) and at 2 1/4 inches (mountain fold).

With a sun rise stencil, orange ink and a sponge dauber, ink in the sun on the folded shut card. Ink the sun rays on the left side of folded card with yellow ink. Open up card and ink in all the sun rays on back panel using the inked sun half to lineup stencil.

Let ink dry before stamping the “He is risen” sentiment in black onto back panel, spacing so it is hiden when the card is closed.  On a white 2 x 4 inch piece of white paper stamp in black ink “Happy Easter.”  Glue white paper on the inside panel of the card.  Die-cut strips of green grass to adhere to the bottom of the stenciled sunrise panels of the card.

Position and then glue the cross to the left half of the closed card. 

To hint at the envelope’s contents, I stamped tulips onto the blue envelope with a yellow ink.

Thank you for reading this blog post. Please like and leave comments 😊

Materials Used:

Dies

Stamps

Stencils

  • Spellbinders – Fun Stampers Journey – Sunny Day Stencil 6”x6” – JM-0135

Inks

Papers

  • Blue, browns tans and green card stock
  • White paper
  • A2 blue envelope

Miscellaneous

Rainbow Wishes

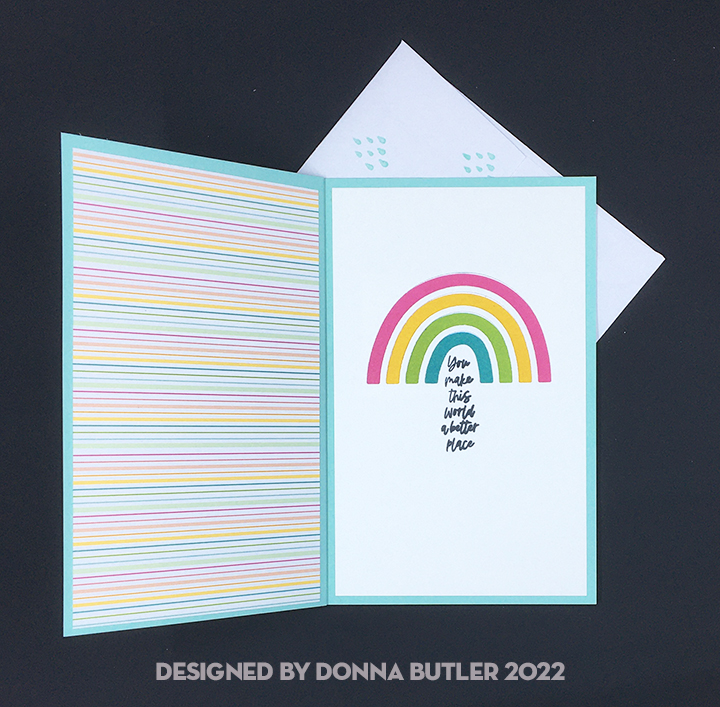
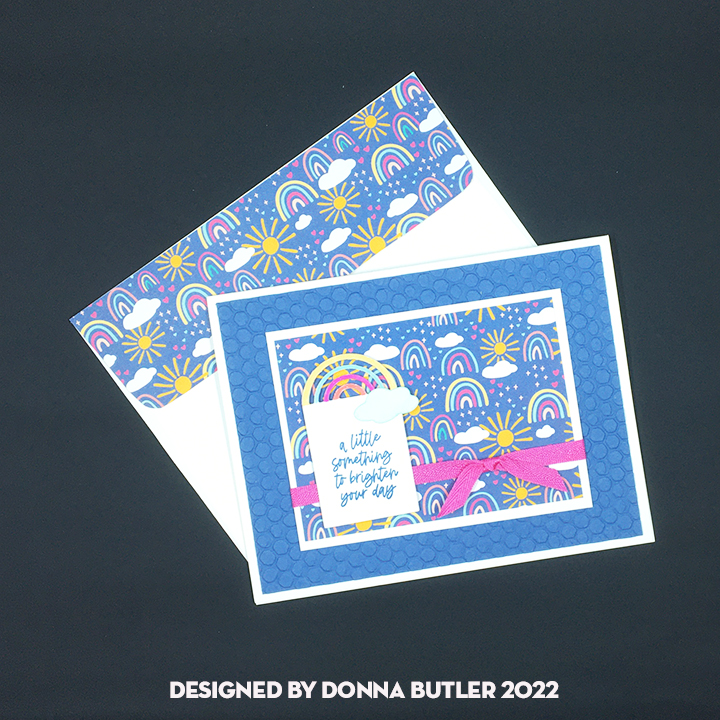
Sometimes it is just fun to craft with others. I took the opportunity to attend a workshop by Donna Butler, a Stampin’ Up demonstrator recently. We made the following three cards using Stampin’ Up products in the Rainbow of Happiness collection.

Donna asked me to say she had cased her designs from Pinterest.

Bookbinder card front
Bookbinder card inside

This was my first bookbinding card.

Embossed mat card front
Embossed mat card inside

I like the use of designer paper scraps being used on the envelope flaps as a quick way to decorate.

Cloud card front
Cloud card inside

Thank you for reading this blog post. Please like and leave comments 😊

My Better Half

Sometimes you just need to let your partner know that they are the better half of yourself.

I needed to do just that and chose some of my partner’s favorite colors and the cute Lawn Fawn “Let’s Toast” stamp set with its add-on pull tab die set. The double-sided plaid papers are Becky Moore’s Say it with Stamps for Photoplay on a green A2 card base.

First, I stamped the images with Memento Tuxedo Black and colored the toaster with a silver metallic marker. Next, I covered the main body of the toaster with Glossy Accents.  The toast, butter pat and butter dish I colored with blending markers and watercolor pencils.

Because I had never used this Lawn Fawn pull tab mechanism before, I found a video to watch for the assembly. It was easy to assemble, but since I had fussy cut my stamped images, I had to trim down the tabs of the mechanism for the toast to be attached to and not show the edges of the tab.

For the pull tab top, I used a scrap of the green plaid cardstock to cover the portion of the tab that shows when the tab is pulled up matching the vertical plaid line. After this cover was glued down, I added the brown oval with the arrow cut-out and folded it to fit the cut-out notch of the cart rather than using the scored fold mark.

The sentiments were stamped with Versamark Watermark ink and heat embossed with a black detail embossing powder onto white scrap cardstock. The front sentiment was cut out as a banner and adhered to the card front with foam squares and the interior sentiment was cut close and glued in place with its matching images.

To hint at the envelope’s contents, I stamped two pieces of smiling toast onto the back flap with brown ink.

Thank you for reading this blog post. Please like and leave comments 😊

Materials Used:

Dies

Stamps

Inks & Embossing Powder

  • Memento – fade-resistant Dye Ink – Tuxedo Black
  • VersaMark – Watermark Stamp Pad
  • Recollections – Detail Embossing Powder – Ebony
  • My Favorite Things – Premium Dye Ink – Milk Chocolate

Papers

  • Photoplay – Fall Plaids 6×6 paper Pad – Say it with Stamps by Becky Moore
  • White card stock scraps
  • A2 green card base and white envelope

Miscellaneous

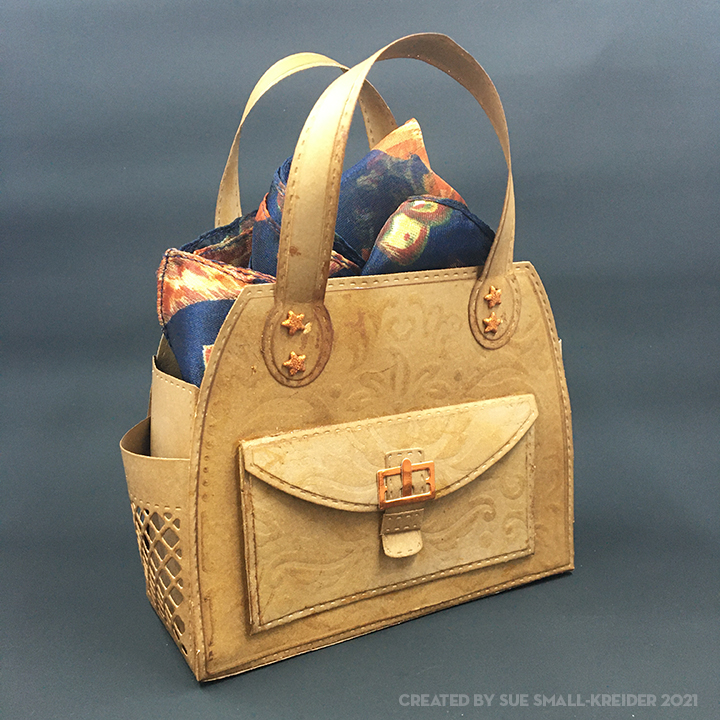
Faux Leather Bag

A favorite leather bag has a certain smell and memories of all the fun times with friends and family. This little faux tooled leather bag can add to those memories.

Made with the tote die set by Divinity Designs, a crafting company based out of Ohio, the bag goes together relatively easily. I looked at the assembly video before making, but I assembled the bag mesh pockets a little differently.

Cut two each of the front/back, side, mesh pocket, handle, pocket pleat, front/back layer and handle layer from brown Kraft cardstock. Cut one each of front pocket flap, front pocket flap layer, pocket layer, and stitched belt buckle set from brown Kraft cardstock. Cut two front/back layers from brown paper. Cut one each of the buckle and pin from orange foil cardstock.

Using the tote embossing insert plate and your embossing sandwich for your die-cutting machine emboss the two front/back layers and pocket flap and pocket layers.

With an ink blending sponge, darken the edges of all pieces, especially the stitched areas with brown ink.  Rub the embossed layering pieces to highlight the “tooled” design.  Glue the layers onto their base pieces.

To assemble, I glued the mesh pocket tabs on to the side tabs first, bowing out the mesh pocket. Next, I adhered the bottom side tabs to the bottom rectangle of one of the front/back pieces. Glue the other bottom rectangle over the top of the first rectangle to hide the side tabs. Next adhere the side tabs to the front/back pieces. Take your time to hold the tabs in place until the glue sets.

Shape the handles by running them through your fingers to bend them into an arch shape. Glue rounded ends of on handle to the front of the bag. Repeat with handle for the back side of bag.

To assemble the front pocket, pleat the two pocket pleats and glue one tab to the inside of the front pocket tab. Repeat with the other pocket pleat. Fold the bottom tab of Front pocket over the ends of pleats and glue corners. Fold over the front pocket flap tab and glue its corners to the top pleat corners.  Glue assembled pocket to front of bag.  Thread large brown stitched belt piece through foil buckle and glue pin in place. Fold tiny stitched brown piece around larger piece as the loop that holds the belt tongue in place. Glue top of belt piece to pocket flap and loop tabs to pocket. This belt with hold the pocket flap securely closed.

I used some tiny star brads that I had in my stash to reinforce the handles to the bag. I punched the starter holds with an old ice pick or awl and a sanding block inside the bag. Once the brads were in place, I glued the front/back layer over the inside of the bag to hide the brads and side tabs.

All of the glued layers make for a study bag that measures 6 ¼ inches high x 5 inches wide and 2 inches deep.  I plan to gift a lovely scarf and earrings in this bag.

Thank you for reading. If you enjoyed this blog post, please like it and follow the blog. 😊

Dies

Ink

  • Ranger – Tim Holtz’s Distress Ink – Vintage Photo

Papers

  • Heavy weight 8 ½ inches x 11 inches brown cardstock
  • Brown kraft paper
  • Orange foil cardstock scraps

Additional Supplies:

Christmas Cookies

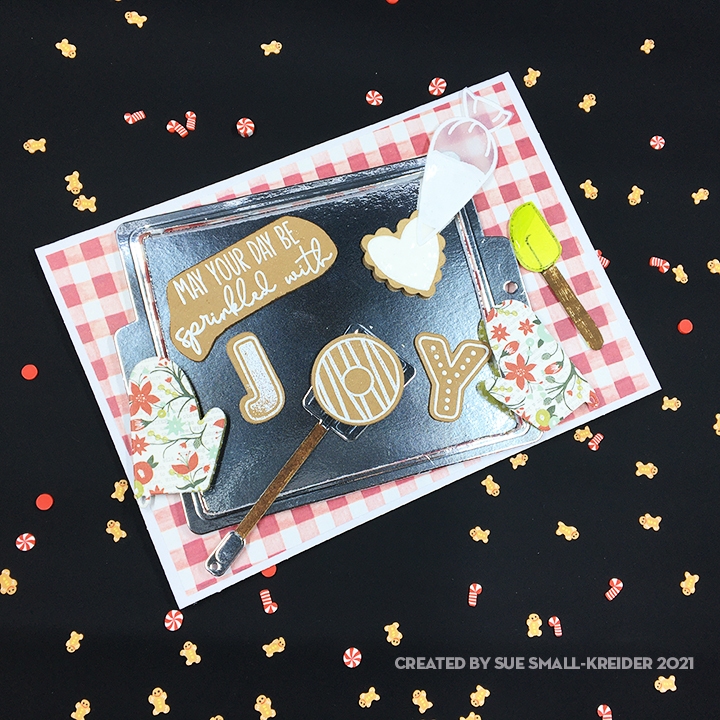
Sweet cinnamon and icing sugar glaze scent drift through the air as you open this card. You visualize the baking sheet cooling as you ice the spice cookies to spell out “JOY.” Opening the card, you see a cup of hot coco complete with marshmallows and a candy cane. Turning the card over you find a jam filled heart cookie.

Made with Honey Bee Stamps and dies, this card is based on one designed by Keiko Ichikawa on the Honey Bee website.  I used a lot of my foam scrapes from Queen & Co. Shaker shapes to pop-up the baking sheet rim and thinner foam squares under the cookies, oven mitts and rubber spatula.

All of the cookie’s stamped white decorations as well as the vellum icing bag were stamped with a watermark ink and heat embossed with a white detail embossing powder. Using an embossing ink pen, I filled in the vellum icing bag and heat embossed the piece for a second time. I used a new anti-static tool filled with a powder, brushing it over all the cardstock and vellum before stamping.  (I like the results of this tool.)

The heart cookies on the front and back of the card are iced with Nuvo Drops for a white icing sugar glaze on the front (I cut the heart shape and placed the Nuvo Drops on it and let dry overnight before gluing to the scalloped heart cookie.)  The jam filled cookie on the back is two of the heart shapes cut from brown paper and foam squares placed on the bottom cookie then a transparent red Nuvo Drops in the center of the bottom cookie. The top cookie has a small heart die cut from its center. Place the top cookie onto the foam pads and let any Nuvo Drops come through the open heart. Allow to dry overnight before placing on card.

For the green rubber spatula and the metal spatula, I cut an extra die-cut of the shapes from white cardstock and rubbed the handle sections over a brown Distress Ink mini cube to create the wooden handles of these utensils.  A little Glossy Accents gel was added to the edge of the rubber spatula as if it was used to fill the icing bag. Once dry, a small amount of white Nuvo Drops was added over the Glossy Accents to complete the look. (My apologies that these photos don’t show the white Nuvo Drops.)

I ended up using puffy stickers for the inside sentiment. The main sentiment is stamped on the envelope flap using Rare Earth stamps and a dark green ink.

Thank you for reading. If you enjoyed this blog post, please like it and follow the blog. 😊

Dies

  • Honey Bee Stamps – Sugar Cookie Alphabet Dies – HBDS-334
  • Honey Bee Stamps – Apron: BBQ Add-on Honey Cuts (Dies) – HBDS-APRBBQ
  • Honey Bee Stamps –Cookie Sheet Honey Cuts (Dies) – HBDS-CKSA2

Stamps

  • Honey Bee Stamps – Baked with Love – HBST-333
  • Honey Bee Stamps – Sugar Cookie Alpha – HBST-334
  • Rare Earth – Sweet Treats and Sweet Traditions Stamps set from the magazine Let’s Make Cards issue 89, Dec. 2020

Inks & Embossing Powder

  • VersaMark – Watermark Stamp Pad
  • Wow Embossing Pen
  • Recollections – Detail Embossing Powder – Snow
  • Stampin’ Up – Classic Stampin’ Pad – Tranquil Tide
  • Ranger – Tim Holtz’s Distress Ink – Walnut Stain

Papers

  • Heavy weight white card base A7 (5 inches x 7 inches)
  • Vellum scrap
  • Colored and patterned scrap papers
  • Silver mirror card
  • Gingham paper from by A Christmas Tale 8×8” stack by Forever Friends/Papercraft Essentials
  • A7 envelope

Additional Supplies:

Home for the Holidays

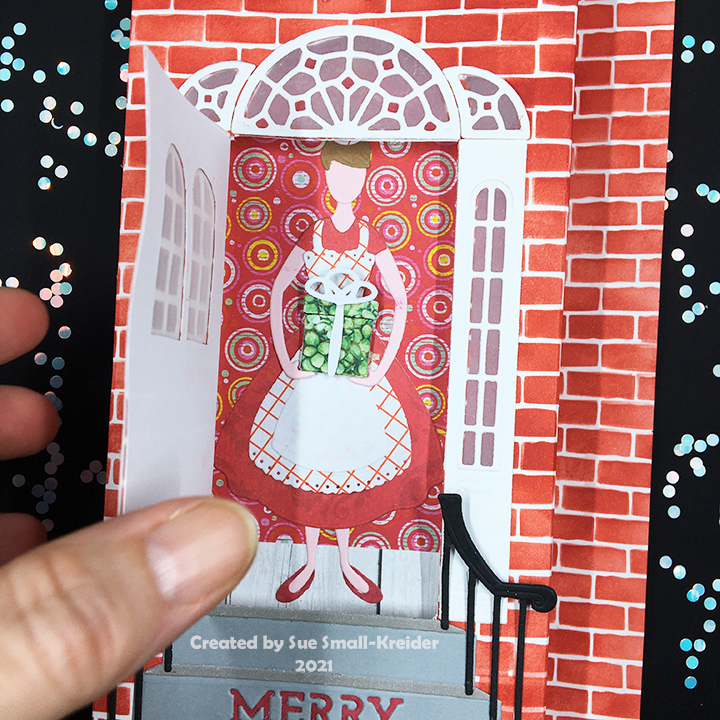
Going home to be greeted by family and friends is a Christmas tradition since the mid-1800s.  This slimline tower card uses Spellbinder’s Open House dies to an interactive card that emotes the feeling of being welcomed home. (I must give credit to @DebsyG of Craftworld and Sam Calcott’s Made to Surprise tower cards for the inspiration for this card.)  

Spellbinder’s Open House collection has a number of add-on sets for various holidays, but none include a door wreath. (I had to use an older Lawn Fawn Mini Wreath from their door collection to complete my card.) I did use the side panel set to add more windows to the doorway.

Card base: Using heavyweight white cardstock that is 8 ¾ inches tall x 8 ½ inches wide, I scored and folded at 1 1/8 inches, 2 2/8 inches, 6 1/8 inches and 7 3/8 inches. Next, I stenciled the card base with brick colored ink, a brick stencil and a small make-up brush (I find these inexpensive contour make-up brushes from Dollar Tree work as well as the expensive ink brushes.) The folds should go to the back of the card, to form a jut-out entryway often found on townhouses.

Stairs: A gray cardstock was used to cut the main steps with the sentiment “Merry Christmas.” The sentiment was backed with scraps of red paper. I found an old envelope that was just a shade darker gray that the cardstock for the step tops. The railing is cut from heavy black cardstock and glued only at the rod tips to the steps.  The stairs where then adhered to the center of the card base, which when folded shut is 3 ¾ inches.

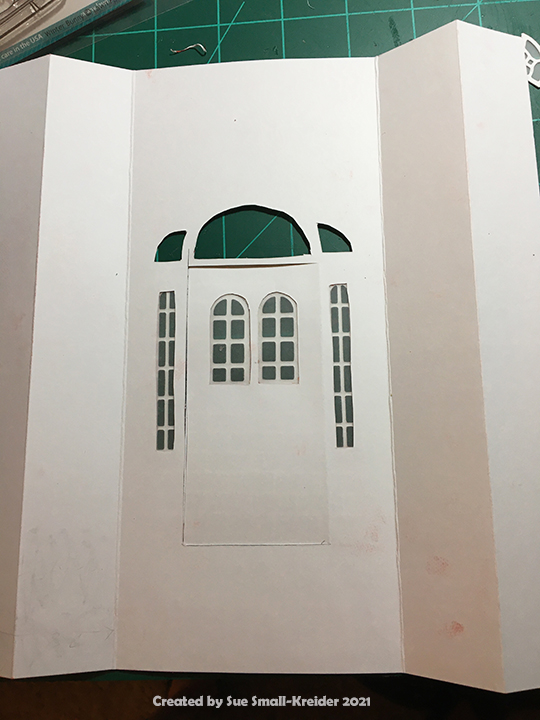
Door and Windows: The door was die cut with the windowpane dies in one pass. The side panels had to be cut and then cut with the window die. The top transom windows were also die cut from white cardstock.

I positioned the die cut door over the stairs and used a pencil to trace where the windows and the door edges.

Using the pencil lines, I cut out the windows and three side of the door with a craft knife.

Positioning the side panels next to the door, I traced the window positions with pencil and cut out and did the same with windows over the door and panels.

I saved the window frames to be glued in place to scrap pieces of clear vellum on the back side of the door and side panels and transom windows. Then I glued the vellum backed door onto the card base door. The vellum backed panels and transom windows where also glued in place so that the vellum was sandwiched between the case base and the white window and panel frames.

Inside Mechanism:  To create the set-back house interior, I cut a 8 ½ inches tall x 5 ½ inches wide piece of lightweight white cardstock. I scored and accordion folded at ¼ inch, ½ inch ¾ inch, 1 inch, 4 ½ inches, 4 ¾ inches, 5 inches and 5 ¼ inches. Next, I cut a floor from some woodgrain paper and the wallpaper from a small, patterned paper.  These piece where adhered to the center of the inside mechanism. 

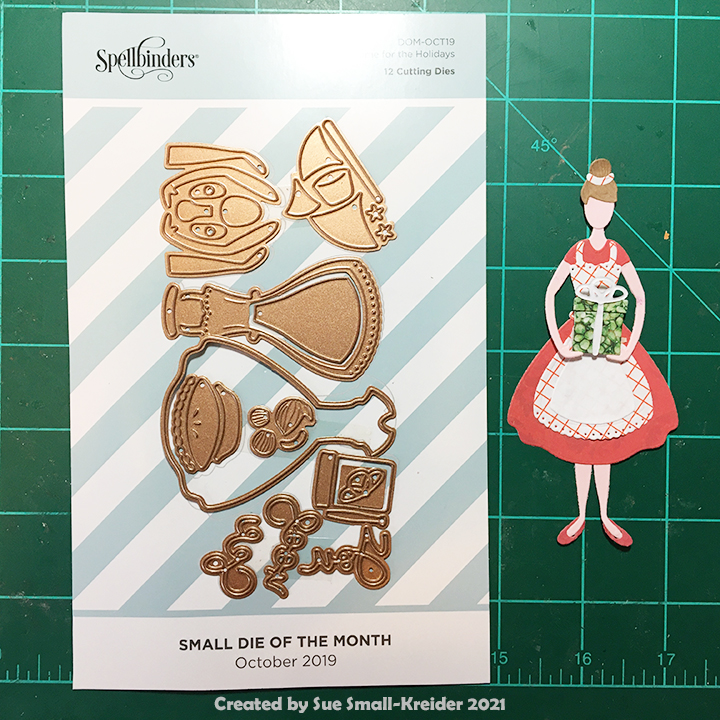
The woman is an older Spellbinder’s small die of the month that can hold a pie, a present or a small fir tree. I chose a present popped-up on a foam square. The woman is glued to the wallpaper and floor before the inside mechanism is glued onto the back side of the card base.

The finishing touches are a tiny wreath I had in my stash that is glued over the door and attaching the mail slot and doorknob (cut twice and glued together for depth) to the door front.

The back of the envelope is stamped in red using a Tim Holtz rubber stamp “Have Yourself a Merry Little Christmas.”

Thank you for reading. If you enjoyed this blog post, please like it and follow the blog. 😊

Dies:

Stencil & Stamp

Inks

Papers

  • Colored cardstock scraps
  • Pattered papers from Colorbok and Mrs. Sparkle paper pads
  • White cardstock
  • Clear vellum
  • #10 Business envelope

Additional Supplies: