Santa’s Naughty List

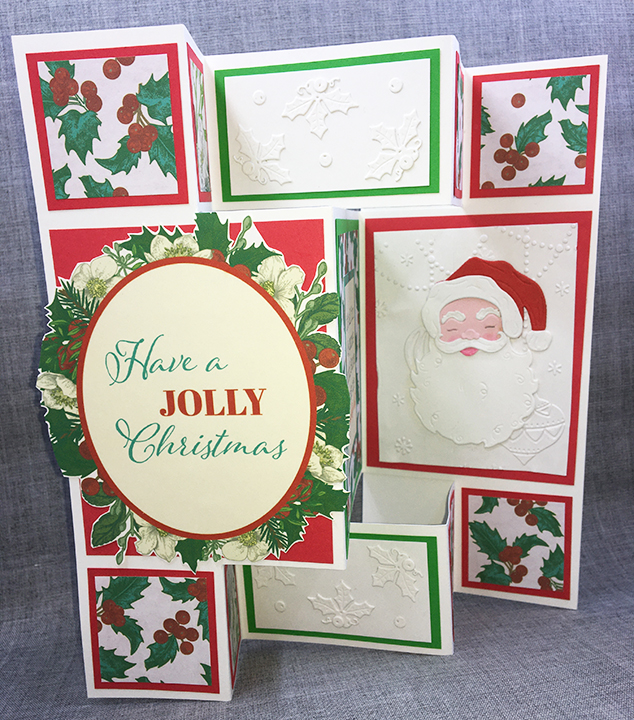
Staying off Santa’s naughty list can be a challenge sometimes.  This fun shutter card featuring a retro Santa die-cut and papers is sure to bring back childhood memories of the holidays.

Based on a card in the Die-cutting Essentials, issue 82, by Sharon-Elaine Jones, the card uses the free dies and printable papers and sentiments from the magazine.  I had to convert the template from 20cm x 30cm to fit an 8 ½ inches x 11 inches card base.  It took me several tries to get the correct measurements and folds, but in the end I got there. (See template).

You will need to cut:

  • One rectangle from white cardstock 8 ½ inches x 3 ¾ inches for the card back
  • Six 1 ¾ inch squares from red cardstock
  • Two rectangles 1 ¾ inches x 1 3/8 inches from red cardstock
  • Two rectangles 3 3/8 inches x 4 ¼ inches from red cardstock
  • One rectangle 3 ½ inches x 4 ¼ inches from green cardstock
  • Two rectangles 3 inches x 1 ¾ inches from green cardstock
  • Two rectangles 2 ¾ inches x 1 ½ inches from white cardstock
  • One rectangle 3 1/3 inches x 4 inches from white cardstock (to be embossed)
  • One rectangle 3 ¼ inches x 4 inches from patterned paper
  • Two rectangle 1 1/3 inches x 1 1/2 inches from patterned paper
  • Six 1 ½ inch squares from patterned paper

Die-cut:

  • Six of the holly die from white cardstock
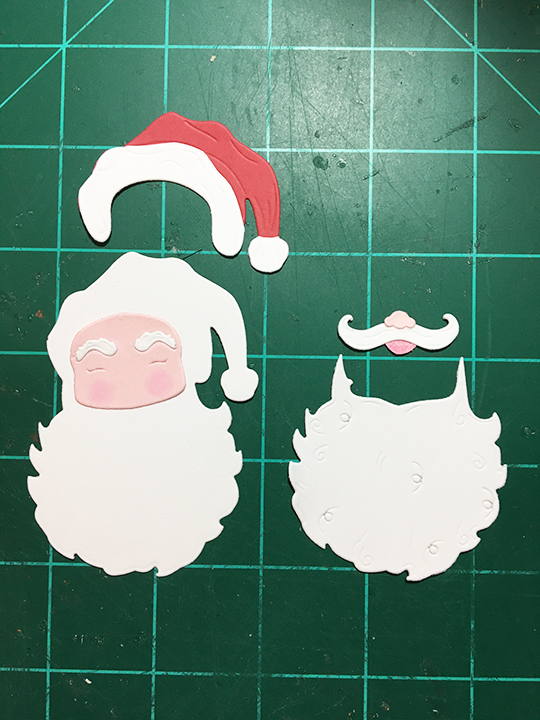
  • One of the Santa outline from white cardstock
  • One hat from white cardstock (Fussy cut just the fir trim and ball to be glued on to red hat.)
  • One beard, mustache and eyebrows from white cardstock
  • One hat from red cardstock
  • One of face, nose and mouth from pink cardstock (Using a watercolour pencil and water brush, color the cheeks and mouth pieces rosy pink. Then using a fine-tipped pencil or maker, highlight the eyes.)

Print and fussy cut from sentiments:

  • One oval sentiment topper
  • One rectangular Santa’s naughty list sentiment

To emboss the background of the Santa panel, lightly mist the white card stock (3 1/3 x 4 inches) with water before placing in embossing folder. This will allow the paper fibers to bend in the embossing folder rather than break and tear. Set emboss piece aside to dry before gluing onto red matting piece (1 3/8 x 1 ¾ inches).

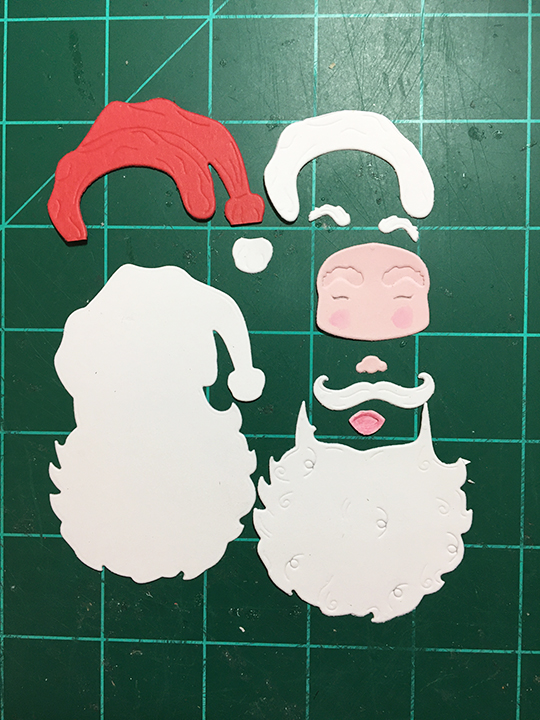
Assembling Santa:  Position the face piece on the Santa outline backing piece with the bread and hat over it. Mark position of face with pencil. Glue eyebrows on to face in indentations. Glue white fur pieces to red hat. Attach nose on top of mustache and mouth under it. Adhere face on to backing using pencil markings. Glue beard onto backing and just up to face.  Attach hat over face matching it up with same shape on backing. Glue on mustache with nose and mouth attached. Glue assembled Santa onto embossed panel that was already glued to red mat.

Faux Embossing of Holly Panels: Glue three of the holly die cuts and three of the berries on to one of the white rectangles (2 ¾ x 1 ½ inches). Adhere white panel onto a green rectangle mat (3 x 1 ¾ inches). Repeat with another three holly die-cuts, white rectangle and green mat.

Other Panels: Glue the six square pattern papers on to six red square mats.  Glue the two small pattern paper rectangles onto the two small red rectangle mats. Glue the large patterned paper rectangle to the large green mat and then glue the Santa’s naughty list sentiment onto the center of the patterned paper.

To Assemble Card: Take white card base that has been cut, scored and folded into shutter card and open-out flat. Glue red squares and rectangles in the areas shown in photo. The large rectangle for the card front will have its topper sentiment glued on after the squares have been glued down. Adhere the green rectangles into the appropriate spaces in the center of card base.  Fold-up and glue large white rectangle piece to back of card. This back piece will be where you can write a personal message as well as helping stablish the card when opened and set on display.
Envelope: The card folds to fit inside a #10 business size envelope. To hint at what is inside the envelope, I stamped the flap with a sentiment “Have a Holly Jolly Christmas” and below it a Santa’s sleigh with reindeer.

Thank you for reading. If you enjoyed this blog post, please like it and follow the blog. 😊

Dies & Embossing Folder:

  • Retro Santa from Die-cutting Essentials, issue 82, October 2021
  • Cut & Emboss Baubles from Papercraft Essentials, issue 192, November 2020

Papers

Stamps and Ink

Additional Supplies:

  • Scoring board and tool
  • Paper cutter
  • Metal ruler
  • Craft knife
  • Nuvo Watercolour Pencils
  • Waterbrush
Spring Is In The Air

Hello, it’s Sue of the Dies R Us Design Team and today we are making a spring time pop-up card for a gardener using Karen Burniston dies.

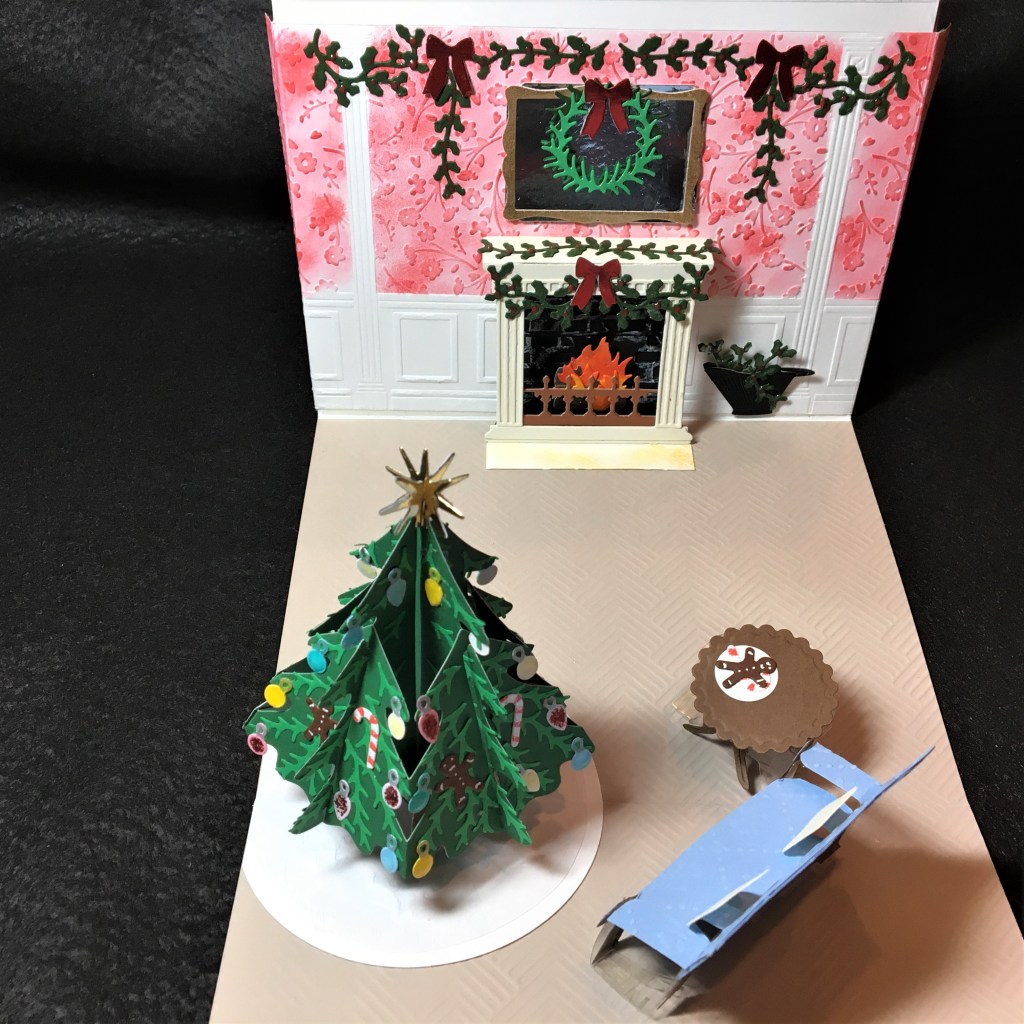
Cut the two printed papers to 4 15/16 inches x 7 inches. Position them inside the card base so that there is a gap between the papers where the fold can be seen. Using removable tape, tape them together and place the chair die with the nibs over the fold.

Run taped papers with die through die-cutting machine. Cut chair, arms and seat from woodgrain paper. (I aged the chair with white ink pad rubbed over the grain.)

Glue printed papers inside card base, adding matching scraps of papers to cover the brown spaces let where chair is cut away. Fold woodgrain chair folds as shown on packaging. Glue wood grain chair to patterned paper chair matching up the seat, back, arms and leg pieces. Train the chair to pop-up by opening and closing card a few times.

Decorate card with the garden charm set cutting off the charm loops. (I dirtied-up the tools and gloves with brown ink.) The pink flowers are made with the flowers from the Tiny Trees Pop-Up set.

Fold up all the petals on the flowers and then glue a smaller flower on top of a larger flower. Add a yellow Nuvo Drop center to flower. Let dry overnight before gluing on to card.

The front of the card is made with scrap rectangles of green patterned paper with another watering can cut on the back side of the mirror cardstock and rounded with my fingers so that it pours from the left. The sentiment is a also a Karen Burniston die.

Hope this fun card has put a smile on your face and provided some inspiration for your crafting. 😊

See more chair cards below:

Dies from Dies R Us:

Additional Supplies Used:

Don’t forget to come join in the fun at the Dies R Us Challenge Blog. There’s a new challenge theme offered on the 1st and 15th of each month and one lucky randomly drawn winner will receive a gift voucher prize to the Dies R Us Store.  

 For your convenience, all the important Dies R Us links are provided below.

click below for:

STORE

CHALLENGE BLOG

FACEBOOK

INSPIRATION BLOG

FRIENDS OF DIES R US PINTEREST PAGE

Have A Seat Mini Series

For the next four days I have a mini chair series focusing on a pop-up chair die by Karen Burniston.

Today’s chair uses the Adirondack Chair Pop-Up with a slip cover to make it into a big overstuffed chair, perfect for cats to nap in!  You can access this post and the ones in this week’s seasonal chair posts below as they become live posts.

See more chair cards below:

Welcome to the Horse Farm

Greetings it’s Sue here from the Dies R Us design team with another barn pop-up card.

The barn pop-up is Karen Burniston’ Barn Pop Stand as are the Farm Edges fence and hills. The horses are cut and stenciled using Karen Burniston’s Horse, Unicorn and Zebra set and the hat and pitchfork come from her Tiny Accessories 3 set. “Howdy!” sentiment is also by Karen Burniston.

Cut:

2 – largest barn die out of red card stock -Cut doors out of one

1 – small “X” window from white

2 – doors “X” die out of white

1 – door railing out of white

2 – roof trim die out of white

2 – weathervanes at same time by placing silver mirror card back-to-back

3 – hay bales -color with Distress Ink

1 – pitchfork – color with markers

2 – fence out of white

3 – horse bodies

3 – horse manes and tails

1 – cowboy hat from yellow – color with distress inks and markers

2 – Howdy! – one from white and one from yellow

Cut horses and color using stencils on dies and Distress Oxide inks using large Pink & Main blender brush. (This was my first time using this larger inking brush and I was delighted with the ease of inking up the large horse pieces.  The ink blending went smoothly unlike when I use sponge inking tools.)

Glue white “X” frames to window cut outs to form a hay loft door. Using clear tape hinge door onto loft. Glue on roof trim to front and back barn pieces. Glue weather vane to inside back piece.

To assemble the sliding doors, weave the top bar end of the red door piece through the white door railing piece fold the red bar over the railing where indicated and glue bar onto top of door making sure no glue is on the railing. Glue white “X” frame over door. Repeat with second door.

The card base is a 10 x7 inch white heavy weight card stock folded in half to form a 5 x 7 inches card. Panels of printed paper were cut to cover the front and back panels (5 x 7 inches, front and 5 ½ x 7 inches, back).

The inside panels are 4 ¾ x 6 ¾ inches. I positioned and taped the inside panels with clear removable tape so that I could die cut the pop-up flaps to anchor the barn to. Using Scor-tape, I adhered the paper panels to the card base removing the clear tape once all panels were adhered.

Glue barn pieces to pop-up tabs. Cut a 1-inch strip of paper fold in half and fold to create tabs on both bottom edges. Glue two hay bales and pitchfork to one side and glue tabs down inside barn, over the card fold. This will be seen when the barn doors are opened. Glue remaining hay bale behind barn hay loft door.

Glue matching printed papers to cover over tabs inside barn. Using only a small dot of glue at inside top of barn glue barn pieces together. Fold fences in half and glue ends inside barn. Glue decorated horses to fence.

Decorate the inside and outside of card with grass and hills cut using Farm Edges die set. (I trimmed off the tractor from my hills and had to cut and move the die to get a longer hill for my 7-inch card.)

The front sentiment is cut twice and slightly off set. I used Distress Oxide ink to color the yellow layer.

Stamped a vintage stamp of a horse on the back flap of envelope.

Hope this fun card has provided some inspiration for your crafting. 😊

SUPPLIES Used from Dies R Us:

Other Supplies:

  • Red, yellow, green and white cardstock
  • Printed papers from The Paper Studio’s Beach House pad and Graphic 45’s Fruit & Floral pad
  • Clear tape
  • Crayola Signature Brush & Detail Dual-ended Markers
  • Pigma Micron 05 archival ink pen
  • Vintage horse stamp
  • Stampin’ Up – Early Espresso ink pad
  • Ranger – Distress Ink – Fossilized Amber
  • Ranger – Distress Oxide – Ground Expresso
  • Sponge dauber
  • Stamping platform
  • Scissors
  • Tweezers

Don’t forget to come join in the fun at the Dies R Us Challenge Blog. There’s a new challenge theme offered on the 1st and 15th of each month and one lucky randomly drawn winner will receive a gift voucher prize to the Dies R Us Store.  

 For your convenience, all the important Dies R Us links are provided below.

click below for:

STORE

CHALLENGE BLOG

FACEBOOK

INSPIRATION BLOG

FRIENDS OF DIES R US PINTEREST PAGE

Mother and Daughter Cards

Mothers and daughters can be so alike and yet not see it.  Here are two cards made for a woman who has recently received a job promotion and a birthday card for her 13-year-old daughter.

Both cards are made using a Studio Light stamp and die set designed by Karin Joan called Betty. It is much like creating paper dolls. The main head and shoulders die cuts four individual pieces -head, 2 ears and the neck and shoulders. I laid out the position of the hair, ears, facial features stamps as well as the jewelry stamps before I did anything else. Next, I stamped and heat embossed the facial features.

The three hair dies can be combined in a multitude of ways to create different looks. Both the mother and daughter cards use the back full hair piece placed at different heights to create long or short hair. The front bangs pieces are different. The daughter’s hair is accentuated by a large bow.

The set comes with several collar line options. I have used the V-neck for the mother and the off-the-shoulder cut for the daughter. For jewelry on the mother, I’ve used a flower hair pin stamp for the earrings (stamped and heat embossed before the head was glued over the hair) and the heart and chain stamps for the necklace.

For the sentiment on the mother’s card, I used the sentiment stamp included in the Betty set to stamp and heat emboss the “She believed she could, so she did!” and die-cut the “Happy Birthday.” (The words on the stamp “so she did!” are so fine, I found that they didn’t heat emboss well, so I stamped that line in black ink and then cut it out and glued over the blurred embossed one.) Next the sentiment was die-cut using a scalloped stitched rectangle from Tutti Designs. For the daughter’s card, a Poppy Stamps “Happy Birthday” die was used.

Both cards used layered mats of printed papers on both the front and back covers. Inside the cards have been left blank for personal messages.

Thank you for reading. If you enjoyed this blog post, please like it and follow the blog. 😊

Supplies Used:

Good Morning Farmstyle

Greetings it’s Sue here from the Dies R Us design team with a barn pop-up easel card.

Using PoppyStamps’ new Country Barn Pop Up Easel Set and lots of PoppyStamps’ Whittle animals and sun, this is an easy card to make.

Cut:

1 – largest barn die out of brown card stock

1 – middle barn die out of cream

1 – smallest barn die out of red (Save all the doors and windows cut out for the backing of the “X” frames)

2 – small “X” window from white

1 – doors “X” die out of white

1 – roof trim die out of white

1 – straight line out of white

Cut animals/sun and color with markers, black gel pen and Distress Ink.

Glue white “X” frames to doors and window cut outs to form doors. Glue on roof trim.

If you plan on having doors that open, ink blend the cream barn piece edges and door/window openings.  

Using clear tape, make hinges for all the doors and windows to open.

Position and glue cow to inside of barn. Glue barn to middle cream barn piece making sure not to glue any doors that are hinged to open. Glue flying chicken inside open barn door and other animals to front of barn.

Glue tab of brown base piece to back of cream piece. Test the barn in pop-up easel position. Using foam squares adhere green grass with eggs glued to them to the brown base to act as easel stops. Don’t have grass in front of the door that opens. Glue sun on to back of cream piece as if sun is rising behind the barn roof. (Make sure that sun top is no higher than the roof tip so card will fit in envelope.)

Stamp a sentiment on card base and back flap of envelope.

Hope this fun card has provided some inspiration for your crafting. 😊

SUPPLIES Used from Dies R Us:

Other Supplies:

  • Red, brown, cream and white cardstock
  • Foam squares
  • Clear tape
  • Scrap green paper for grass
  • Staples – Invitation Brights 24 lb.- Gummed Envelope – 4 3/8 x 5 3/4 inches
  • Crayola Signature Brush & Detail Dual-ended Markers
  • Simply Made Crafts by Helen Griffin – Fun Sentiments Stamp Set
  • Vintage goat stamp
  • Stampin’ Up – Early Espresso ink pad
  • Ranger – Distress Ink – Vintage Photo
  • Sponge dauber
  • Stamping platform
  • Scissors

Don’t forget to come join in the fun at the Dies R Us Challenge Blog. There’s a new challenge theme offered on the 1st and 15th of each month and one lucky randomly drawn winner will receive a gift voucher prize to the Dies R Us Store.  

 For your convenience, all the important Dies R Us links are provided below.

click below for:

STORE

CHALLENGE BLOG

FACEBOOK

INSPIRATION BLOG

FRIENDS OF DIES R US PINTEREST PAGE

Rainbow Threads

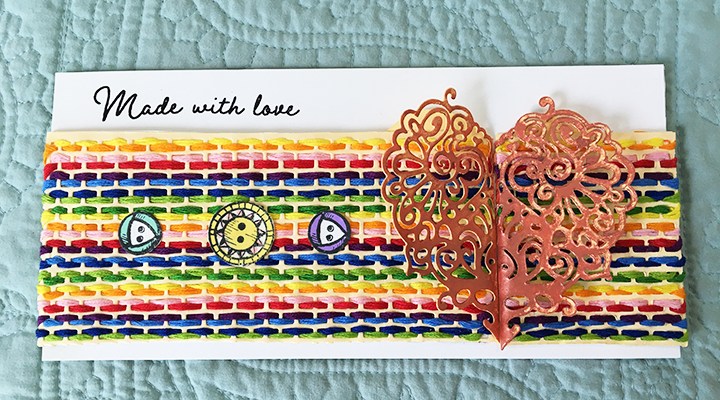
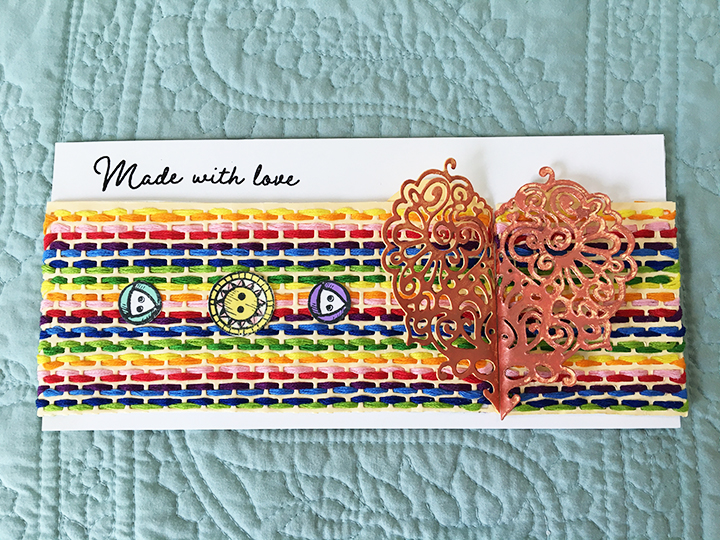
“Beautiful things come together one stitch at a time,” is the sentiment of this friendship card made with a new Lou Collins Text{ures} die and stamps along with some vintage stamps and heart die.

The Fabric Edging Die Set has a die that cuts a course woven strip of hessian or burlap which I used as the base for weaving embroidery floss in bright rainbow colors for the flaps of this asymmetrical-gatefold slimline card. Once the weaving was completed, I covered the back of the weaving with white cardstock cut ½ inch longer than the woven panel to use as a tab to glue to the 8 ½ inches x 4 inches rectangular card base.

For the lacy heart, two hearts were cut using the lace heart die by Moda Scrap of Elizabeth Craft Designs. Each heart is folded in half and the lacy side covered in Persian Red Nuvo Embellishment Mousse.

The solid part of the folded heart is glued to the inside of the flaps lining up the tips of the heart halves to make a whole heart when card is closed.

Before gluing the flaps to the card base, I stamped, and heat embossed the two sentiments in black detail embossing powder.

On the front of the card are three stamped and watercolored buttons from the Fun Stampers Journey Button Bliss set.

The envelope back is stamped with another sentiment from the same stamp set in a dark blue ink.

Hope you enjoyed this quick card. If so, please comment and like and follow this blog. 😊

Supplies used:

A Pumpkin Patch Kind of Halloween

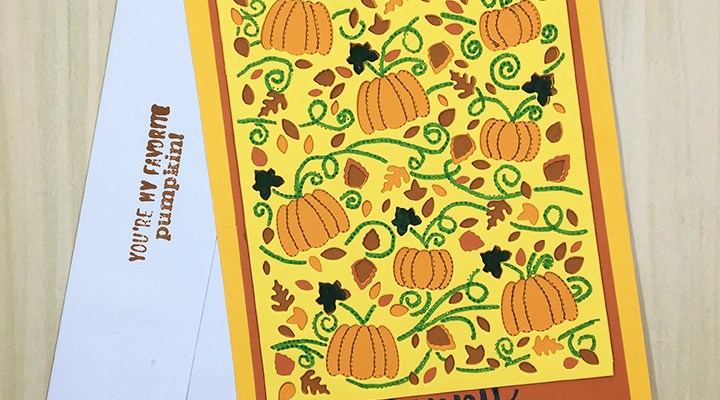
Here is a quick layered card for Halloween or Fall greetings using one of the Birch Press layered designs.  It went together in less than an hour.

First decide on your colors. I knew orange for the pumpkins and then decided on autumn leaf colors for the four layers needed.  The dies cut an A2 size panel (4 ¼ x 5 ½ inches), I decided to go for a 5 x 7 inches card, so I also cut a 5 x 7 inches rectangle of an orange card stock and a mat layer of Terra Cotta card stock at 4 ½ x 6 ½ inches.

I cut layer A from Lemon, layer B from Terra Cotta and layer C from Orange. All the layers will give you lovely small leaves as off-cuts, but layer B also gives you large, veined leaves that can be used to decorate your card or save for other projects. You will want to cut a fourth layer for the backing. I cut my 4 ¼ x 5 ½ inches backing from Pumpkin Bread cardstock.

Using a green fine-tip marker, I colored in the pumpkin vine leaves and vine once the layers were all glued up.  (Another alternative would be to cut same green squares of paper to cover behind the lemon layer the pumpkin leaves.)

The sentiment was an extra one left from another project using Karen Burniston’s Halloween Charms.

Because the card has so many layers, I have opted to leave it as a single layer -postcard style card that will fit in an A7 envelope as it is too thick to send as a postcard.

Hope you enjoyed this quick card. If so, please comment and like and follow this blog. 😊

Supplies used: