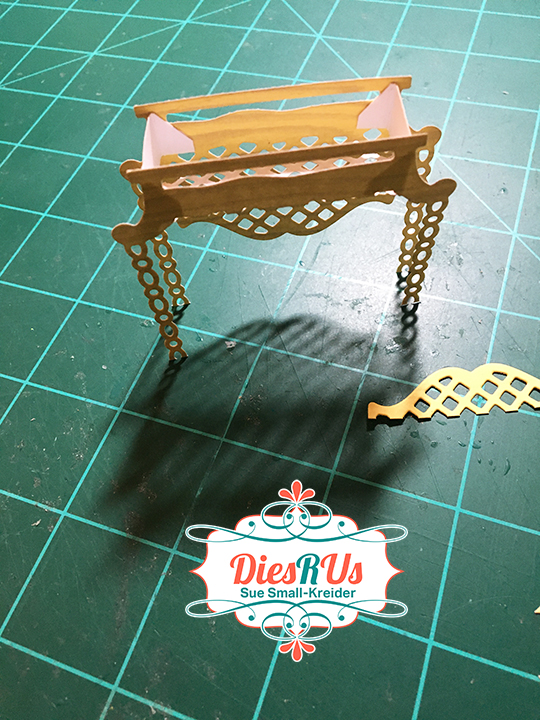
For the next four days I have a mini chair series focusing on a pop-up chair die by Karen Burniston.
Today’s chair uses the Adirondack Chair Pop-Up with a slip cover to make it into a big overstuffed chair, perfect for cats to nap in! You can access this post and the ones in this week’s seasonal chair posts below as they become live posts.
One circle the size of the castle from green card stock
One circle at least a half inch larger all round the size of the castle from blue paper
There are two ways to create the card base – one using two single side flaps in the center of the card acting as the hinge with the top black 9 x 4 piece, and the second way using a single piece folded to form the 9x 4 card base. (I will be showing the first way in photos.) Glue top-flaps to short sides of the green card base. With these flaps closed, glue the two side flaps to the center of card base. Glue the final top-fold flap to front side of the two center flaps.
Castle – Lightly ink the embossed tower and wall pieces with a grey or black Distress Ink. Folded the six score lines on the castle piece.
Adhere all decorative pieces to front and back of castle piece except for back/inside short wall and back/inside drawbridge tower pieces. (You will adhere these pieces once the castle is installed to card base so they can cover over the green and twine pieces.)
Glue tab to undecorated side of castle to form a six-side circle.
Fold both the green circle and the blue circle in half and cut along fold. Glue one half of blue circle to center of the center flaps along the center fold. Adhere the other side of blue circle to other side of fold allowing a small gap along the fold so that the card can open easily. Center the green circle pieces over the blue circle and tape the green circle at sides using removable tape. Using the pop-up die with the nubs, center the nubs over the fold or gap on the green circle and tape. Move the taped green circle with die taped to it to die cutting machine. Remove all the tape from the die and green circle after cutting. Fold up the cut tabs in the circle. Glue the green circle on to the blue circle with the tabs up.
Match the drawbridge tab to the inside of the castle and glue in place with the door/bridge open. Thread twine through top holes in tower. Adhere the solid tab to the inside of castle opposite of drawbridge opening. Glue brown door to top of drawbridge matching up holes. Thread twine through drawbridge holes and glue to underside of bridge and then adhere bridge open to blue circle. Glue remaining decorative pieces to inside of castle to hide the green tabs and twine.
From scrap green cardstock cut rectangles to hide the blue showing from where tabs fold up. (An alternative would be to cut circle slightly smaller than the green circle of a thin paper that would mimic grass or stone of a castle floor to cover the holes.)
(If your tallest tower hangs out when the card is closed, you can trim the tower some and reglue the flag. I decided that I could live with the hint of the flag showing.)
Knight, Princess and Dragon – Assemble figures following package directions. To attach the figures and trees to the card, first glue any decorative background papers to the back of the three flaps. Layout the position of the figures and trees with angles platforms making sure none of the figures will show when the card is closed. Adhere the figures to platforms and then to the card base following the die package instructions.
Card Front – Adhere a starry night paper panel to black front card base and the other piece to the back side of card base hiding the flaps’ tabs. With card closed, glue black side of front panel to center flaps.
Secure the inside of black panel to card base with washi tape. Glue “ing” to “wish” to form the word “wishing.” Adhere sentiments to front of card.
A personal message can be added above and below the castle.
The finished card will fit into a #10 business envelope.
Hope this pop-up card has put a smile on your face and provided some inspiration for your crafting. 😊
Patterned papers, pearlescent and solid colored cardstock
Gold and red foiled paper
#10 Business envelope
Washi tape – grass pattern
Don’t forget to come join in the fun at the Dies R Us Challenge Blog. There’s a new challenge theme offered on the 1st and 15th of each month and one lucky randomly drawn winner will receive a gift voucher prize to the Dies R Us Store.
For your convenience, all the important Dies R Us links are provided below.
This slimline easel card was inspired by some made by Jennifer McGuire. Elements from both sets were used to create the paperdoll and an action wobble spring.
To assemble the paperdoll, begin by stamping and heat embossing the facial features using the stamps from the Tasha set. (I colored the tongue with a pink gel pen and the teeth and eye highlights with a white gel pen.) Play with the layout of the hair pieces, ears and head. Once you have the position using a pencil, mark the location of the head and ears on the long hair piece. Glue the ears in place using a fine tipped glue bottle then glue bangs in place. Glue top half of head to long hair piece making sure to leave the lower half without glue.
Adhere collar and button placket to front of blouse. Glue blouse to shoulders and neck piece. (I used Nuvo drops for the buttons and let the piece dry overnight before going to the next step.) Using the fine tipped glue bottle, attached the head to the neck. Glue the long hair to back of shoulders.
Assemble arm and sleeve as directed on cutting instructions. (You may want to cut an additional sleeve and cuff if it will be seen on the backside.) Add the action wobble spring to the back of the arm.
To make the card base cut two piece of patterned cardstock 8 1/2 x 4 inches. Score one piece across the short end 1/2 inch. Fold and glue the tab to the end of the other piece. Score and fold the top flap of card base at 2 3/4 inches to form the easel.
Glue three hellos together to form the easel stop that will be glued to lower card base. The fourth hello will be used for decoration on the card front when closed.
Position paperdoll and arm piece on the easel portion of card front. Make sure that the hand is within the card front when closed. Adhere paperdoll and arm to card making sure to only glue lower half of paperdoll to easel. The arm’s elbow needs to not touch or catch on the card base. (I ended up having to trim a small tip of the elbow on this card to make it wave smoothly.)
Now you have a card that will wave a cheery hello.
“A truly great friend is hard to find, difficult to leave and impossible to forget,” is the sentiment stamped on the back of the envelope.
Hope this fun card has put a smile on your face and provided some inspiration for your crafting. 😊
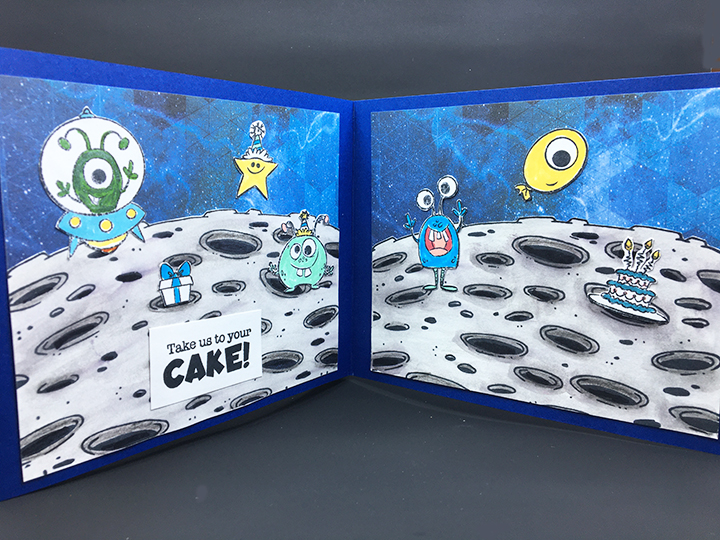
Sometimes we just feel like being out there in space when it comes to celebrating birthdays. This interactive space themed birthday card is made with Whimsy Stamps “Over The Moon” stamp set and kinetic dies.
Having watched Jennifer Dove’s video on Whimsy Stamps kinetic dies, I proceeded in making a similar card to the one she made, but I expanded the card into a tri-fold card letting the viewer find the cake.
Because this was the first time, I had used the kinetic dies, I made a few mistakes – the first being I have the rocket moving backwards when you first pull the strip. My second mistake was that I should have used thicker cardstock or cut two and glued together for the pull strip. And my third mistake was allowing the moon to warp when I watercolored it.
I stamped the images with black Memento Fade-Resistant Dye Ink onto white cardstock. The images are colored with Spectrum Noir Sparkle GlitterBrush-Pens and a Faber-Castell white India ink pen. Once dry, the images were fussy cut and ready to use for decorations.
The moon background was colored using Nuvo Watercolour Pencils in gray and black tones as well as a black Spectrum Noir Sparkle Glitter Brush Pen. I used a heat tool to dry the second and third moon backgrounds which did not warp as badly as the first moon which I let air dry overnight.
I recommend watching the assembly video for all the steps in assembling the No-See Kinetic mechanism. Because I followed the video’s directions forgetting that my rocket image went the opposite direction from the one in the video, my rocket goes backwards. Doubling up the foam tape is a must so that it matches the height of the foam dot.
The navy blue card base is made up of two panels 5 1/2 x 6 1/2 inches with tabs scored and folded at 1/4 inches on the short side. The tabs are then glued to a 5 1/2 x 6 inches panel to create the tri-fold card base.
My card uses all the stamps in the set for the three panels. It would be an ideal card for a child.
The card fits folded into an A7 envelope which is stamped on the back with the last of the three sentiments included in the stamp set – “I’m over the MOON for you!”
Thank you for reading. If you enjoyed this blog post, please like it and follow the blog. 😊
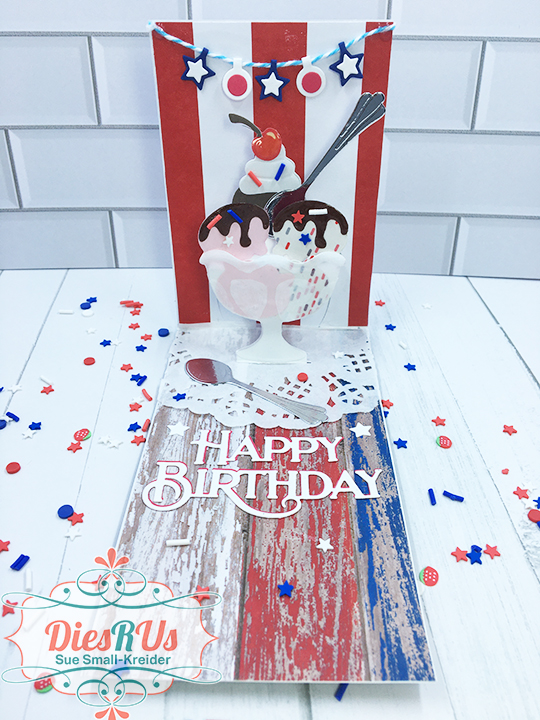
Today we are making a 3-dimensional ice cream sundae card to fit in a mini slimline envelope using dies from Dies R Us.
1. You will need:
One card base 11 inches x 3 3/8 inchesfrom heavy white cardstock
One outside star paper 11 inches x 3 3/8 inches
One red and white strip inside back paper 4 3/4 inches x 3 3/8 inches
One wood-grained inside base paper 6 1/4 inches x 3 3/8 inches
One ice cream dish cut from vellum with details colored with white ink
Five ice cream scoops (I used 2 pinks, two white confetti and one chocolate)
Two chocolate toppings (I coated mine with a clear glaze to make it shiny)
One whipped cream topping (I used a shiny coated white scrap)
One red cherry (I cut from red card stock, added white gel pen accent, brown cardstock stem and coated with a clear glaze to make it shiny)
Two spoons (I cut mine from silver mirror cardstock)
Two sets of “You’re Sweet” sentiment – one red and one black or navy blue
Two sets of “Happy Birthday” sentiment – one white and one red
Stars and circles for hanging banner and decorations
One paper doily cut in half, 6 inches baker’s twine and clay red, white and blue confetti pieces
2. Fold the card base at 6 ¼ inches and place pop-up sundae die on fold per package instructions.
3. Follow the photos on working the folds. Start with bottom tier, then second tier and finally the two angled fold on first tier.
4. Glue narrow support piece to back of dish stem as marked in photo.
5. Glue white scrap to fill in rectangular hole in pop-up dish base, if covering with a vellum dish.
6. Place striped inside back and base papers behind/under card base and trace opening with pencil and cut out as shown in photo.
7. Adhere star paper to outside of card base.
8. Adhere inside striped papers to inside of card. Attach the cut-out sections as well.
9. Glue two scoops to pop-up dish and then add glue to back side of vellum dish where white inked decorations are so glue won’t show through vellum. Position vellum dish over pop-up dish base.
10. Attach ice cream scoops, toppings, cherry and one spoon to tiers, making sure that the movement of pop-up is not impaired by these decorations. Add clay confetti sprinkles.
11. Trim and fit a half paper doily under dish. Secure to base with dots of glue at three points.
12.Position and trim the other half of doily to front of card.
13. Glue the two sentiments together off-setting the darker shade in back to create a shadow effect.
14. Position and attach sentiments on front and inside card base.
15. Glue-up stars and circles banner on baker’s twine and glue in the corners over ice cream. Decorate with additional spoon, clay confetti sprinkles and paper stars.
Hope this sweet card has put a smile on your face and provided some inspiration for your crafting.
For another Ice Cream Sundae card I’ve made click here
Thank you for reading this blog post.Please like and leave a comment.😊
The Paper Studio – Crackled Stars 665976, Patriotic Woodgrain 847111 and XXl Stripe-Red/White 690587
The Paper Studio – Printable Vellum Paper – 8 1/2″ x 11″
Buttons Galore & More – Star Spangled Sprinkletez – NK114
BoBunny -I Heart Stars Stamp set – 121054444
Stampin’ Up Classic Stampin’ Pad – Dapper Denim ink
Taylored Expressions – Mini Slim Envelopes
Don’t forget to come join in the fun at the Dies R Us Challenge Blog. There’s a new challenge theme offered on the 1st and 15th of each month and one lucky randomly drawn winner will receive a gift voucher prize to the Dies R Us Store.
For your convenience, all the important Dies R Us links are provided below.
Hi, it’s Sue here from the Dies R Us Design Team with an interactive Father’s Day card.
This card is made with Karen Burniston dies focusing on the Tiny Trees Pop-Up in a 3 3/4 inch x 8 3/4 inch card base. (I used a thin white card base cut 8 3/4 inch by 7 1 /2 inch folded in half and covered with four panels of 3 3/4 inch x 8 3/4 inch decorative papers.)
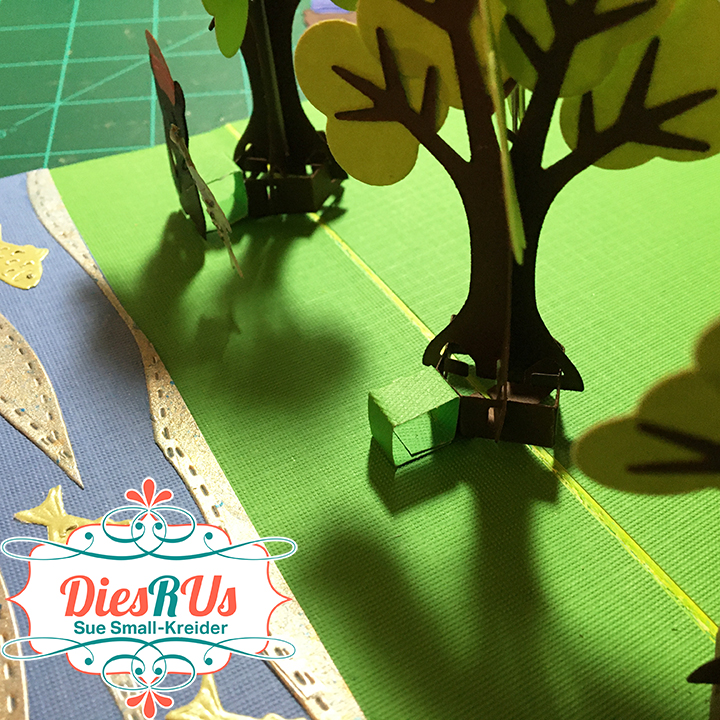
Cut the number of trees you plan to use and assemble using the packaging directions. Decide on placement of trees based on where they will be in the folder position. (For slimline cards the trees must be place on the center fold rather than using the offset piece which allows for trees to be added off the center card fold.) Glue down tree frames and wait until glue has set to attach trees.
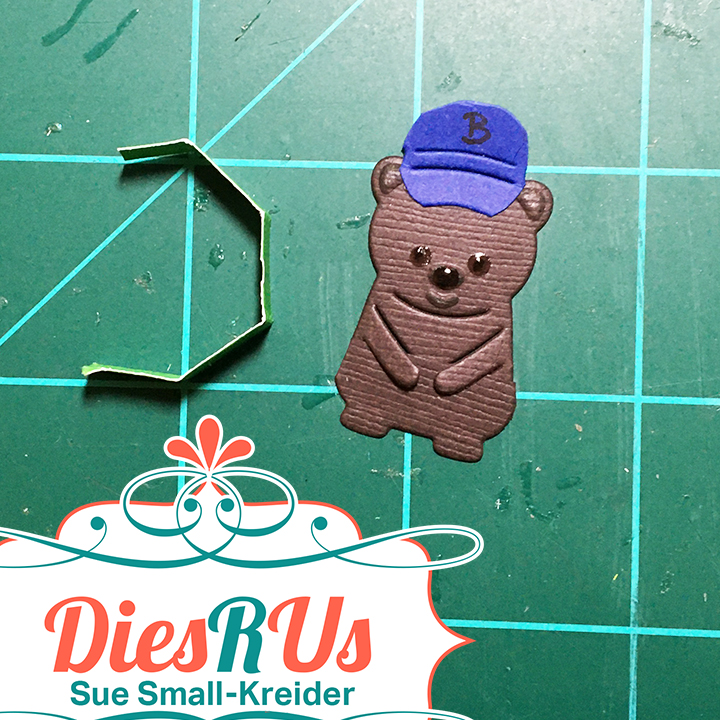
Die-cut four bears (Winter Animals) stenciling through the die with a black fine tip pen the eyes, nose and mouth. Run the stenciled bears back through the machine with the embossing mat and plate for your die-cutting machine to emboss the face and bottom feet. To make a baby bear, cut the bear just below its paws and then slide the bottom piece up under the arms and trim off excess edges. Glue together. The baseball caps are made by die-cutting the engineer’s cap from the Tiny Accessories 3 die set and rounding off the puffy crown and bill of the cap. (I tried to make the logo of the recipient’s favorite baseball team on the caps.) The fishing poles are described below. Drops of Glossy Accents were added to the bears’ eyes and nose to made them standout on the dark brown cardstock.
The stream is made with a long scrap of shiny spray painted paper in blue, gold and silver that was die-cut several times using the hill die from the Long Nature Edges die set. These wavey pieces were then glued to a strip of blue cardstock and fish cut from the Camping Charms die set, were added to the stream flow. The same fish were embossed, and their eyes stenciled in black ink and then glued to a piece of string or cording which was glued to the stick charm from the same die set. The rings were all cut off of the charms.
To make the bears stand under the trees inside, a small strip of green cardstock was cut and scored to form a cube. The cube is glued to both the card base and the tree frame and then the bear is glued to the font of the cube.
Decorations to the card include one tree front with leaves and three birds cut using the dies from the Tiny Trees set, two apples from the Tree Fruit set, and a white blanket from the Picnic Elements set. The blanket could be used to write a personal message on.
The “Happy Father’s Day” was cut three times from thin cardstock using Karen Burniston’s Alphabet dies. The layers were glued together and then glued to the front of the card using a T-ruler to keep the letters in a straight alignment.
Hope this fun card has provided some inspiration for your crafting. 😊
Trees and sky printed paper from Die-Cutting Essentials issue 32
Colored and shimmer cardstock scraps
Ranger Glossy Accents
Natural colored cording
Black fine tipped pen
Stampin’ Up – Early Espresso ink pad
Stampin’ Up Best Catch stamp set
Neenah Social –No. 10 envelope – Natural kraft
Don’t forget to come join in the fun at the Dies R Us Challenge Blog. There’s a new challenge theme offered on the 1st and 15th of each month and one lucky randomly drawn winner will receive a gift voucher prize to the Dies R Us Store.
For your convenience, all the important Dies R Us links are provided below.
1. Cut two of each color using the swing die. Save the off-cut pieces for bench supports (I find the best piece is right below the bench , about 3/8 inches tall x 2 inches)
2. Trim off two roofs from darkest colour and the four posts from the lightest color. Cut the chains off the middle color. Cut bench support into two strips. (I save all the parts that I’m not using on this card to use on other cards.)
3. Cut words from each of the three colors.
4. Cut four stems from green and ten small flowers and center circles from flower dies.
5. Cut a 5 inch square and four small strips ¼ inches X 1 ¼ inches from sturdy green cardstock for the card base and post tabs.
6. Trim heart and scallop off one of the roof pieces. Glue roofs to yellow bases.
7. Glue heart and scallop trim together, being careful not to glue roofs.
8. Glue white posts ton fronts of yellow base posts.
9. Take one of yellow benches, snip the back at sides and fold down back to become bench seat. Trim of top of the bench as shown.
10. Cut the bench support strip into two side strips Fold ¼ on either end to form two tabs.
11. Trim tabs to fit the bench cut-outs. Glue tabs to lower side of back of seat piece as shown. Then glue other tabs to back bench piece.
12. Take 5 inches green square and fold in half, fold down one side to make a mountain fold, repeat on other side. Base should have two mountain folds in the shape of a “M.”
13. Glue small green support strips to inside of posts. Let dry and then glue posts to inside valley of base as shown in red circles.
14. Trim off top two loops on bench chains.
15. Cut two lengths of thread or embroidery floss. Thread one piece through the two chains on one side of bench. Repeat with other thread on opposite side of bench.
16. Tape threads to underside of roof making sure bench hangs evenly. (Red circles) Trim off tails of thread. Test swinging your bench. Smile.
17.Glue your words together offsetting at least one or both of the back colors. (Off-setting all three gives a blurred effect as shown, but off-setting just one makes the letters look 3D.)
18. Glue your flowers together and then onto the stems/bushes. Glue to base.
Hope this fun card has put a smile on your face and provided some inspiration for your crafting.
Want to see other swing cards I’ve made? Click here.
Thank you for reading this blog post. Please like and leave a comment. 😊
Stampin’ Up Classic Stampin’ Pads – Early Espresso and Emerald Envy
Summer meadow stamp set from Cardmaking & Papercraft Issue 198, August 2019
Square envelope from my stash
Don’t forget to come join in the fun at the Dies R Us Challenge Blog. There’s a new challenge theme offered on the 1st and 15th of each month and one lucky randomly drawn winner will receive a gift voucher prize to the Dies R Us Store.
For your convenience, all the important Dies R Us links are provided below.
Hi, it’s Sue here from the Dies R UsDesign Team with an interactive wedding card.
This card is primarily made with Karen Burniston dies focusing on the Cake Pop-Up in a 7 inch x 5 inch card base. (I used an off-white shimmer card stock for the inside of the card and took mica spray-painted shimmer card panels for the front and back of the card.)
Cut out two of each of the cake tier pieces, two of the three scalloped edging pieces and two of the bride and groom piece. (I used shimmer cardstock for all but the groom pieces.) Fold tier pieces on scored lines as shown in the video. Glue each tier together following the video.
It is easier to decorate the cake before attaching it to the card. (I added some embellishment drops to the scalloped edges that needed to dry overnight.) Glue one set of bride and groom together on to tab at cake top. Glue the second set on to back side of cake top. Adhere the scalloped edging on to each tier of cake, starting and stopping each scalloped piece at the center fold of each tier.
Cut a 3 1/4 inch circle from silver mirror and then cut a 2 1/4 inch circle from the center of the larger circle. Cut in half and glue on either side of the card base fold. Play with the layout of your decorative pieces before gluing the cake to the silver circle. Align the cake center fold with the card base fold. Place glue on the lowest tier’s folded tabs and glue in place. Fold card closed and firmly press cake to card base. Wait until glue has set to open.
I used the fancy layered label and tiny hearts dies from the Paper Frames Pop-Up set to decorate the inside of the card. (To make the tiny hearts be visible I coated them in a peachy translucent embellishment drops that had to dry overnight.)
The sentiments for the card front are dies from my stash and the “Happily ever after” is a Karen Burniston die that I cut twice so that I could paper piece the red heart into the blue words. The gold swags on the card front are from another Karen Burniston dies set of Party Border Blends.
Hope this fun card has provided some inspiration for your crafting. 😊
Don’t forget to come join in the fun at the Dies R Us Challenge Blog. There’s a new challenge theme offered on the 1st and 15th of each month and one lucky randomly drawn winner will receive a gift voucher prize to the Dies R Us Store.
For your convenience, all the important Dies R Us links are provided below.
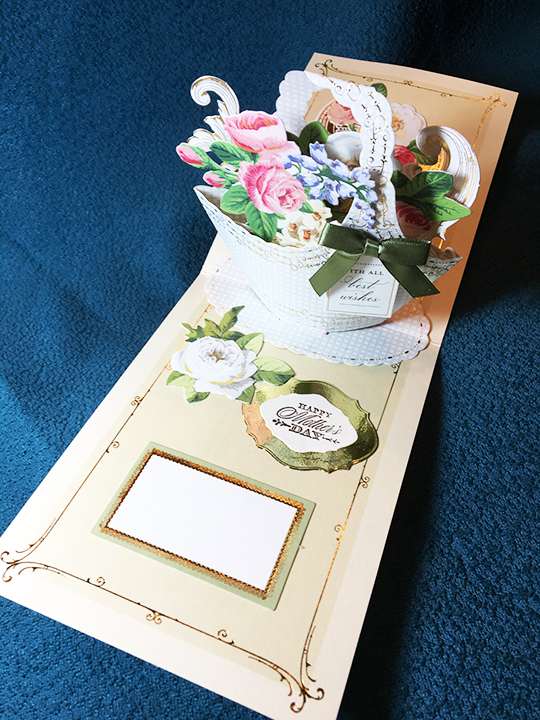
Mothers deserve special cards. A basket full of roses using Anna Griffin’s new Basket Pop-Up kit and a few tea service pieces from an older Anna Griffin Favorite Tea Embellishments made the perfect card for this special mom.
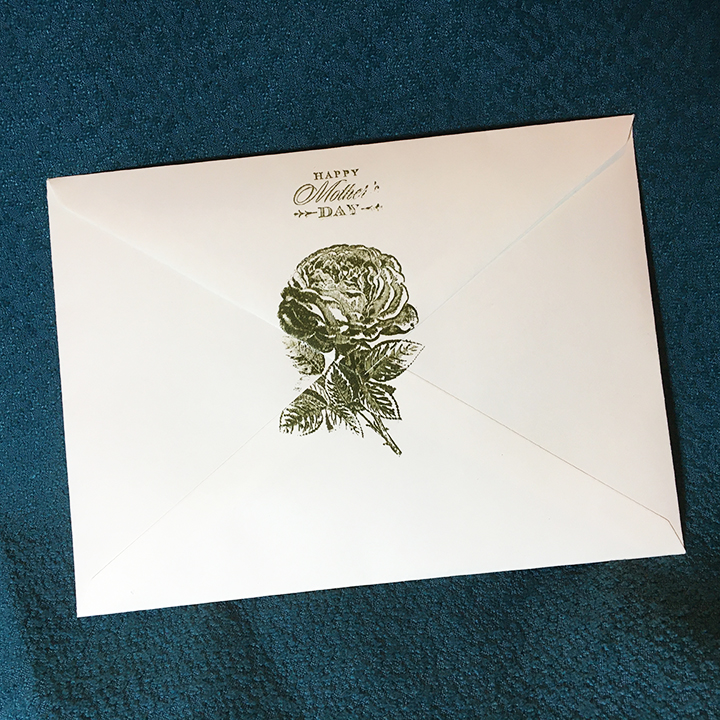
The envelope was stamped with stamps from Anna Griffin’s Treasury of Stamps and Dies using Stampin’ Up Always Artichoke ink.
Other cards using stamps and papers from Anna Griffin include:


