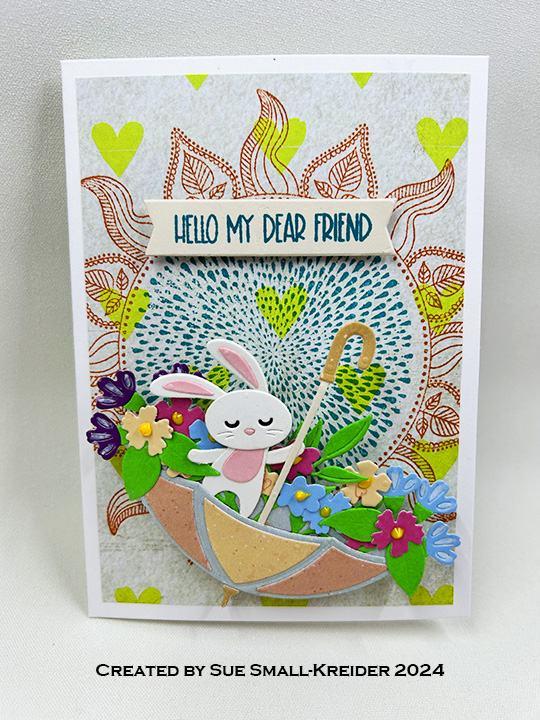
Squeeze The Day!

Sometimes life keeps throwing lemons at people. I am always amazed at how individuals keep smiling through it all and even find time to do kind things for others as well. This is a card for those smiling individuals that know how to make lemonade out of what life throws at them.

Using the Vintage Lemon Twist papers by Simple Stories and the You Shine stamp set both in the Simon Says Stamp! July 2022 Card Kit of the Month, I crafted this card with dies from Karen Burniston, Divinity Designs, Crafter’s Companion, Made to Surprise and Oriental Trading.

The front of the card is made from the paper collection with Nuvo Drops, buttons and a tiny ribbon bow from my stash. A symmetry is a theme for this card. The back of the card is a collage of leftover pieces from making the rest of the card. (I decorated both the inside and outside of the card base because the card base was thin cardstock. I adhered the papers with double side tape and an occasional drop of glue.

I had the idea of a pitcher of lemonade pouring into a glass with a lemon slice as the inside interactive mechanism of the card. After looking at a number of Karen Burniston pop-up/interactive dies, I settled on the Mailbox Pop-Up after watching a video by Karen using the mechanism for a double spinner card which I adapted into a tilting pitcher. I cut from scrap cardstock, a template of the mailbox to know where to cut the square opening in my decorative scalloped circle (Made to Surprise). After trimming the lower lever mechanism off, I folded the piece as directed in the video and trimmed the small section off one edge that would not be covered by the scalloped circle.

Using clear vellum to resemble glass, I die cut two tumblers (Divinity Designs) and fitted a scrap of vellum behind the die-cut pale blue pitcher (Crafter’s Companion). Using a bright yellow marker, I colored the back side of the vellum as the lemonade. I always color the edges of exposed vellum with a black marker to make them more defined. From the backing paper from some adhesive sheets that I had saved because the paper had a shiny yellow surface, I cut some lemon slices (Divinity Designs) for the tumblers and pitcher.

The lemonade sentiment is from the You Shine stamp set and is heat embossed with black ink and clear embossing powder. Once heat embossed, I die cut the sentiment out with a wave oval die from oriental Trading. I cut a second oval of plain white cardstock as the sentiment for a personal message to be added.

Black backgrounds inside the card make the white scalloped circle and ovals pop. Small scraps of the yellow printed paper were used to balance out the inside decorations.

The card fits into an A2 size envelope which has been stamped on the front with a lemon slice and back flap with a whole lemon. the back flap image is colored with markers. All the stamps are from the Simon Says Stamp You Shine stamp set.

Thank you for reading this blog post. Please like and leave comments 😊

Materials Used:

Dies

Stamps

Inks

Papers

  • Pattern papers by Simple Stories – Vintage Lemon Twist
  • Clear vellum scraps
  • White cardstock scraps
  • Shiny yellow paper scraps
  • A2 white card base and envelope

Miscellaneous

Holly Jolly Santa Greetings

What a jolly feeling the “Ho Ho Ho” of Santa brings to anyone who hears or sees it. This 3D snow globe designed by Becca Feeken for Spellbinders makes you hear the jolly old elf.

This was my first time using these die sets. I focused on using just four colors of red, green, white and gold and mostly mirror or foiled cardstock.

My Santa and tree are based off of the picture on the packaging using Nuvo Drops instead of jewels. I die cut several layers of the Santa and tree using up scraps to fussy cut the various pieces of the scene which are glued onto a red base. The belt and boots are colored with a fined-tipped black permanent marker. The belt buckle is a freehanded square of gold paper.

The holly leaves are fussy cut and glued onto the sentiment and front layers. The red berries are red glitter glue. I added a thin green stripe at the bottom of the front layer for interest.

As is my style, I stamped the back of the envelope with hints of what’s inside using red and green ink and Christmas sentiment stamps from Paper Discovery. I used a new stamping tool with my stamping platform for an even and easy stamped image. I highly recommend the Stampendable Stamping Tool.

Thank you for reading. If you enjoyed this blog post, please like it and follow the blog. 😊

Dies:

Stamps & Ink

Papers

Additional Supplies Used:

Sweet Christmas Greetings

Can you smell the fresh baked gingerbread straight from the oven?  This card is made for a child’s Christmas and depicts a gingerbread house complete with white sugar icing, cinnamon drops, peppermint drops and candy canes.

This was my first attempt making Karen Burniston’s Tiny House Pop-Up and I made some mistakes that created a catch point on a roof corner. (I highly recommend watching the assembly video to avoid some of my mistakes such as making the front door of the house on the end with the bottom attachment flaps and gluing the roof unevenly on top of the house.)

Overall, the Gingerbread Tiny House Add-ons set is easy to use with the Tiny House set. The cane canes and peppermint drops are tiny and may require tweezers to assemble. (I added Glossy Accents to the tops of the candy canes and peppermint drops to give them a shiny coating.) There are other decorative die pieces for gum drops and tiny dots in the set, but I opted to use some Nellie’s Effect Snow media for dimensional icing and Nuvo Drops for red cinnamon drops. (The Effect Snow made the roof curl up some creating more of a catchpoint on the roof corner.)

The card base is an A2 size card (5 ½ x 4 ¼ inches) made of heavy white cardstock and covered with patterned papers for smooth surfaces for the house to slide over. The sweets decorations are placed so that they don’t hinder the house mechanism opening.

Merry Christmas has a shadow die cut background of patterned paper and all the sentiments are cut from red paper so there are less chances of creating catchpoints. (I used some fancy nested label dies to create areas for a personal message.)

As is my style, I stamped the back of the envelope with hints of what’s inside using two colors of ink and a gingerbread house stamp set from Hero Arts.

Thank you for reading. If you enjoyed this blog post, please like it and follow the blog. 😊

Other cards that use the Tiny House Pop-up die Set

Dies:

Stamps & Ink

  • Memento -Fade-resistant Dye Ink – Rich Cocoa
  • Stampin’ Up Classic Stampin’ Pad – Melon Mambo
  • Hero Arts – Clear Stamp Set – Color Layering Gingerbread House -CM462

Papers

  • Heavy white card stock
  • Brown cardstock
  • Patterned papers from Carnation Crafts – Merry & Bright
  • Colored papers from my stash
  • A2 green envelope

Additional Supplies Used:

A Truly Great Friend

Hello, it’s Sue of the Dies R Us Design Team and today we are making a Happy Mail card using Karin Joan Misses dies and stamps by Studio Light.

This slimline easel card was inspired by some made by Jennifer McGuire. Elements from both sets were used to create the paperdoll and an action wobble spring. 

Cut from the Betty die set:

  • One head and shoulders from skin colored cardstock making sure to not loose the ears which cut separately as is the head
  • One blouse using just the shoulders and neck section of the die, cut the blouse from a patterned paper. Then using v die cut the v-neckline
  • One collar and button placket from white cardstock. (Save the button circles for another card)
  • One long bangs from your choice of hair colored cardstock

Cut from the Tasha die set:

  • Two arms from skin colored cardstock (Glue them together for sturdiness)
  • One arm from patterned paper as a sleeve (Fold back hand and trim to form sleeve cuff. I covered my cuff with a scrap of white cardstock.)
  • One long hair piece from your choice of hair colored cardstock

Cut four Hellos from Hello die.

To assemble the paperdoll, begin by stamping and heat embossing the facial features using the stamps from the Tasha set. (I colored the tongue with a pink gel pen and the teeth and eye highlights with a white gel pen.) Play with the layout of the hair pieces, ears and head. Once you have the position using a pencil, mark the location of the head and ears on the long hair piece. Glue the ears in place using a fine tipped glue bottle then glue bangs in place. Glue top half of head to long hair piece making sure to leave the lower half without glue. 

Adhere collar and button placket to front of blouse. Glue blouse to shoulders and neck piece. (I used Nuvo drops for the buttons and let the piece dry overnight before going to the next step.)  Using the fine tipped glue bottle, attached the head to the neck. Glue the long hair to back of shoulders.

Assemble arm and sleeve as directed on cutting instructions. (You may want to cut an additional sleeve and cuff if it will be seen on the backside.) Add the action wobble spring to the back of the arm.

To make the card base cut two piece of patterned cardstock 8 1/2 x 4 inches.  Score one piece across the short end 1/2 inch. Fold and glue the tab to the end of the other piece. Score and fold the top flap of card base at 2 3/4 inches to form the easel.

Glue three hellos together to form the easel stop that will be glued to lower card base.  The fourth hello will be used for decoration on the card front when closed.

Position paperdoll and arm piece on the easel portion of card front. Make sure that the hand is within the card front when closed. Adhere paperdoll and arm to card making sure to only glue lower half of paperdoll to easel.  The arm’s elbow needs to not touch or catch on the card base.  (I ended up having to trim a small tip of the elbow on this card to make it wave smoothly.)

Now you have a card that will wave a cheery hello.

“A truly great friend is hard to find, difficult to leave and impossible to forget,” is the sentiment stamped on the back of the envelope.

Hope this fun card has put a smile on your face and provided some inspiration for your crafting. 😊

Supplies Used from Dies R Us:

Additional Supplies Used:

  • Pink gel pen
  • Patterned papers from Recollections, Hot Off the Press
  • Colored paper scraps from my stash
  • VersaMark – Watermark Stamp Pad
  • Recollections -Detail Embossing Powder – Ebony
  • Nuvo Dream Drops – Cloud 9
  • Papertrey ink – Quoted: True Friends Stamp Set – 3374
  • Stamin’ Up Classic Stampin’ Pad – Blueberry Bushel
  • No. 10 – Neenah Social – Bare White Techweave Envelope

Luscious Wedding Wishes

Hi, it’s Sue here from the Dies R Us Design Team with an interactive wedding card.

This card is primarily made with Karen Burniston dies focusing on the Cake Pop-Up in a 3 3/4 inch x 8 3/4 inch card base. (I used a green leafy coated card stock for the base and coordinating mosaic tile cardstock inside.)

Cut out two of each of the cake tier pieces, two of the three scalloped edging pieces and two of the bride and groom piece. (I used shimmer cardstock for all but the groom pieces.) Fold tier pieces on scored lines as shown in the photos. Glue each tier together following the photos.

It is easier to decorate the cake before attaching it to the card. (I added some embellishment drops to the scalloped edges that needed to dry overnight.) Glue one set of bride and groom together on to tab at cake top. Glue the second set on to back side of cake top. Adhere the scalloped edging on to each tier of cake, starting and stopping each scalloped piece at the center fold of each tier.

Cut a 3 1/2 inch circle from gold mirror and then cut a 2 inch circle from the center of the larger circle. Cut in half and glue on either side of the card base fold. (Because I used inside decorative panels, I cut out the 3 1/3 circle from my panels so the card would have no catch points and lessen the bulk of the card.) Play with the layout of your decorative pieces before gluing the cake to the gold circle. Align the cake center fold with the card base fold. Place glue on the lowest tier’s folded tabs and glue in place. Fold card closed and firmly press cake to card base. Wait until glue has set to open.

The sentiments for the card front are Karen Burniston’s Word Set 12 -Anniversary and Happily ever after that I cut twice so that I could off-set the gold and green letters and to be able paper piece the gold heart into the green words. The gold borders on the card front are from another Karen Burniston dies set of Party Border Blends.

Hope this fun card has provided some inspiration for your crafting. 😊

SUPPLIES Used from Dies R Us:

Dies

Miscellaneous

Other Supplies:

  • Papers by BoBunny and Recollections’ Shimmer Cardstock
  • Colored and mirror cardstock scraps
  • Nuvo Dream Drops – Cloud 9
  • Stampin’ Up – Crumb Cake ink pad
  • Neenah Social – A7 envelope – Bare white techweave

Happily Ever After

Hi, it’s Sue here from the Dies R Us Design Team with an interactive wedding card.

This card is primarily made with Karen Burniston dies focusing on the Cake Pop-Up in a 7 inch x 5 inch card base. (I used an off-white shimmer card stock for the inside of the card and took mica spray-painted shimmer card panels for the front and back of the card.)

Cut out two of each of the cake tier pieces, two of the three scalloped edging pieces and two of the bride and groom piece. (I used shimmer cardstock for all but the groom pieces.) Fold tier pieces on scored lines as shown in the video. Glue each tier together following the video.

It is easier to decorate the cake before attaching it to the card. (I added some embellishment drops to the scalloped edges that needed to dry overnight.) Glue one set of bride and groom together on to tab at cake top. Glue the second set on to back side of cake top. Adhere the scalloped edging on to each tier of cake, starting and stopping each scalloped piece at the center fold of each tier.

Cut a 3 1/4 inch circle from silver mirror and then cut a 2 1/4 inch circle from the center of the larger circle. Cut in half and glue on either side of the card base fold. Play with the layout of your decorative pieces before gluing the cake to the silver circle. Align the cake center fold with the card base fold. Place glue on the lowest tier’s folded tabs and glue in place. Fold card closed and firmly press cake to card base. Wait until glue has set to open.

I used the fancy layered label and tiny hearts dies from the Paper Frames Pop-Up set to decorate the inside of the card. (To make the tiny hearts be visible I coated them in a peachy translucent embellishment drops that had to dry overnight.)

The sentiments for the card front are dies from my stash and the “Happily ever after” is a Karen Burniston die that I cut twice so that I could paper piece the red heart into the blue words. The gold swags on the card front are from another Karen Burniston dies set of Party Border Blends.

Hope this fun card has provided some inspiration for your crafting. 😊

SUPPLIES Used from Dies R Us:

Dies

Miscellaneous

Other Supplies:

  • Simply Creative Mr & Mrs steel cutting die
  • Momenta Firefly’s Celebrate Happy Birthday die set 35516 R7
  • Papers by BoBunny and Recollections’ Shimmer Cardstock
  • Colored and mirror cardstock scraps
  • Nuvo Dream Drops – Cloud 9
  • Nuvo Jewel Drops – Peach Sobert
  • “Congratulations” stamp by Jennifer Ellory from Cardmaking & Papercraft issue 178
  • Stampin’ Up – Crumb Cake ink pad
  • Neenah Social – A7 envelope – Bare white techweave
  • Nuvo Mica Mists – Pecan Peach, Nebula Blue, Silver Smoke and Antique Gold

Don’t forget to come join in the fun at the Dies R Us Challenge Blog. There’s a new challenge theme offered on the 1st and 15th of each month and one lucky randomly drawn winner will receive a gift voucher prize to the Dies R Us Store.  

 For your convenience, all the important Dies R Us links are provided below.

click below for:

STORE

CHALLENGE BLOG

FACEBOOK

INSPIRATION BLOG

FRIENDS OF DIES R US PINTEREST PAGE

Triple Hearts

Valentine’s Day is coming and a handmade card, reminiscent of folk art hearts and flowers, fancy chocolate boxes and old-fashioned lacy Valentines, maybe just the thing for your loved one.

This card is the third of a series of Split-Slider Slimlines.

Split-Slider: This split slider is based off Spellbinders Large Die of the Month for January 2021.  The three mini easels were drawn and cut based off the three heart openings in the slimline die. (See previous split slider posts for more detailed directions.) The slider arm is horizontal rather than vertical as previous cards were. (Hint: Cut rectangular easels that will slide under the heart frames to eliminate a catchpoint for the easel.)

You can glue the easel panel to the back of the lacy panel as long as you don’t glue the easel tab area at the bottom of the heart frames.

Because the top lacy panel is adhered on three sides to the card base and needs to be raised, I used foam tape strips to raise the panel. (I like Stampin’ Up’s foam adhesive strips because they are precut and narrow enough to fit along the edge of the lacy panel.) Adhere the easel tabs to the slider arm before removing the backing paper of the foam tape.

You may have to help fold the easels into the fully opened position the first time to train them. Once satisfied with the slider/easels’ movement, remove panel backing tape paper and adhere to card base.

Decorating the Easels: Because I had cut the lacy panel three times (once from lightweight cardstock and twice from heavy weight cardstock), I had plenty of the heart cut outs. I used the lightweight hearts so form the easel base that was folded at the tip of the heart when adhered to the slider easel. The decorated heavy weight hearts are glued only at the rounded tops to the easel base hearts.

I used flowers and greenery left from other projects on the outer hearts and then I foiled the center heart with a coordinating foiling plate from the Spellbinders Glimmer Plate of the Month for January 2021.

Make sure you don’t glue anything that will impede the easels from moving.

Pull-Bar: The long pull bar or top edge of the slider arm is reinforced with a thick cardstock strip. Three holes were punched, and ribbon looped through for pulls. (If I were to make this card again, I would make the card base narrower so no ribbon pulls would be needed. See free template download under Materials Listed)

The foiled “Happy Valentine’s Day” sentiment is attached with foam squares. Nuvo Glitter Drops were added to the lacy panel.

When sending this card, I would enclose a slip of paper with directions on how to open. (See split-slider CRX Sheet download.)

Thank you for reading this blog post. Please like and leave comments 😊

Split-Slider Slimline Series:

Day 1 – Split Sea Slider

Day 2 – Cloud Dreams

Day 3 – Triple Hearts

Day 4 – A Valentine for A Baseball Fan

Materials Used:

Dies

Foiling

Papers

Miscellaneous

© 2021 Sue Small-Kreider/Ully Cat Designs

Santa Vintage Trifold

Sometimes we just need to believe that there once was a perfect Christmas Eve with Santa flying through the starry night.

This shimmering trifold Christmas card delivers on that idea. Based on the Spellbinders’ Christmas village vignette frame die set, the scene is set with Santa flying his sleigh through the air, over the tops of fir trees to the next house. Each screen frame holds another layer of the snowy scene.

To make this card, I cut three of the lacy frames from bright blue foil cardstock and three backing panels from shimmer cardstock. I waited to cut the center openings in each back panel knowing that they had to line up for the scene to work. To cut the front panel opening I place the blue frame over the back panel and lined-up the “Christmas Greetings” die based off the blue frame center. To cut the lower hill window from the center panel, I use the front panel to line up the lower hill die on to the shimmer side of the cardstock. Using the first two panels to position the back panel’s higher hill die, I used the same technique to cut the final window.

Assembling the card was easy, gluing the blue frames to the white shimmer side panels and using clear removable tape to join or hinge the panels together on the back side.

To decorate the scene, I die cut two large fir trees, five small fir trees, 12 holly springs, one house and one Santa’s sleigh from the scrap shimmer cardstock left from cutting the windows. (Hint: Always make sure you are cutting with the shimmer side of the cardstock up.) The shimmer card takes the water-soluble markers well giving the images a nice texture. Color can be layered-on allowing some shading. The trees on the center panel are glued with a tree on both front and backsides of the panel so that when folded shut they are visible. The back panel has a single layer of trees and house. I used a paper scrap from a Hunydory paper pad that had a starry night sky to be the backdrop for the final panel’s window.

Holly springs were colored and glued to the frame inside corners of all the panels, but only the top panel had red Nuvo drops added to the berries. Nuvo drops were also added to the circle parts of the blue frame on the top panel only.

Finished card when folded shut measures 5 x 4.5 inches (127 x 113 mm).

Thank you for reading about this card. Please like and leave a comment. 😊

If you enjoyed this tri-fold card, check out some of my other trifolds:

One In A Melon

Shabby Chic Trifold Card

Festive Foliage and Hearts – Trifold card

Sleepytime Dreams

SUPPLIES

Dies/Punches

Ink

Paper

Miscellaneous