I have been collecting and making oven cards for several years now. Here is a collection of all my ovens blog posts. Click on an image to see details of the oven.
(Images are posted from the earliest release of dies/stamps/kits 2016 to newest 2023.)
____________________________
Thank you for experiencing this blog post.
I hope this inspires you and makes you smile.
Please like and leave comments 😊
___________________________________
Disclaimer: Karen Burniston products are provided free of charge by the manufacturer for review and use. All other items were personally purchased. Compensated affiliate links used where or when possible, meaning I will receive a small percentage commission from these manufacturers at no cost to you. This will allow me to add more content to my YouTube channel and help out a lot. Thank you.
I’m using Tim Holtz’s Retro Oven to create this tri-fold shaker card.
Watch video above for a tutorial on how to make the card.
Cardbase: Start with a 9 x 5-inches rectangle of white 65lb. cardstock. Score and fold at 3-inches and 6-inches.
Oven: Cut out two oven base piece from red cardstock covered with clear packing tape. Cut decorative oven pieces for each stove from silver, white and black. (I used cardboard packaging from some Tim Holtz protucts for the white and black pieces.)
Sentiments: Stamp the Paper Discovery “Eat Drink & be merry” inside the last oven window panel. Use other sentiment stamps on other middle panels. (I used “Fill your heart with joy” from Scrapbook and Cards Today’s Jolly Holiday workshop kit.)
Envelope: The card fits into an A2 envelope.
___________________________________
Thank you for experiencing this blog post.
I hope this inspires you and makes you smile.
Please like and leave comments 😊
___________________________________
Disclaimer: Karen Burniston products are provided free of charge by the manufacturer for review and use. All other items were personally purchased. Compensated affiliate links used where or when possible, meaning I will receive a small percentage commission from these manufacturers at no cost to you. This will allow me to add more content to my YouTube channel and help out a lot. Thank you.
Materials Used:
Dies
Sizzix – Thinlits by Tim Holtz – Retro Oven
Stamps
Paper Discovery – A5 Stamp Set – Cosy Kitchen – Simple Food
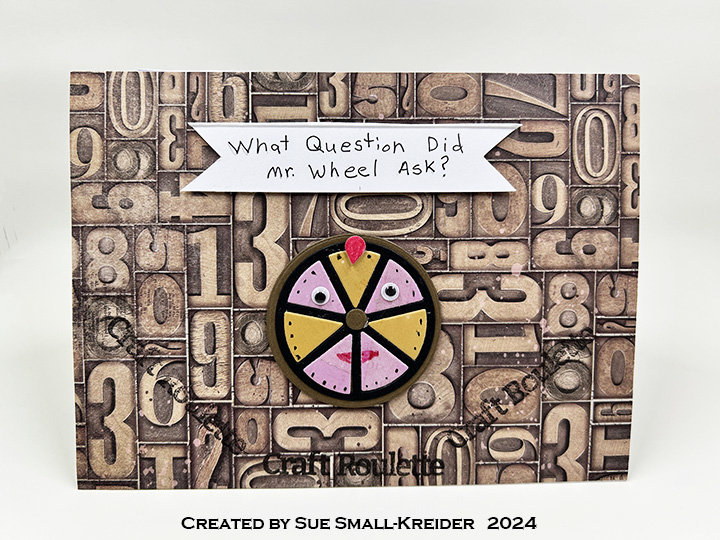
This card was made for Craft Roulette #209 whose parameters included a tri-fold card, sleigh ride colors, joke(s)or funny element and out of proportion. It has a number of insider jokes in it for that Craft Roulette fan to get.
The card uses a purchase A6 cardbase (4.625 in x 6.25 in) as a top fold and two pieces of decorative 6 in x 8 in paper.
What fun to be a child with a new toy or two to play with on Christmas morning. This card takes its inspiration from a BoBunny paper pad and matching die-cut pieces as well as a recent release of Karen Burniston’s Flip Frame Pop-up die set.
I found the Flip Frame Pop-Up easy to assemble, but strongly suggest practicing with scrap paper the gluing placement of the mechanism and frame before gluing with your good paper. (Here is the assembly video.)
I cut the flip frame from dark green mirror card and used some scrap green pattern pieces to hide the white side of the mechanism so that the mechanism strip blends into the background.
The cream-colored doily is for writing a personal message, but it does give the feel that the open card is a tabletop with a picture frame of a loved one.
The front is decorated with pictures cut from the paper pad and the little boy is a die-cut from the BoBunny set that is adhered with foam squares. A ribbon was the final dimensional element to tie the little girl to the boy and the opened gift box.
The card base is made entirely from two papers from the BoBunny paper pad. The inside sentiment and snowflake are from the coordinating die cuts set.
As is my style, I stamped the envelope flap with an older Kaisercraft stamp sentiment to set the mood for the card.
Hope this card makes you remember your childhood Christmases.
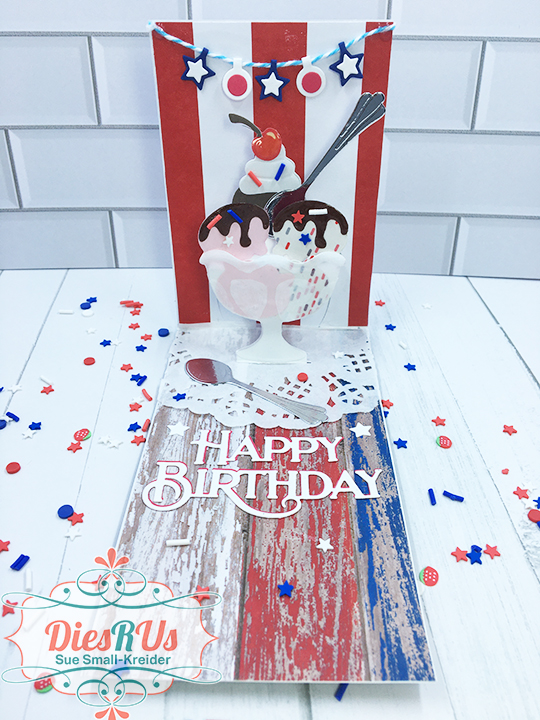
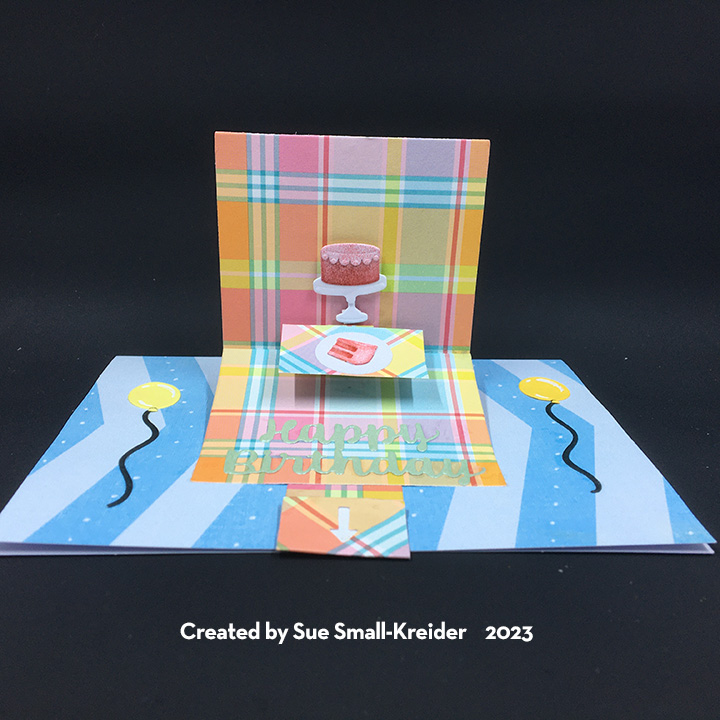
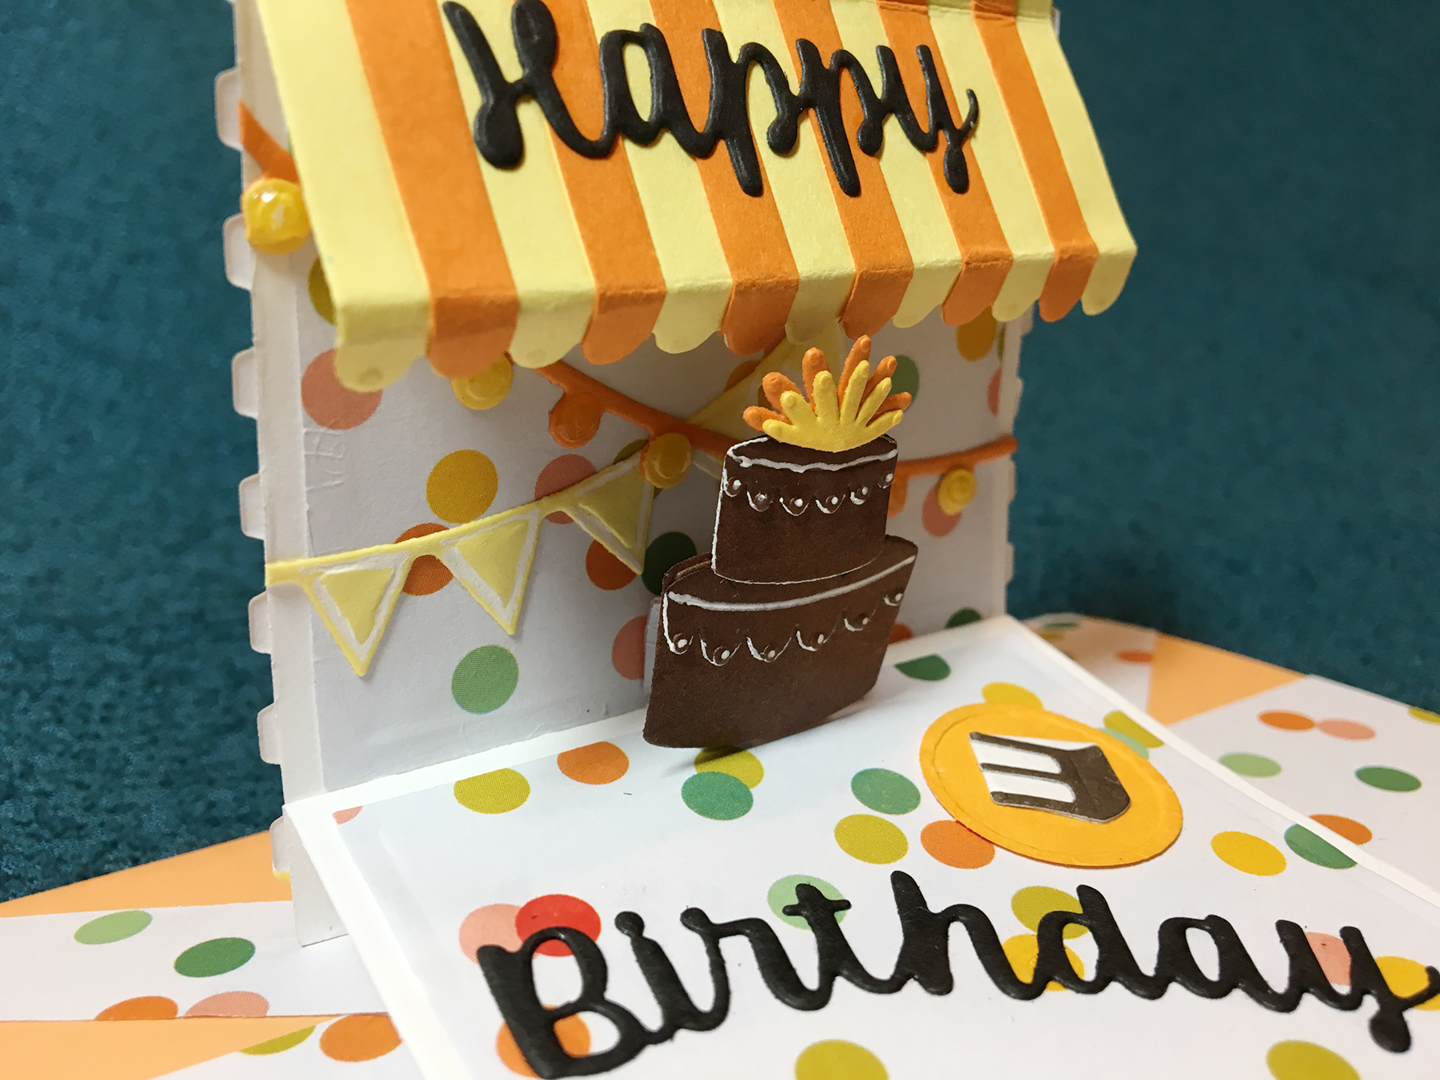
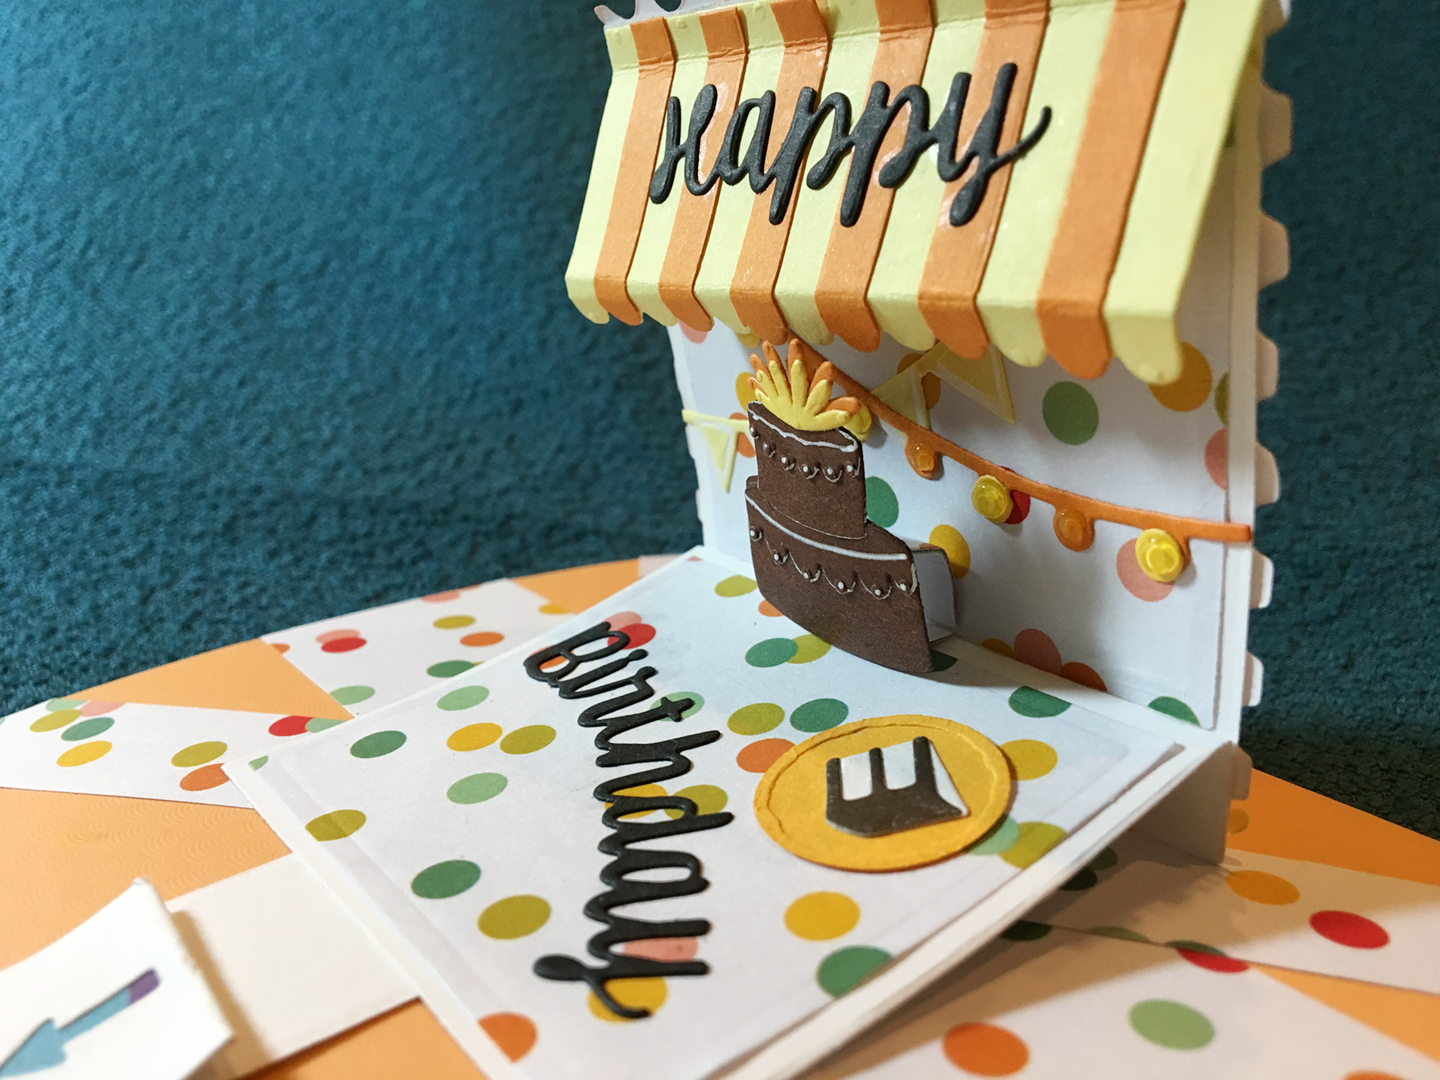
Spontaneous birthday parties are wonderful, especially pop-up ones. This card’s inspiration came from experimenting with cutting multiple square wave frames and playing with shadow boxes. Once I realized the square wave frames fit the Karen Burniston Frame Pull Pop-Up top square, I knew I had to create a mini pop-up version of Courtney Chilson’s Birthday Shadow Box card.
Having made the Frame Pull Pop-up card before, I studied my practice card to make sure I remembered the assembly. (You can access the assembly video at here.) I remembered her advice to keep the top square flexible and not over decorated with stiff layers and used papers rather than cardstock to lay the background of colorful wave frames. I made sure the top edge did not have any overhanging edges of the frames that would catch when the card popped open.
I had cut and assembled several sets of decorations from the Birthday ShadowBox card die set the last time I had made the card, so I only had to cut the cake and frosting and a circle for a plate from scrap cardstock in my stash. I found two shades of browns for the cake and used a white gel pen to added accents to the frosting. After gluing the cake together, I gently rounded the cake with my fingers to add depth to it as well as a Mini Dimensional foam dot to adhere it to the pop-up cube on the card. Double-sided red tape was used to attach the awning to the top of the pop-up.
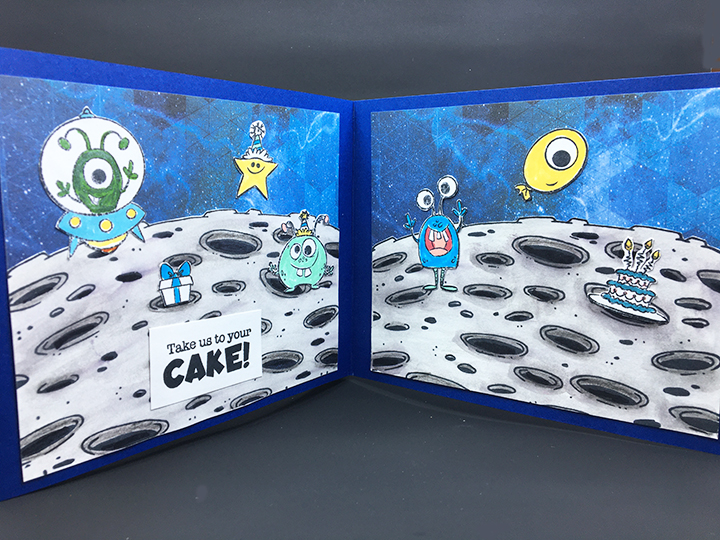
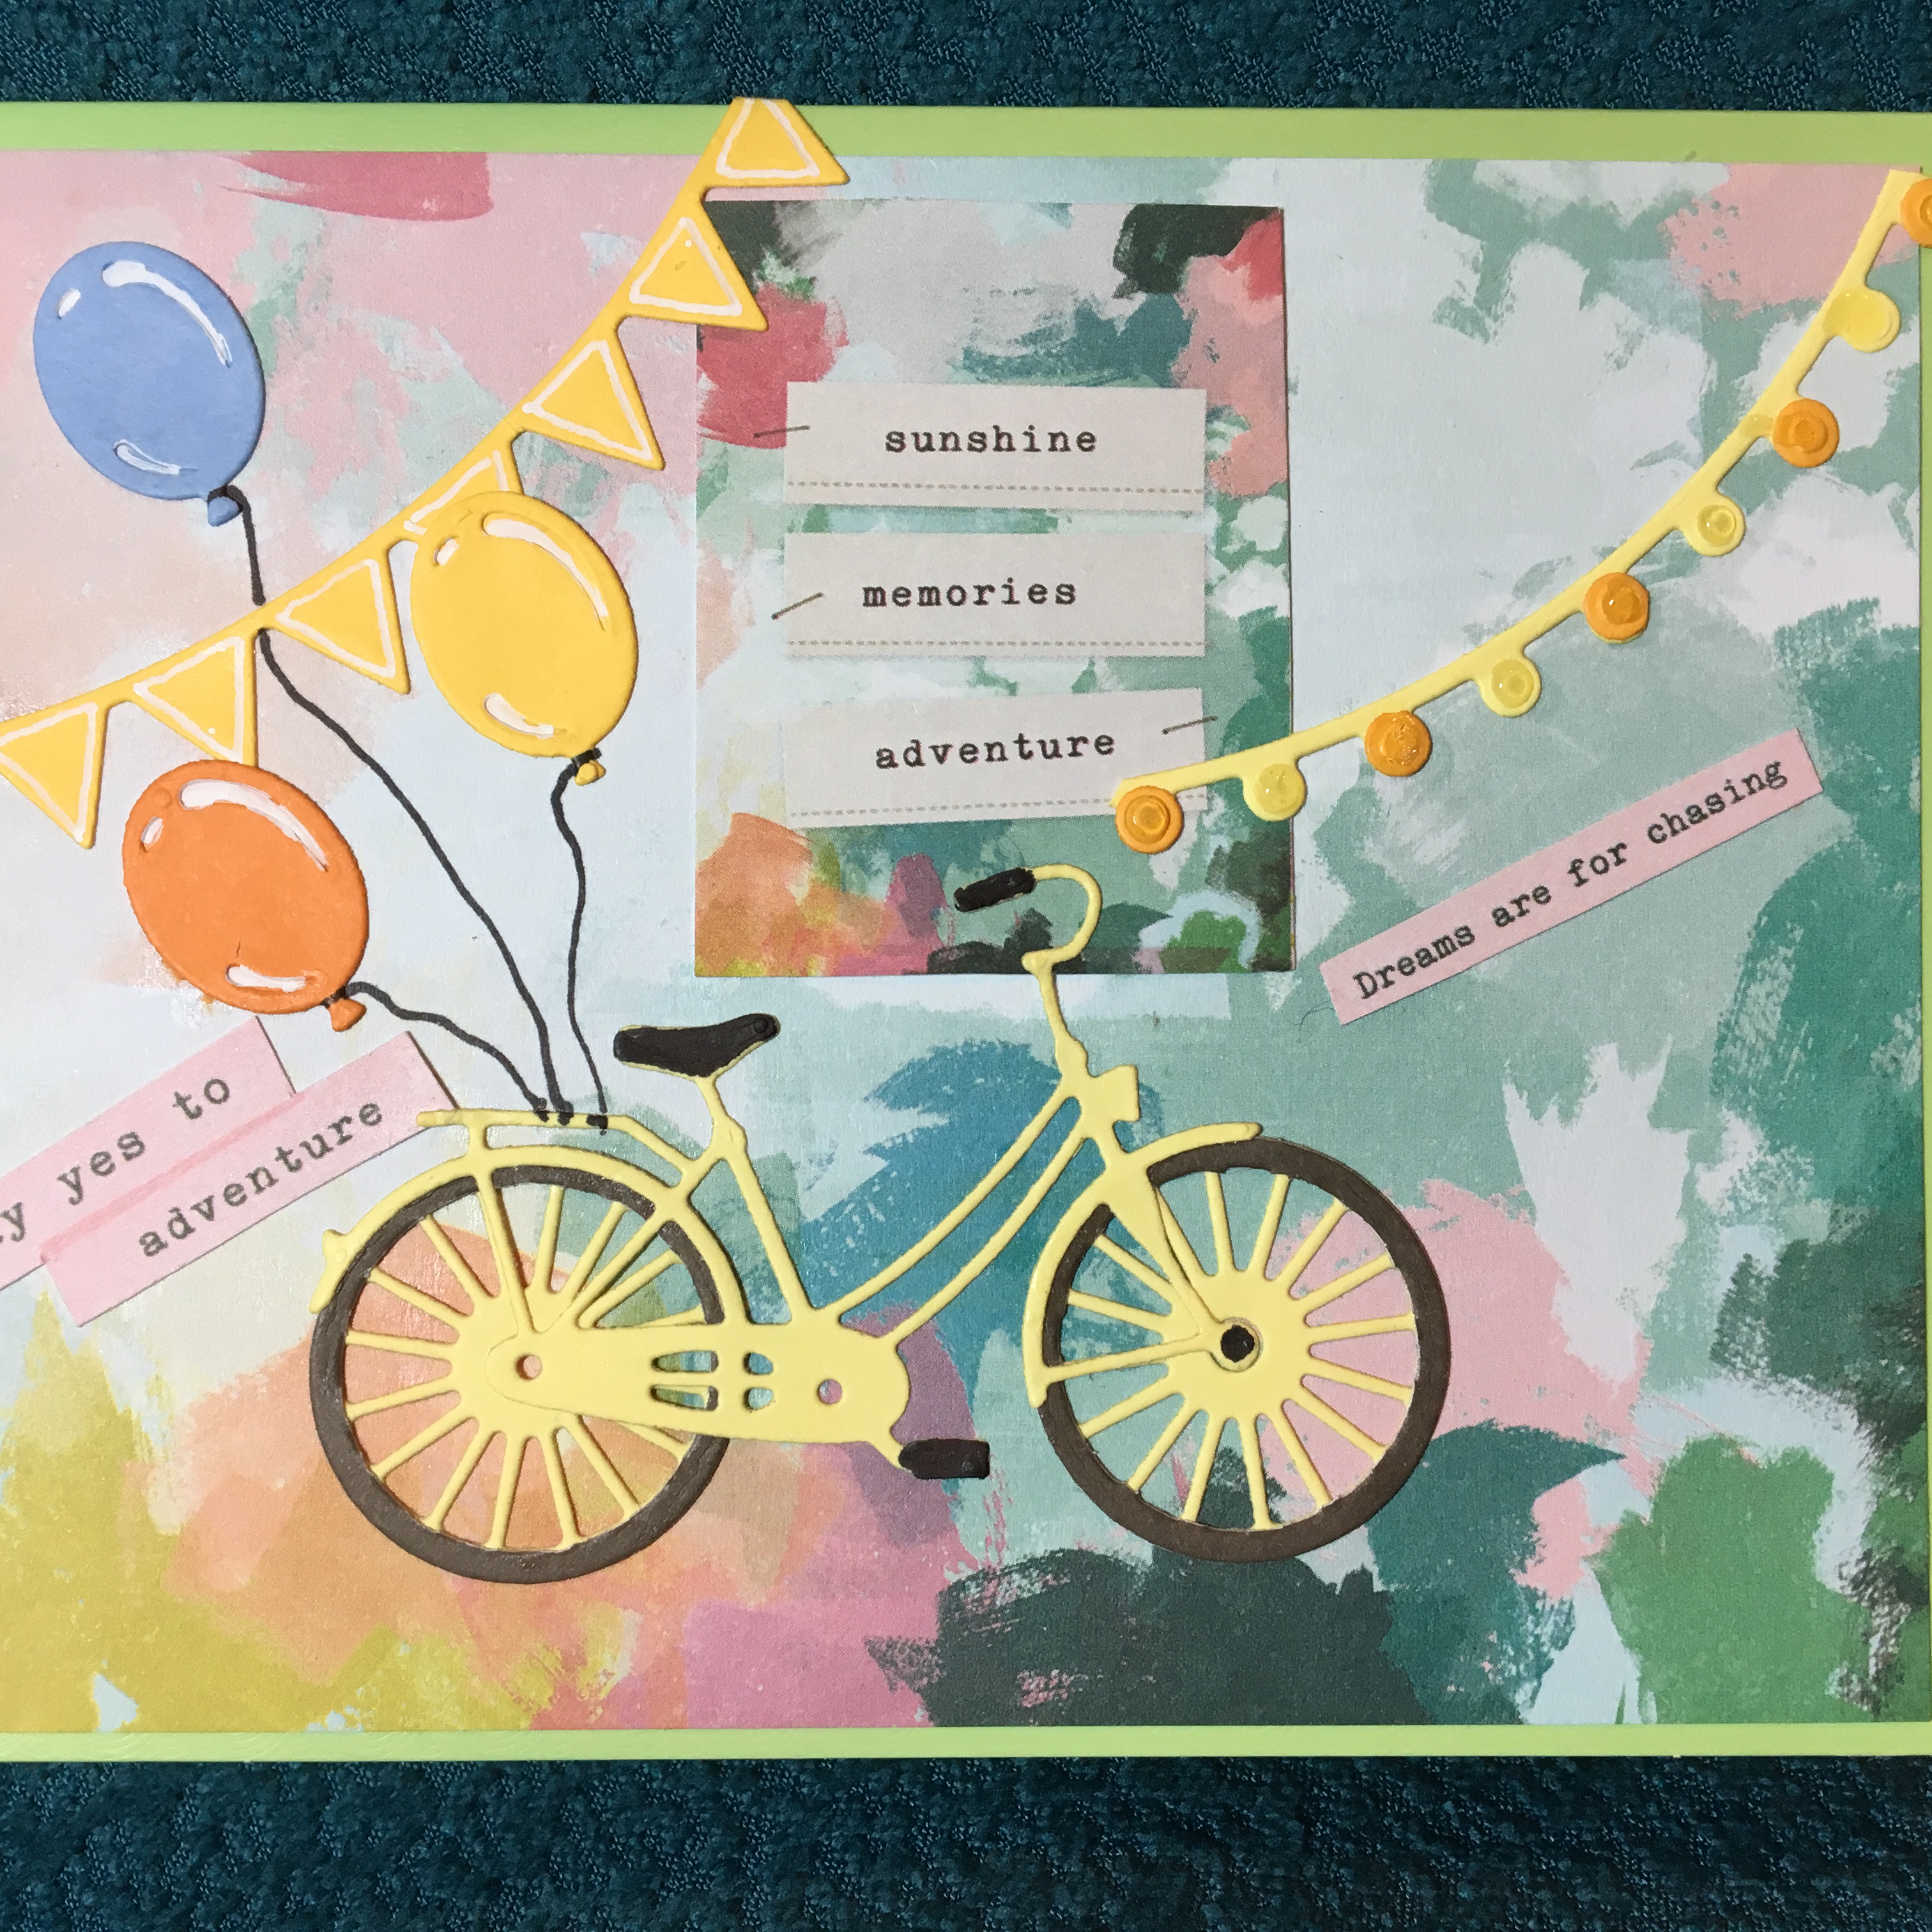
Say yes to adventure. Chase your dreams. Who knows where it will lead you? This is a card that tries to capture all these sentiments and to celebrate achievement.
The inspiration for this card comes a desire to use all of my bicycle dies, but morphed into a card trying to only use one paper set (Chasing Dreams by Maggie Holmes for Crate Paper). The bicycle die set is by Simon Says Stamp and has the wheel as a separate die so you can cut the perfect tire from a separate color and has a separate basket die as well. The balloons, string of lights and banner flags are from one of my favorite die sets by Sizzix and Courtney Chilson. A fine tipped black marker was used to color the bike’s handles, pedals and balloon strings. A white gel pen was used to color in the balloons’ highlights.
While the outside of the card is to suggest the current moment, the inside is to suggest how pleasant the future will be if you chase your dreams and say yes to adventure.
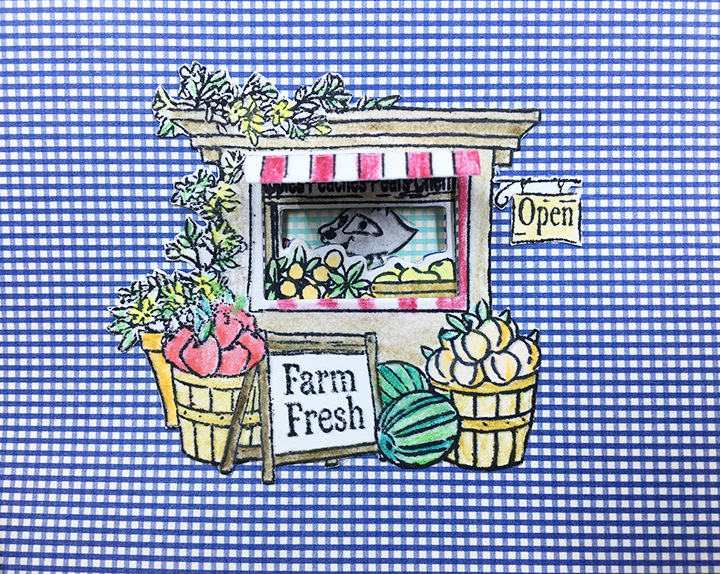
All of the pop-up, stamped, watercolored and die cut images come from the Hero Arts January 2019 My Monthly Hero kit. I had to cut off the top awning of the flower stand and lower it to fit inside the card. I reinforced the back side of the stand with strips of scrap paper before attaching with double-sided tape.
The outside sentiments come from the paper stack while the inside sentiments are from two separate sets. The “you’re wonderful” is stamped and embossed from the Hero Arts set and the ”Celebrate” is die-cut from Momenta Firefly’s Celebrate Happy Birthday die set.
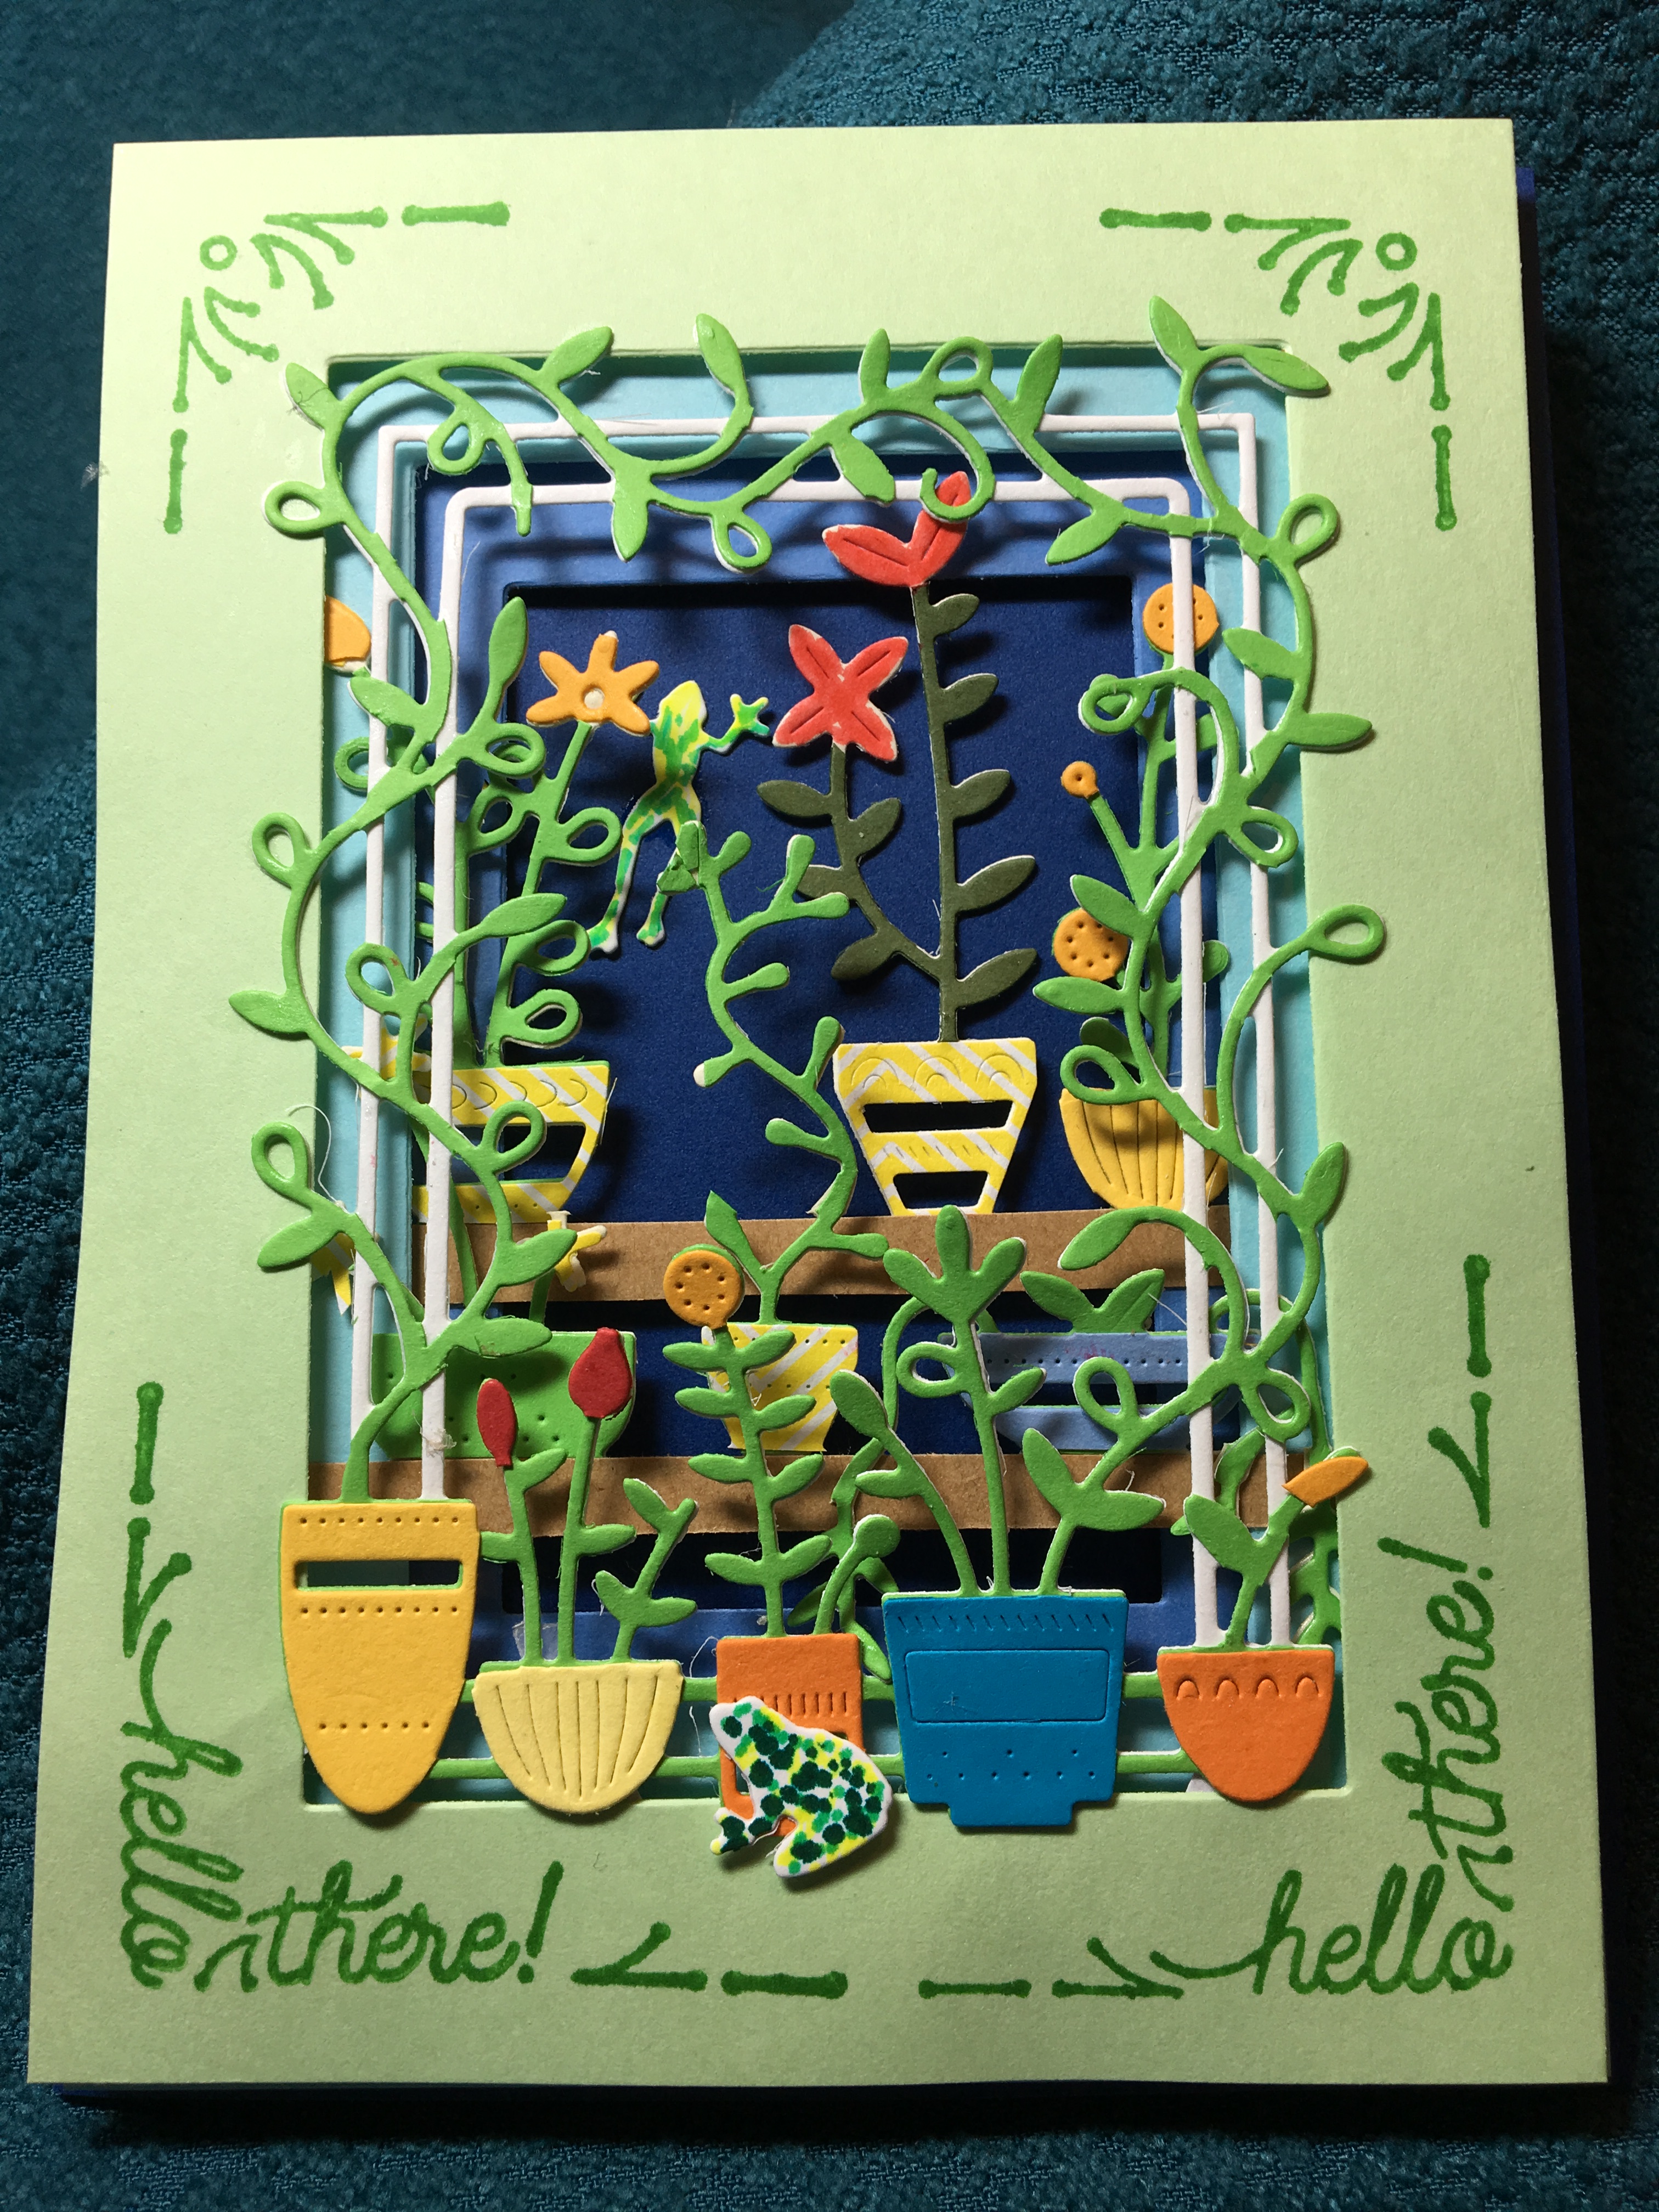
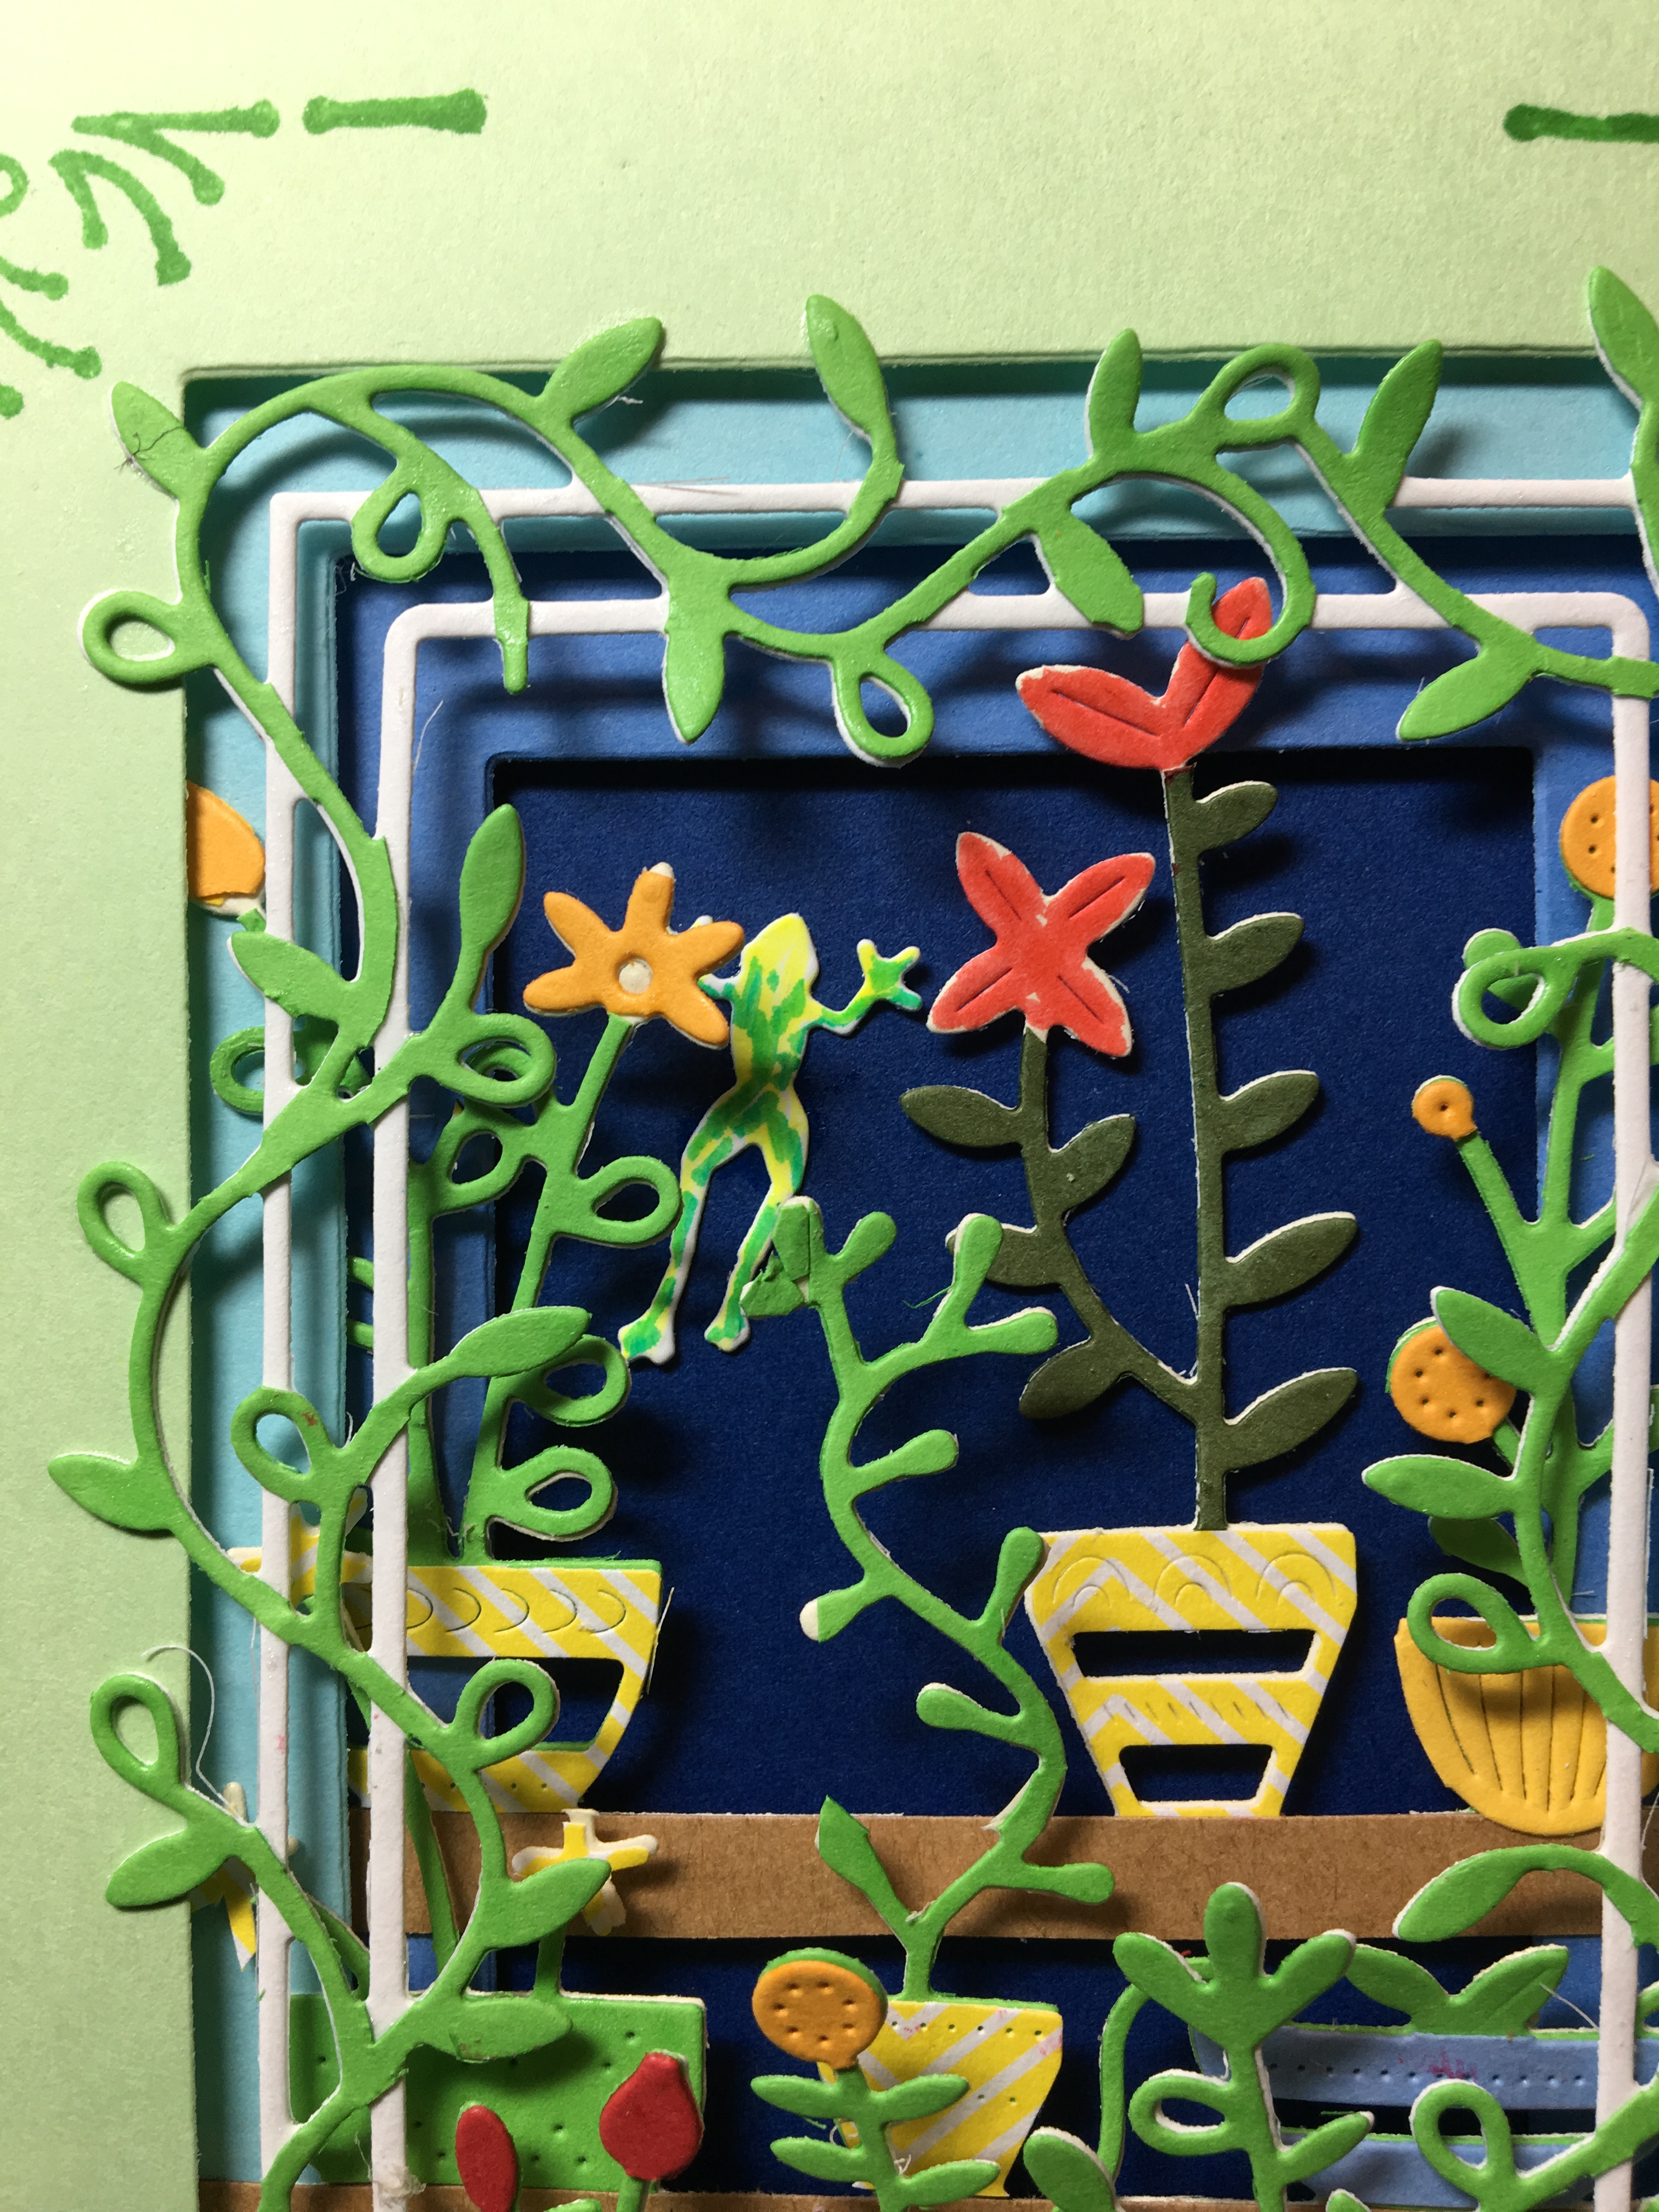
A colorful archway of potted plants looking into shaded shelves of plants. What could be more inviting on a hot summer’s day than the cool retreat into a shaded, colorful paradise?
The shadow frames were die cut using the three rectangles from Sizzix’s Courtney Chilston’s Birthday Shadow Box Thinlits set from a set of blue cardstock that progressively gets darker as it goes backwards, just as the light and shades would looking through a doorway on a sunny day.
This card was created using Poppy Stamps’ Spring Pots Shelves, Spring Pots Frame and Tiny Frogs dies. Two full die cuts were made from each of the pots dies – one in white/cream cardstock and one in green. The green die cuts had the rectangular frame cut away from the vine on the frame and the green shelves had the two shelves separated. Using colorful scrapes, additional dies cuts were made of pots and flower blooms. (Hint: Use wax paper over these intricate dies. They will peel off from the back side of the cardstock and take many of the tiny dots and squiggles with them as you peel. Use a poking tool for the rest.)
The green die cuts were glued onto the white/cream die cuts and the colorful pots and blooms were glued down. Using some scrap brown kraft-paper, two narrow strips were cut and glued over the separated pots to form two new shelves that were a quarter of an inch longer on each side.
Foam tape was used between the four layers placing the tape near the cut out rectangle so that foam layers are not directly above each other so that the card will meet the .25” maximum thickness of U.S. Postal Service.
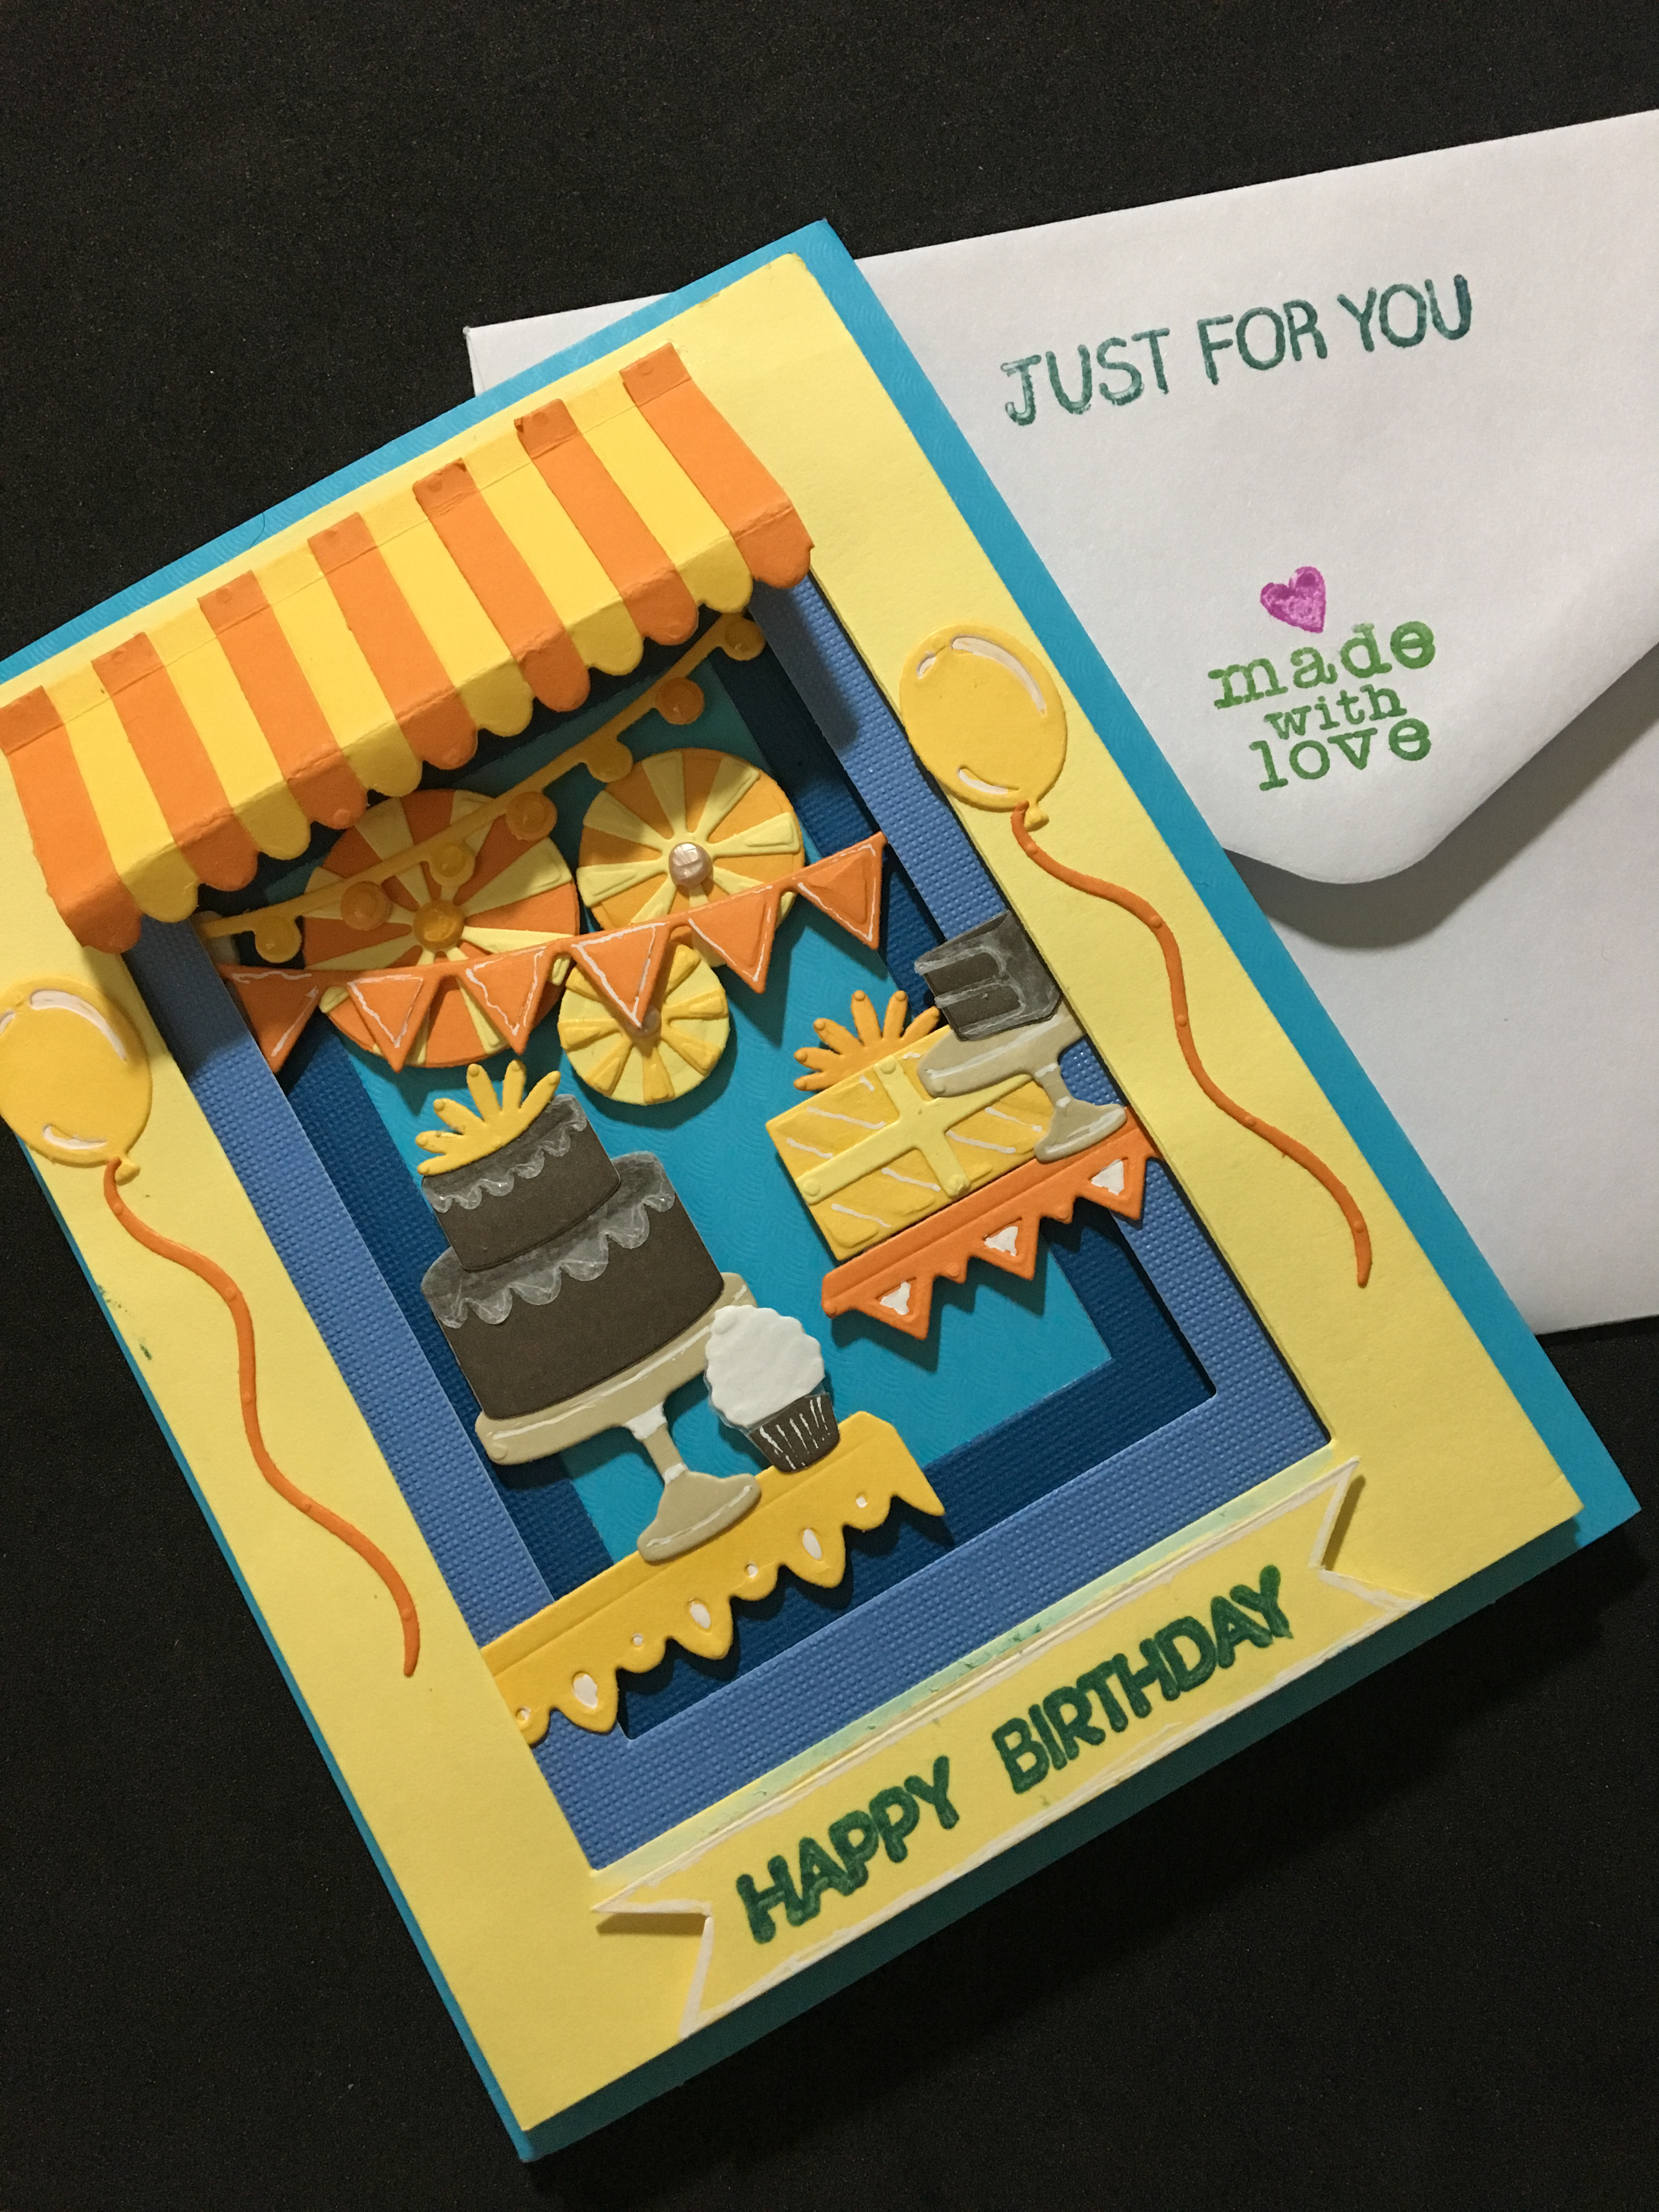
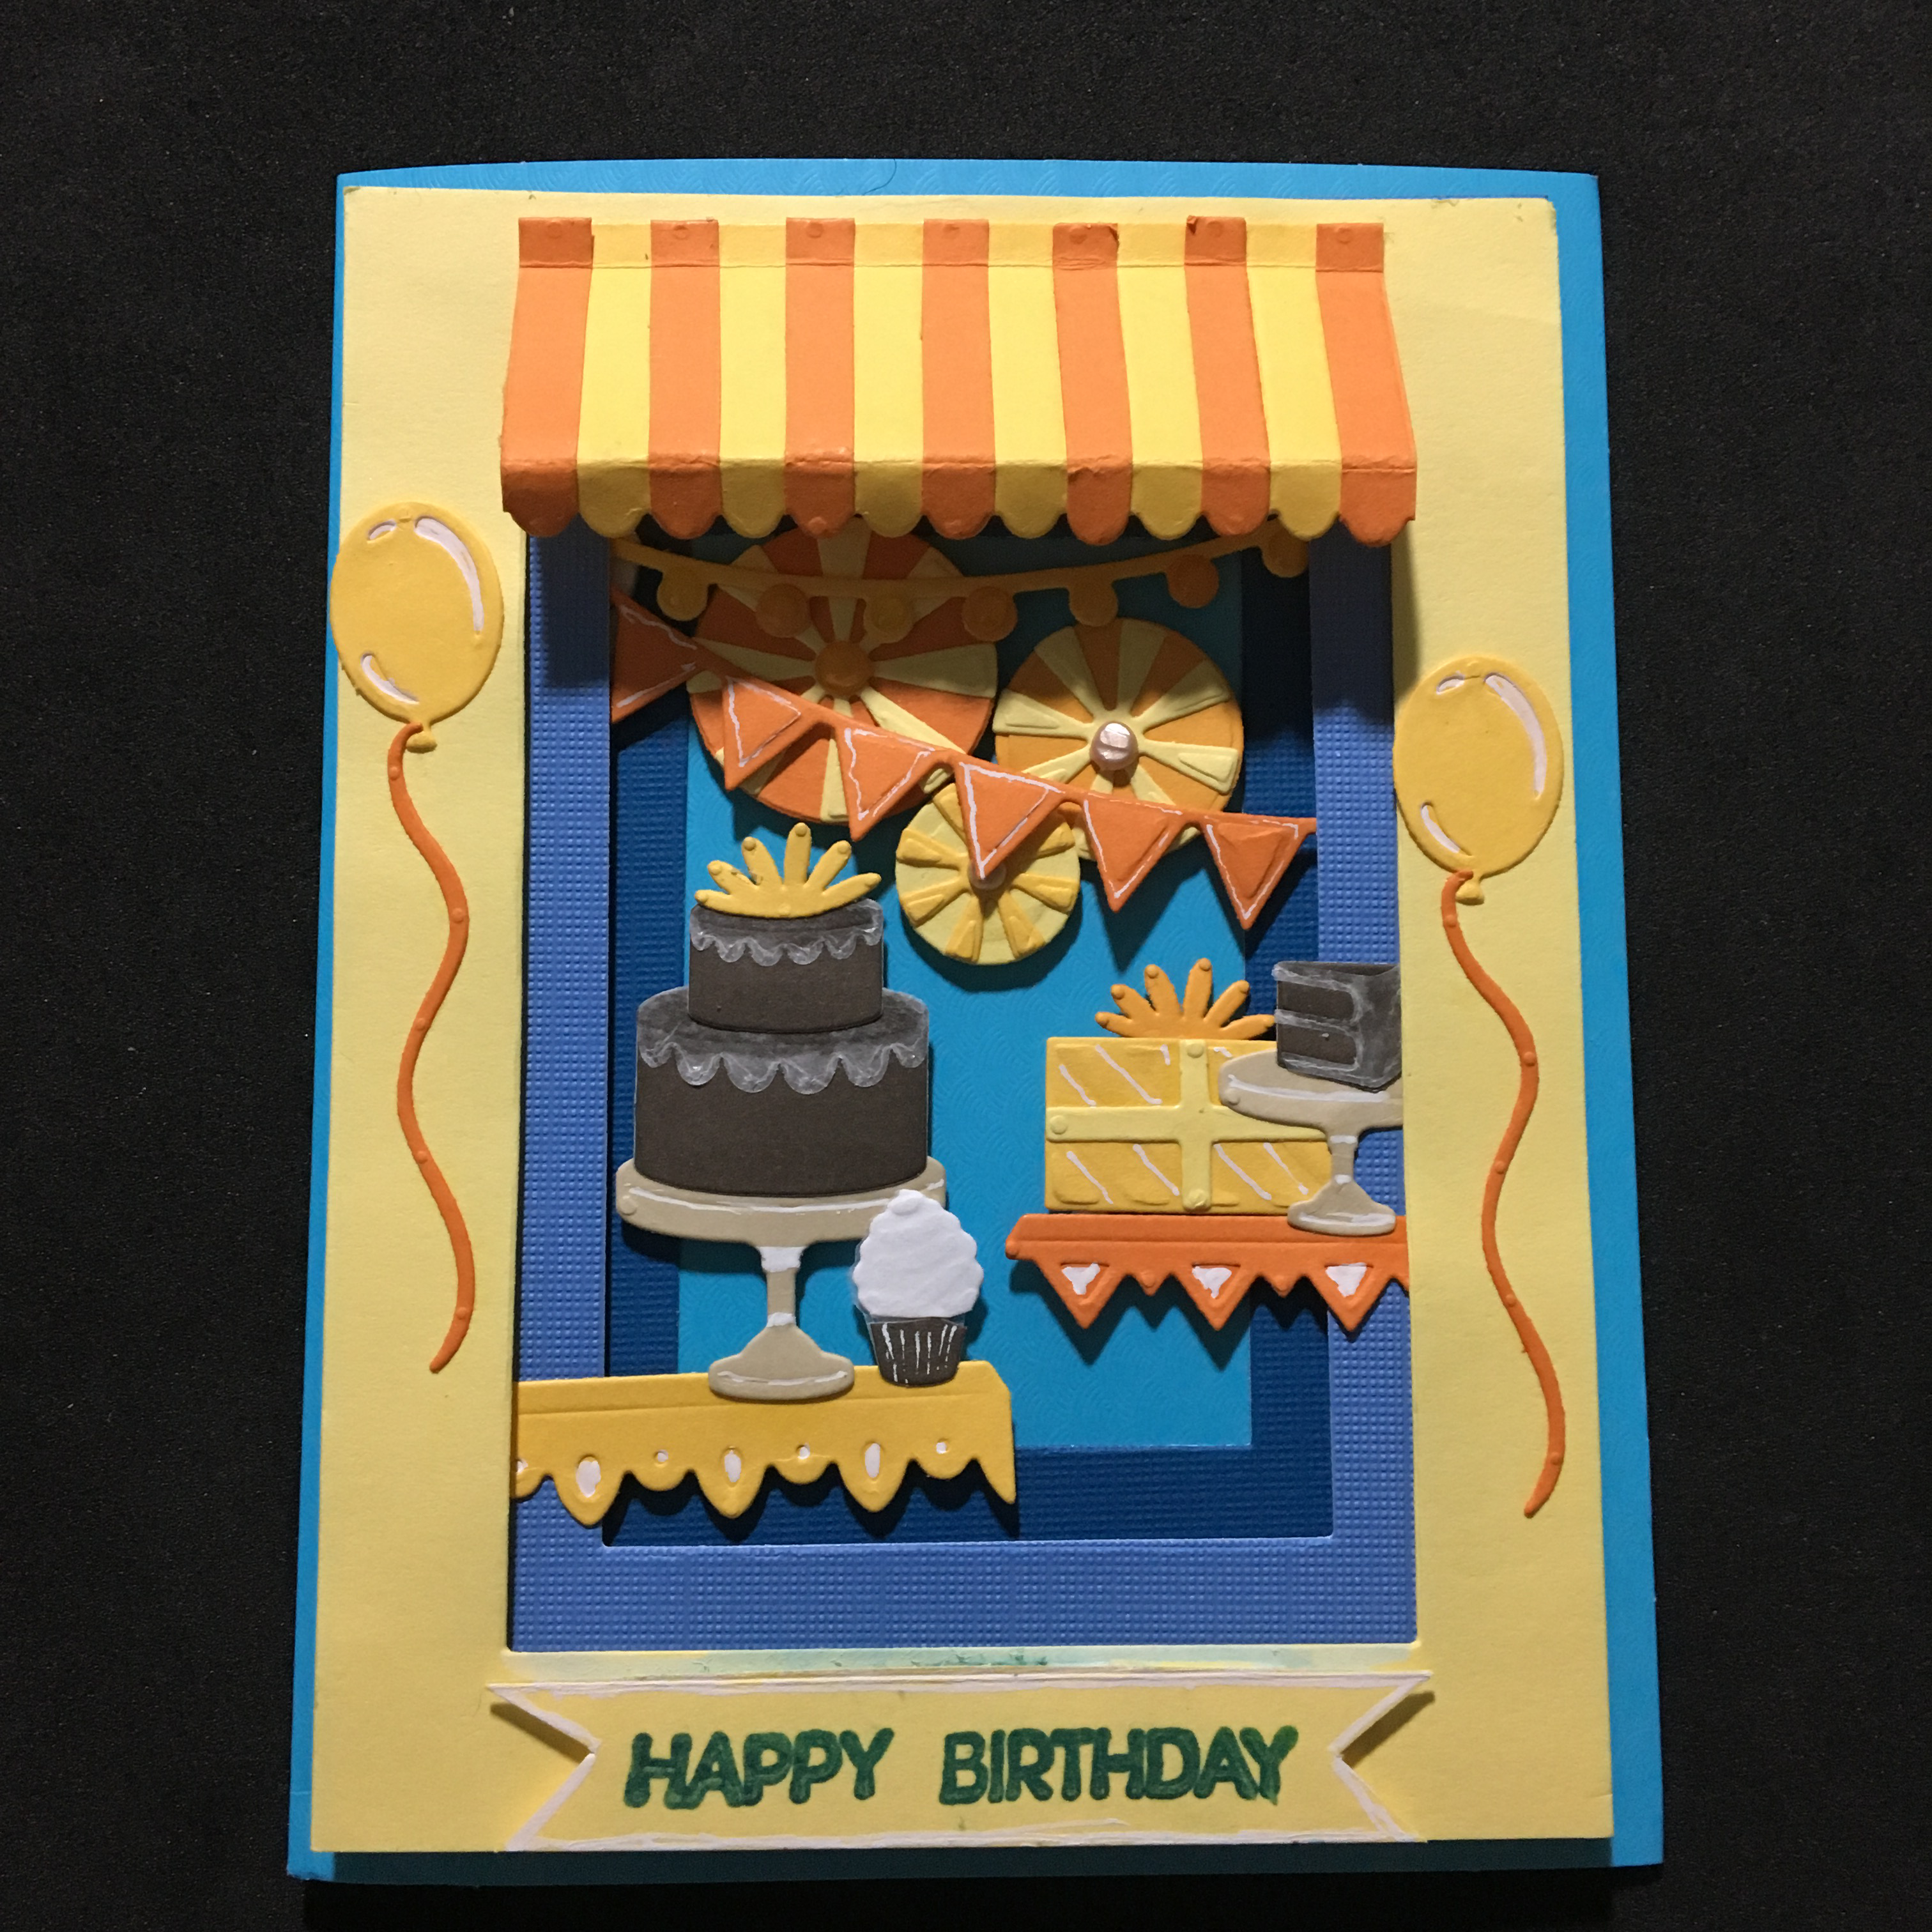
Here is a birthday party in an envelope. The recently released Sizzix Birthday Shadow Box by Courtney Chilson is a great deal of fun to create. Because I love chocolate cake with a thin glaze of icing, I used wax paper for the icing. White gel pen and Nuvo Drops help create the 3D look on the card. Foam tape between the window frames and under the decorations, cake, gift and shelves create the shadow box.
The inside carries on the window theme with additional part decorations. I used the yellow window cut-out from the card front as the bottom mat for the computer-generated greeting.


![TZXT2727[1]](https://ullysworld489442913.com/wp-content/uploads/2019/07/tzxt27271.jpg)

 Say yes to adventure. Chase your dreams. Who knows where it will lead you? This is a card that tries to capture all these sentiments and to celebrate achievement.