Santa Stop Here

Fur babies can enjoy the winter holidays as much as their human parents. This little pup doesn’t want Santa to forget her. She’s got her Santa hat and lights on her house as well as a sign asking Santa to stop.

The card front uses the dog from the Dog House Tiny House Add-Ons cut three times to make her stand out from the busy background paper. Dog bones from this set were also added to hint at what is to come on the inside.

To create the dog house, cut out and assemble a red Tiny House. (See assembly video.) I used the same red lightweight cardstock for the side panels from the add-ons. I choose not to ink the dies to print the siding lines, but rather to emboss them and then, using a white ink cube, to add a powdery dusting of snow.

For the colorful lights, use the lights from the Holiday House die set. (I used shimmer paper and colored them with fine-tipped markers.) The wreath is also from the Holiday House. Pup is added to the front of the dog house with a thick foam dot.

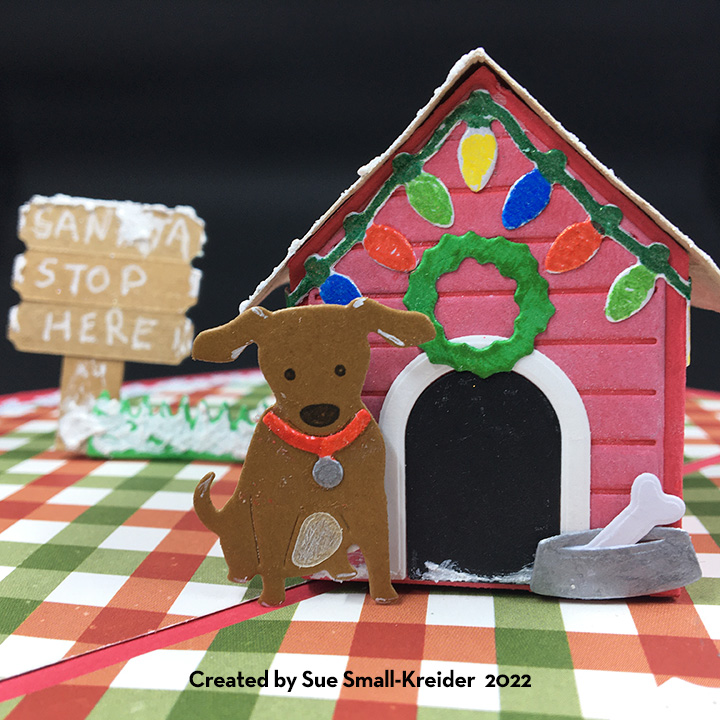
The snowy look on the roof was created by painting a thick coating of glitter gloss and using Effect Snow around the edges. To hold up the β€œSanta Stop Here” sign, a grassy strip from the Mushroom Tiny House Add-Ons set was cut, Effect Snowed, and glued to the card base and dog house. The sign is made from three of the school signs from the Church and School Tiny House Add-Ons set.

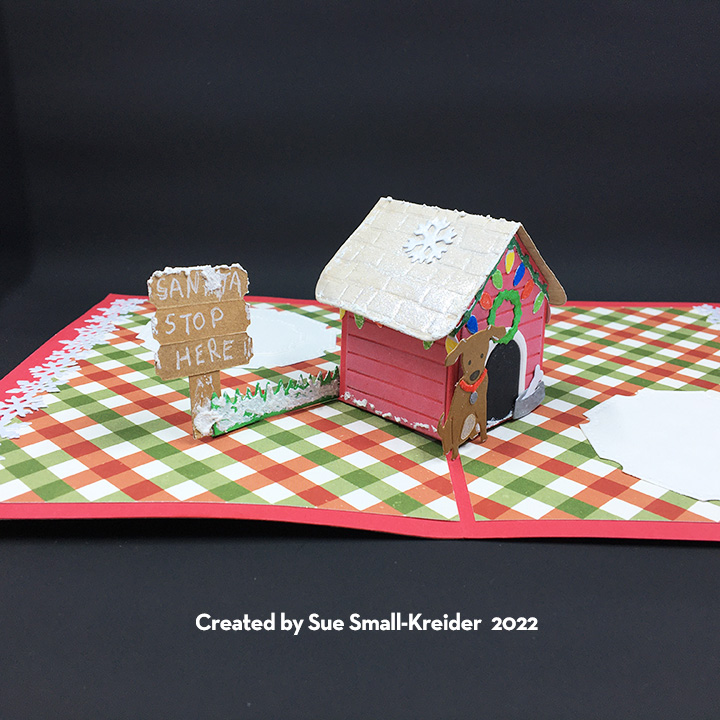
White octagons from the Bam Box Pop-Up die set are placed in opposing corners like snowballs for personal messages. Snowflake borders cut from shimmer paper using the Long Nature Edges 2 set.

Card backs are just as important as fronts. This one is decorated with left over strips.

The back flap of the envelope hints at what’s to come with the Santa capped pup.

Thank you for reading this blog post. Please like and leave comments 😊

Materials Used:

Dies

Papers

  • Echo Park Paper Co. – 12 x 12 Double-Sided Cardstock – A Perfect Christmas by Lori Whitlock – Christmas Collage – APC135008
  • Red Light-Weight Cardstock – 8.5 x 11
  • Colored Cardstock Scraps
  • White A7 Envelope

Pens & Inks

  • Blue, Red, Yellow and Blue Fine-Tipped Markers
  • Gelly Roll 08 Pen – White
  • Pigma Micron 05 – Archival Ink .045mm – Dark Brown
  • American Crafts – Metallic Markers – Silver

Miscellaneous

Popping The Question

Hi Crafty Friends,

Welcome to our Karen Burniston Products – KB Riley LLC December Release Blog Hop. The Design Team have come together with Karen today for a fun blog hop to celebrate the release of 11 new dies. Sneak peeks of the new release started last week, and the dies are available to order NOW!

This proposal is literally popping the question!

Karen Burniston’s December 2022 release includes the Surprise Cube Pop-Up, Slider Box and Wedding Charms die sets used to make this proposal box.

Three decorated Surprise Cubes comfortably fit inside the slider drawer. (See assembly video for Surprise cubes.) Using the smallest crosshatch rectangle from the Slider Box set to hold the big question, it was glued to one side of a cube when flat. Placing this cube in the bottom of the drawer it tends to stay inside the drawer when the other cubes pop out. (Slider Box assembly video)

Four different charms- groom tux, bride wedding dress, double wedding rings and clicking champagne glasses – from the Wedding Charms set cover the sides of the cubes.

The tiny crosshatch squares and triangles included in the Surprise Cube set along with matting squares and triangles make for quick decorating. The Mini Alphabet letters spell out the proposal.

Not ready to pop the big question? Then try these die sets for asking someone to the prom, wishing a Happy Birthday or a Happy Christmas. The drawer will fit a gift card under the three cubes.

This release includes:

  • 2 new charm die sets
  • 1 new stand alone die set
  • 2 new Tiny House Add-Ons sets
  • 2 new Pop-up die sets
  • 1 new Woven Box Basket die set
  • 2 new Crosshatch die sets
  • 1 new Box die set

Dies are available to order now on the website.

GIVEAWAY:

To celebrate the release Karen Burniston and each of the Karen Burniston – KB Riley LLC Design Team members will be giving away a $25 Gift Certificate to some lucky person who comments on our blog posts, so make sure you join the hop and comment on everyone’s blog post. Winners will be randomly chosen from ALL of the blog hop comments received on our blog posts by Monday, 19th December 2022. Lots of chances to win some goodies, so just leave a comment on this post or any other blog hop posts to enter! Don’t forget to leave some way for us to contact you, in case you are a lucky winner!

Karen Burniston 

Lois Bak 

Sue Small-Kreider –Β YOU are HERE

Karen Aicken 

Jennifer Webster 

Frances Byrne 

Nicky Foden 

Sandy Diller  

Suzanne Smit

Fran Sabad 

Gingerbread Holidays

Gingerbread is a sweet treat and holiday cards that smell of sweet baked goods make these two variations on gingerbread house pop-up cards a treat for the senses.

Karen Burniston’s Tiny House Pop-up die set and add-ons feature strong in these two cards. Primarily the Gingerbread add-ons are used, but the rounded door is from the Mushroom add-ons set.

The main difference to these two cards is the position of the two tabs that attach the tiny house to the card base and therefore, where the extension bar is attached on the house – front or back. The tree is a Winter Charm.

White hearts cut from the crosshatch hearts die set are places to write a personal message.

To give the cards their sweet scents, Nuvo Aroma Drops were used – red Strawberry Tart as the red candies on the roof and Vanilla Cupcake as light brown icing on the window panes and door frame.

Card backs are just as important as fronts. These are decorated with left over strips to mimic ribbon on gift boxes.

The envelope back hints at what’s to come when the card is opened. The stamps are from the same Lisa Horton Crafts Premium Magazine kit as the inside cookies and candy canes paper and front foiled paper sentiment topper.

Like the Tiny House? See more tiny house sets by clicking here.

Thank you for reading this blog post. Please like and leave comments 😊

Materials Used:

Dies

Papers

  • Echo Park Paper Co. – 12 x12 Double-Sided Cardstock – I Love Christmas by Lori Whitlock – Here Comes Santa
  • Stampin’ Up – Doubled-Sided Cardstock from my stash –
  • Colored Cardstock Scraps
  • Pink A2 Envelope

Pens, Inks & Embellishment Drops

Miscellaneous

Santa’s Sleigh Pop-Up

A wet snowy night for Christmas Eve and Santa and his reindeer are feeling a bit blue with the weather, but whoever receives this card will be cheerfully surprised when Santa pops-up.

This is a slimline card version of a non-traditional color scheme Santa scene that I used on another project that will be unveiled during the sneak peak week of Karen Burniston’s December 2022 release.

To create the the inside pop-up scene, I used four of Karen Burniston’s previously released die sets – Sleigh Pop-Up, Christmas Animals and Gnome and Santa. I had to reverse the direction of the sleigh to make it work with the reindeer dies. The reindeer are each made up of two die cuts that are glued together at their antlers and have the face colored on the front side only, but with narrow strips of cardstock forming “U” shaped bases for the feet to be glued onto. Blue and white baker’s twine is glued on to the reindeer for the harness and reins.

The front sentiment and pine branches are all by Karen Burniston. The tiny bows are from the sleigh die set while the pine branch is from the Holiday Charms set.

Velvety flocked paper lines the inside of the card with crisp white snowflakes (from holiday charms and sleigh die sets) and a fancy edged label for a personal message finish the inside scene.

As per my usual, I like the back of the envelope to hint at what is to come. The stamps are by Paper Discovery.

Materials Used:

Dies

Papers

  • Recollections – Signature Especial 12×12 Foil Paper – Silver Glitter -220520
  • Spellbinders -8.5×11″ sheets of 100lb. Cardstock – Waterfall – CS-017
  • Stampin ‘Up – 12×12″ Specialty Vellum – Snowflakes
  • Stampin’ Up – 12×12″ Snowy White Velvet Sheets
  • Brazzill – 12×12″ Cardstock -Coconut Swirl
  • Pink, Black and Yellow Cardstock Scraps

Inks

  • Blue and Pink Fine-Tipped Markers
  • Sakura – Gelly Roll Pen – Silver -XPG#744
  • Ranger – Tim Holtz – Distress Ink – Salty Ocean
  • Stampin’ Up – Classic Stampin’ Pad – Blueberry Bushel

Stamps

  • Paper Discovery by Olga Direktorenko – A5 Clear Stamps – Rustic Christmas – Christmas Sentiments

Miscellaneous

Brr, It’s Cold Outside!

Sometimes it’s nice just to watch it snow with a warm cup of coffee or hot coco.

This fun mini-slim sized card is a blend of stenciled coffee cups and a die-cut snowflake collage pop-up. All the dies used are by Karen Burniston while the layered stencil is by Pretty Posh Pink. The coffee cups by both designers are similar in size and work well together.

I went through all my Karen Burniston die sets to find as many different single snowflakes as possible to use for the swirling collage mechanism inside the card. (I recommend watching the assembly video before starting your card. The video has useful tips and card base minimum sizes that will help you design your card.)

The sentiments all come from Karen Burniston’s Word Set 13 – Snow and include the shadow dies for the large words of β€œBrr!” and β€œSnow.” The mug and travel coffee cup inside are all die-cuts inked similar to the stenciled ones on the card front.

As with all my cards that are sent in an envelope, I have decorated the back flap with a hint of what’s inside. This time I stenciled a coffee mug on the flap.

See more coffee themed cards by clicking here.

Thank you for reading this blog post. Please like and leave comments 😊

Materials Used:

Dies

Stencils

  • Pretty Pink Posh – 6×6 Stencil – Layered Coffee Cups

Ink

  • Ranger – Tim Holtz – Distress Oxides – Festive Berries, Saltwater Taffy, Ground Espresso, Pumice Stone, Hickory Smoke, Mowed Lawn, Crushed Olive, Prize Ribbon and Tumbled Glass

Papers

  • Stampin’ Up – 6’ x6” Specialty Designer Series paper – Lights Aglow
  • Blue and White Medium Weight Cardstock
  • Simon Says Stamp – Mini Slimline envelope – Grocery Gag

Miscellaneous

Thanksgiving Leaves

November winds are working the last of the leaves off the trees as we go to celebrate Thanksgiving.

A fun little pop-up card using Karen Burniston dies and some thread to dangle fallen leaves from in the two open ovals. The pop-up mechanism, small trees, small ovals, and grass are from the Oval Frames Pop-up set.

The leaves and large tree are from the Tiny Trees Pop-up set. And the large oval and frame are made using the Oval Crosshatch dies. While acorns are from the Autumn Elements die set, the grass pieces are scraps from another project.

I glued two leaves together with a bit of cotton thread between them and then sandwiched the threads between two of the oval pop-up frames.

The sentiment is cut from two different shades of brown using the Autumn word set.

For a place to write a personal message, I used medium crosshatched ovals with two leaves as decoration.

As with all my cards that are sent in an envelope, I have decorated the back flap with a large oak leaf from the Autumn Elements die set.

Thank you for reading this blog post. Please like and leave comments 😊

Materials Used:

Dies

Papers

  • Rubbernecker – 6 x6 Paper Pad Double-Sided Papers 80# Cardstock – Autumn Leaves
  • A2 Brown Kraft Paper Card and Envelope

Miscellaneous

  • White Cotton Thread

Snow in review

Over the past few years, I’ve made a few cards featuring snow and thought it might be fun to review them again.

Early Christmas Cards

12 Days of Christmas Trees – Day 4

Let It Snow Shadow Box

Snowy Forest Day

A Snowy Drive with Santa

Warmish Winter Wishes

Santa Vintage Trifold

Winter is in the Air

Snow Days

Snowy Good Morning

Hillside Holiday Wishes

Silent Night in the Village

Winter Mail

Scandinavian Snowman

Meet The SnowΒ Family

Happy Autumn Colors

Autumn can be such a happy, colorful time with much to be thankful for in life.

This card uses Karen Burniston’s Label Charm Pop-Up and her Autumn word set. Colorful double-sided paper makes this card pop.

I decided to make a cardbase mistake into a proper card. I had cut the main pivot Label Charm Pop-Up die through both front and back of an A6 cardbase (6 1/4 x 4 1/2 inches) and used the smallest fancy label die from the set with two small strips to connect the two pivot labels.

My favorite way to make the Label Charm Pop-Up is to figure out the mechanics with a thin cardbase and then cover it with decorative papers. The frames around the pivots are the waste from cutting the out. Because of catch-points the frames create, the sharp points of the frame are trimmed to allow the fancy label to pivot freely.

Double cut the sentiments from different colors and stagger the layers to create shadows as well as some dimension.

Final elements on the card are decorative strips from the paper collection.

Continuing with the autumn leaf theme, I stenciled colorful leaves onto the back of the envelope.

Thank you for reading this blog post. Please like and leave comments 😊

Materials Used:

Dies

Papers

  • Sunny Studio – Double-Sided 6×6 Cardstock – Critter Country
  • Park Lane Paperie – A6 Cardbase and Envelope – Ivory

Inks & Stencil

  • AlteNew – Grape Leaves Mask Stencil
  • Ranger – Tim Holtz’s Distress Oxide – Barn Door, Mustard Seed and Ripe Persimmon

Miscellaneous

Meet the Snow Family – Baby Snow

This card is part of the Karen Burniston Design Team snowmen challenge for November.

Today, I’m show you how to Baby Snow.

Baby Snow is comprised of the Mini Ball Pop-Up and the Bitty Ball Pop-Up with his coal features and scarf from the Snowman Add-Ons. His smaller carrot nose and stick arms are from the Snowman Twist Circle set while his cap is custom made.

Cut two of the Bitty Ball halves and two of the Mini Ball halves. (I was able to get all the pieces from a single sheet of 8.5×11 inch cardstock.) I find watching the assembly videos for the balls very useful. (Bitty Balls, Mini-Balls) Numbering the order of gluing the tabs is useful for the assemble of the balls. I cut all the trapezoid panels from an embossed white cardstock. And the ball halves are cut from a 100 lb. smooth white cardstock.

Assemble the balls as shown on videos, including a brad in the bottom of the Bitty Ball. (I didn’t have a brad when I made Baby Snow, so I improvised with a pipe-cleaner. I works, thin wire would be a better choice as the pipecleander adds bulk to the bottom of the card.)

Add facial features to the mini ball. The hat is one half mini ball cut in red, embossed with a knitted pattern embossing fold, and then trimmed down to fit the head. Once glued on, a three snowflake pom-pom was added to the top.

The scarf pieces are glued to the top of the Bitty ball edges and a full-size hexagon is traced using the die to cover the top of the body.

The ear flap and bill of the hat were free handed pieces cut first from scrap paper and once correct size traced onto the red cardstock and fussy cut. Some red and white twine was added when gluing on the ear flaps.

Once the decorations are complete attach Baby Snow to the card base.

Learn more about how each member of the Snow Family was created in these blogs:

Thank you for reading this blog post. Please like and leave comments 😊

Materials Used:

Dies

Papers

  • Spellbinders – 100 lb cardstock – Waterfall
  • Hot Off the Press – Black Suede
  • Hot off the Press – Black Glitter Cardstock
  • Blue, orange, brown, red and white cardstock scraps
  • Recollections – 8.5×11 White gold shimmer cardstock
  • Staples – 8.5×11 Printable glitter paper

Miscellaneous