Snow Days

What North American children hasn’t hoped for a school closing day due to a snowstorm.  This is a card celebrating a snowy day in lighthearted pastels. Karen Burniston dies are used for the card.

To make this A2 size card, cut a rectangle 4 ¼ x 11 inches of pink heavy cardstock and fold in in the middle to make a 4 ½ inches tall by 5 ½ inches wide card base.  Cut four decorative paper panels at 4 x 5 ¼ inches. Adhere these panels to front, back and insides of the card base.

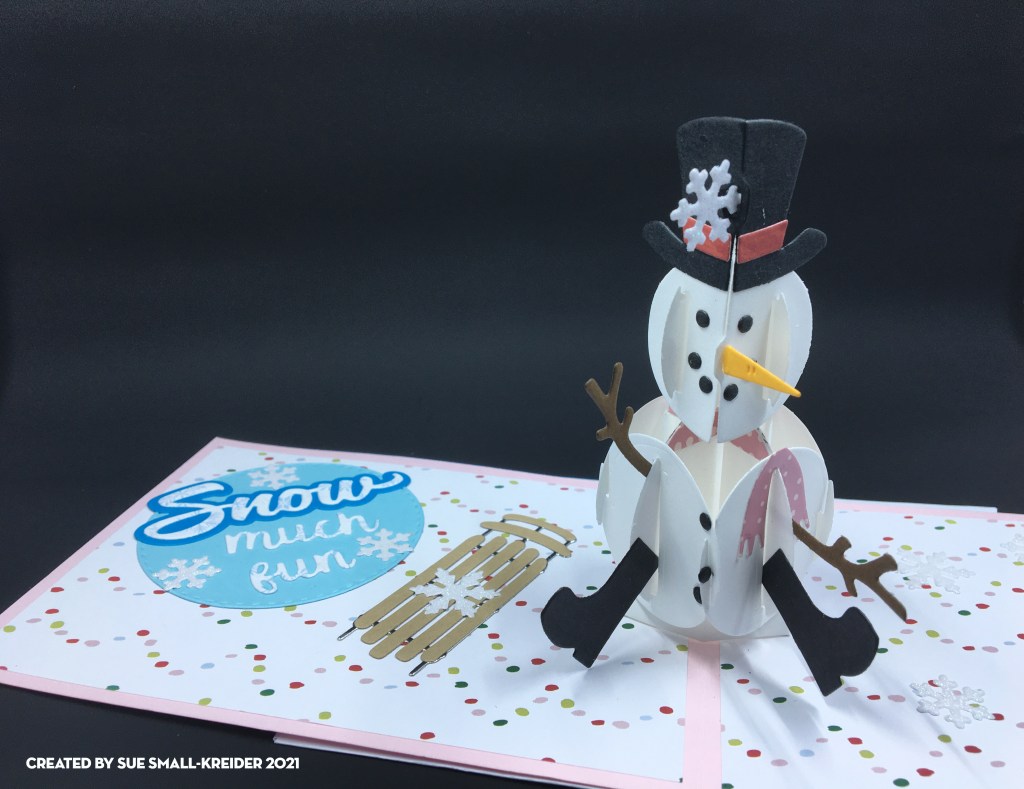
It is easiest to die cut all the pieces you will need to make both the inside and outside snowmen at the same time so that they are similar in colors and papers used. Also cut three circles or other label shapes on which to mount your sentiments. (For the personalized message circle, I added a smaller white circle.) Think about using contrasting colors for your words and their backgrounds. (I used blue to make the mostly white with snowflake paper I used for the words standout.)

After watching the assembly video on the inside snowman assemble as directed. Once the snowman is adhered to the card base, you can begin to decorate the card. (I used a sled die-cut from Memory Box to add to the snow time activities.) Remember to balance out the position of decorations from one side of the card to the other. There are two different snowflakes in the two snowmen die sets by Karen Burniston. They make wonderful filler decorations for the card.

Because I could not make up my mind on which stamp to use on the back of the envelope, I stamped two envelopes with hints as to the card’s theme. The word cloud is from Stampendous while the snowman is from Art Impressions.

Thank you for reading. If you enjoyed this blog post, please like it and follow the blog. 😊

Dies:

Stamps & Ink

  • Stampin’ Up Classic Stampin’ Pad – Dapper Denim
  • Stampendous – Winter Stags stamp set from Creative Stamping issue 90, Dec 2020
  • Art Impressions – Unmounted Rubber Stamp – Scrapbook.com exclusive Snowman – 5084

Papers

  • American Crafts – 348953
  • Pink card base – Bazzill -Pink Icing – PS1 – 102
  • Glitter paper – white from my stash
  • Colored cardstock from my stash
  • A2 Envelope

Additional Supplies Used:

Fineline 20 Gauge Applicator & Bottle

Tiered Cupcakes

Cards for tiered birthdays (as in 29 again and again) can be fun to make when you add in a pop-up element like a third tiny cupcake.

This card was inspired by the Karen Burniston Mission Poppable for August 2021 to use her Parcel Pop-Up die set. In addition to that die set, I used her Cupcake Pop-Up, the sentiments of “You’re Sweet” and “Happy Birthday,” and the candle from the Cake Pop-Up.

The double side paper is from Echo Park which is an older set designed by Lori Whitlock called Happiness is Homemade. Because the heavy cardstock is double-sided, it cut down on heavy layers of decorative papers.

I assembled the parcel pop-up as shown in Karen’s assembly video But I did not put on the decorative square front panel or flap. I also used a longer strip as the pop-up arm so that it would be tall enough to be seen behind the cupcake pop-up which was cut from a scrap piece of card stock and cut with tabs at the top and bottom to attached to card base and the parcel mechanism front.

The sentiments are cut once from pink glitter cardstock and once from glossy white paper (backside of some packaging). The white is just slightly seen so that the red on red stands out on the “You’re Sweet.”  I used a topper from the paper set that had an oval design and the used an oval die to cut it out to frame the cupcake.

Because the card is a slimline size card to fit in a No. 10 business envelope, I needed a large white paper doily to fill the bottom half of the card and allow for a space to write a personal message.

The back of the envelope is stamped with a watermelon colored ink using a cupcake and “Made with love” stamps from Simply Made Crafts.

Thank you for reading. If you enjoyed this blog post, please like it and follow the blog. 😊

Dies:

Stamps & Ink

Papers

  • Echo Park – Happiness is Homemade by Lori Whitlock
  • Glitter paper – pink and white from my stash
  • Dotted paper from my stash
  • No. 10 Business Envelope – Neenah Social – Bare White Techweave

Additional Supplies Used:

Summer Is In The Air

Hello, it’s Sue of the Dies R Us Design Team and today we are making a summer pop-up card for a vegetable gardener using Karen Burniston dies.

The chair die just fits in a 3 ½ inch x 6-inch mini slimline card. I started by cutting a 3 ½ inch by 11-inch piece of lightweight white card stock and folded it in half.

Next, I cut piece of patterned background paper slightly larger than 3 ½ inch by 5 ½ inch and marked with a pencil where the chair arms connect with the card back on the patterned paper and cut slits so that the printed paper could be slid into place behind the chair. Using the same technique, I cut a piece of green grassy card stock 3 ½ inch by 6-inch for the ground, cutting slots for the chair feet. Glue both decorative papers to card base.

Cut chair, arms and seat from woodgrain paper. (I made my own woodgrain paper using a woodgrain stamp that I heat embossed with watermark ink and clear embossing powder.)

Fold woodgrain chair folds as shown on packaging. Glue wood grain chair to patterned paper chair matching up the seat, back, arms and leg pieces. Train the chair to pop-up by opening and closing card a few times.

Decorate card with the Garden Charm set cutting off the charm loops. To make the basket of corn and tomatoes, use the basket from the Picnic Elements set and the fruit from the Tree Fruit set. (I had corn and red apples already cut from a Rubberneck Stamps dies set which I use turning the apples sideways to look like tomatoes.)

On the card back I cut a patterned piece of green card stock 3 ½ inch by 6-inch and glued to the card base. For the card front I cut a 3 ½ inch by 7 ½ inch piece of green printed paper and glued it onto the card base folding over onto the back of the bard. I added a small decorative topper to finish the back of the card. For the front of the card I used some of the garden charms to hint at what is inside.

The Karen Burniston “Hello sunshine, hello summer” sentiments were cut twice and glued together using a fine-tipped glue bottle for the tiny lines. This adds some depth to the words.

Hope this fun card has put a smile on your face and provided some inspiration for your crafting. 😊

See more chair cards below:

Dies from Dies R Us:

Additional Supplies Used:

Don’t forget to come join in the fun at the Dies R Us Challenge Blog. There’s a new challenge theme offered on the 1st and 15th of each month and one lucky randomly drawn winner will receive a gift voucher prize to the Dies R Us Store.  

 For your convenience, all the important Dies R Us links are provided below.

click below for:

STORE

CHALLENGE BLOG

FACEBOOK

INSPIRATION BLOG

FRIENDS OF DIES R US PINTEREST PAGE

Winter Is In The Air

Hello, it’s Sue of the Dies R Us Design Team and today we are making a Christmas pop-up card with a Charlie Brown Christmas tree using Karen Burniston dies.


The chair die just fits in a 3 ½ inch x 6-inch mini slimline card. I started by cutting a 3 ½ inch by 11-inch piece of lightweight white card stock and folded it in half. Next, I cut piece of patterned background paper slightly larger than 3 ½ inch by 5 ½ inch and marked with a pencil where the chair arms connect with the card back on the patterned paper and cut slits so that the printed paper could be slid into place behind the chair. Using the same technique, I cut a piece of white glitter card stock 3 ½ inch by 6-inch for the ground, cutting slots for the chair feet. Glue both decorative papers to card base.

Cut chair, arms and seat from woodgrain paper. (I made my own woodgrain paper using a woodgrain stamp that I heat embossed with watermark ink and snow embossing powder.)

Fold woodgrain chair folds as shown on packaging. Glue wood grain chair to patterned paper chair matching up the seat, back, arms and leg pieces. Train the chair to pop-up by opening and closing card a few times.

Decorate card with the Holiday Charm set cutting off the charm loops. To make the tiny potted fir tree, use the pine branch from the charm set and the sand pail from the chair set.

I used Cosmic Shimer Fluffy Stuff to create the little piles of snow around the base of the chair. Read the directions on the bottle before using! (You need to be careful when you heat the fluffy stuff up so as not to burn your card with your heat tool.)

Last, I sprayed the inside of the card with a white spray paint for a soft snow fall effect.

For the card front I cut a 3 ½ inch by 5 ½ inch piece of white glitter card stock and glued it onto the card base. On the card back I cut a textured piece of white card stock 3 ½ inch by 6-inch and glued to the card base. Next taped the top seam of the front and back with a red plaid washi tape and continued down the back of the card for added decoration. On the front the Merry Christmas sentiment is an old die I’ve had in my stash for many years. The snowflakes are from the charm set. (I used a fine-tipped glue bottle for adding glue to the sentiment and snowflakes that made it so easy to glue without a big mess.)

The back of the mini slimline envelope is stamped with fir trees in a dark green ink.

Hope this fun card has put a smile on your face and provided some inspiration for your crafting. 😊

See more chair cards below:

Cat In The Window

Fall Is In the Air

Spring Is In The Air

Summer Is In The Air

*·  Winter Is In The Air

* Happy Hour at the Beach

Dies from Dies R Us:

Additional Supplies Used from Dies R Us:

Don’t forget to come join in the fun at the Dies R Us Challenge Blog. There’s a new challenge theme offered on the 1st and 15th of each month and one lucky randomly drawn winner will receive a gift voucher prize to the Dies R Us Store.  

 For your convenience, all the important Dies R Us links are provided below.

click below for:

STORE

CHALLENGE BLOG

FACEBOOK

INSPIRATION BLOG

FRIENDS OF DIES R US PINTEREST PAGE

Keys, Stars and Sprays

Playing with new dies and spray mica paints resulted in this card.

I used Marianne Design Craftables Punch Die: Keys to die-cut the keys that are glued to a sheet of card stock and sprayed with brown, silver and gold metallic sprays. The green sheet that was cut up was die-cut with and Joy! Crafts Die – Bille’s Background Stars and sprayed with green and gold sprays. The back blue sheet was sprayed with blue and silver sprays. The birthday sentiment is die-cut from shiny black paper using the Happy Birthday Stamp and Die Set from Stamps by Chloe.

Hope you enjoyed this quick card. If so, please comment and like and follow this blog. 😊

Other Supplies Used:

A Truly Great Friend

Hello, it’s Sue of the Dies R Us Design Team and today we are making a Happy Mail card using Karin Joan Misses dies and stamps by Studio Light.

This slimline easel card was inspired by some made by Jennifer McGuire. Elements from both sets were used to create the paperdoll and an action wobble spring. 

Cut from the Betty die set:

  • One head and shoulders from skin colored cardstock making sure to not loose the ears which cut separately as is the head
  • One blouse using just the shoulders and neck section of the die, cut the blouse from a patterned paper. Then using v die cut the v-neckline
  • One collar and button placket from white cardstock. (Save the button circles for another card)
  • One long bangs from your choice of hair colored cardstock

Cut from the Tasha die set:

  • Two arms from skin colored cardstock (Glue them together for sturdiness)
  • One arm from patterned paper as a sleeve (Fold back hand and trim to form sleeve cuff. I covered my cuff with a scrap of white cardstock.)
  • One long hair piece from your choice of hair colored cardstock

Cut four Hellos from Hello die.

To assemble the paperdoll, begin by stamping and heat embossing the facial features using the stamps from the Tasha set. (I colored the tongue with a pink gel pen and the teeth and eye highlights with a white gel pen.) Play with the layout of the hair pieces, ears and head. Once you have the position using a pencil, mark the location of the head and ears on the long hair piece. Glue the ears in place using a fine tipped glue bottle then glue bangs in place. Glue top half of head to long hair piece making sure to leave the lower half without glue. 

Adhere collar and button placket to front of blouse. Glue blouse to shoulders and neck piece. (I used Nuvo drops for the buttons and let the piece dry overnight before going to the next step.)  Using the fine tipped glue bottle, attached the head to the neck. Glue the long hair to back of shoulders.

Assemble arm and sleeve as directed on cutting instructions. (You may want to cut an additional sleeve and cuff if it will be seen on the backside.) Add the action wobble spring to the back of the arm.

To make the card base cut two piece of patterned cardstock 8 1/2 x 4 inches.  Score one piece across the short end 1/2 inch. Fold and glue the tab to the end of the other piece. Score and fold the top flap of card base at 2 3/4 inches to form the easel.

Glue three hellos together to form the easel stop that will be glued to lower card base.  The fourth hello will be used for decoration on the card front when closed.

Position paperdoll and arm piece on the easel portion of card front. Make sure that the hand is within the card front when closed. Adhere paperdoll and arm to card making sure to only glue lower half of paperdoll to easel.  The arm’s elbow needs to not touch or catch on the card base.  (I ended up having to trim a small tip of the elbow on this card to make it wave smoothly.)

Now you have a card that will wave a cheery hello.

“A truly great friend is hard to find, difficult to leave and impossible to forget,” is the sentiment stamped on the back of the envelope.

Hope this fun card has put a smile on your face and provided some inspiration for your crafting. 😊

Supplies Used from Dies R Us:

Additional Supplies Used:

  • Pink gel pen
  • Patterned papers from Recollections, Hot Off the Press
  • Colored paper scraps from my stash
  • VersaMark – Watermark Stamp Pad
  • Recollections -Detail Embossing Powder – Ebony
  • Nuvo Dream Drops – Cloud 9
  • Papertrey ink – Quoted: True Friends Stamp Set – 3374
  • Stamin’ Up Classic Stampin’ Pad – Blueberry Bushel
  • No. 10 – Neenah Social – Bare White Techweave Envelope

Vested Tags

Cards for men can be fun to make when they use a small die set by Leane Creatief which includes a suit jacket, a vest, shirt collar, two ties and a BBQ apron as well as a tag box. The box makes up to a little over 4 ½ inches tall by 1 ¾ inches wide and 3/8 inches deep. Perfect for tucking a note, tickets to a sporting event, or folded money.

(I purchased this die from Dies R Us when they had one of their special European dies sales, but it sold out quickly. You can get some lovely dies from around the world in these sales, but you must act quickly when you see one you like.)

For the card background I used two Poppystamps border dies to create a layered set of circles using oatmeal cookie and a dark brown scrap of cardstock for the layers under the plaid paper. Oatmeal cookie was used to cut the tags out of and a cream piece of Recollections cardstock was used to make a mini slimline card base (5 ½ inches x 3 ½ inches).

The “Happy Birthday” sentiment was cut once from a light color and once from a dark brown scrap and glued together a bit off set to give depth. A third layer was cut and glued to the back not be seen, but to raise the words up.

The vest was cut from a plaid paper. The buttons and pockets were stenciled on through the die. The tag is attached using foam squares.

A mustache was stamped using an older Sizzix stamp set in a dark brown on the back of the envelope.

Thank you for reading this post. Please like, comment, and follow this blog. 🌞

Supplies:

Dies

Stamps

Papers

Inks

Miscellaneous

A Spring Basket of Flowers

Special aunts deserve special cards. A basket full of spring flowers using Anna Griffin’s new Basket Pop-Up kit and a few flowers from an older Anna Griffin Pretty Paintings kit made the perfect card for this special aunt.

The envelope was stamped with stamps from Anna Griffin’s Treasury of Stamps and Dies using Stampin’ Up Soft Suede ink.

Thank you for looking at my blog. Please like, comment and follow. 🌞

Other cards using stamps and papers from Anna Griffin include:

A Quick Thank You

Needing a unique and handcrafted Thank You card, I came up with this pop-in window card using double-sided patterned paper from Paper Heaven, the frame dies from the newest Die-cutting Essentials issue 75, and some word dies from Hunkydory’s Moonstone brand.

When the card is closed it look like a flat card, but when it opens, the window back mechanism opens and moves the window panel ¼ inch back from the card opening.

Because of the dark inside of the card, I cut two white labels from old envelope scraps in my stash to be able to write a message on them.

Need more ideas for Thank You cards?  Here is more inspiration:

Supplies:

Dies

Stamps

  • Inkadinkado – Clear Stamps – Modern Flower Flourish – 60-30380

Papers

Inks

  • Stampin’ Up – Blueberry Bushel

Miscellaneous