Thankful Wreath

I like making Thanksgiving Day cards for my family to let them know how thankful and blessed I feel to have them in my life.

This card was inspired by one that Nicky Gilburt made in Die-cutting Essentials, issue 81 using a hexagon base. I used a 3 ¼ inch circle die-cut base since I don’t own any hexagon dies and followed Nicky’s general instructions cutting apart the foliage corner die-cuts.

I colored the die-cuts with Distress oxide inks using sponge ink blender tools and a cotton swab for the tin acorn caps.

The thankful sentiment was die-cut three times (two orange and one yellow that was inked brown) and glued together with the top layer slightly off to have an orange shadow. (I find that using a fine tipped glue bottle really makes gluing tiny die-cuts easy.)

The top layer of large leaves, pumpkins and acorns were adhered with a variety of thickness foam squares and glue dots. The entire wreath is attached to the 5 x4 ¼ inch cardbase with thick foam squares. For the final elements, I used Nuvo drops for the red berries.

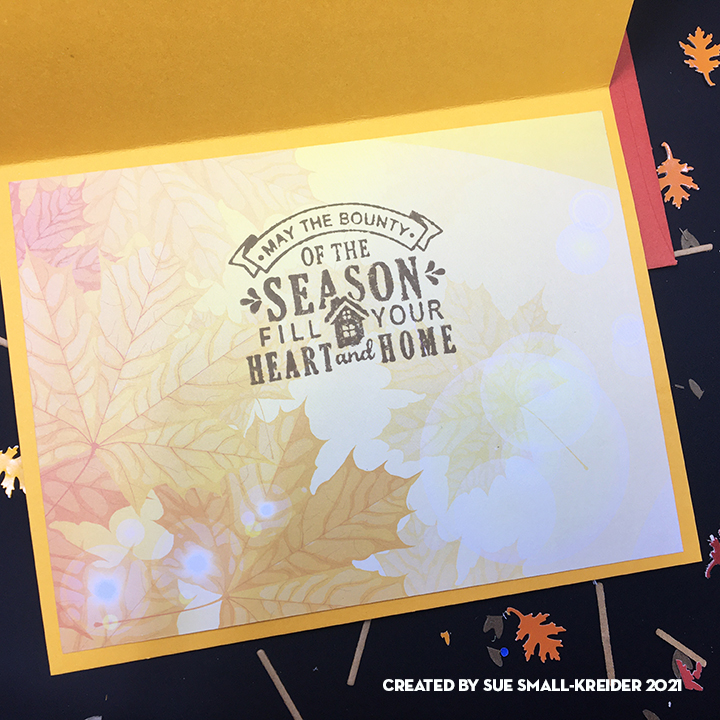
Inside an old LDRS autumn sentiment stamp was inked onto autumn leaves insert paper from the Sweater Weather foiled collection, Papercraft Essentials, issue 202.

To hint at what is inside the burnt orange envelope, I stamped the flap with a sentiment from this August’s Simply Cards & Papercraft, issue 220 and the pumpkin and leaves are from last year’s Simply Cards & Papercraft, issue 208 all in a brown ink from Memento.

Thank you for reading. If you enjoyed this blog post, please like it and follow the blog. 😊

Dies:

  • Autumn Wishes die set from Die-cutting Essentials, issue 81, September 2021

Stamps & Inks

  • Autumn Blessings from Simply Cards & Papercraft, issue 220, August 2021
  • Autumn Days from Simply Cards & Papercraft, issue 208, August 2020
  • LDRS Creative – Clear Stamps – Happy Fall Sentiments
  • Memento – Fade-Resistant Dye Ink Pad – Rich Cocoa
  • Ranger – Distress Oxides – Barn Door, Ground Espresso, Mowed lawn, Ripe persimmon, Rusty Hinge

Papers

  • Yellow and Orange cardstock from my stash
  • Insert paper from Sweater Weather foiled collection, Papercraft Essentials, issue 202, August 2021
  • A2 burnt orange envelope from Taylored Expressions

Additional Supplies:

  • Nuvo Vintage Drops – Postbox Red

Ship-In-A-Bottle II

This card can be for a birthday or another special day for a nautical person.

Ship -in-the-Bottle:  Using the Tutti Designs Ship in A Bottle die, cut four times from light blue, brown, white, and oatmeal. Only cut the whole die from blue. The other colors cut the sections needed from scraps. Using distress inks, color the various die-cut sections of the bottle and paper piece as needed. Glue bottle outline to a piece of acetate on the front side. Cut out the bottle shape. Glue rope to outside of bottle neck.

Background:  Die cut the rope background from oatmeal cardstock making such al the chads are removed from the image. Glue to a dark piece of wood grained cardstock cut to 4 inches x 5 ¼ inches.

Assembly of Card:  Position sentiment strip, ship and then the bottle on to rope background. Glue ship down followed by bottle. Adhere sentiment strip with foam squares. Attached front panel to bard base with foam squares.

Sentiments:  The foiled sentiment strip was one I had made during a batch foiling session using up scraps. It was die-cut into a ribbon. The inside stamp sentiment is from a favorite nautical stamp set by Sara Davies.

As is my style, I stamped the back of the envelope with the lighthouse image from the Sara Davies stamp set to hint as to what is inside.

Thank you for reading this blog post. Please like and leave a comment. 😊

Materials Used:

Dies

Stamps

Ink

Papers

Foiling Plates

Miscellaneous

Happy Easter!

This card is my second go at using the Spellbinders Spring Collection add-on dies for the Sunday Drive die set that makes a detailed classic convertible car. On this card I went with an Easter Bunny theme complete with colored eggs.

I used a tulip embossing folder from a recent issue of Simply Cards and Papercraft magazine for the background. It took me a number of tries to find the best sandwich pieces to make this embossing folder work. (I ended up using the Glimmer plate, shim and platform to get the right pressure for the embossing folder.) This green background panel was adhered to the white card base using foam tape after it was decorated.

The car goes together as usual except I left off the folded roof layer as you wouldn’t be able to see the baby bunnies.  The adult bunnies have separate arms, heads and body so their poses have lots of possibilities and could be used separately away from the car.  I also added a floral swag with carrots and eggs as well as flowers to the back of the car. For the license plate, I used a white scrap behind the green “Easter” to make it pop and coated Nuvo Glitter Gloss over the plate and the “HAPPY” pendant. The taillights have Nuvo Glow Drops Neon in Shocking Pink for that bit of glow.

A circle the same size as the embossed circle has been inked using a make-up brush and Distress Oxides. It is glued to the green panel.

Once the car was assembled, and a yellow organza ribbon wrapped and taped to the back of the green panel, I used a plastic spring affixed to the back of the car to raise and allow movement for the car.

The “Just for you” sentiment is also from the same Simply Cards and Papercraft free gift set. It is heat embossed and fussy cut. I adhered it with foam squares.

Inside the card, the sentiment is from Riley and Company’s Funnybones series and reads “Everybunny needs somebunny sometimes.” It is stamped on some scrap Hunkydory Christmas insert paper.

The envelope is stamped on the front lower corner and on the back flap with bunnies from the Craft Consortium’s English Garden collection.

Thank you for reading this blog post. Please like, leave comments and follow Ully’s World.😊

Other Sunday Drive cards:

Sunday Drive Celebration

A Snowy Sunday Drive with Santa

Santa Bauble

Santa Delivers to the Tropics

Being Spooky

Driving into a Spooky Sunset

The Best is Yet to Come

Hoppy Spring!

Happy Easter!

MATERIALS USED:

Dies/Embossing Folder

Stamps/Inks/Embossing Powders

Papers

Miscellaneous

© 2021 Sue Small-Kreider/Ully Cat Designs

Hoppy Spring!

If you have followed my blog, you will know I am enamored with the Spellbinders Sunday Drive die set and all its seasonal add-ons. The Spring collection has arrived with bunnies.

For this spring card I used a tulip embossing folder from a recent issue of Simply Cards and Papercraft magazine for the background. By using a white core cardstock with green top and bottom, I could sand the top of the embossing to make it white. (Great technique I learned in the magazine from Nicky Gilburt.)

The car goes together as usual except I left off the folded roof layer as you wouldn’t be able to see the baby bunnies.  The adult bunnies have separate arms, heads and body so their poses have lots of possibilities and could be used separately away from the car. For the license plate, I used a white scrap behind the green “SPRING” to make it pop and coated Nuvo Glitter Gloss over the plate and the “HOPPY” pendant.

A circle smaller that fits inside the embossed circle has been inked using a make-brush and Distress Ink.

The “Hello…” sentiment is also from the same Simply Cards and Papercraft free gift set. It is heat embossed on a die cut sentiment strip using a Spellbinder’s glimmer plate die. (Many papercrafting magazines include a free gift set that can really added to your craft stash and gives you inspiration on how to use the stamps, dies and other tools and papers.)

A sequin butterfly from my stash wings bent and adhered on foam squares is the final accent element to the front of the card.

Inside the card, the sentiment is from Riley and Company’s Funnybones series and reads “Everybunny needs somebunny sometimes.” It is stamped on some scrap Hunkydory Christmas insert paper.

The envelope is stamped on the front lower corner and on the back flap with bunnies from the Craft Consortium’s English Garden collection.

Thank you for reading this blog post. Please like and leave comments 😊

Other Sunday Drive cards:

Sunday Drive Celebration

A Snowy Sunday Drive with Santa

Santa Bauble

Santa Delivers to the Tropics

Being Spooky

Driving into a Spooky Sunset

The Best is Yet to Come

Hoppy Spring!

Materials Used:

Dies/Embossing Folder

Stamps/Inks/Embossing Powders

Papers

Miscellaneous

© 2021 Sue Small-Kreider/Ully Cat Designs

Celebrate 2021! – Part 2

A new year is almost here and the celebration of it should be festive even if we can’t celebrate together.

This card is made with the “Let’s Celebrate!” die set from Die-cutting Essentials issue 72 and the “Fabulous Fizz” stamp set from Simply Cards & Papercrafts issue 212, along with a pre-cut and scored 5 inches x 6 ½ inches card base and envelope.

Mirror card is used as the background that peaks through the die cute sentiment on this card. The card front, after it was covered in a patterned paper, was trimmed to 4 ¾ inches x 6 ¼ inches so that the mirror card border would show. When the word “Celebrate” was cut out the waste from the loops was saved and glued on to the mirror card. The year 2021 was cut from mirror card and glued to the front of the card.

Inside the sentiment was stamped with Versamark Watermark ink and heat embossed with a matte gold embossing powder from Ranger. The confetti was heat embossed with gold tinsel embossing powder.

To add interest to the mirror card inside, a champagne glass was cut from vellum and the glue applied to mimic a liquid filled glass. Bubble made from Glossy Accents were added over the glass.

The closed card, after the glossy accents had dried for several hours, was rolled between cutting plates on a die cutting machine to emboss the “Celebrate” and “2021” into the mirror card.

The back flap of the envelop was also heat embossed with clear gold sparkle confetti to hint at the celebration to come.  The card could be filled with sequins when being placed in the envelope to add to the card recipient’s experience. (In my case, knowing the recipient will not appreciate the mess to clean up, I am omitting this step.)

Thank you for reading this blog post. Please like and leave comments 😊

You can see Celebrate 2021! – Part 1 by clicking here.

Materials Used:

Stamps/Dies

Inks/Embossing Powders

Papers

Miscellaneous

Celebrate 2021!

A new year is coming and the celebration of it should be festive.

This card is made with the “Let’s Celebrate!” die set from Die-cutting Essentials issue 72 and the “Fabulous Fizz” stamp set from Simply Cards & Papercrafts issue 212.

A piece of double-sided patterned cardstock measuring 8 ¾ inches x 8 inches was folded in half to make a slimline card measuring 4 inches by 8 ¾ inches. Next the “celebrate” die cut the word from the front of the card (with both the word and the waste pies from the letter loops were saved.) It was cut again from mirror cardstock. The single die to cut the splash design was used six times to create a sense of pizzaz to the feeling of celebration. Because of my limited amount of mirror card, the shiny side of a 3 ¼ inches by 8 ¾ inches piece of mirror card was adhered to the underside of the die cut front of the card base. The “celebrate” die cut from mirror card was glued into the opening left from the die cut on the card front. The leftovers from the patterned paper were paper pieced in the openings. The year 2021 was also die cut from mirror card and glued in place.

Because the inside of the card is a patterned paper, a decorative label was cut from white card stock and a larger frame for it from mirror card stock.  Using an anti-static pad to dust the white label before being stamped with Versamark watermark ink and then a matte gold embossing powder was applied and heat set. The white label and its mirror card frame were then glued in place on the card base.

Two different colors of embossing power were used on the decorative fireworks and confetti stamped on the white back side of the large mirror card glued to the backside of the card front. These decorations were stamped, and heat embossed in three phases – left fireworks – gold tinsel confetti – right fireworks.

The back flap of the envelop was also heat embossed with the gold tinsel confetti to hint at the celebration to come.  The card could be filled with sequins when being placed in the envelope to add to the card recipient’s experience. (In my case, knowing the recipient will not appreciate the mess to clean up, I am omitting this step.)

Thank you for reading this blog post. Please like and leave a comment. 😊

You can view Celebration 2021! – art 2 by clicking here.

Materials Used:

Stamps/Dies

Inks/Embossing Powders

Papers

  • Joy Craft Mirror Cardstock
  • First Edition – 12 in x 12in Gem Effect Premium Paper Pad – Storyteller – FEPAD137
  • #10 Business Envelope from my stash

Miscellaneous

Bounty of the Season

“May the bounty of the season fill your heart and home” is the message of this layered Thanksgiving card. It uses the October 2020 Large Die of the Month by Spellbinders as well as a variety of other brands’ elements to make a 6 ½ x 5 inches card with matching envelope.

I started by using an older Tim Holtz brick stencil with his fired brick Distress Ink on a 6 x 4 ½ inches brick red cardstock. I went through my paper scrap bins for the paper that I cut the rest of the scene’s elements, much of it coming from junk mail advertisements and envelopes. The brass letter slot and doorknob where from a candy box.

The window was cut twice from white and black cardstock and pieced together. All the white elements were cut from shiny coated packaging. Several years ago, I employed a tiny Fiskars oak leaf punch to cut the colorful leaves from junk mail. The leaves were used to make the door wreath which uses the wreath from the die set as a base. The welcome mat is cut from a brown craft paper.

By laying out the doorway pieces on the stenciled red panel I knew where to glue the bottom step piece and then the left column, red door and right column followed by the top piece. (I recommend watching the assembly video to understand how the pieces all go together.) A sticky tip tool is especially useful in assembling this doorway scene’s tiny pieces.

After the glue on the front panel was dry, I took a soft glue eraser to the white sections to erase the glue smudges.

I stamped the inside sentiment using paper masks (from sticky note paper) to allow only the intended sections to be stamped using three colors. The order of stamping was light to darkest ink – orange, green, brown. I placed a fussy-cut mask of the pumpkin after the orange layer was stamped which is hard to see in the photos showing what I masked for each stamping layer. Before I stamped the sentiment stamp in brown, I removed the pumpkin vine stamp from the stamping platform.

As is my style, I like to stamp the envelope flap with a hint of what’s inside.

SUPPLIES

Dies/Punches

Stamps/Stencils

Ink

Paper

Miscellaneous

Warmish Winter Wishes

Sending warm wishes for the holiday season is what this card is all about.

It is a simple card made with pre-printed white snowflakes on brown kraft paper card, holographic snowflake glitter and red stamped images adhered with foam squares.

I made 24 of these cards in one day. The stamping was done first using a Tim Holtz stamping platform by Tonic Studios. I had cut 8 ½ x11 inch white cardstock into 4 ¼ x 5 ½ inch pieces to make it easy to stamp two sets of images per piece and never have to move the stamps, except to stamp the two sentiments and the fox on the envelope flaps.

I fussy cut the images and placed tiny and large foam squares from my stash on the backs of the images.

Once the cut images were adhered to the card fronts, I glued the snowflake glitter to the cards matching up with the centers of the printed snowflakes.

SUPPLIES

Stamps

Ink

Paper

Miscellaneous

Day 4 of Mini Challenge – Autumn Leaves and Letting Go

This is the fourth and final day of the challenge I set myself to make five cards with the Autumn Days stamp set from the most recent Simply Cards and Papercrafts magazine.

There was a terrible rain storm going on outside when I started stamping with the Autumn Days stamp set from the most recent Simply Cards and Papercrafts magazine. I made a number of backgrounds using a color palette ranging from a mustard yellow to a muddy red. This card uses one made with the tiny individual leaf stamps and the pile of leaves stamp.

The sentiment was heat embossed in a shiny black on light orange cardstock, fussy cut and raised up with foam pads.

Using a large sycamore leaf stamp, I stamped the envelope flap in brown ink.

This will make a lovely Thanksgiving card with plenty of space inside for a personal note.

DAY 1 – Winter Joys

DAY 2 – Looking Up and Letting Go

DAY 3 – N is for Nuts

Day 4 – Autumn Leaves and Letting Go

Supplies:

Stamps

Papers

Inks/Embossing Powder

Miscellaneous