Florida Snow Day

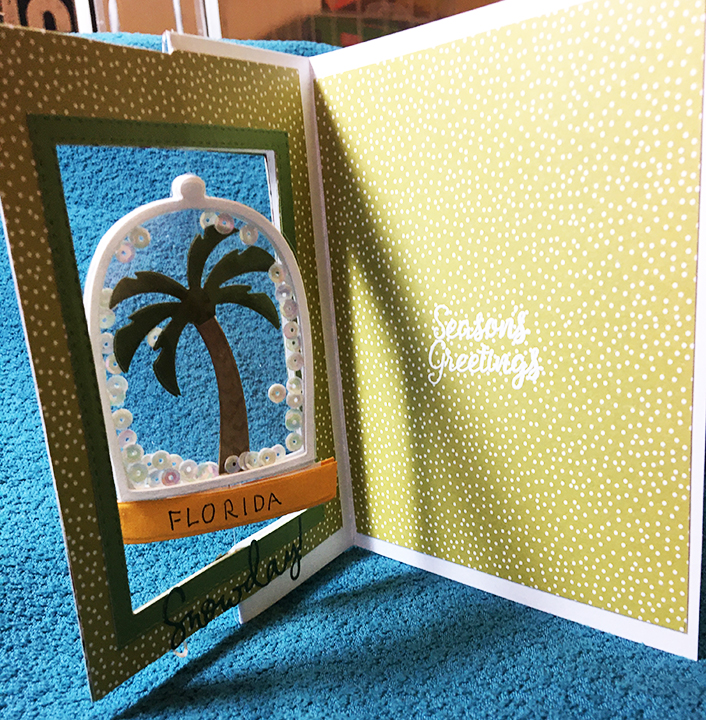
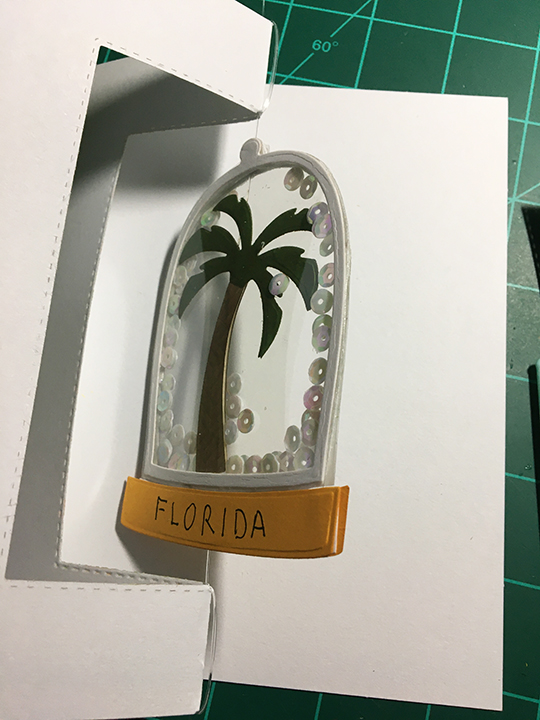
What’s a Florida snow day? Well, one version is a snow globe with a palm tree that says Florida.

This card was inspired by Sharon-Elaine Jone’s spinning shaker card on Craftworld.com, Spellbinder’s Santa’s Workshop die set’s snow globe and one very hot and humid day in Florida.

A. Die Cut – 2 trees (I used textured paper for trunk), 2 globes from white cardstock, 2 globes from acetate , 2 globes from foam (I put double-sided adhesive sheets on both sides of foam before cutting.), 2 globe bases from orange cardstock and 2 “Snowday” sentiment.

B. Snow globe

    1. Palm tree
      • Glue one branches onto top of tree trunk.
      • Glue backside of tree to monofilament. Glue second tree trunk to encase monofilament line. Glue remaining branches to tree.
      • Distress ink tree.
    2. Assemble snow globe
      • Glue 1 paper globe to1 acetate globe and let dry. Repeat with second globe paper and acetate pieces.
      • Peeling back only the top knob off adhesive on foam globe, adhere to inside of one acetate globe. Peel, align and slowly adhere all of one foam globe to one acetate globe. Repeat with second foam globe and other acetate globe.
    3. Filling snow globe
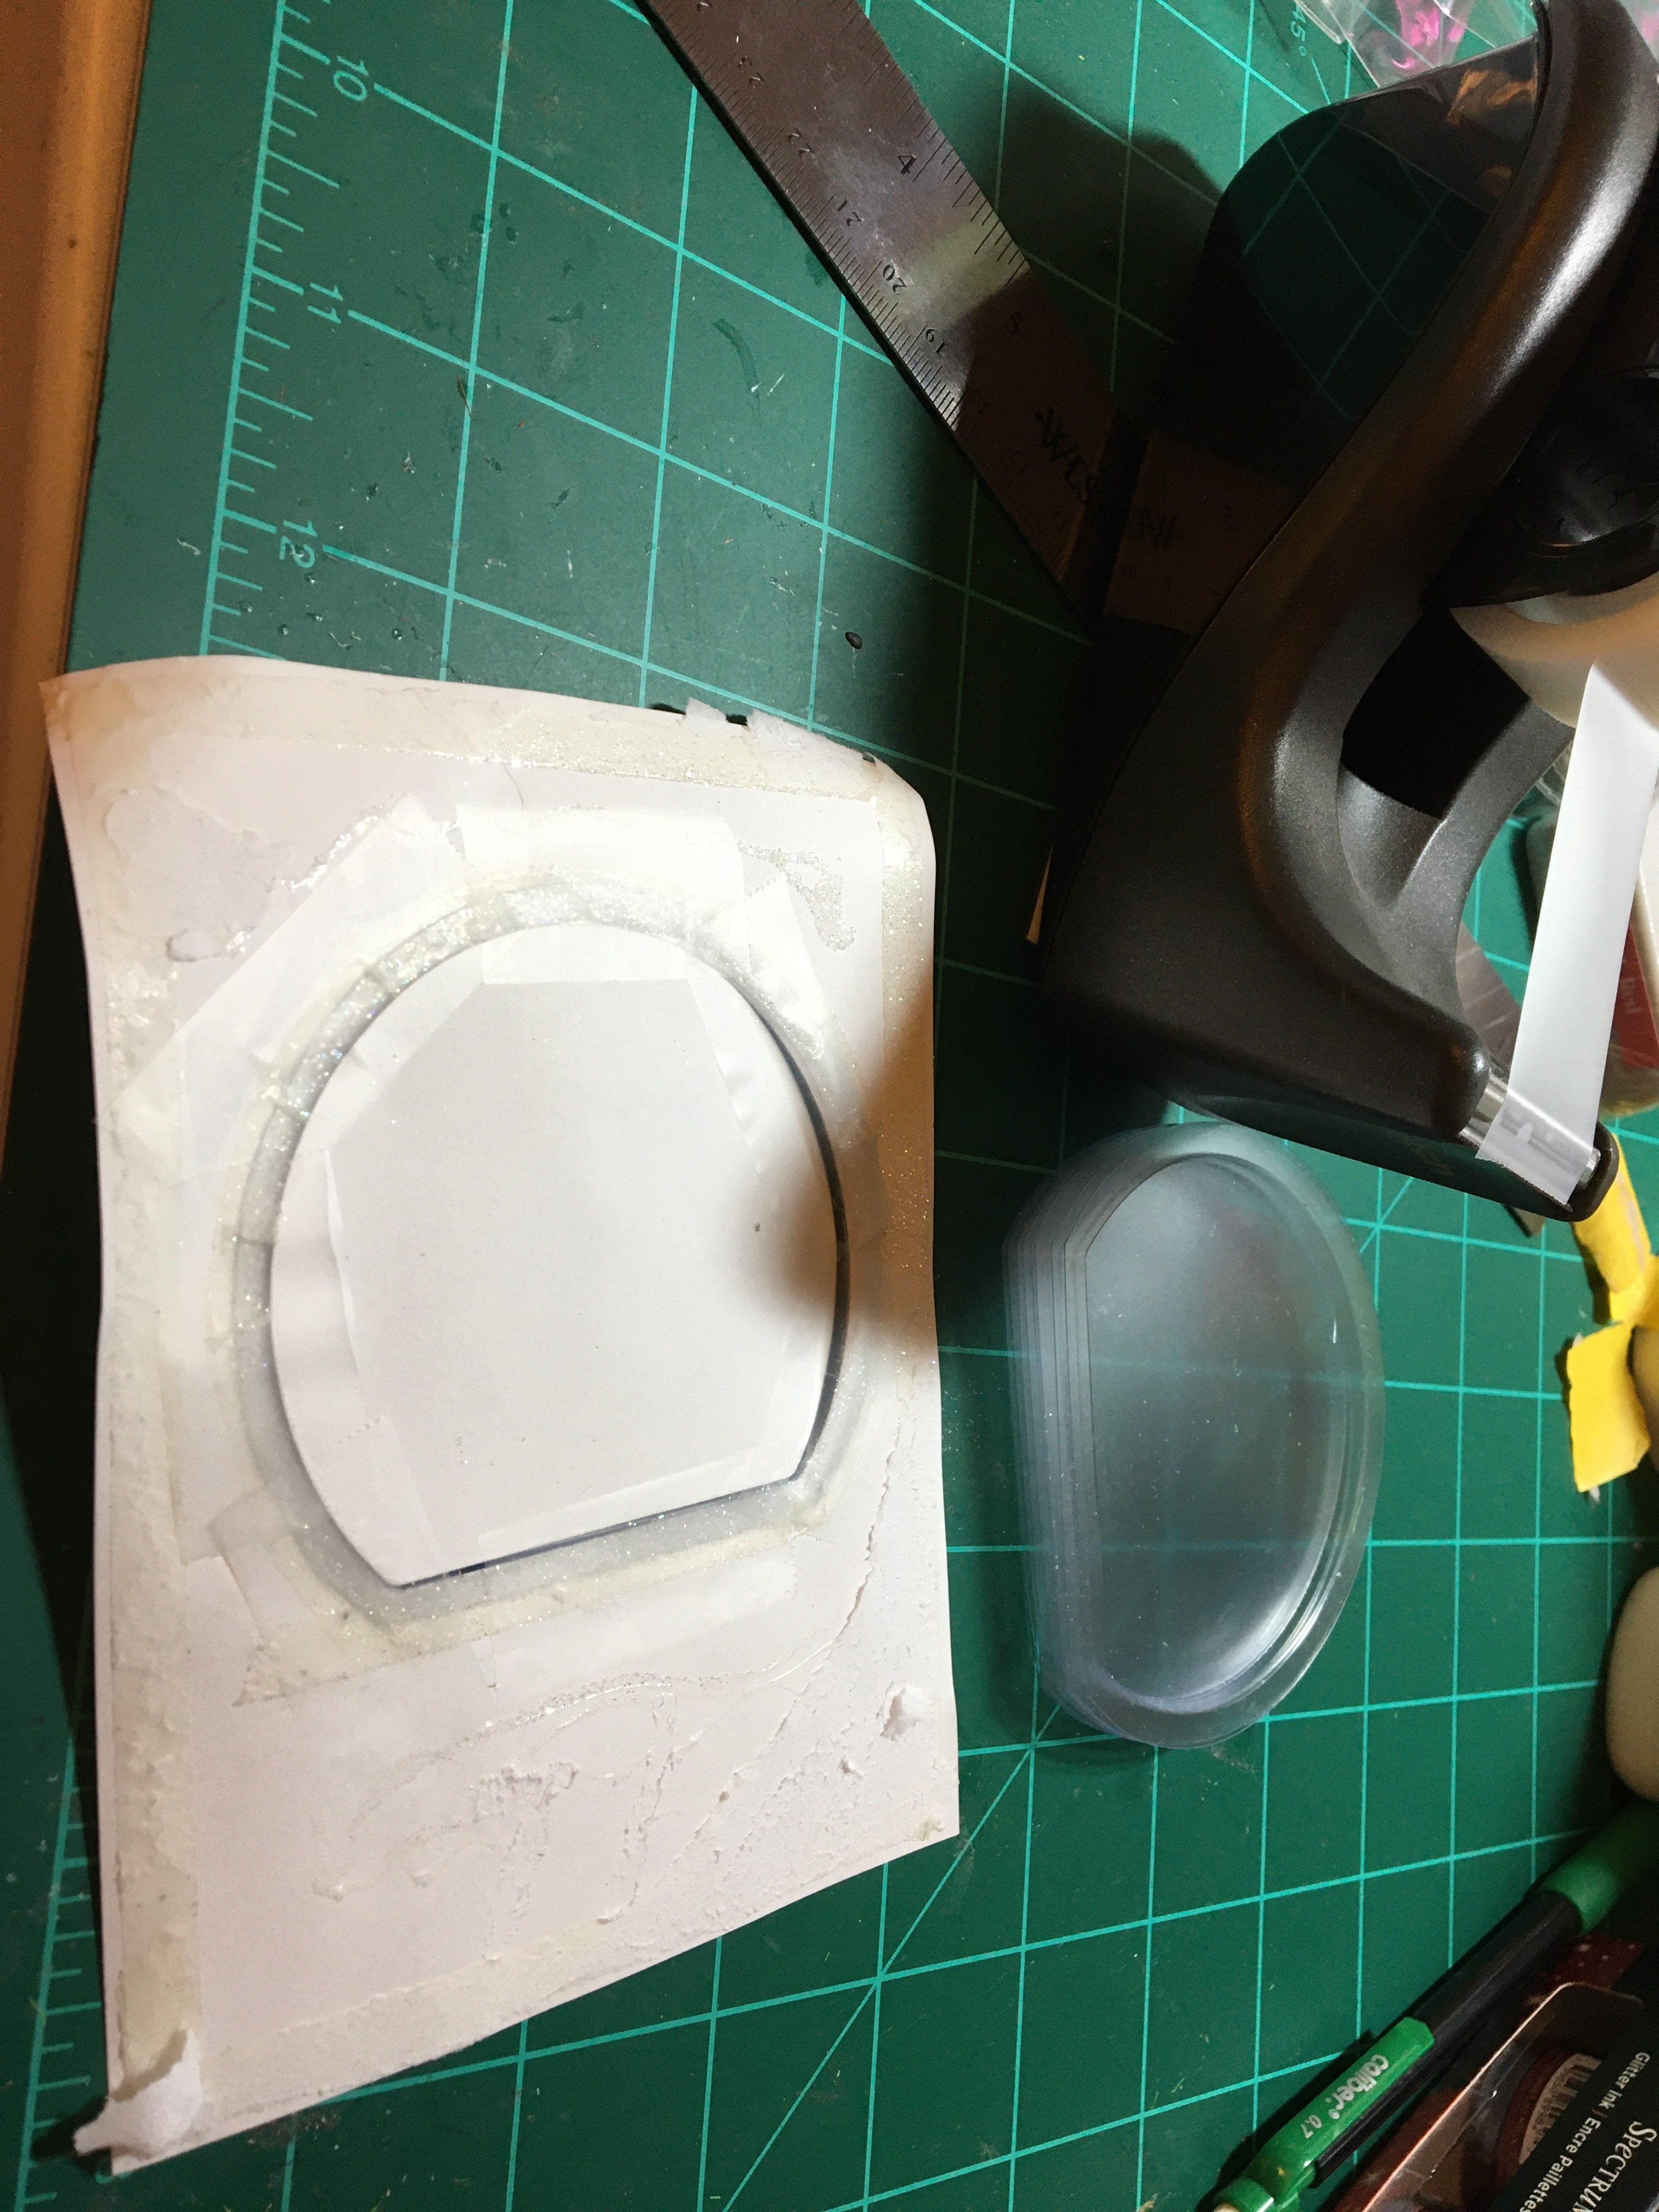
      • Using the grid on a craft mat, lay the palm tree on top of one acetate globe against foam side. Tape aligned monofilament line to the craft mat above and below globe
      • Loosen backing paper from top of globe and press monofilament into sticky foam. Do not take off any other backing paper but globe knob.
      • Sprinkle sequins into center of globe, pushing some under and over palm tree. Keep sequins away from foam edges.
      • Lay second acetate globe over first globe, foam side to foam side. Slowly, remove backing paper from both foam sides, aligning edges together a little bit at a time until globe is sealed.
      • Pull monofilament taunt and test the spinning action of globe shaker.
      • Using scrape foam with double-sided adhesive as foam tape, adhere orange globe bases to globe on monofilament. (Write “FLORIDA” on bases before adhering.)

Florida Snow Day-inside-1

C. Card Base

    1. Select decorative papers (three pieces – two at 6 x 4 ½ inches for front frame and one at 6 x 4 ¾ inches for inside back)
      • Tape one of the small decorative paper pieces to front of card base and tape rectangle die (Needs to be large enough for globe to freely spin inside of) to over both paper and base. Die cut out rectangle. Remove tape and use decorative paper to trace in pencil the placement of die for other piece of decorative paper and cut out rectangle. (I cut the frames separately, so any die embossing/decorative piercing is prominent on both fronts of frame pieces.)
      • If you want, you can cut a narrow border frame for the opening as I did.
      • With a pencil, lightly mark the center point of the rectangular opening at the top and bottom of the card base. Using the marks, score the card base and fold the right front half of base to the left to make a valley fold.

D. Attaching globe spinner

    1. Open card base open so “frame” section is flat and the top and bottom fold creases are aligned on craft mat grid. Aline the globe shaker’s monofilament line with fold creases on card base extending the line to match craft mat grid line. Tape extended line to mat to hold firmly in place.
Florida Snow Day-shaker detail 1

    • Glue monofilament line to the top and bottom of card base frame. Let glue dry 1-2 hours or overnight.

Florida Snow Day-shaker detail 3

    • Once glue is dry, wrap extra line around frame at fold. Tape over wrapped line with clear tape on inside of fold.

Florida Snow Day-shaker detail 2

E. Decorating Card

  1. Adhere one of the 6 x 4 ½ inches decorative paper frames to the front of card alining the opening with the halved card base frame. Adhere on the inside of card the other decorative frame piece so that the two decorative pieces from a front and back frame for the snow globe to spin inside of.
  2. If you cut a border frame adhere it now.
  3. Add “Snowday” sentiment at bottom on each side of frame.
  4. Aline the third piece of decorative paper on inside back of card base with the front frame.
  5. Mark the corners of where the decorative paper should go lightly with pencil on card base.
  6. With the decorative paper laying on card base, position inside greeting stamp and tape stamp in place with removable tape.
  7. Carefully remove the paper to be stamped and place in a stamping platform to stamp with Versamark Watermark ink. Remember to wipe paper with an antistatic bag or tool before stamping.
  8. Once stamped, use white embossing powder and heat emboss sentiment.
  9. Adhere embossed paper to inside of card using pencil alinement marks.

Florida Snow Day-inside-2

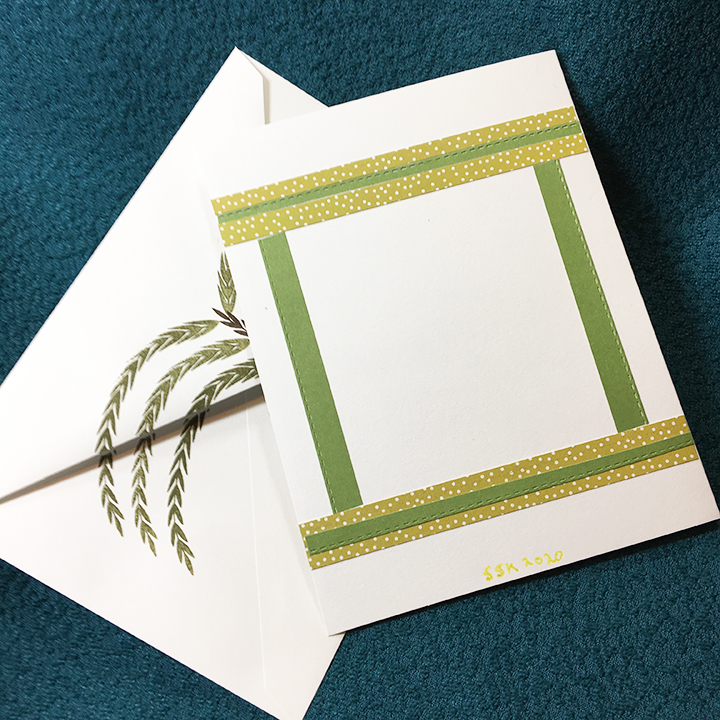
Decorate the back of card (This may be the place you choose to write your personal message at.)
Florida Snow Day-BACK Envelope

I stamped the back of the envelope with what I hope would be taken as a palm tree, using what stamps I had since I don’t have a palm tree stamp.

Supplies

Dies

Stamps

Paper

Inks

Miscellaneous


An Old-Time Christmas

1 Parlor-Wide

Queen Victoria and Prince Albert are credited with popularizing the idea that families need evergreen trees adorned with babbles and sweet treats at Christmas.  This fold-out parlor card is in that tradition.

1 Tree CU

Christmas Tree:  The tree frame and pop-up mechanism were made using Karen Burniston’s Christmas tree pop-up die set. I embossed thin copier paper with the saucer die from Karen Burniston’s Cup Pop Stand die set and then cut a circle of cardstock to back it. Using the tabs cutting die from the Christmas tree set, I cut tabs on the embossed saucer to make the tree skirt. Next, I assembled the tree (an assembly video is on the link to die set below) and decorated it using fir branches from the Gemini fireplace accessories pack, ornaments from the Gemini Yuletide treasures die set, and candy canes and gingerbread men from Sara Davis’ Frosty Christmas die set. (The ornaments have glitter glue, Nuvo Drops and Aqua Shimmer on them.) The two star pieces are cut twice from recycled foil from an envelope liner. Once the tree was decorated, it was attached to its brown tree stand and then glued to the tree skirt tabs. Placement on card was based off where the furniture and tree would be when the card was closed.  A portion of the tree skirt was trimmed to fit the card size.

1 Furniture wide

Furniture:  Using Karen Burniston’s Family Room Pop-up die set I altered the style of sofa and changed the chair into a table. I cut the base pop-up mechanism from clear acetate and made the chair arms lower by trimming some of the middle arm piece off and adhere the remaining sides together. Next, I embossed some blue cardstock with an embossing folder by Jennifer Ellory to create brocade fabric for the sofa. I used the sofa seat/back piece to cut the basic shape and then trimmed and added an additional sofa back piece cut from Olga Direktorenko’s Elegant Room sofa die. I made my own template for the brown base and legs of the sofa trying to mimic an empire style settee. A separate back sofa piece was also cut with the Elegant Room die. The Family Room die set has the cushions die and pop-out mechanism on the sofa seat. The tea table was created using the table die from the Elegant Room die set and a Spellbinder’s scalloped circle die for the tabletop. The plate was cut using Courtney Chilston’s Birthday Shadow box die set and the candy cane and gingerbread man were made as describe in the tree section above. Placement on card was based off where the furniture and tree would be when the card was closed.

Fireplace:  Using a recycled greeting card back in an off-white, cut the fireplace out using the Gemini Fireplace Concept die set. Because the die is designed to pop-up from a folded card, I had to cut the fireplace out with tabs at the back edge of mantle and the floor of the fireplace. I I also cut the trim pieces from the same card back and glued the pieces in place after scoring the tab folds. I also cut a rectangular piece of black cardstock to become the back of the fireplace. Taping the bottom of the black back to the floor tab. I cut two brick pattern pieces from the Gemini Yuletide Treasures die set and then I glued them to the black back piece and created smoke and soot on the brick by rubbing a Tim Holtz Distress Crayon over the bricks. The fire and logs were cut from the Gemini Fireplace Accessories Pack. The flames were cut from cardstock that I had blended two colors of Spectrum Noir Sparkle Glitter Ink on, let dry and then cut. The logs and flames were glued together and then placed in fireplace with foam squares.

1 fireplace decorated

Wallcovering:  The wallcovering was created using two embossing folders by Olga Direktorenko. The main piece with pillars and molding is the Elegant Room folder and the crown molding is from the Timeless Room folder. I masked the molding and rubbed Distress Ink over the wallpaper. The mirror (cut from recycle mirror card from a box) wreath, bows, holly and coal shuttle were also cut using the Fireplace Accessory Pack. The embossed “wings” on each side are from the Timeless Room embossing folder.

1 Front Door

Door: The Front of the folded-up card is an elegant Italianate styled door. I used Olga Direktorenko’s entire Elegant Door die and embossing folder set. The windows are wax paper over pale yellow card stock and red marker. The door hardware is cut from gold foil cardstock and gold gel pen. The wreaths were cut from recycled boxes using lawn Fawn’s mini wreath die set.

1 Greeting wngs folded

Greeting: The greeting is on the front of the second folded-side of this tri-fold card. Merry Christmas is cut from recycled red foil envelop liner using a Card Deco Essentials die. The gold lacy background was cut from foil card using Spellbinders Charming Christmas Boughs die set. The greeting is offset to left to allow room for a personal message.

1 Parlor close up

Supplies

Dies:

Embossing Folders:

Stamps & Inks:

Papers:

Miscellaneous:

Shake Your Snow Globe

Snow Globe Shaker-Front

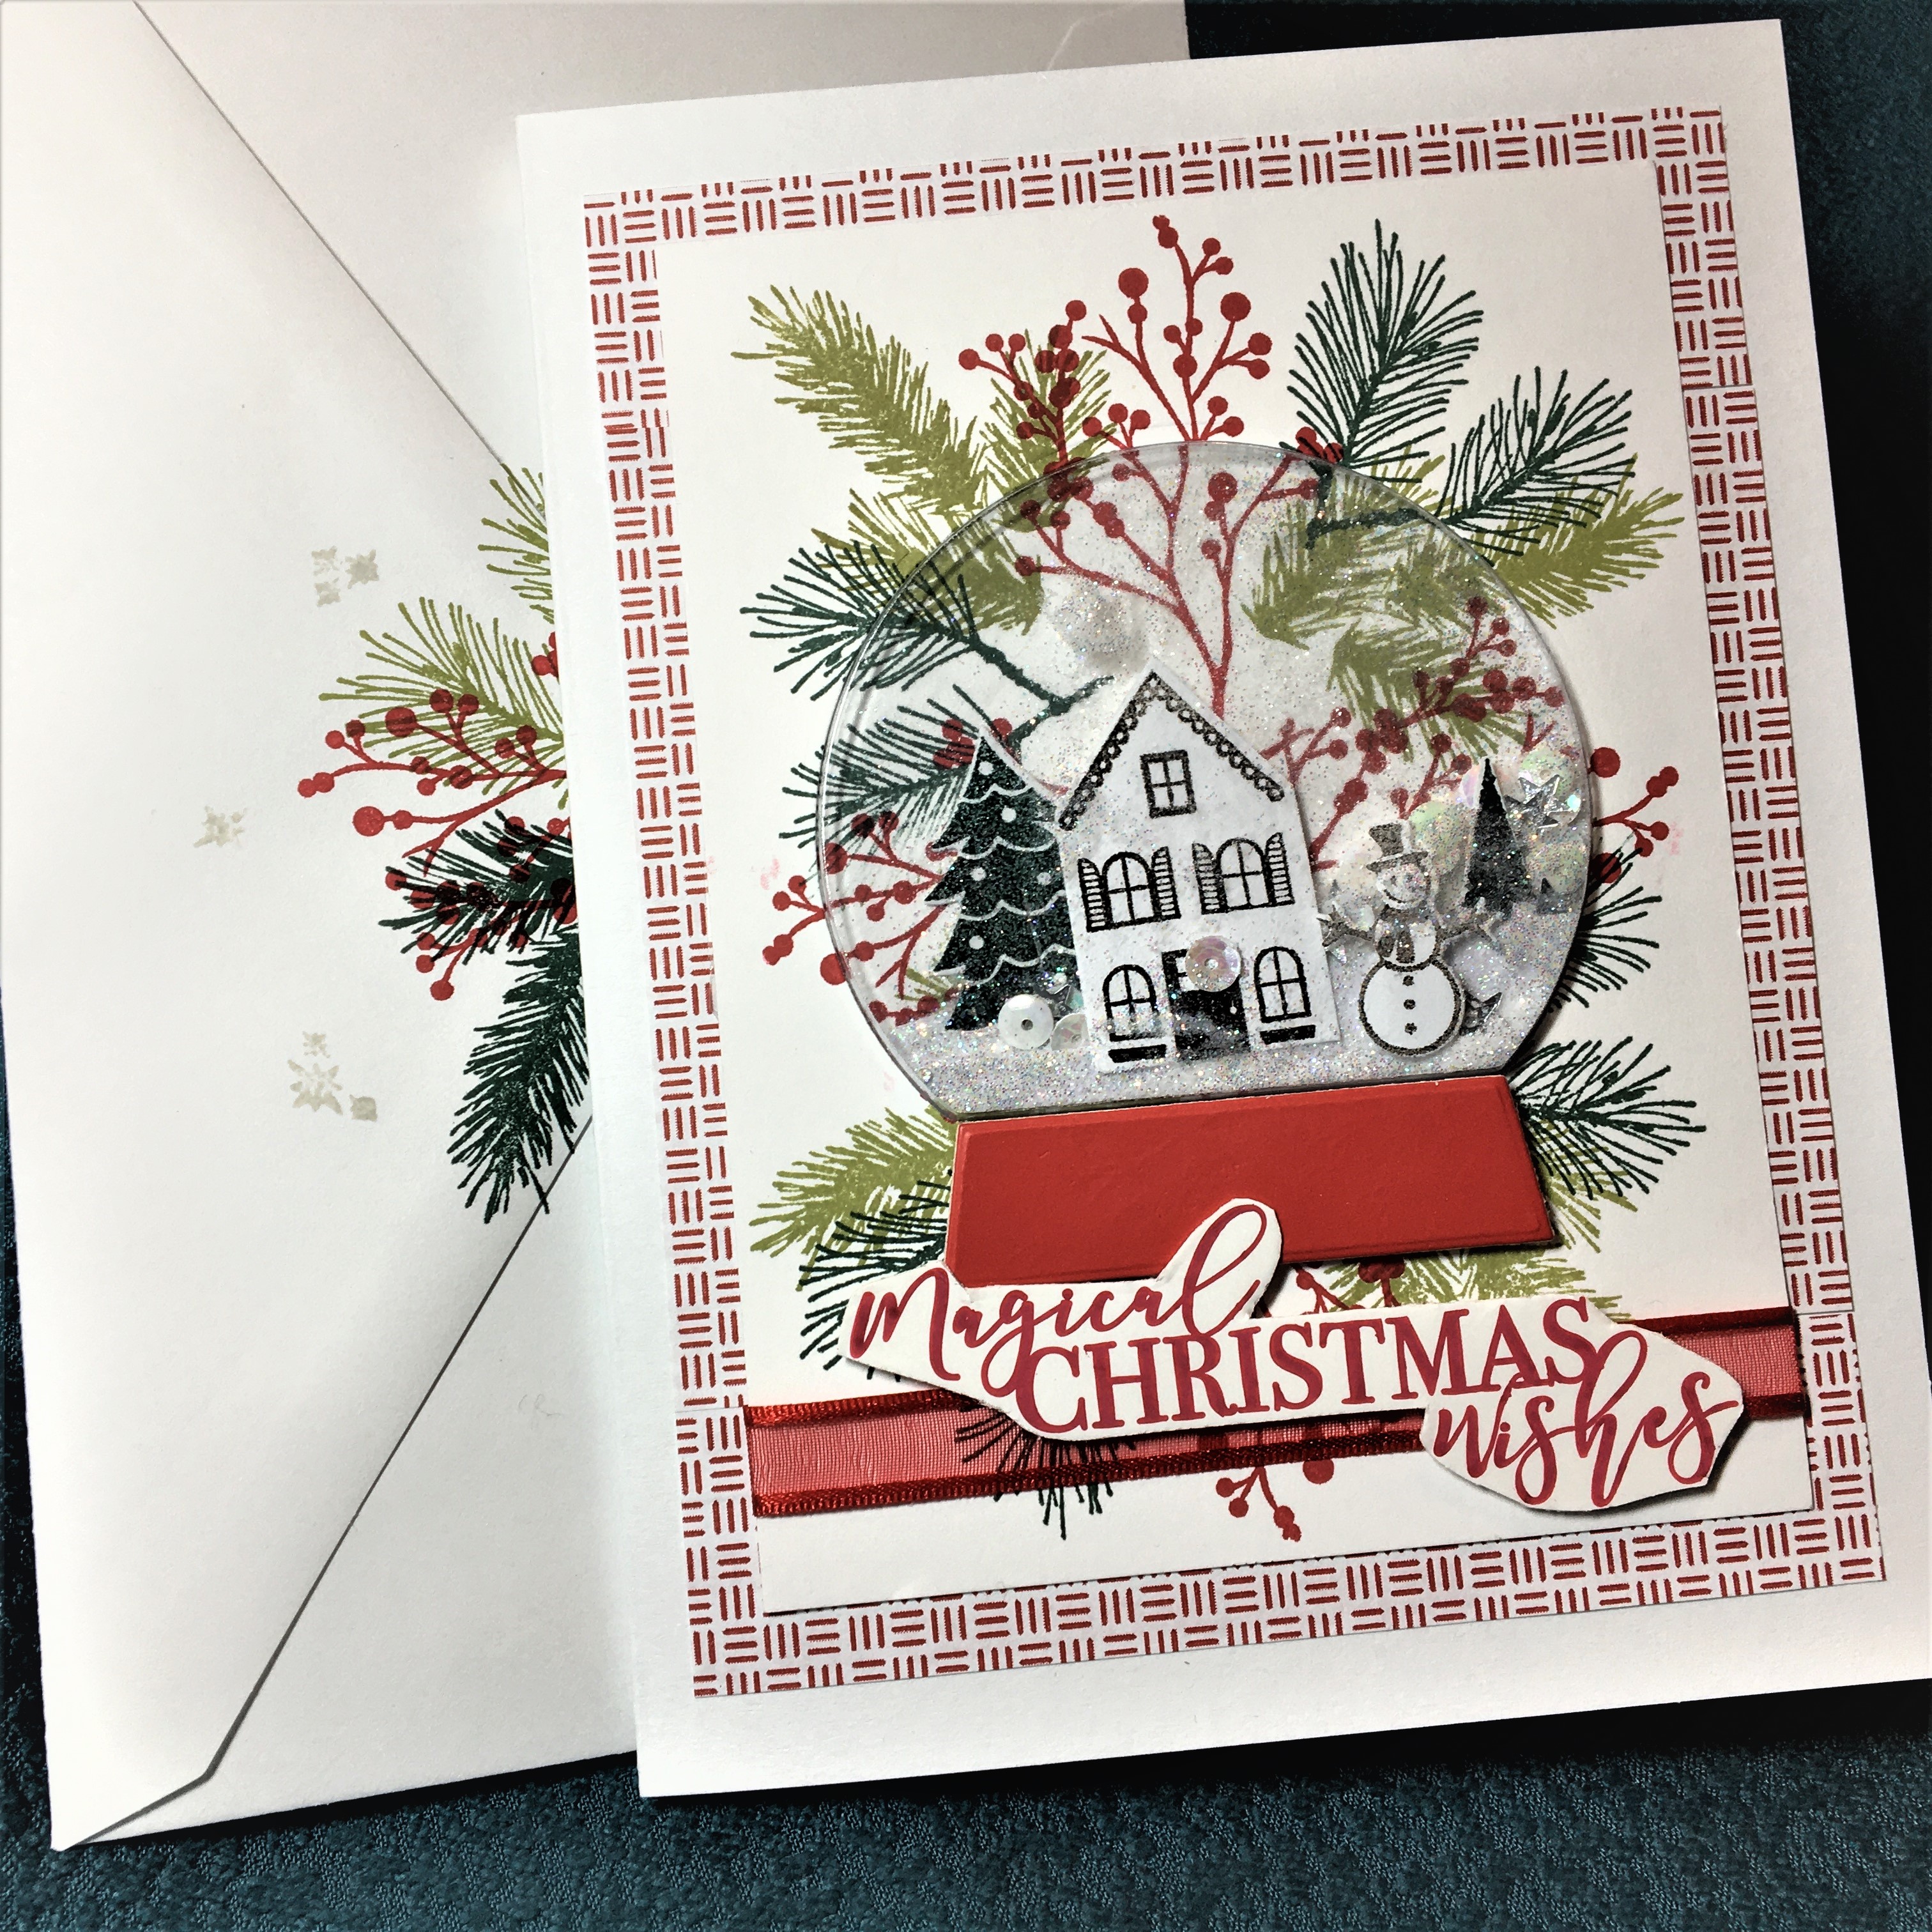
This snow globe is filled with pearlessense sequins and silver star sequins and a hint of snow glitter.  I was inspired by a number of snow globe stamp and die set project cards by a variety of companies, but in the end, I made the card with affordable alternatives that I had on hand.

I stamped the pine boughs and red berry branches on a stamping platform, turning the card four times and then changing color ink and stamp for the next layer and once more for the final color and stamp change.

Next, I cut out the opening for the plastic shaker globe from the stamped card. I then stamped and cut out the house, snow man and trees. Using white glitter paper to cut the two snowy hills, I attached the house, trees and snowman using foam squares.

Assembling the globe: I added a few white and silver sequins and a hint of fine snow glitter. (I find the that glitter clings to most of the surfaces inside the globe and a hint gives a sparkle without fogging up the globe.) Using clear removable tape, I sealed the back of the globe with the house and hills which were attached to the stamped globe cut-out. Once the globe was sealed, it was placed into the stamped card with the globe cut out.

The red and white background paper, heavy white card stock with the red sentiment stamped on it and the red globe base where all recycled from junk mail, and packaging. A ribbon was taped to the back of the pine boughs stamped card before it was adhered with double-sided tape to the card base. The “Magical Christmas wishes” and red globe base were attached using foam squares.

Snow Globe Shaker -inside

The inside sentiment is from an old Kaisercraft clear stamp set that I was unable to find a link for.

SUPPLIES USED:

Dies

Stamps

Paper:

Miscellaneous:

Let It Snow Shadow Box

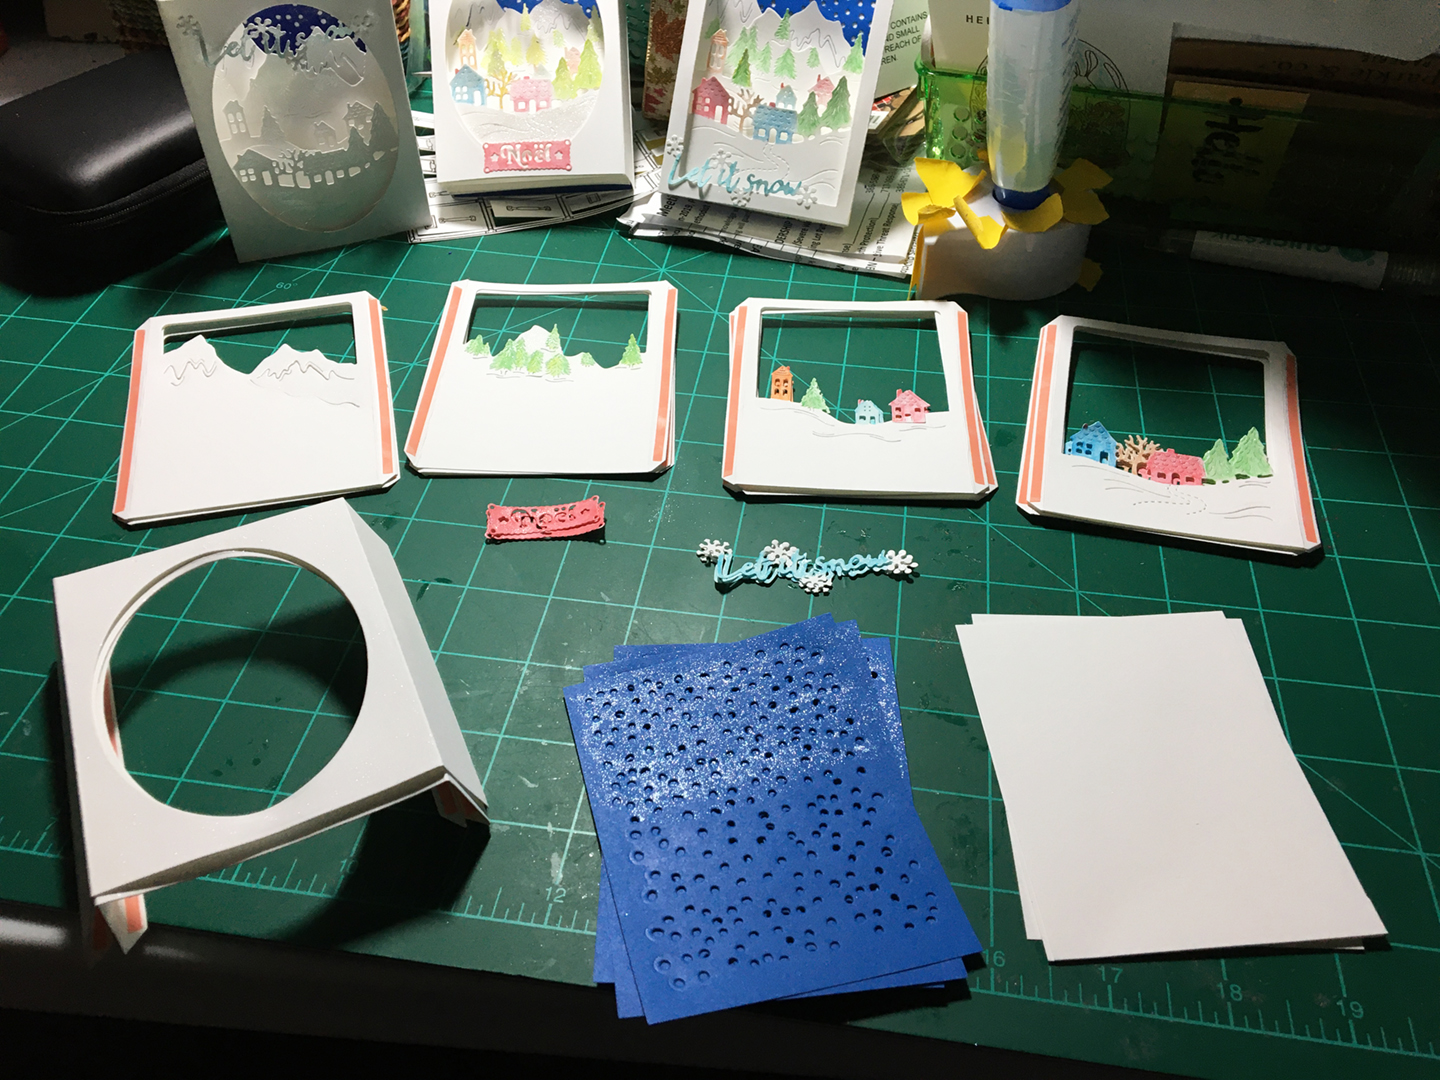
Shadowbox -frontShadow box cards can be as simple or as complicated as you want to make them. Let It Snow is of medium difficultly. This die set, along with strong double-sided tape, makes it quick to cut and assemble a four-panel shadow box with depth and character.  You can choose to color or not.
Shadowbox -materials

Step 1: Using the shadow box frame set, cut out one large box frame – your choice of oval or rectangle opening. See video on assembly of shadow boxes. (I used a shimmer pen on the blue panel as well as snow highlights on other panels.)

Step 2: Using both the smaller panel frame from shadow box die set and the four panels of winter scene diet set, cut one of each panel. (Because of the delicate detail of some of the dies and the score marks, you may have to use a precision metal cutting pad or make two passes through your die cutting machine.)

Step 3: Cut a piece of blue cardstock and a piece of white cardstock3 inches x 4 inches (76mm x 101mm). Using the snowy background die from the winter scene die set, die cut the snowy background onto the blue cardstock.

Step 4: Fold the tabs and sides of box and panels first one way and then the other way. Flatten to decorate.

Step 5: Flatten to decorate. Colored pencils, watercolors, or just some glitter pen gloss are some ways of decorating.

Step 6: Place double-sided strong tape on all panel flaps on the face-up side. Place double-sided tape on both front and back tab flaps of shadow box.

Shadowbox -snowy panel backStep 7: Assembly – start with blue background and peel off backing of one shadow box tab tape on inside of box. Line up long side of blue paper to folded edge of tab.

Shadowbox -back panelStep 8: Peel off tape on back panel same side as blue panel and line up with fold of shadowbox tab.  Shadowbox -all panelsRepeat with other three panels butting the edge of new panel up to folded edge of previous panel until all panels are adhered to inside of shadow box.
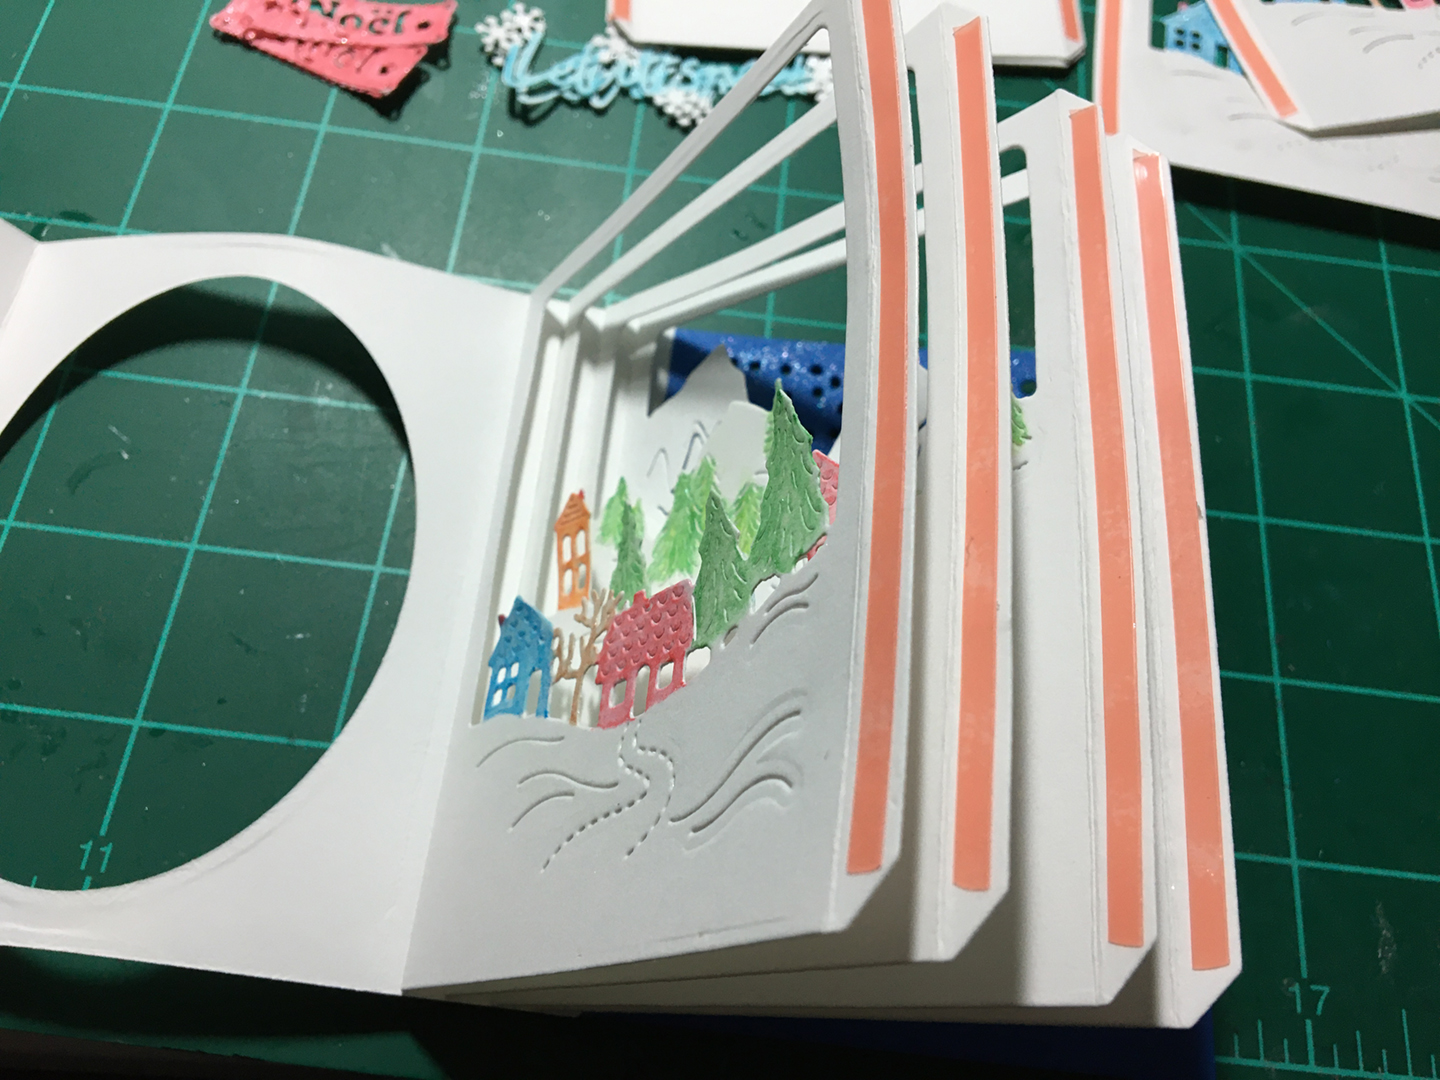
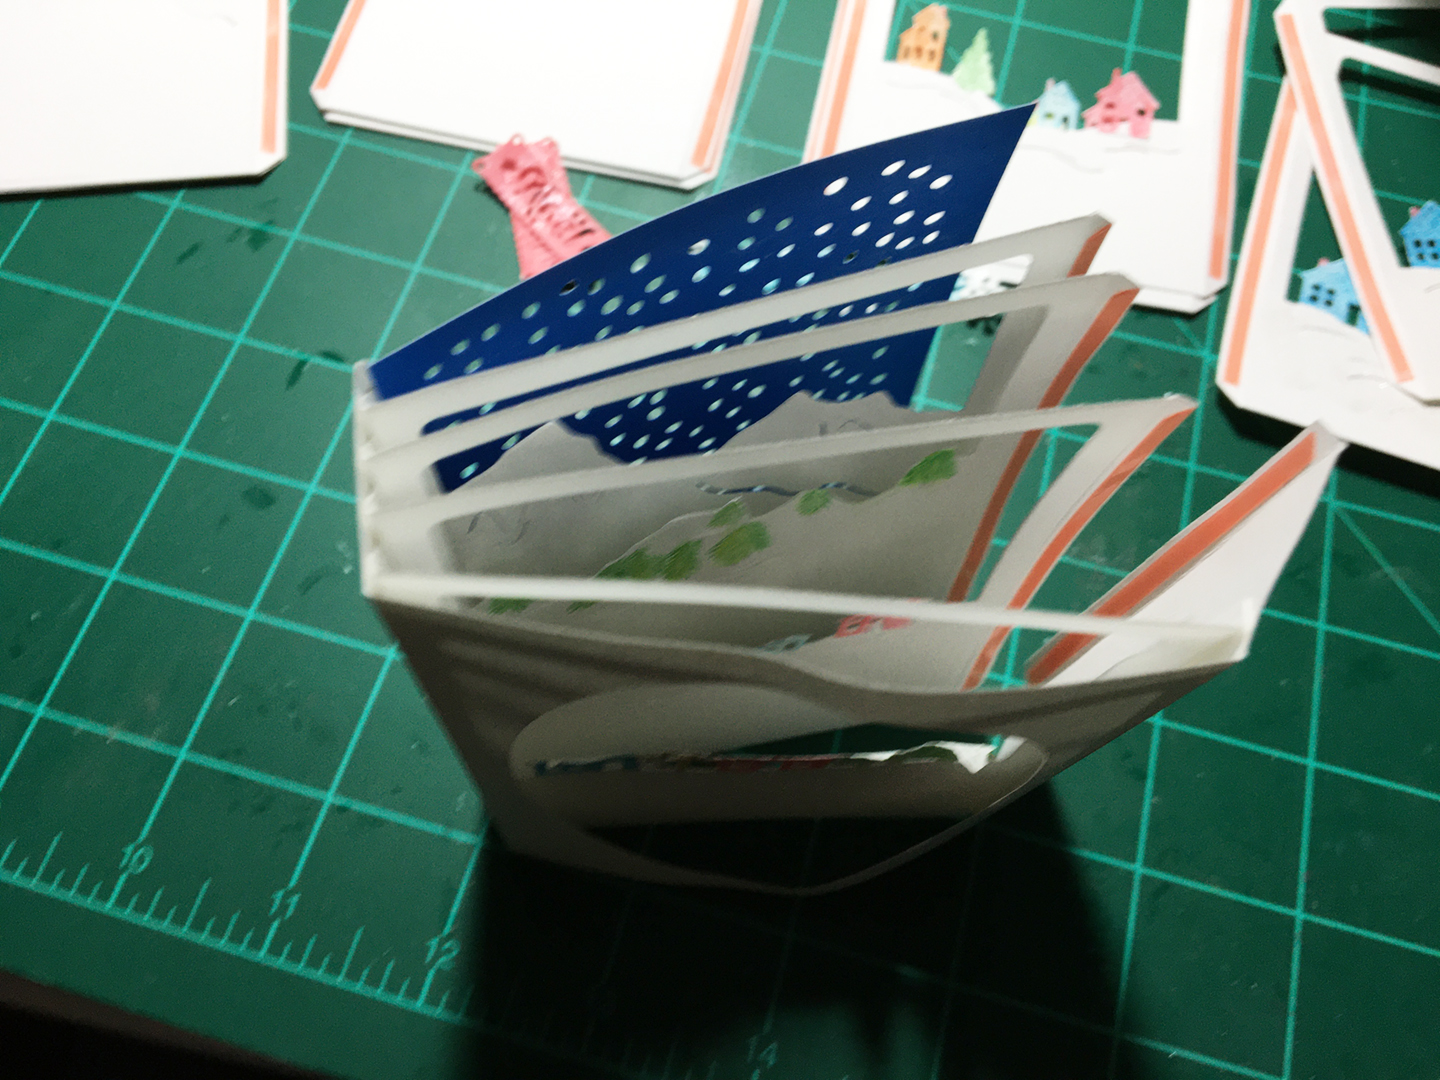
Shadowbox -front panelStep 9: Peel off tape on Front panel and line it up on opposite side of shadow box to be equal distance from front opening as other side of panel. Shadowbox -most panelsRepeat with remaining three panels.

Shadowbox -snowy backStep 10: Peel off tape on inside of shadow box tab and adhere blue panel.
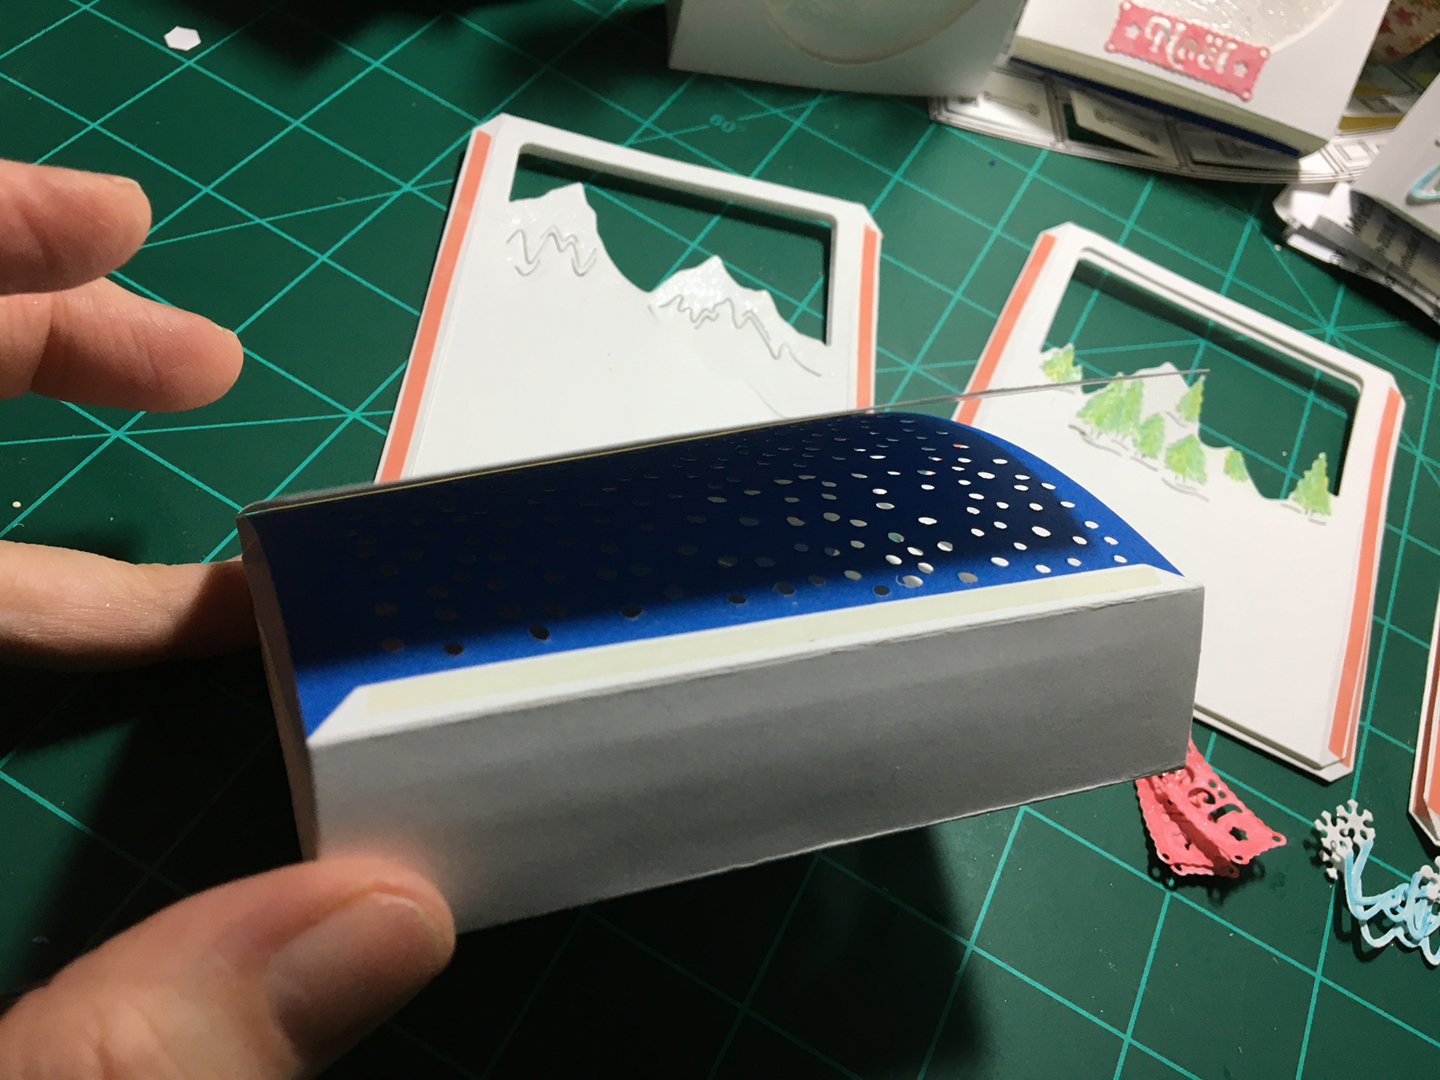
Shadowbox -white backStep 11: Peel off tape on outside of shadow box tabs and adhere white card panel.

Shadowbox -frontStep 12: Decorate outside of shadow box as desired using sentiment die cuts from Winter Scene set.


SUPPLIES USED:

Dies

Paper

Miscellaneous

12 Days of Christmas Trees -in 1:18

Thank you for being part of The 12 Days of Christmas Trees +1.

Click Here to learn about my earliest Christmas Cards.

Day 1 – Give Joy -Plaid

Day 2 – Home for the Holidays-Village

Day 3 – Holly Joy

Day 4 – Snowy Day

Day 5 – Give Joy – Holly

Day 6 – Gingerbread Joy

Day 7 – Home for the Holidays-Joy to the World

Day 8 – Nutcracker Greetings

Day 9 – Plaid Joy

Day 10 – Home for the Holidays-Let It Snow

Day 11 – White Christmas

Day 12 – Home for the Holidays-Peace and Joy

Bonus Day – Topical Christmas

12 Days of Christmas Trees – Bonus Day

img_7189

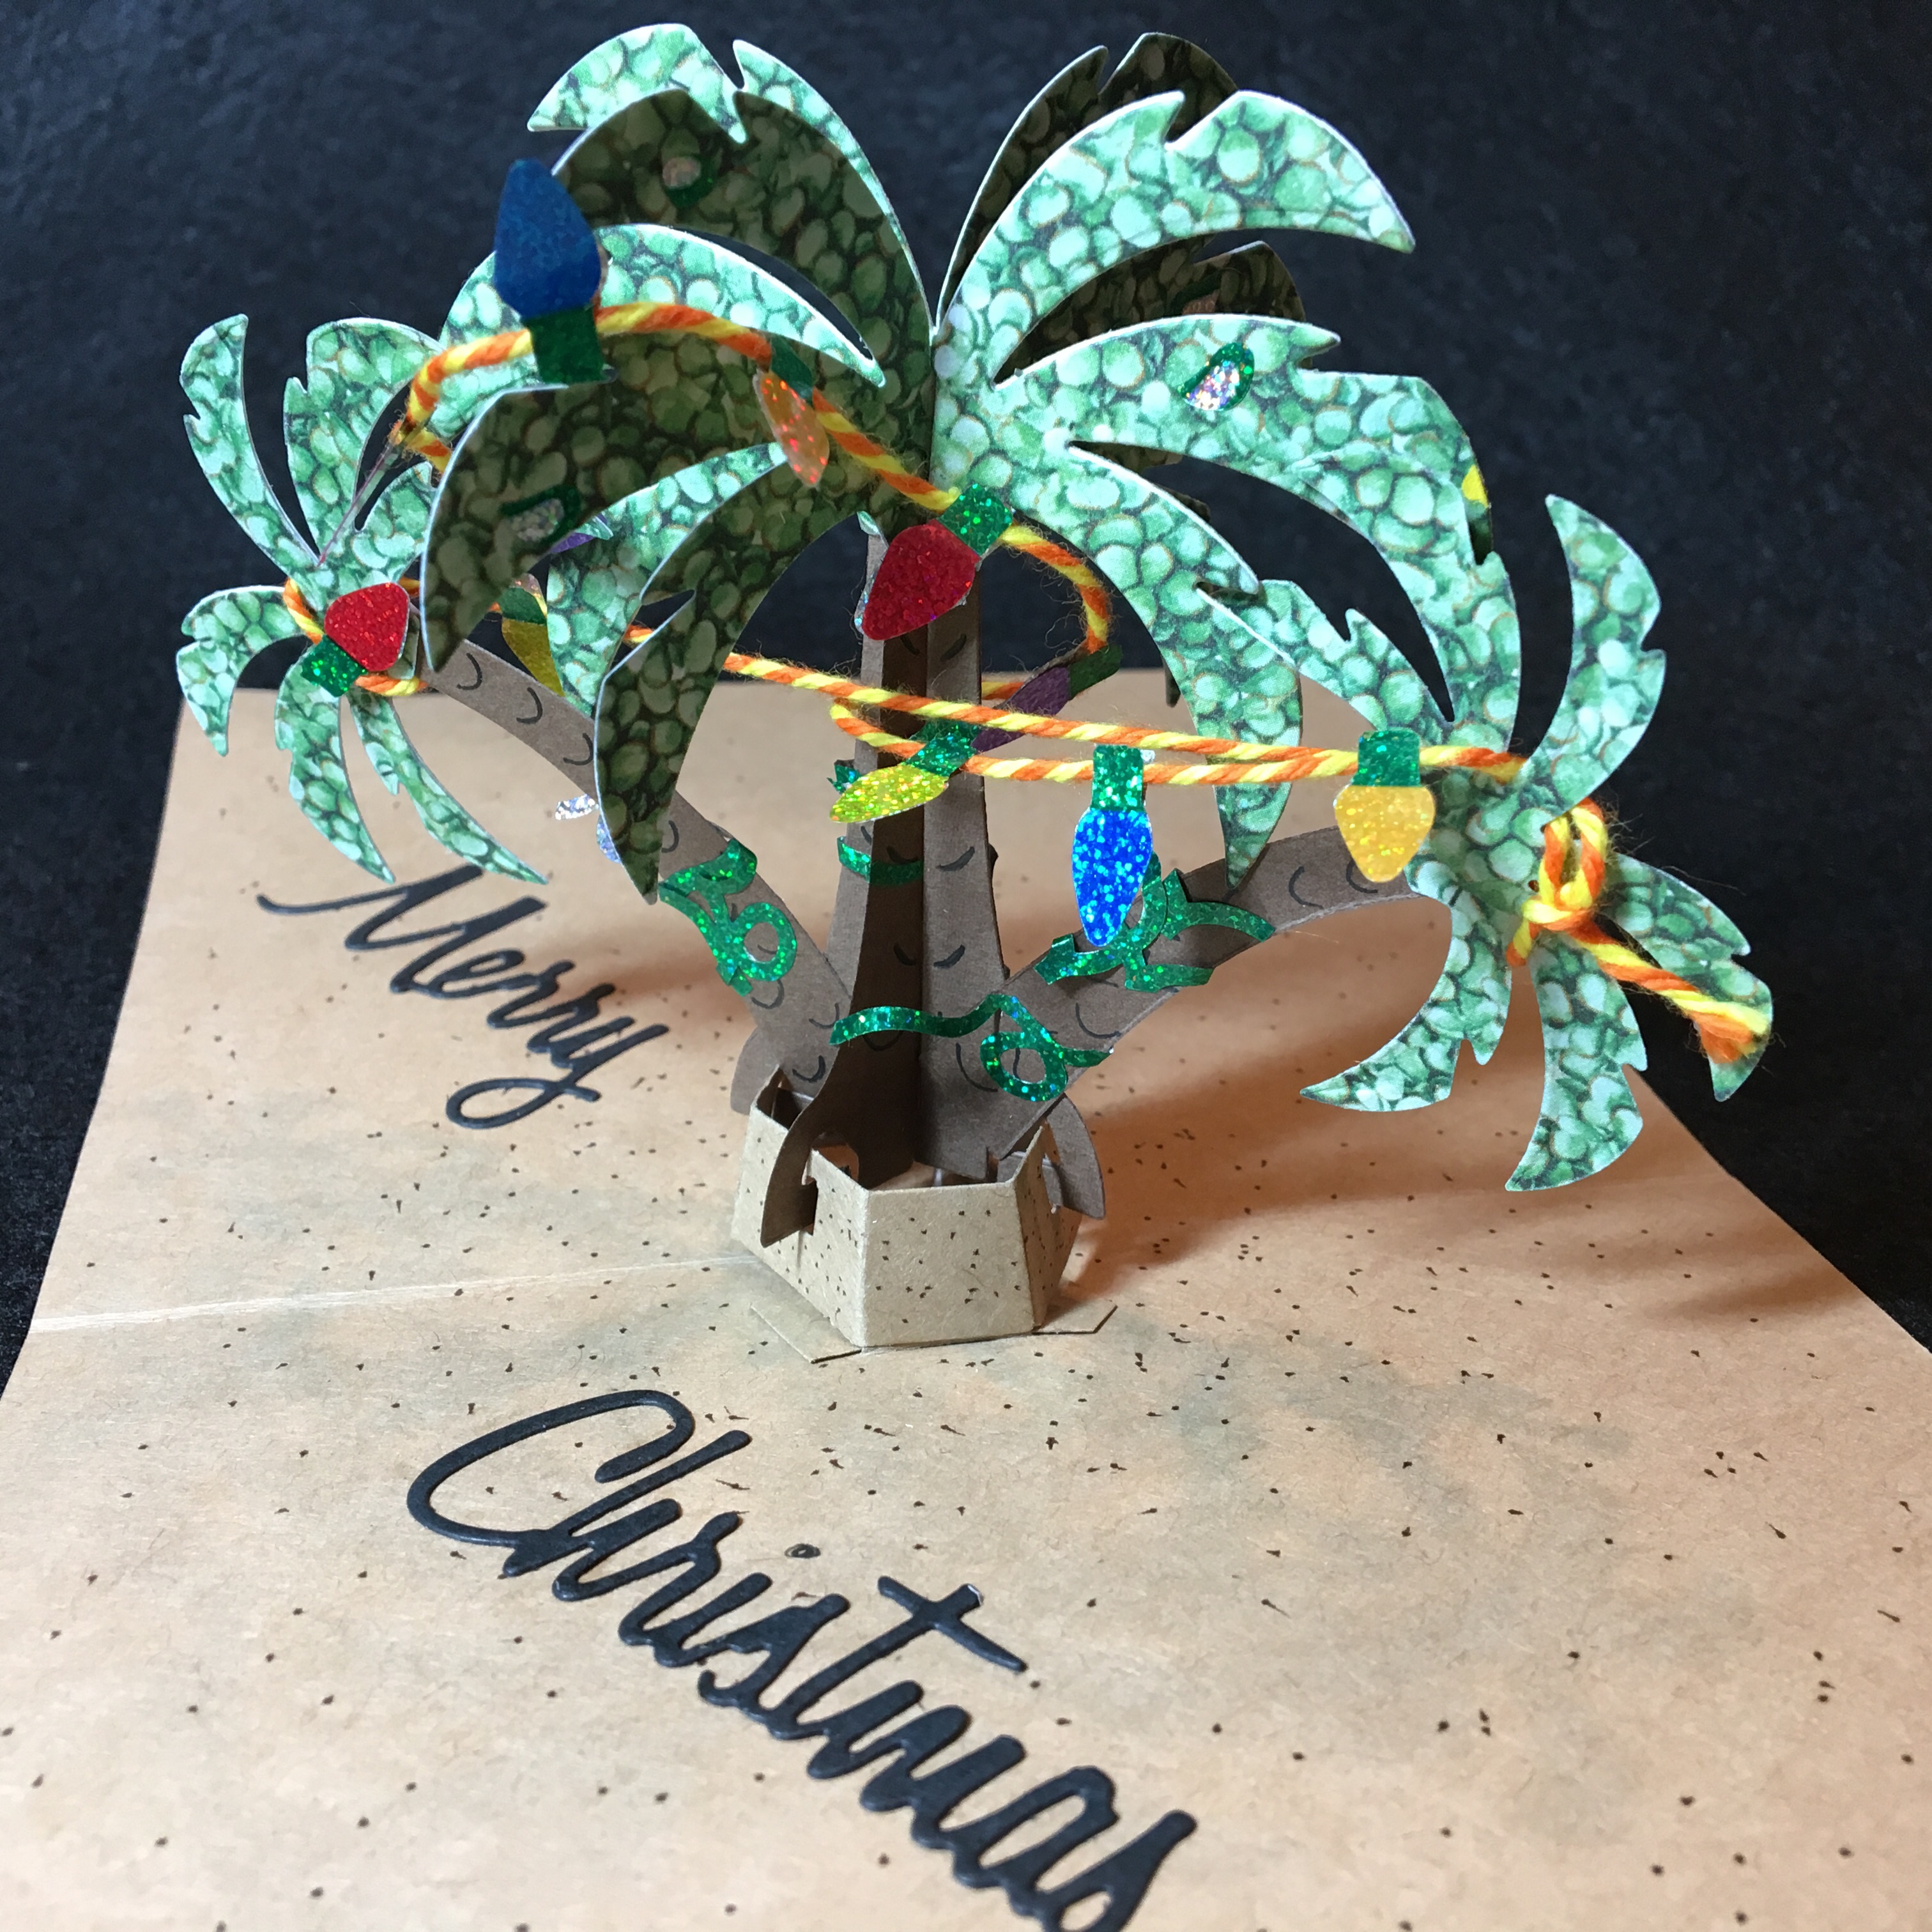
I could not forget those who celebrate Christmas in the warmer climates. (Yes, Karen Burniston has a die for this one too!)

img_7187

Using the Palm Tree Pop-up die set, heavy kraft paper, baker’s twine and vintage Mrs. Grossman’s Christmas light stickers, this card comes together. The sand is a brown fine tip marker. The vintage postcards are free from copyright.

img_7195

See all the of the 12 Days of Christmas Trees by clicking on one below.

Day 1 – Give Joy -Plaid

Day 2 – Home for the Holidays-Village

Day 3 – Holly Joy

Day 4 – Snowy Day

Day 5 – Give Joy – Holly

Day 6 – Gingerbread Joy

Day 7 – Home for the Holidays-Joy to the World

Day 8 – Nutcracker Greetings

Day 9 – Plaid Joy

Day 10 – Home for the Holidays-Let It Snow

Day 11 – White Christmas

Day 12 – Home for the Holidays-Peace and Joy

Bonus Day – Topical Christmas

SUPPLIES USED:

Dies

Stamps & Ink (on envelope)

Paper/Stickers

Miscellaneous

  • Tombow Multi Mono Liquid Glue
  • ½ inch white double-sided tear tape
  • Baker’s Twine orange/yellow

12 Days of Christmas Trees – Day 12

Each day for 12 days, I have been showing card variations made with Karen Burniston’s Christmas Tree Pop-up die.  I recommend watching her assembly video before attempting to cut and assemble the pop-up tree.

For all of these cards I started with an A7 size card base (10 x 6 ½ inches), but because my die cutting machine can only accommodate 6-inch-wide pieces of paper, I had to trim the cards down to 10 x 6 inches.

Day 12 – Home for the Holidays-Peace and Joy

HFH-Peace-Inside

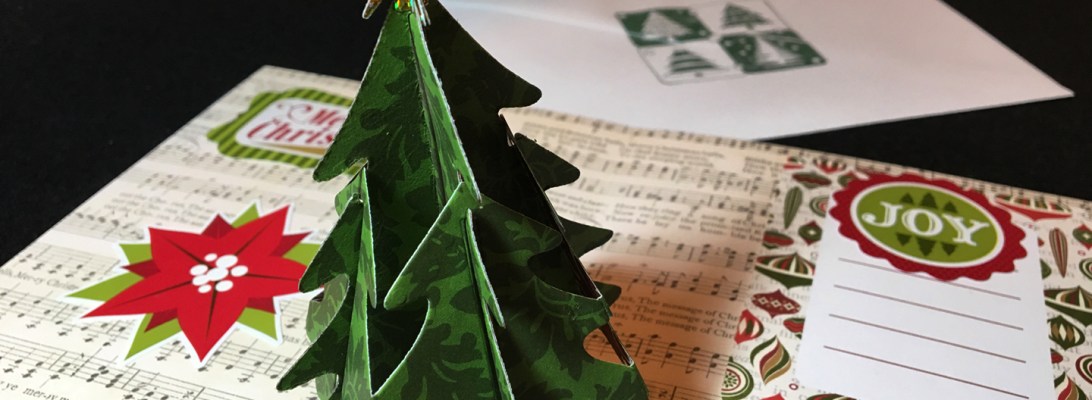
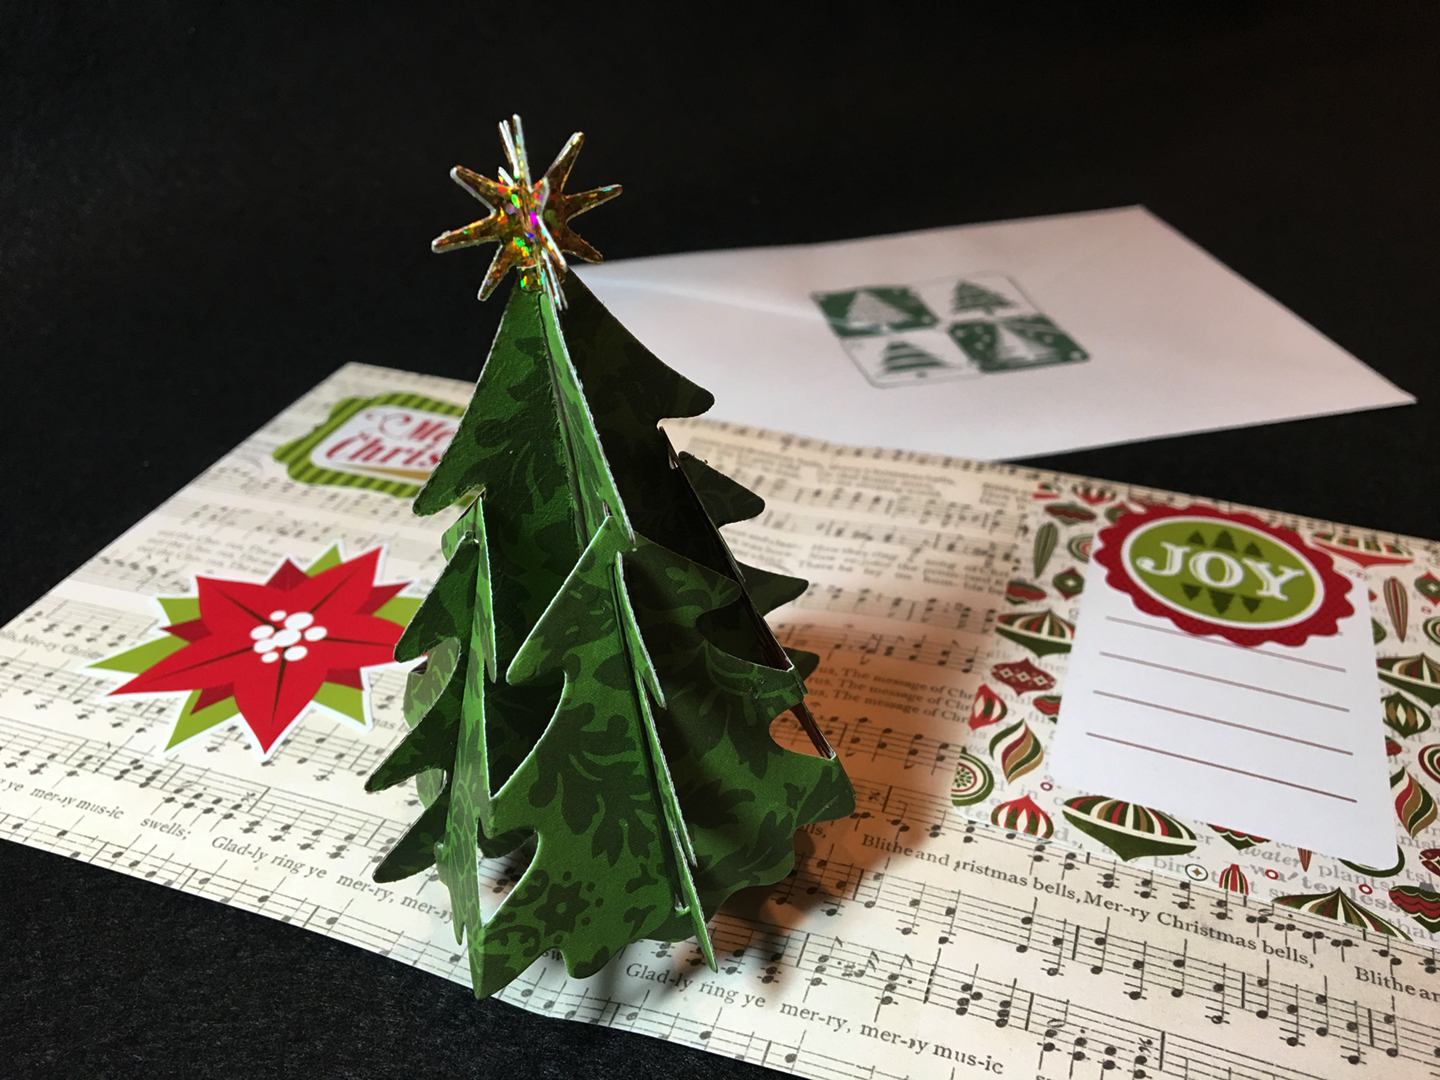
Using a paper collection kit makes inspiration and color matching easy and gives you the finished, color-coordinated cards that you might find in a high-end boutique shop.

I used the Echo Park Home for the Holidays Collection Kit by Alisha Gordon for this card. You can cut a 12 x 12 inch sheet into two 10 x 6 inch card bases (Ornaments #HFH73006). From a second sheet of 12 x 12 paper (Holiday Swirl #HFH73003) you will cut four sets of the tall center tree pieces and four of the smaller side trees. (I cut the paper into three strips – two strips wide enough for the center trees – folding these strips over to be able to double cut the large center trees.) by double cutting you have perfectly matched front and back for the center two sections. Glue them together.  This adds strength and ensures the tree is green from all angles of viewing. The star atop the tree is the only paper not contained in the kit. It is a holographic paper, cut twice for each piece, so the star can be seen as gold sparkles from all angles.

HFH-Peace-Front

I used one of the smaller topper with the ornament and decorated it with scraps from the inside tree cuttings and a white gel pen to write “PEACE” on the banner. The tree stand mechanism hole is piece patched. (See if you can find it?)

HFH-Peace-Inside-CU

Inside, stickers are used for decoration along with the tree itself.

See all the of the 12 Days of Christmas Trees by clicking on one below. Don’t miss tomorrow’s Bonus Day post!

Day 1 – Give Joy -Plaid

Day 2 – Home for the Holidays-Village

Day 3 – Holly Joy

Day 4 – Snowy Day

Day 5 – Give Joy – Holly

Day 6 – Gingerbread Joy

Day 7 – Home for the Holidays-Joy to the World

Day 8 – Nutcracker Greetings

Day 9 – Plaid Joy

Day 10 – Home for the Holidays-Let It Snow

Day 11 – White Christmas

Day 12 – Home for the Holidays-Peace and Joy

Bonus Day – Tropical Christmas

Click Here for video of all 12 trees

SUPPLIES USED:

Dies

Stamps & Ink (on envelope)

Paper

Miscellaneous

12 Days of Christmas Trees – Day 11

Each day for 12 days, I have been showing card variations made with Karen Burniston’s Christmas Tree Pop-up die.  I recommend watching her assembly video before attempting to cut and assemble the pop-up tree.

For all of these cards I started with an A7 size card base (10 x 6 ½ inches), but because my die cutting machine can only accommodate 6-inch-wide pieces of paper, I had to trim the cards down to 10 x 6 inches.

Day 11 – White Christmas

White Christmas front

This card was inspired by my memories of the movie “White Christmas” with Bing Crosby and Rosemary Clooney and Danny Kaye (Yes, I had to look that one up and sure it wasn’t Bob Hope.) Every time I watch it, I keep wishing it would snow during certain scenes, but (SPOILER ALERT) it doesn’t really snow until the end of the last scene.

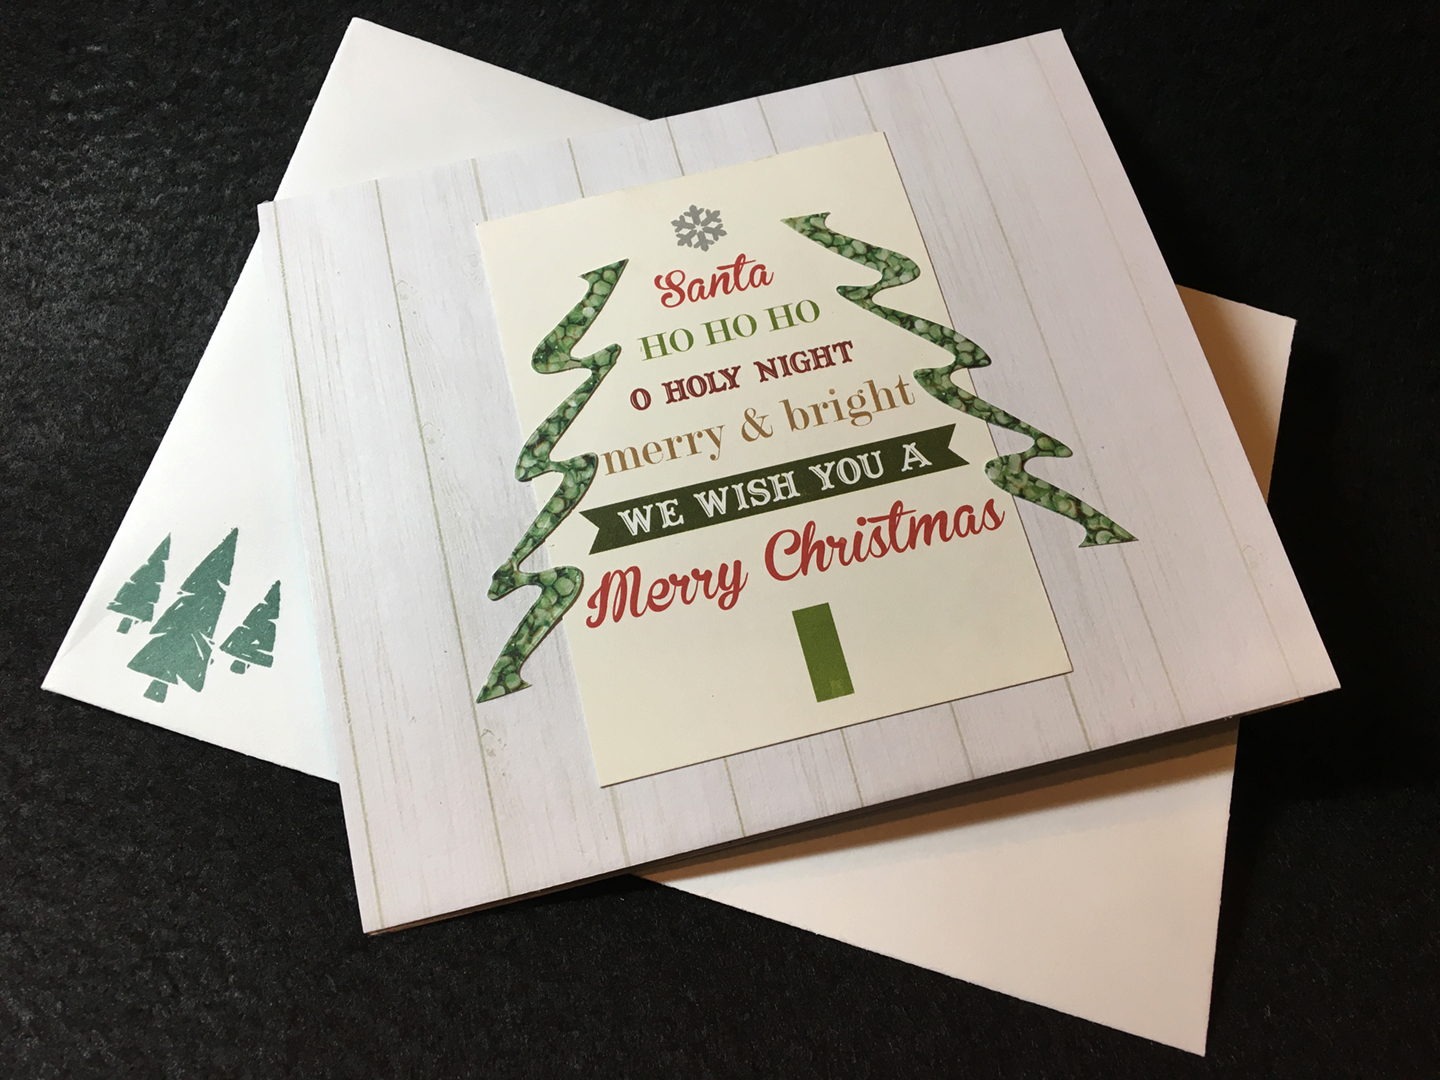
So this card is bit like the old inn with it’s wooden rustic floors, cold New England nights, and a bit sentimental. The tree may have the allusion of blurred tiny lights, but it is really a Bo Bunny paper of succulent plants.

White Christmas inside

For the embossed tree skirt, used an older Karen Burniston die set from her Elizabeth Craft Designs time called Cup Pop Stand. I embossed the card base and then cut the circle in the wood grained paper (from the same Bo Bunny Garden Party Collection as the succulent paper). The die cut “Merry Christmas” and tree squiggles on the front of the card are also cut from the succulent paper. The mittens sticker and the front sentiment topper came from the Echo Park Home for the Holidays Collection.

White Christmas inside cu

Read the past posts of the 12 Days of Christmas Trees by clicking below on the list. Don’t miss the 12th post tomorrow.

Day 1 – Give Joy -Plaid

Day 2 – Home for the Holidays-Village

Day 3 – Holly Joy

Day 4 – Snowy Day

Day 5 – Give Joy – Holly

Day 6 – Gingerbread Joy

Day 7 – Home for the Holidays-Joy to the World

Day 8 – Nutcracker Greetings

Day 9 – Plaid Joy

Day 10 – Home for the Holidays-Let It Snow

Day 11 – White Christmas

Day 12 – Home for the Holidays-Peace and Joy

Bonus Day – Tropical Christmas

Click Here for video of all 12 trees

SUPPLIES USED:

Dies

Stamps & Ink (on envelope)

Paper

Miscellaneous

12 Days of Christmas Trees – Day 10

Each day for 12 days, I will be showing card variations made with Karen Burniston’s Christmas Tree Pop-up die.  I recommend watching her assembly video before attempting to cut and assemble the pop-up tree.

For all of these cards I started with an A7 size card base (10 x 6 ½ inches), but because my die cutting machine can only accommodate 6-inch-wide pieces of paper, I had to trim the cards down to 10 x 6 inches.

Day 10 – Home for the Holidays-Let It Snow

HFH-Snow-Inside

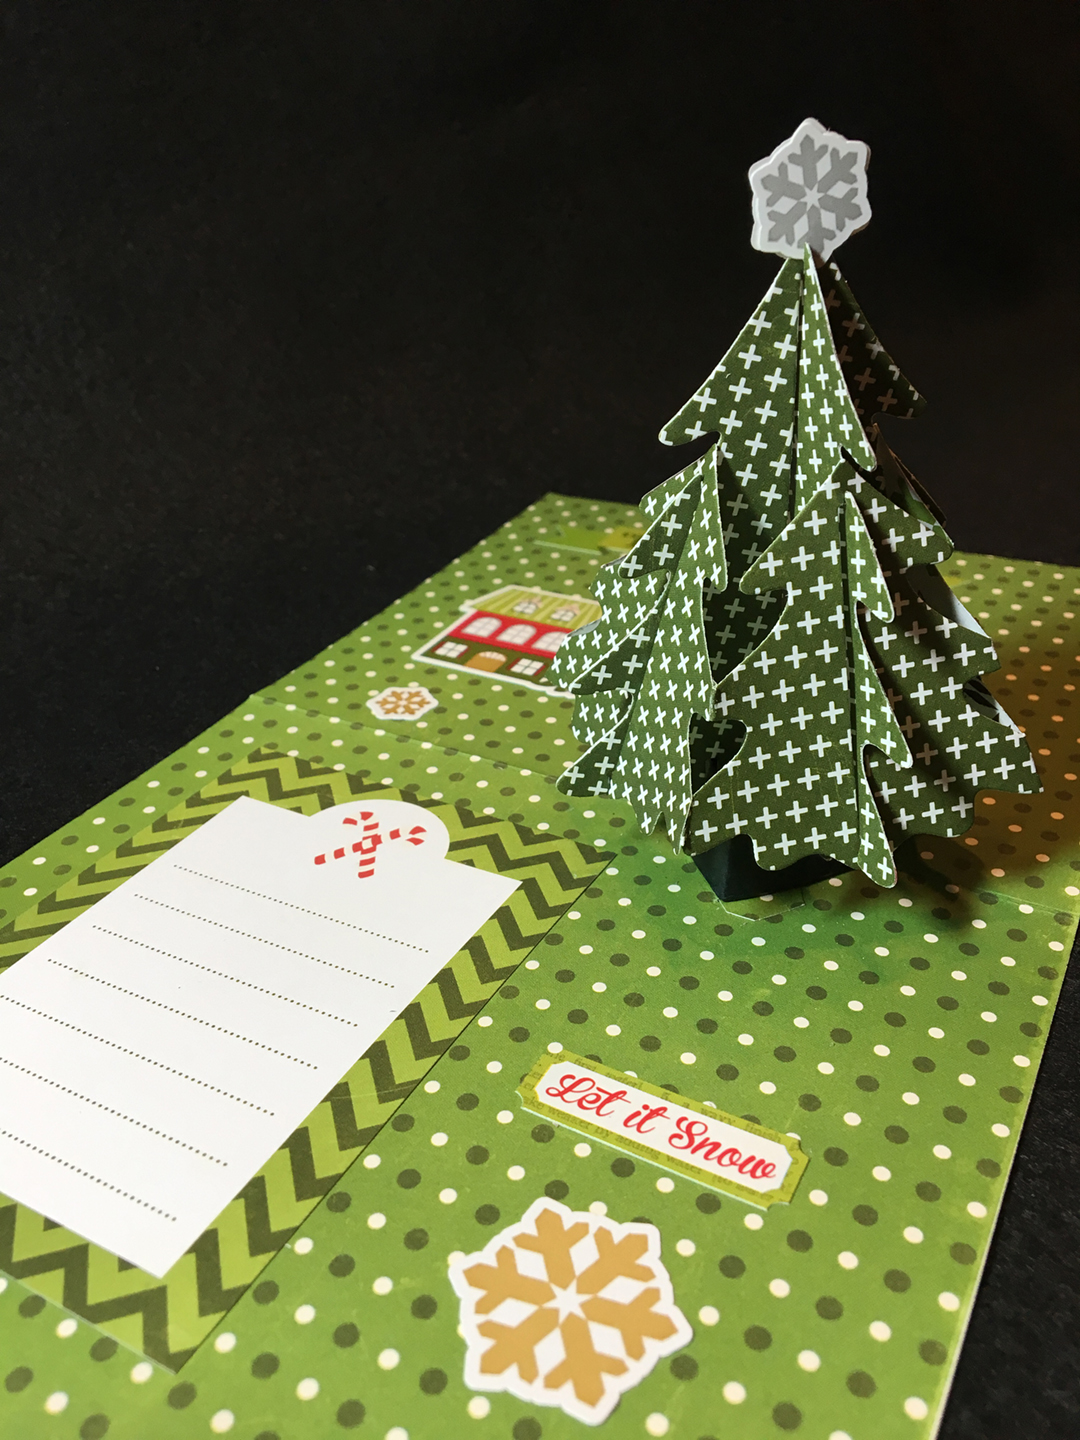
Echo Park Home for the Holidays Collection Kit by Alisha Gordon made this card quick and easy as well as professional looking. The double-side cardstock papers in the kit make it quick to create a card base. I used the Snowflake paper (HFH73013) for the tree and Festive Chevron (HFH73002) for the card base. A large card sentiment topper for the front and stickers for additional decoration inside and out made it a super-fast card to create.

HFH-Snow-Front

This a top fold card because of the orientation of the sentiment topper.  For the tree inside I cut two layers cut for the two taller center tree pieces so that all sides of the tree would show the green side of the paper while smaller side trees are single layer because the white side of the paper is not visible. Two snowflake stickers form the star atop the tree. The tree base was cut from a scrap piece of black cardstock The holes created by the tree mechanism cutting into the card base were pieced from the inside of the card to match the outside pattern. A sticker covers the front hole.

HFH-Snow-CU-Inside

Follow the rest of the 12 Days of Christmas Trees with a new post tomorrow.

Day 1 – Give Joy -Plaid

Day 2 – Home for the Holidays-Village

Day 3 – Holly Joy

Day 4 – Snowy Day

Day 5 – Give Joy – Holly

Day 6 – Gingerbread Joy

Day 7 – Home for the Holidays-Joy to the World

Day 8 – Nutcracker Greetings

Day 9 – Plaid Joy

Day 10 – Home for the Holidays-Let It Snow

SUPPLIES USED:

Dies

Stamps & Ink (on envelope)

Paper

Miscellaneous