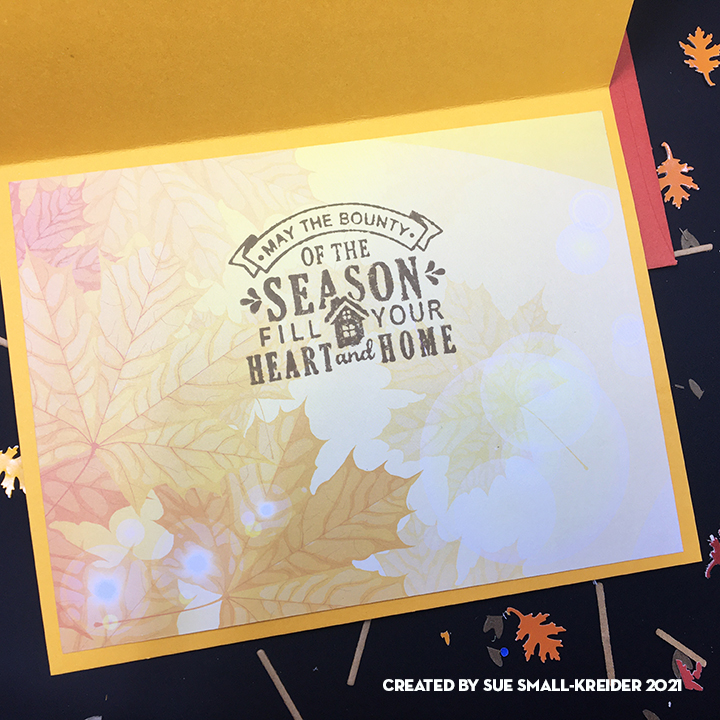
Some of my favorite birthday cards have been about food. Here is a look back at some of them.

Triple The Fun With Mini Mini Slimline Pop-Up Cards

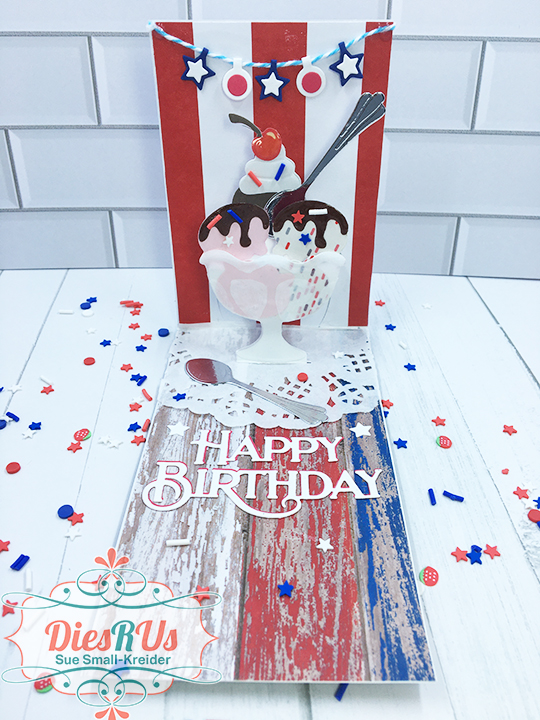
Popcorn Lover’s Birthday Card From All of Us


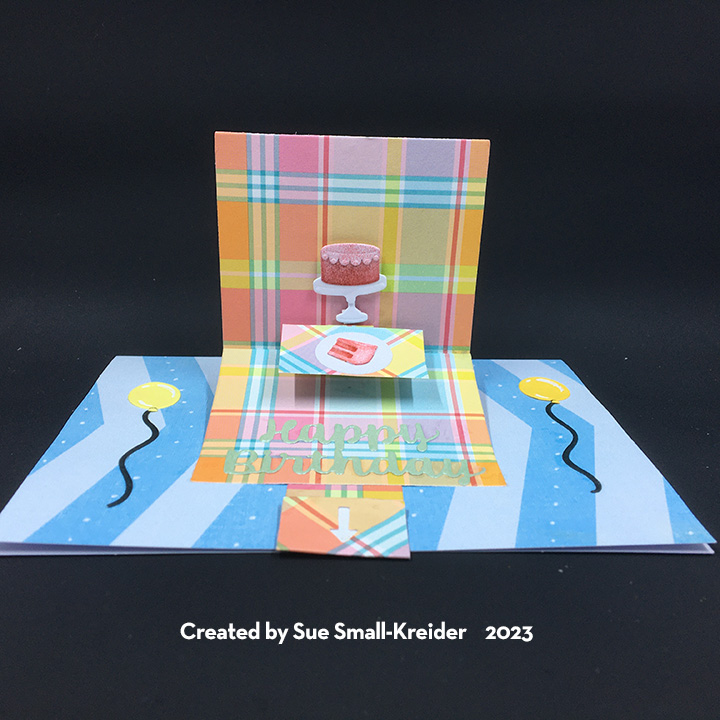
A Party Without Cake Is Just A Meeting


Some of my favorite birthday cards have been about food. Here is a look back at some of them.
Triple The Fun With Mini Mini Slimline Pop-Up Cards
Popcorn Lover’s Birthday Card From All of Us
A Party Without Cake Is Just A Meeting

This card was made for Craft Roulette #176 whose parameters included: a split in the middle, jolly colors, a fruit element and a heart.
My inspiration for this card came from the Berry Special die and stamp set that came in the Die Cutting Essentials, issue 103. (This magazine is available on the Craftstash website. Note that there are different country based websites for this online vender. Use the one that works for you to avoid unnecessary currency/customs fees.) It has a stamp that says “Jam like a strawberry” so I immediately thought of a jam jar shaker and went to my Queen and Company stash of shaker kits.
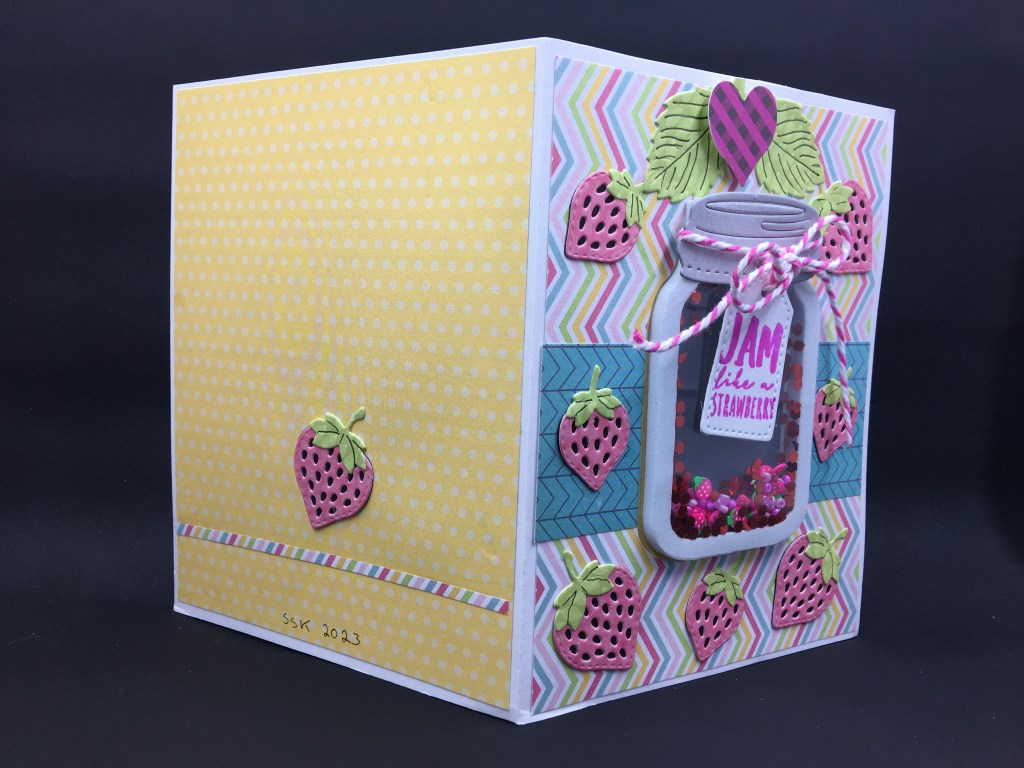
Cardbase: Using a 8.5×5.5 inch rectangle of heavy white cardstock for the cardbase, I folded it in half and used a bone folder to burnish the card into a 4.25×5.5 inch A2 size. The front and back panels of the card are covered with 4×5.25 inch decorative paper rectangles. The front has an additional strip of blue decorative paper near its middle. The back uses a thin strip cut from the front panel paper as decoration. I used the jar frame die to cut the aperture into the card front when only the front decorative papers had been attached. Next, I glued on the inside decorative papers and cut the aperture again.
Shaker: Queen and Company are known for their shaker kits which use pre-cut foam shaker frames with adhesive on both sides and clear acetate covers which take the tediousness out of making shaker cards. For the jar I used two acetate pieces and one foam frame that all had been dusted with an anti-static brush. I peeled off one side of the frame’s adhesive backing and attached a pre-cut piece of acetate. Adding the glitter, seed beads and strawberry slices to the frame, I dusted the next acetate sheet again and peeled off the adhesive backing on the foam frame and attached the acetate to enclose the shaker elements. (The chucky glitter had a lot of static electric charge and jumped to the tiny bits of adhesive at the foam edges.) The shaker is attached to the card by gluing a jar frame cut from the front of the card to the inside of the card and then gluing the shaker to the jar frame.

Decorations: Eight layered strawberries were cut using the Berry Special die set from pink and green patterned paper and black cardstock. The dies cut two stems, large and small strawberry outlines and fronts with seeds cutout as well as a plant stem with large leaves. I also used two of the large leaves on the card front. Seven strawberries are scattered on the card front and one large strawberry on the back. A red plaid paper sticker on a foam dot is at the top of the card front.

Sentiments: Using the stamps from the Die-Crafting Essentials gift set, I stamped in purply-pink ink the sentiment “Jam like a strawberry” on the jar tag which is tied around the jar lid with baker’s twine, and the inside sentiment “Thank you berry much!”

Envelope: Stamped on the envelope flap is “You’re the sweetest!” in purply-pink ink.
Thank you for reading this blog post. I hope this inspires you and makes you smile. Please like and leave comments 😊
Materials Used:
Dies
Stamps
Shaker Elements and Frame
Papers
Ink
Adhesives
Tools
Miscellaneous


For this card I used a floral window die and stamp set by Memory Box that was the gift with issue 97 of the Die-Cutting Essentials magazine. The die makes an image using tiny holes and cuts out the aperture inside the wreath. I die-cut it on a 5.5 x8.5 piece of heavy pink cardstock and then stitched it completely before trimming it down to the final 5.5-inch square to fit on a 6-inch square cardbase.

Using the needle, enlarge the holes before stitching. The larger flower petals and leaves were outline or chain stitched before filling in the centers of them using two strands of floss. The yellow stamens are French knots.

The accompanying sentiment stamps provided the “Thinking of You” was heat embossed directly to the back mat after determining the placement with the stitched frame. The frame was attached to the 6-inch square of patterned paper with thin foam squares.
If you enjoyed this stitched card, there are more stitched card posts on this blog site:
Thank you for reading this blog post. Please like and leave comments 😊
Materials Used:
Dies & Stamps
Ink & Embossing Powder
Papers
Miscellaneous

Staying off Santa’s naughty list can be a challenge sometimes. This fun shutter card featuring a retro Santa die-cut and papers is sure to bring back childhood memories of the holidays.

Based on a card in the Die-cutting Essentials, issue 82, by Sharon-Elaine Jones, the card uses the free dies and printable papers and sentiments from the magazine. I had to convert the template from 20cm x 30cm to fit an 8 ½ inches x 11 inches card base. It took me several tries to get the correct measurements and folds, but in the end I got there. (See template).

You will need to cut:
Die-cut:
Print and fussy cut from sentiments:
To emboss the background of the Santa panel, lightly mist the white card stock (3 1/3 x 4 inches) with water before placing in embossing folder. This will allow the paper fibers to bend in the embossing folder rather than break and tear. Set emboss piece aside to dry before gluing onto red matting piece (1 3/8 x 1 ¾ inches).

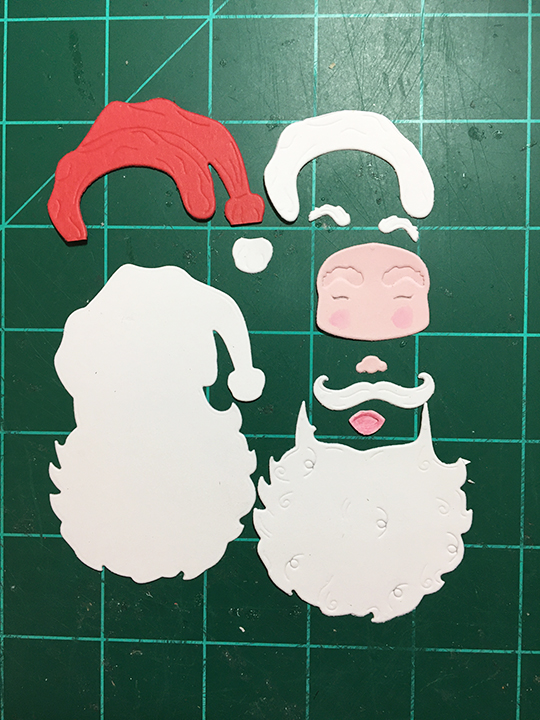
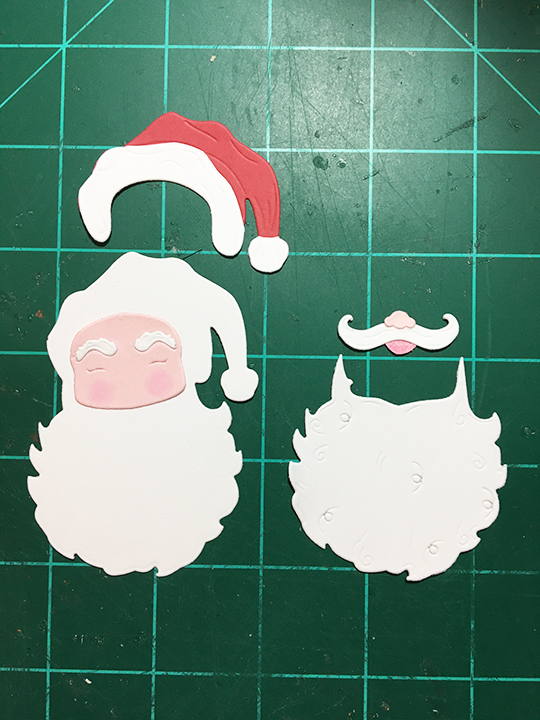
Assembling Santa: Position the face piece on the Santa outline backing piece with the bread and hat over it. Mark position of face with pencil. Glue eyebrows on to face in indentations. Glue white fur pieces to red hat. Attach nose on top of mustache and mouth under it. Adhere face on to backing using pencil markings. Glue beard onto backing and just up to face. Attach hat over face matching it up with same shape on backing. Glue on mustache with nose and mouth attached. Glue assembled Santa onto embossed panel that was already glued to red mat.


Faux Embossing of Holly Panels: Glue three of the holly die cuts and three of the berries on to one of the white rectangles (2 ¾ x 1 ½ inches). Adhere white panel onto a green rectangle mat (3 x 1 ¾ inches). Repeat with another three holly die-cuts, white rectangle and green mat.
Other Panels: Glue the six square pattern papers on to six red square mats. Glue the two small pattern paper rectangles onto the two small red rectangle mats. Glue the large patterned paper rectangle to the large green mat and then glue the Santa’s naughty list sentiment onto the center of the patterned paper.
To Assemble Card: Take white card base that has been cut, scored and folded into shutter card and open-out flat. Glue red squares and rectangles in the areas shown in photo. The large rectangle for the card front will have its topper sentiment glued on after the squares have been glued down. Adhere the green rectangles into the appropriate spaces in the center of card base. Fold-up and glue large white rectangle piece to back of card. This back piece will be where you can write a personal message as well as helping stablish the card when opened and set on display.
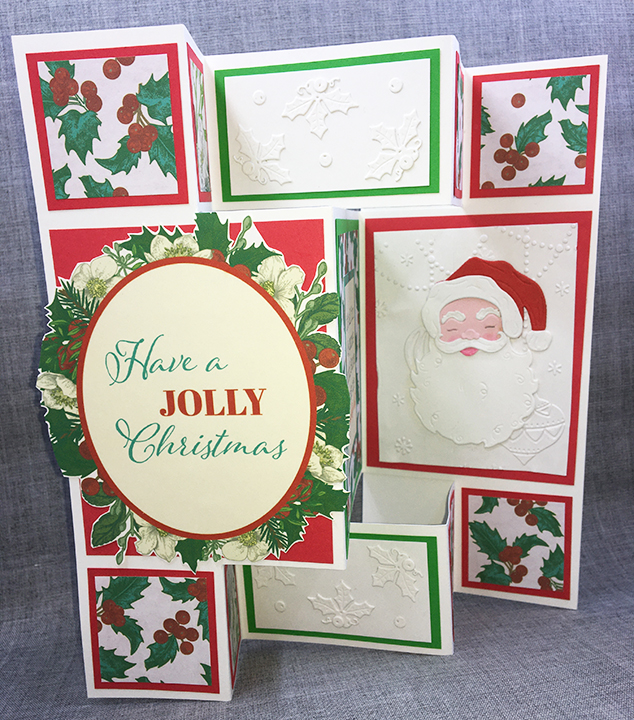
Envelope: The card folds to fit inside a #10 business size envelope. To hint at what is inside the envelope, I stamped the flap with a sentiment “Have a Holly Jolly Christmas” and below it a Santa’s sleigh with reindeer.
Thank you for reading. If you enjoyed this blog post, please like it and follow the blog. 😊
Dies & Embossing Folder:
Papers
Stamps and Ink
Additional Supplies:


I like making Thanksgiving Day cards for my family to let them know how thankful and blessed I feel to have them in my life.

This card was inspired by one that Nicky Gilburt made in Die-cutting Essentials, issue 81 using a hexagon base. I used a 3 ¼ inch circle die-cut base since I don’t own any hexagon dies and followed Nicky’s general instructions cutting apart the foliage corner die-cuts.

I colored the die-cuts with Distress oxide inks using sponge ink blender tools and a cotton swab for the tin acorn caps.
The thankful sentiment was die-cut three times (two orange and one yellow that was inked brown) and glued together with the top layer slightly off to have an orange shadow. (I find that using a fine tipped glue bottle really makes gluing tiny die-cuts easy.)

The top layer of large leaves, pumpkins and acorns were adhered with a variety of thickness foam squares and glue dots. The entire wreath is attached to the 5 x4 ¼ inch cardbase with thick foam squares. For the final elements, I used Nuvo drops for the red berries.
Inside an old LDRS autumn sentiment stamp was inked onto autumn leaves insert paper from the Sweater Weather foiled collection, Papercraft Essentials, issue 202.
To hint at what is inside the burnt orange envelope, I stamped the flap with a sentiment from this August’s Simply Cards & Papercraft, issue 220 and the pumpkin and leaves are from last year’s Simply Cards & Papercraft, issue 208 all in a brown ink from Memento.
Thank you for reading. If you enjoyed this blog post, please like it and follow the blog. 😊
Dies:
Stamps & Inks
Papers
Additional Supplies:

Weddings can be times of great joy. This wedding card inspired by traditions from India is a brightly colored card using a flower mandala as its centerpiece in marigold colors.

The marigold petals are three die-cut layers using the free die set from Die-cutting Essentials Issue 78.
To create the card base, I used a 7-inch tall by 12 inches wide piece of double-sided cardstock. The piece is scored and folded at 1 inch, 3 ½ inches, 8 ½ inches and 11 inches.
The inside sentiment was printed digitally onto printable 8 1/2 x 11 inch vellum and adhered with glue dots.
For the final decoration Nuvo drops were added onto the card front and the flower center.

Thank you for reading this blog post. Please like and leave a comment. 😊
Materials Used:
Dies
Stamps
Nuvo Drops
Papers
Miscellaneous

Needing a unique and handcrafted Thank You card, I came up with this pop-in window card using double-sided patterned paper from Paper Heaven, the frame dies from the newest Die-cutting Essentials issue 75, and some word dies from Hunkydory’s Moonstone brand.

When the card is closed it look like a flat card, but when it opens, the window back mechanism opens and moves the window panel ¼ inch back from the card opening.

Because of the dark inside of the card, I cut two white labels from old envelope scraps in my stash to be able to write a message on them.
Need more ideas for Thank You cards? Here is more inspiration:
Supplies:
Dies
Stamps
Papers
Inks
Miscellaneous

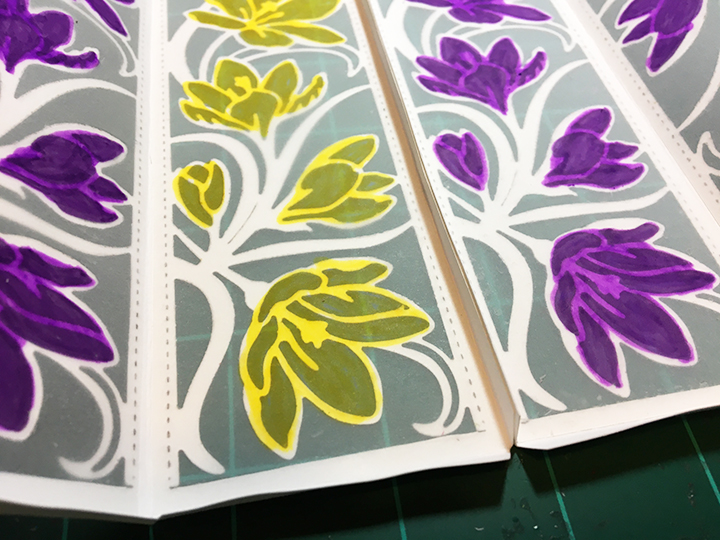
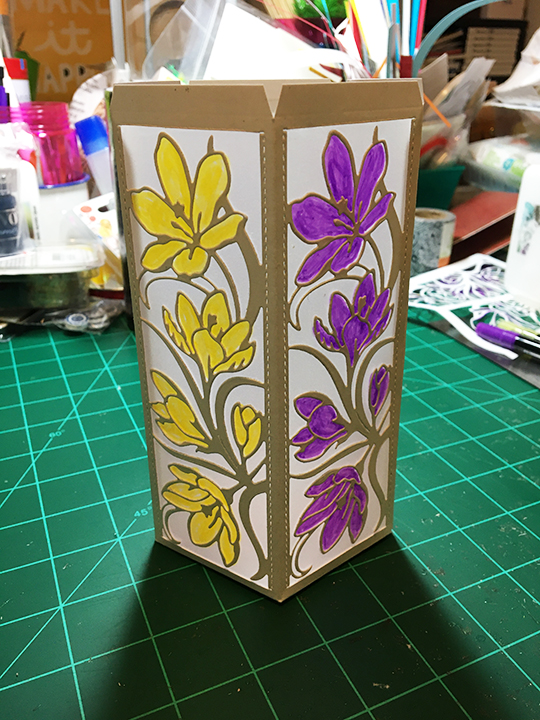
When the crocus start blooming in their purples and yellows, spring can not be far behind. This tall tealight holder is reminder that spring is coming.

Th intricate die cut is a design by Christina Griffiths of Card Making Magic that was the free gift in Die-cutting Essentials issue 73. The pentagon base is from a Tonic Craft Kit 25. Colored vellum panels behind the die-cut cardstock sides defuse light.

Materials: Cut two 5 inches x 6 ¾ inches (12.5 cm x 17 cm) rectangles, one 2 ¾ inches x 6 ¾ inches (7 cm x 17 cm) rectangle from heavy white cardstock, and five vellum rectangles 2 ¼ inches x 6 ¼ inches (5.5 cm x 15.75 cm). Die-cut a sixth panel from scrap cardstock to use as a stencil. Die-cut one pentagon from heavy white cardstock.
Die-cut Sides: Score all three white rectangles along all four sides at ¼ inch (3 cm). On the two larger rectangles score down the center at 2 ½ inches (6.25 cm). Place die centered inside score lines on all five sections and cut. (Hint: Because this an intricate die, you may need to add cardstock shims to get a good sharp cut throughout the die. I rolled the die through three times to cut the thick cardstock.) Using fine tipped scissors or a craft knife and metal ruler, trim off the attached top and bottom pieces of the die-cut.

Vellum Panels: Tape a vellum panel to the front of the stencil and turn the vellum and stencil over to color the crocus flowers through the stencil onto the backside of the vellum. Once all panels are colored, glue to the back of the die-cut panels. Once glued, touch-up the coloring on the backside of the panel. (Hint: Depending on what type of markers are used to color the vellum, ink can transfer to the white cardstock, so coloring the backside away from the cardstock is best.)


Assembly: Trim away the squares created by the score lines on the white cardstock pieces and cut the tab corners off as shown in photograph. Fold the two double panel pieces down the center score line and burnish with a folding tool. Fold the five bottom tabs and burnish. Fold and burnish the six long side tabs.
With two of the panels lying flat on your work surface, align the panels and glue the two tabs together. Pinch until the glue sets. Repeat until all but the last set of tabs are glued. Allow glue to dry. Gently fold the glued sides and burnish by pinching the sides together to have crisp folds. Glue the final tabs laying panels flat and reaching in, to pinch tabs until glue sets. Allow glue to dry. Fold and burnish the last corner. Drop pentagon base into center of holder and work under the three seams. Glue tabs to bottom of pentagon.

Add your battery powered tealight. (Note: because this light holder is made from flammable paper, do not use candles with real flames.)
Thank you for reading this blog post. Please like and leave a comment. 😊
Materials Used:
Dies
Colors
Papers
Miscellaneous


A new year is almost here and the celebration of it should be festive even if we can’t celebrate together.
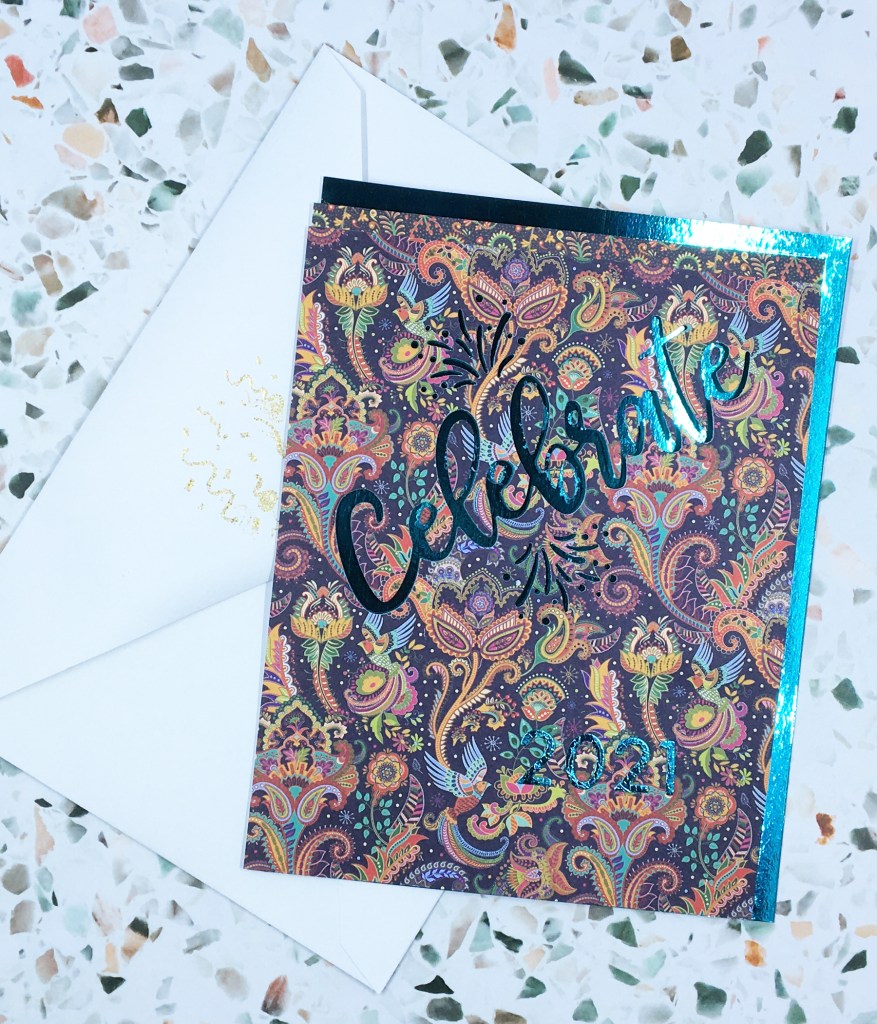
This card is made with the “Let’s Celebrate!” die set from Die-cutting Essentials issue 72 and the “Fabulous Fizz” stamp set from Simply Cards & Papercrafts issue 212, along with a pre-cut and scored 5 inches x 6 ½ inches card base and envelope.

Mirror card is used as the background that peaks through the die cute sentiment on this card. The card front, after it was covered in a patterned paper, was trimmed to 4 ¾ inches x 6 ¼ inches so that the mirror card border would show. When the word “Celebrate” was cut out the waste from the loops was saved and glued on to the mirror card. The year 2021 was cut from mirror card and glued to the front of the card.
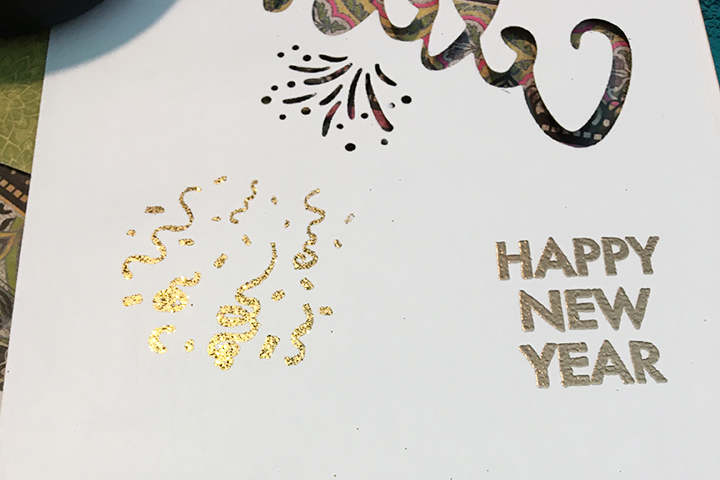
Inside the sentiment was stamped with Versamark Watermark ink and heat embossed with a matte gold embossing powder from Ranger. The confetti was heat embossed with gold tinsel embossing powder.
To add interest to the mirror card inside, a champagne glass was cut from vellum and the glue applied to mimic a liquid filled glass. Bubble made from Glossy Accents were added over the glass.

The closed card, after the glossy accents had dried for several hours, was rolled between cutting plates on a die cutting machine to emboss the “Celebrate” and “2021” into the mirror card.
The back flap of the envelop was also heat embossed with clear gold sparkle confetti to hint at the celebration to come. The card could be filled with sequins when being placed in the envelope to add to the card recipient’s experience. (In my case, knowing the recipient will not appreciate the mess to clean up, I am omitting this step.)

Thank you for reading this blog post. Please like and leave comments 😊
You can see Celebrate 2021! – Part 1 by clicking here.
Materials Used:
Stamps/Dies
Inks/Embossing Powders
Papers
Miscellaneous
